


180
Chapter 7
Setting Up the Display of Measurement Results
Trace-based Comparison and Calculation
NOTE
At this time, you may want to hold (stop) the sweep cycle for the data trace by pressing the
HOLD
key in the Trigger menu, which is accessible from the
[Trigger]
key. Doing so
ensures that you can create an exact snapshot of the measurement data when you later store
the data into the memory trace.
Step 6.
Press the
[Display]
key to display the Display menu.
Step 7.
Press the
DEF TRACE [ ]
key to display the Trace Definition menu.
Step 8.
Press the
DATA
®
MEMORY
key to store the measurement data into the memory trace.
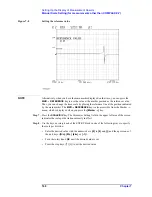
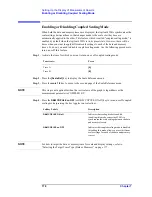
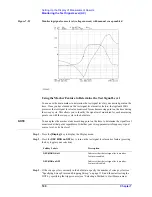
Figure 7-16
Storing measurement data into memory trace (with constant frequency of 1 MHz)
NOTE
When you press the
DATA
®
MEMORY
key, the memory trace captures the measurement
data exactly as it is displayed on screen. The memory trace always stores measurement
data, even when the data trace is displaying the results of a calculation. Note that while the
subtraction of the offset value is being executed, described in “Subtracting an Offset
Value” on page 184, the resulting subtraction is stored in the memory trace.
The
DATA
®
MEMORY
key affects both Traces A and B. This means that the measurement
data for the non-active trace is also stored into the memory trace.
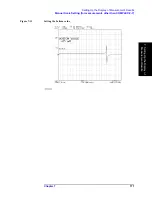
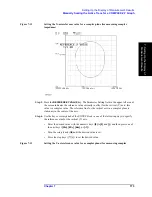
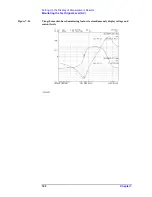
Step 9.
The Agilent 4294A provides a number of options that allow you to control how each trace
is displayed. Select one of the following display options by pressing the appropriate key:
Data trace
Memory trace
Press:
DATA
(Hidden)
DATA
Summary of Contents for 4294A
Page 1: ......
Page 2: ......
Page 4: ......
Page 5: ......
Page 6: ......
Page 8: ......
Page 16: ...8 ...
Page 30: ...22 Chapter1 Installation Power Cable Figure 1 2 Alternative Power Cable Options ...
Page 70: ...62 Chapter3 Front Rear Panel and LCD Display Items Displayed on the LCD ...
Page 436: ...428 AppendixB Key Definitions Softkeys displayed by pressing the Recall key ...
Page 454: ...446 AppendixC Error messages WRONG I O PORT DIRECTION ...
Page 468: ......


