


26
Chapter 1
Installation
Using a Rackmount Kit
Using a Rackmount Kit
If you want to combine the Agilent 4294A with other instruments and a controller to
assemble a comprehensive measuring system, you can use one of the optional
rackmount/handle kits to install it in an efficient way. Figure 1-6 shows how to install the
rackmount kit.
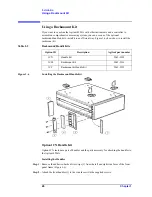
Figure 1-6
Installing the Rackmount/Handle Kit
Option 1CN Handle Kit
Option 1CN includes a pair of handles and the parts necessary for attaching the handles to
the Agilent 4294A.
Installing the Handles
Step 1.
Remove the adhesive-backed trim strips (1) from the left and right side faces of the front
panel frame (Figure 1-6).
Step 2.
Attach the front handles (3) to the side faces with the supplied screws.
Table 1-2
Rackmount/Handle Kits
Option ID
Description
Agilent part number
1CN
Handle Kit
5063-9229
1CM
Rackmount Kit
5063-9216
1CP
Rackmount & Handle Kit
5063-9223
Summary of Contents for 4294A
Page 1: ......
Page 2: ......
Page 4: ......
Page 5: ......
Page 6: ......
Page 8: ......
Page 16: ...8 ...
Page 30: ...22 Chapter1 Installation Power Cable Figure 1 2 Alternative Power Cable Options ...
Page 70: ...62 Chapter3 Front Rear Panel and LCD Display Items Displayed on the LCD ...
Page 436: ...428 AppendixB Key Definitions Softkeys displayed by pressing the Recall key ...
Page 454: ...446 AppendixC Error messages WRONG I O PORT DIRECTION ...
Page 468: ......


