5/Maintenance
5-4
1503-0151-000
5/26/0
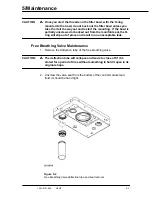
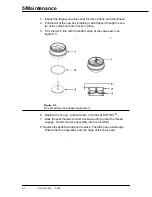
3. Inspect the flapper and valve seat for nicks, debris and cleanliness.
4. Pull the tail of the new free breathing valve flapper through the cen-
ter of the valve seat until it locks in place.
5. Trim the tail in line with the bottom edge of the valve seat, see
figure 5-3.
Figure 5-3
Free Breathing Valve flapper replacement
6. Replace the O-ring. Lubricate with a thin film of KRYTOX
™.
7. Back the seat threads counter clockwise until you feel the thread
engage. Hand screw the assembly into the manifold.
8. Replace the deflection tube on the valve. The tube has a rolled edge.
Ensure that the edge slips over the ridge of the valve seat.
Содержание Aestiva 7900 SmartVent
Страница 2: ...1503 0151 000 3 27 97 ...
Страница 4: ...1503 0151 000 3 27 97 ...
Страница 12: ...Notes viii 1503 0151 000 3 27 97 ...
Страница 18: ...1 Introduction 1 6 1503 0151 000 5 26 0 Notes ...
Страница 44: ...2 Theory of Operation 2 26 1503 0151 000 3 27 97 Notes ...
Страница 46: ...3 Post Service Checkout 3 2 1503 0151 000 5 26 0 Notes ...
Страница 158: ...8 Schematics 8 2 7900 Ventilator 1503 0151 000 1 97 Figure 8 1 System connection block diagram ...
Страница 159: ...8 Schematics 7900 Ventilator 1503 0151 000 1 97 8 3 Figure 8 2 SIB schematic diagram interface cable connections ...
Страница 160: ...8 Schematics 8 4 7900 Ventilator 1503 0151 000 1 97 Figure 8 3 Patient interface cable Machine side ...


