


78
Chapter 4
Preparation of Measurement Accessories
Adapter Setting
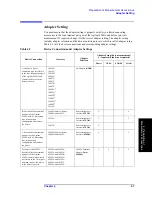
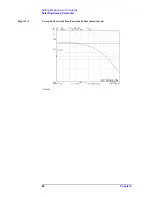
Figure 4-7
Connecting LOAD (50
W
) to the 42942A
Step 11.
Press the
LOAD [-]
key to start the load data measurement.
NOTE
When the load data measurement is completed, the softkey label changes to
LOAD [DONE]
.
Step 12.
Press the
done
key to start calculating the adapter setup data from the measured OPEN,
SHORT, and LOAD data. The adapter setup data is automatically saved to the EEPROM
(nonvolatile memory) in the Agilent 4294A.
NOTE
Press the
cancel
key to cancel the adapter setup process. If the adapter setup process is
canceled, the previously obtained data is saved as the available adapter setup data.
Adapter Setup Procedure for the 42941A
Perform the adapter setup for the 42941A Impedance Probe in accordance with the
following procedure (the operation manual for the 42941A also describes the adapter setup
procedure).
NOTE
Adapter setup should be performed at an ambient temperature as close as possible to the
temperature in which the device measurement will actually be made.
If the ambient temperature for your measurement is outside the range of
±
5
°
C from the
adapter setup temperature, it is recommended that you perform adapter setup again at the
appropriate temperature.
It takes a few minutes to complete each setup data measurement.
During each data measurement, the message “WAIT--MEASURING ADJUSTMENT
KIT” is displayed in the instrument state area in the LCD's upper-left side.
Содержание 4294A
Страница 1: ......
Страница 2: ......
Страница 4: ......
Страница 5: ......
Страница 6: ......
Страница 8: ......
Страница 16: ...8 ...
Страница 30: ...22 Chapter1 Installation Power Cable Figure 1 2 Alternative Power Cable Options ...
Страница 70: ...62 Chapter3 Front Rear Panel and LCD Display Items Displayed on the LCD ...
Страница 100: ...92 Chapter5 Setting Measurement Conditions Setting Sweep Range Figure 5 7 After MKR CENTER Figure 5 8 ...
Страница 101: ...Chapter 5 93 Setting Measurement Conditions Setting Sweep Range 5 Setting Measurement Conditions Figure 5 9 ...
Страница 106: ...98 Chapter5 Setting Measurement Conditions Setting Number of Points NOP Figure 5 13 Number of points 801 ...
Страница 330: ...322 Chapter9 Setting Using Control and Management Functions Performing Self Diagnosis of the Agilent 4294A ...
Страница 436: ...428 AppendixB Key Definitions Softkeys displayed by pressing the Recall key ...
Страница 454: ...446 AppendixC Error messages WRONG I O PORT DIRECTION ...
Страница 462: ...454 AppendixD Initial Settings Initial Settings Settings that can be Saved Recalled Settings that can be Backed Up ...
Страница 468: ......


