


178
Chapter 7
Setting Up the Display of Measurement Results
Enabling or Disabling Coupled Scaling Mode
Enabling or Disabling Coupled Scaling Mode
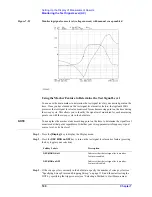
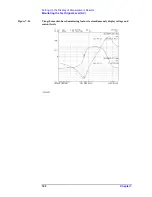
When both the data and memory traces are displayed, the Agilent 4294A synchronizes the
scale settings between them so that changes made to the scale of either trace are
automatically applied to the other. This feature, which is called “coupled scaling mode,” is
enabled by default when the Agilent 4294A is in its preset state. However, there will be
times when you want to apply different scale settings to each of the data and memory
traces. To do so, you need to disable coupled scaling mode. Use the following procedure to
turn on or off this feature.
Step 1.
Activate the trace for which you want to turn on or off coupled scaling mode.
Step 2.
Press the
[Scale Ref]
key to display the Scale Reference menu.
Step 3.
Press the
more 1/2
key to move to the second page of the Scale Reference menu.
NOTE
This step is not applicable when the vertical axis of the graph is logarithmic or the
measurement parameter is COMPLEX Z-Y.
Step 4.
Press the
D&M COPULE on OFF
(or D&M COPULE ON off) key to turn on or off coupled
scaling mode (pressing the key toggles your selection).
NOTE
For how to target the data or memory trace for scale and display settings, refer to
“Selecting the Target Trace Type (Data or Memory)” on page 177.
To activate:
Press:
Trace A
[A]
Trace B
[B]
Softkey Labels
Description
D&M COPULE ON off
Indicates that scaling mode is enabled
(enabling this mode causes the 4294A to
synchronize the scale settings between the data
and memory traces).
D&M COPULE on OFF
Indicates that coupled scaling mode is disabled
(disabling this mode allows you to set different
scale settings for each of the data and memory
traces).
Содержание 4294A
Страница 1: ......
Страница 2: ......
Страница 4: ......
Страница 5: ......
Страница 6: ......
Страница 8: ......
Страница 16: ...8 ...
Страница 30: ...22 Chapter1 Installation Power Cable Figure 1 2 Alternative Power Cable Options ...
Страница 70: ...62 Chapter3 Front Rear Panel and LCD Display Items Displayed on the LCD ...
Страница 100: ...92 Chapter5 Setting Measurement Conditions Setting Sweep Range Figure 5 7 After MKR CENTER Figure 5 8 ...
Страница 101: ...Chapter 5 93 Setting Measurement Conditions Setting Sweep Range 5 Setting Measurement Conditions Figure 5 9 ...
Страница 106: ...98 Chapter5 Setting Measurement Conditions Setting Number of Points NOP Figure 5 13 Number of points 801 ...
Страница 330: ...322 Chapter9 Setting Using Control and Management Functions Performing Self Diagnosis of the Agilent 4294A ...
Страница 436: ...428 AppendixB Key Definitions Softkeys displayed by pressing the Recall key ...
Страница 454: ...446 AppendixC Error messages WRONG I O PORT DIRECTION ...
Страница 462: ...454 AppendixD Initial Settings Initial Settings Settings that can be Saved Recalled Settings that can be Backed Up ...
Страница 468: ......


