


68
Chapter 4
Preparation of Measurement Accessories
Adapter Setting
Adapter Selection
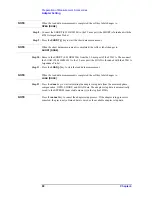
The adapter selection setting must be confirmed before measurement in accordance with
the connection status of each accessory. If necessary, it must be changed to the correct
setting.
The adapter selection of the Agilent 4294A can be confirmed and, if necessary, changed as
follows.
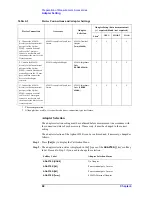
Step 1.
Press
[Cal]
key to display the Calibration Menu.
Step 2.
The adapter selection status is displayed in the
[ ]
space of the
ADAPTER [ ]
key's softkey
label. Proceed to Step 3 if you need to change the selection.
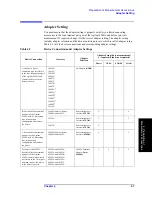
E. Connect the 42942A
directly to the four-terminal
pair port of the Agilent
4294A, connect a coaxial
cable to the 7-mm port,
connect a test fixture, and
then connect the device to the
fixture contacts.
42942A, coaxial cable, and test
fixture
42942A Terminal
Adapter
(
7mm 42942A
)
Ö
Ö
Ö
Ö
F. Connect the 42941A
directly to the four-terminal
pair port of the Agilent
4294A, connect a dedicated
probe adapter to the 3.5-mm
port, and then connect the
device to the adapter
contacts.
42941A and probe adapter
42941A Impedance
Probe
(
PROBE 42941A
)
Ö
Ö
Ö
Ö
G. Connect the 42941A
directly to the four-terminal
pair port of the Agilent
4294A, connect a coaxial
cable to the 3.5-mm port,
connect a test fixture, and
then connect the device to the
fixture contacts.
42941A, coaxial cable, and test
fixture
42941A Impedance
Probe (
PROBE
42941A
)
Ö
Ö
Ö
Ö
1. Phase compensation.
2. Although it has a cable, it is considered a direct-connection-type test fixture.
Table 4-2
Device Connections and Adapter Settings
Device Connection
Accessory
Adapter
Selection
Adapter Setup (data measurement)
(
Ö
: required; blank: not required)
Phase
1
OPEN
SHORT
LOAD
Softkey Label
Adapter Selection Status
ADAPTER [NONE]
No Adapter
ADAPTER [1M]
Four-terminal pair, 1 meter
ADAPTER [2M]
Four-terminal pair, 2 meter
ADAPTER [7mm]
42942A Terminal Adapter
Содержание 4294A
Страница 1: ......
Страница 2: ......
Страница 4: ......
Страница 5: ......
Страница 6: ......
Страница 8: ......
Страница 16: ...8 ...
Страница 30: ...22 Chapter1 Installation Power Cable Figure 1 2 Alternative Power Cable Options ...
Страница 70: ...62 Chapter3 Front Rear Panel and LCD Display Items Displayed on the LCD ...
Страница 100: ...92 Chapter5 Setting Measurement Conditions Setting Sweep Range Figure 5 7 After MKR CENTER Figure 5 8 ...
Страница 101: ...Chapter 5 93 Setting Measurement Conditions Setting Sweep Range 5 Setting Measurement Conditions Figure 5 9 ...
Страница 106: ...98 Chapter5 Setting Measurement Conditions Setting Number of Points NOP Figure 5 13 Number of points 801 ...
Страница 330: ...322 Chapter9 Setting Using Control and Management Functions Performing Self Diagnosis of the Agilent 4294A ...
Страница 436: ...428 AppendixB Key Definitions Softkeys displayed by pressing the Recall key ...
Страница 454: ...446 AppendixC Error messages WRONG I O PORT DIRECTION ...
Страница 462: ...454 AppendixD Initial Settings Initial Settings Settings that can be Saved Recalled Settings that can be Backed Up ...
Страница 468: ......


