


Chapter 5
119
Setting Measurement Conditions
Sweeping Multiple Sweep Ranges with Different Conditions in a Single
Action (List Sweep)
5
. S
etti
ng M
eas
ur
em
ent
Cond
iti
on
s
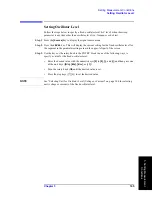
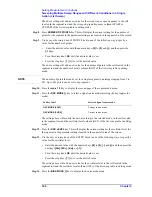
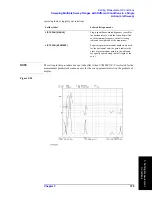
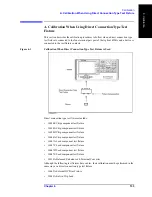
Figure 5-18
Step 3.
Press the
ADD
key to add a new segment to the list sweep table. This operation also
displays the segment edit menu (1/3). The segment added to the list sweep table contains
predefined initial values.
Step 4.
Press the
START
key or the
CENTER
key. This will display the current setting for start
frequency or sweep center frequency in the parameter settings located in the upper left area
of the screen.
Step 5.
Use the keys or rotary knob of the ENTRY block in one of the following ways to specify a
value for the sweep start frequency or sweep center frequency.
•
Enter the desired value with the numeric keys (
[0]
to
[9]
,
[.]
, and
[-]
) and then press the
unit key (
[G/n]
,
[M/
m
]
,
[k/m]
, or
[
´
1]
).
•
Turn the rotary knob (
m
m
m
m
) until the desired value is set.
•
Press the step keys ([
][
¯
]) to set the desired value.
The above setting will add a new value for the sweep start or center frequency to the cell in
the segment row and the sweep start/center frequency column (START or CENTER) of the
list sweep table in editing mode.
Step 6.
Press the
STOP
key if the sweep start frequency is initially set or the
SPAN
key if the
sweep center frequency is initially set. This will display the current setting for the sweep
stop frequency or sweep span frequency for the segment in the parameter settings located
in the upper left area of the screen.
Step 7.
Use the keys or rotary knob of the ENTRY block in one of the following ways to specify a
value for the sweep stop frequency or sweep span frequency.
•
Enter a desired value with the numeric keys (
[0]
to
[9]
,
[.]
, and
[-]
), then press the unit
key (
[G/n]
,
[M/
m
]
,
[k/m]
, or
[
´
1]
).
•
Turn the rotary knob (
m
m
m
m
) until a desired value is set.
•
Press the step keys ([
][
¯
]) to set a desired value.
Содержание 4294A
Страница 1: ......
Страница 2: ......
Страница 4: ......
Страница 5: ......
Страница 6: ......
Страница 8: ......
Страница 16: ...8 ...
Страница 30: ...22 Chapter1 Installation Power Cable Figure 1 2 Alternative Power Cable Options ...
Страница 70: ...62 Chapter3 Front Rear Panel and LCD Display Items Displayed on the LCD ...
Страница 100: ...92 Chapter5 Setting Measurement Conditions Setting Sweep Range Figure 5 7 After MKR CENTER Figure 5 8 ...
Страница 101: ...Chapter 5 93 Setting Measurement Conditions Setting Sweep Range 5 Setting Measurement Conditions Figure 5 9 ...
Страница 106: ...98 Chapter5 Setting Measurement Conditions Setting Number of Points NOP Figure 5 13 Number of points 801 ...
Страница 330: ...322 Chapter9 Setting Using Control and Management Functions Performing Self Diagnosis of the Agilent 4294A ...
Страница 436: ...428 AppendixB Key Definitions Softkeys displayed by pressing the Recall key ...
Страница 454: ...446 AppendixC Error messages WRONG I O PORT DIRECTION ...
Страница 462: ...454 AppendixD Initial Settings Initial Settings Settings that can be Saved Recalled Settings that can be Backed Up ...
Страница 468: ......


