


Chapter 5
109
Setting Measurement Conditions
Setting and Applying dc Bias
5
. S
etti
ng M
eas
ur
em
ent
Cond
iti
on
s
range as narrow as possible without causing the error message “DCBIAS OVERLOAD”
(error number: 137) to appear. An initial dc bias range of 1 mA is recommended for the
first measurement when dc bias is applied.
NOTE
When you do not apply dc bias, always set the dc bias range to 1 mA, which is the preset
setting. Keeping this setting is especially important when you run through the sequence of
applying dc bias, turning off dc bias, and then performing a measurement.
Step 1.
Press the
MEAS RANGE [ ]
key to display the dc bias range menu.
Step 2.
Press the
1mA
key to select 1 mA as the dc bias range (preset state is 1 mA).
Step 3.
Press the
return
key to return to the dc bias menu.
NOTE
Always set the dc bias range to 1 mA when you measure without applying dc bias.
5. Turning dc bias ON or OFF
Step 1.
Press the BIAS on OFF (or BIAS ON off) key to make your selection (pressing the key
toggles your selection).
NOTE
When the error message “CAUTION: DCBIAS OVERLOAD” (error number: 137)
appears in the instrument message area in the upper left part of the screen after turning dc
bias ON, follow the steps given in “6. Optimizing dc bias range” to set the appropriate
range for the dc bias.
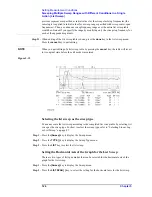
Turning dc bias ON displays “DC BIAS ON” in the lower right area of the screen and also
shows the application status of the dc bias (indicating dc bias mode and whether dc voltage
exceeds the limits). See “dc bias status” on page 57 for details.
6. Optimizing dc bias range
Step 1.
When the error message “CAUTION: DCBIAS OVERLOAD” (error number: 137)
appears after applying dc bias, increase the dc bias range by 1 step until the message
disappears. Then select the narrowest possible range.
Step 2.
Press the
return
key to return to the dc bias menu. Note that the dc bias range currently
Softkey label
Applied dc bias
DC BIAS on OFF
Off
DC BIAS ON off
On
dc bias range
Key stroke
1 mA
1mA
10 mA
10mA
100 mA
100mA
Содержание 4294A
Страница 1: ......
Страница 2: ......
Страница 4: ......
Страница 5: ......
Страница 6: ......
Страница 8: ......
Страница 16: ...8 ...
Страница 30: ...22 Chapter1 Installation Power Cable Figure 1 2 Alternative Power Cable Options ...
Страница 70: ...62 Chapter3 Front Rear Panel and LCD Display Items Displayed on the LCD ...
Страница 100: ...92 Chapter5 Setting Measurement Conditions Setting Sweep Range Figure 5 7 After MKR CENTER Figure 5 8 ...
Страница 101: ...Chapter 5 93 Setting Measurement Conditions Setting Sweep Range 5 Setting Measurement Conditions Figure 5 9 ...
Страница 106: ...98 Chapter5 Setting Measurement Conditions Setting Number of Points NOP Figure 5 13 Number of points 801 ...
Страница 330: ...322 Chapter9 Setting Using Control and Management Functions Performing Self Diagnosis of the Agilent 4294A ...
Страница 436: ...428 AppendixB Key Definitions Softkeys displayed by pressing the Recall key ...
Страница 454: ...446 AppendixC Error messages WRONG I O PORT DIRECTION ...
Страница 462: ...454 AppendixD Initial Settings Initial Settings Settings that can be Saved Recalled Settings that can be Backed Up ...
Страница 468: ......


