Chapter 7
179
Setting Up the Display of Measurement Results
Trace-based Comparison and Calculation
7. S
ett
ing
Up t
he Di
sp
la
y o
f
M
eas
ur
em
ent Res
ult
s
Trace-based Comparison and Calculation
Traces A and B each provide two different trace types: data and memory. The data trace
keeps track of the DUT's characteristics as it is being tested, while the memory trace
captures the measurement data at a specific point in time and displays that data. With the
data trace, you can perform a simple calculation on the measurement data and display the
results. For example, you can display the differential between the measured data and the
memory trace data or the result of subtracting your specified offset value from the
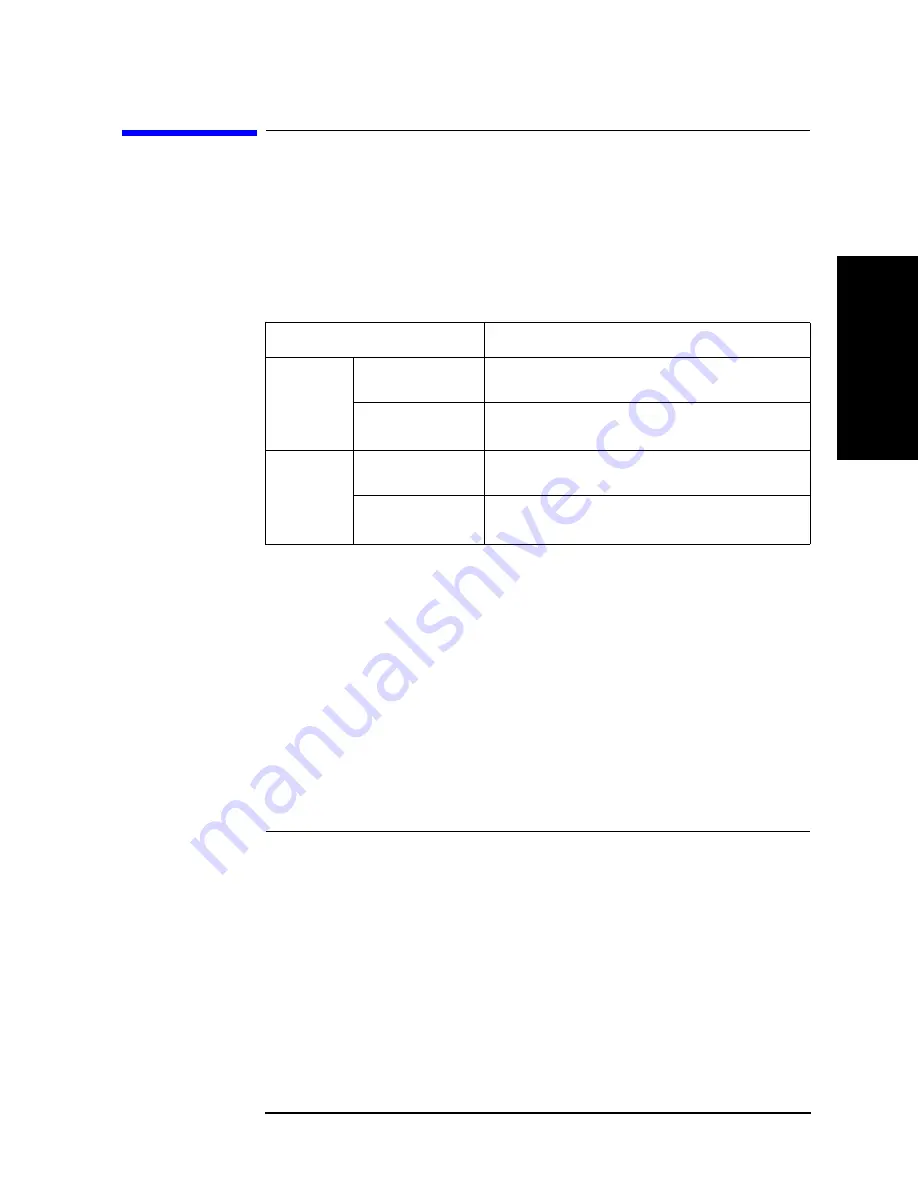
measured data. Table 7-1 lists the trace types and their functions:
These features add flexibility to your testing task; for example, on the same screen you can
compare the data and memory traces with each other or simultaneously display the results
of a calculation as shown by the data and memory traces.
Identifying Differences between Data and Memory Traces through
Comparison or Calculation
Step 1.
Activate the trace for which you want to perform calculation or comparison between the
two trace types.
Step 2.
Press the
[Display]
key to display the Display menu.
Step 3.
Press the
DEF TRACE [ ]
key to display the Trace Definition menu.
Step 4.
Press the
DATA
key to have the data trace directly store and display the measurement data.
Note that
DATA
is selected by default in the preset state.
Step 5.
Start testing the DUT so that the data trace displays the results (for the steps necessary to
perform such a measurement, refer to the appropriate chapters in this guide). You will store
this measurement data into the memory trace later in this procedure.
Trace Types
Functions
Trace A
Data trace (yellow
1
)
1. Factory default settings.For how to change this setting, refer to
“Customizing the Color
of Each Screen Item” on page 208
.
Displays measurement data/calculations
(updated during measurement cycle)
Memory trace
(green
1
)
Stores and displays previously measured data (captures
data when
DATA
®
MEMORY
is pressed)
Trace B
Data trace (blue
1
)
Displays measurement data/calculations
(updated during measurement cycle)
Memory trace
(brown
1
)
Stores and displays previously measured data (captures
data when
DATA
®
MEMORY
is pressed)
To activate:
Press:
Trace A
[A]
Trace B
[B]
Содержание 4294A
Страница 1: ......
Страница 2: ......
Страница 4: ......
Страница 5: ......
Страница 6: ......
Страница 8: ......
Страница 16: ...8 ...
Страница 30: ...22 Chapter1 Installation Power Cable Figure 1 2 Alternative Power Cable Options ...
Страница 70: ...62 Chapter3 Front Rear Panel and LCD Display Items Displayed on the LCD ...
Страница 100: ...92 Chapter5 Setting Measurement Conditions Setting Sweep Range Figure 5 7 After MKR CENTER Figure 5 8 ...
Страница 101: ...Chapter 5 93 Setting Measurement Conditions Setting Sweep Range 5 Setting Measurement Conditions Figure 5 9 ...
Страница 106: ...98 Chapter5 Setting Measurement Conditions Setting Number of Points NOP Figure 5 13 Number of points 801 ...
Страница 330: ...322 Chapter9 Setting Using Control and Management Functions Performing Self Diagnosis of the Agilent 4294A ...
Страница 436: ...428 AppendixB Key Definitions Softkeys displayed by pressing the Recall key ...
Страница 454: ...446 AppendixC Error messages WRONG I O PORT DIRECTION ...
Страница 462: ...454 AppendixD Initial Settings Initial Settings Settings that can be Saved Recalled Settings that can be Backed Up ...
Страница 468: ......


