


66
Chapter 4
Preparation of Measurement Accessories
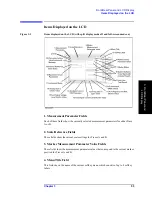
Connecting the Accessories
Connecting the Accessories
Step 1.
Connect the measurement accessories to the Agilent 4294A.
Step 2.
Press the power switch on the front panel of the Agilent 4294A to turn it on.
For more information on connecting accessories to the Agilent 4294A for measurement,
refer to the operation manual furnished with each accessory.
NOTE
Whenever you connect accessories to or disconnect accessories from the Agilent 4294A,
you must first turn off the dc bias (Key strokes:
[Source]
-
BIAS MENU
-
BIAS ON off
). If
this step is not taken, the dc bias may destroy the device.
When you connect or disconnect accessories with the Agilent 4294A turned on, error
messages such as “ADC OVERLOAD” or “BRIDGE UNBALANCED” may be displayed
on the LCD. However, this does not cause any special problem. To turn off the message,
press
[Entry Off]
key.
The power-on self-test is executed at power-on. If an error is detected in the power-on
self-test, the message “CAUTION: POWER ON TEST FAILED” is displayed in the
upper-left area of the screen. In this case, contact your nearest Agilent Technologies office
or the company from which you purchased this instrument. For more information on the
self-test (self-diagnostic) function, refer to “Performing Self-Diagnosis of the Agilent
4294A” on page 320.
Содержание 4294A
Страница 1: ......
Страница 2: ......
Страница 4: ......
Страница 5: ......
Страница 6: ......
Страница 8: ......
Страница 16: ...8 ...
Страница 30: ...22 Chapter1 Installation Power Cable Figure 1 2 Alternative Power Cable Options ...
Страница 70: ...62 Chapter3 Front Rear Panel and LCD Display Items Displayed on the LCD ...
Страница 100: ...92 Chapter5 Setting Measurement Conditions Setting Sweep Range Figure 5 7 After MKR CENTER Figure 5 8 ...
Страница 101: ...Chapter 5 93 Setting Measurement Conditions Setting Sweep Range 5 Setting Measurement Conditions Figure 5 9 ...
Страница 106: ...98 Chapter5 Setting Measurement Conditions Setting Number of Points NOP Figure 5 13 Number of points 801 ...
Страница 330: ...322 Chapter9 Setting Using Control and Management Functions Performing Self Diagnosis of the Agilent 4294A ...
Страница 436: ...428 AppendixB Key Definitions Softkeys displayed by pressing the Recall key ...
Страница 454: ...446 AppendixC Error messages WRONG I O PORT DIRECTION ...
Страница 462: ...454 AppendixD Initial Settings Initial Settings Settings that can be Saved Recalled Settings that can be Backed Up ...
Страница 468: ......


