3.
Click the
Save Template
button (
).
Tip:
Your metadata command templates are saved in the cmdtemp.xml file in the locations below. You can edit this file directly to modify
your templates.
• Windows XP: C:\Documents and Settings\<user name>\Local Settings\Application Data\Sony\Sound Forge Pro\10.0\
• Windows Vista or Windows 7: C:\Users\<user name>\AppData\Local\Sony\Sound Forge Pro\10.0\
Moving the cursor to a command marker
Click the command marker to place the cursor at the current command marker position.
Deleting command markers
1.
Place the mouse pointer on the command marker. The pointer changes to a hand icon ( ).
2.
Right-click to display a shortcut menu.
3.
From the shortcut menu, choose
Delete
. The command marker is removed.
Using regions
Regions identify ranges of time and provide a way to subdivide an audio file. A region is defined as the area between two region tags.
Regions can function as time selections that can be saved with the file. For example, regions can be used to indicate sections of projects
such as choruses or verses, or they can be used to make notes in the project. You can also add regions to the Playlist and use regions to
create new files.
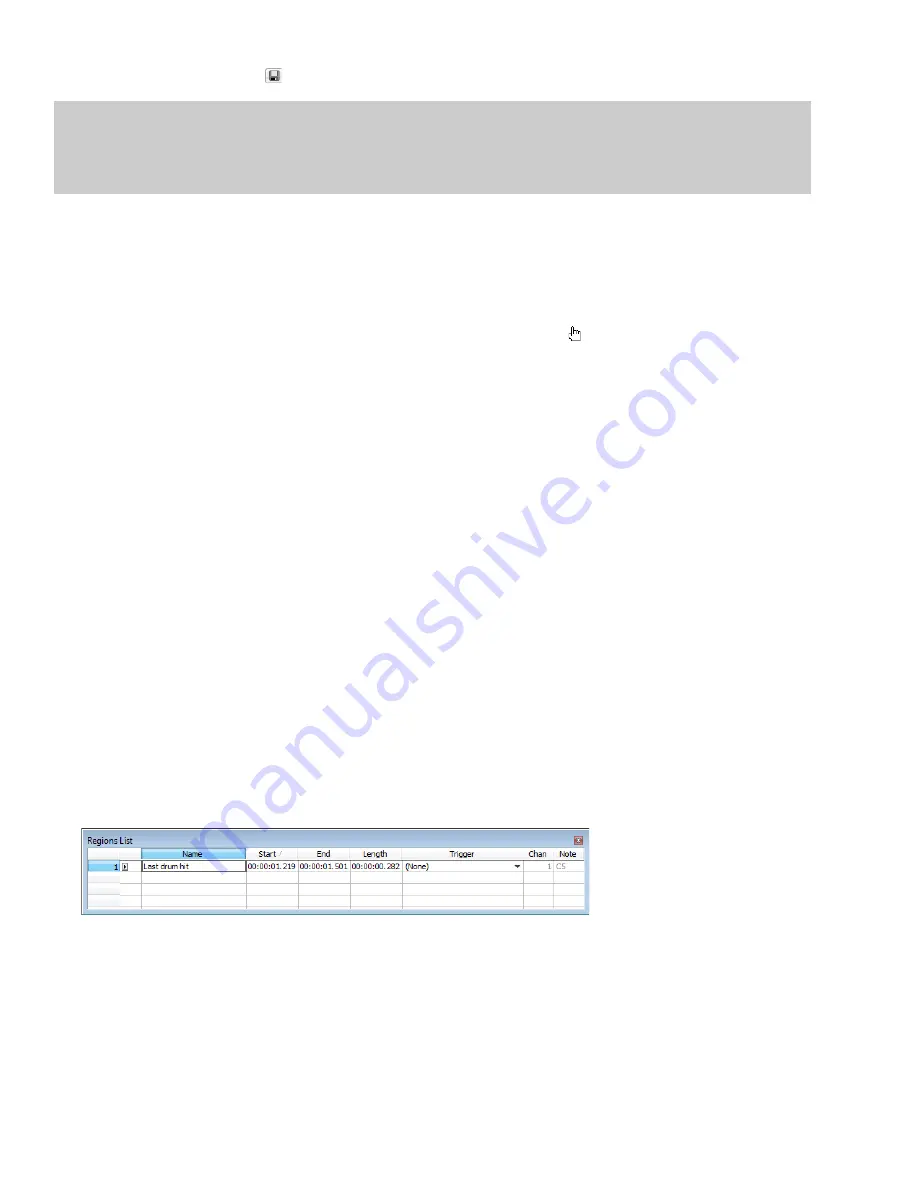
The Regions List window contains all of the regions and markers that exist in the active data window.
Inserting regions
You can use multiple methods of inserting regions including a menu command, drag-and-drop operations, a time ruler shortcut, and a
keyboard shortcut. The following sections briefly describe the methods of creating regions. To work through these procedures, use the
Fill.pca file. This file is located in the same folder as the application.
Inserting regions using menu commands
1.
Open the Fill.pca file. This file is located in the same folder as the application.
2.
From the
View
menu, choose
Metadata
, and then choose
Regions List
from the submenu. The Regions List appears.
3.
Create a selection containing the final drum hit near the end of the waveform display.
4.
From the
Insert
menu, choose
Region
(or press R). The selection appears in the Regions List.
5.
Double-click the
Name
box for the new region. Type a name for the region and press Enter.
Notice that region tags also appear in the data window. These tags indicate the region’s name and position within the original file.
120
|
CHAPTER 7
Summary of Contents for Pro 10
Page 1: ...Pro 10 Sound Forge User Manual ...
Page 2: ......
Page 26: ...20 CHAPTER 1 ...
Page 60: ...54 CHAPTER 2 ...
Page 152: ...146 CHAPTER 8 ...
Page 166: ...160 CHAPTER 9 ...
Page 176: ...170 CHAPTER 10 ...
Page 200: ...194 CHAPTER 11 ...
Page 220: ...214 CHAPTER 12 ...
Page 236: ...230 CHAPTER 13 ...
Page 266: ...260 CHAPTER 16 ...
Page 278: ...272 CHAPTER 17 ...
Page 312: ...306 CHAPTER 20 ...
Page 346: ...340 APPENDIX C ...
Page 366: ...360 APPENDIX E ...


