7-32 Upgrading your Server
11.
Close the retention tab.
12.
Connect any external cables (if they are needed) to the installed option board.
13.
Reinstall the bottom air duct removed earlier. See the section
Bottom Air Duct
.
14.
Replace the left side access panel and close the front door.
15.
Plug in the system power cord, and power on the system.
16.
Make sure no error message appears during POST (see Chapter 6).
17.
Start the BIOS Setup utility to set the "Reset Configuration Data" option in the "Advanced"
menu to "Yes" in order to update hardware configuration information (see Chapter 3).
Removal
Use the following process to remove a PCI board from a PCI slot on the motherboard.
1.
See the section
Preparing for Upgrade
described earlier in this chapter.
2.
Remove the following components:
!
Left-hand side access panel as described earlier in this chapter.
!
Bottom air duct cover as described earlier in this chapter.
3.
Disconnect any cables attached to the option board you are removing.
4.
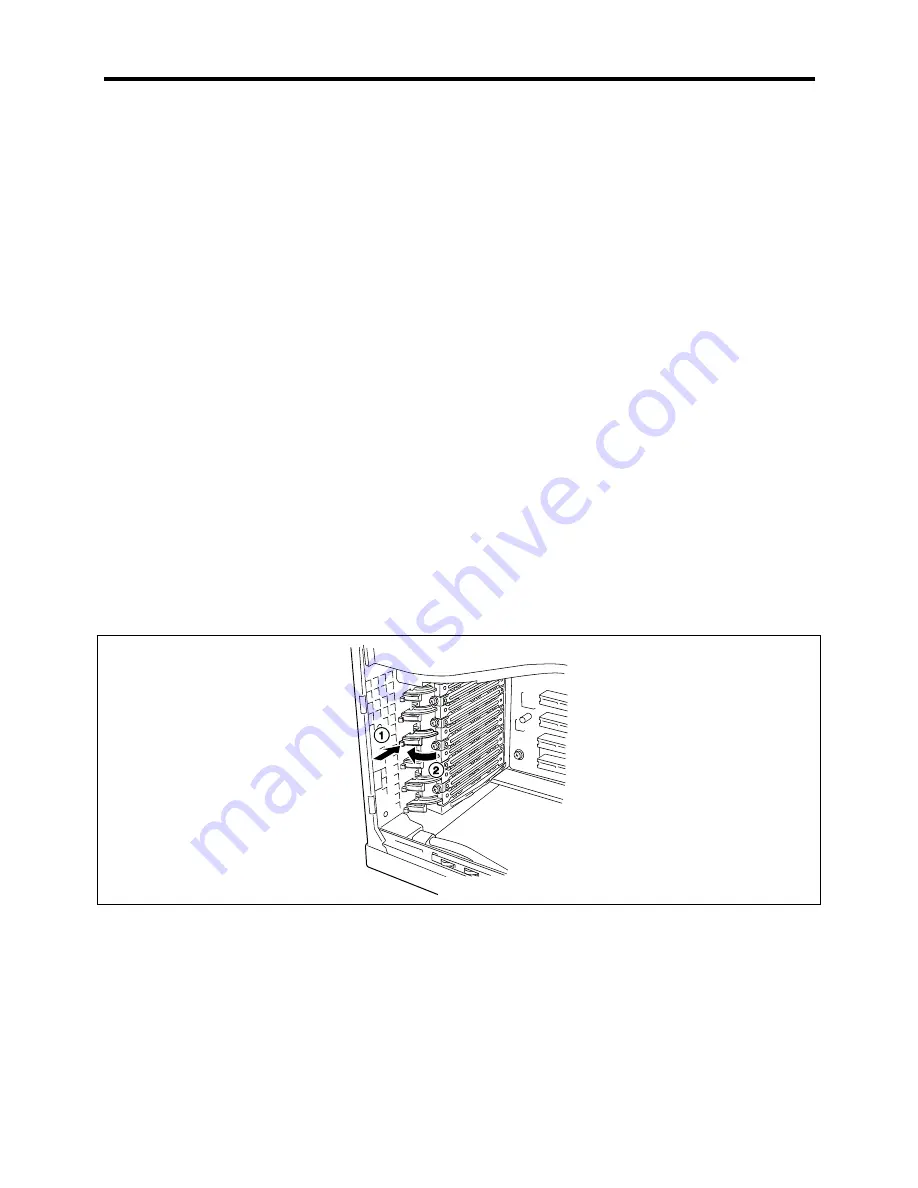
From the inside of the chassis, press the retention tab (1) near the expansion slot cover to
unlock the tab (2). Then, rotate the mechanism on the back of the chassis to free the board.
5.
Hold the board at each end and carefully rock it back and forth until the edge connectors
pull free. Make sure that you do not scrape the board against other components.
6.
Remove the board from the expansion slot and place it in an antistatic wrapper. If you are
replacing a board, go to "Installing an Option Board" earlier in this chapter, otherwise
continue.
7.
Insert an expansion slot connector cover into the vacated slot.
8.
Close the retention tab.
Summary of Contents for EXPRESS5800/120MF
Page 1: ... EXPRESS5800 120Mf U s e r s G u i d e ...
Page 2: ......
Page 4: ......
Page 12: ...x ...
Page 24: ...1 6 System Overview Rear View 11 9 10 12 13 14 15 16 2 17 15 18 17 16 1 8 7 6 1 2 3 4 5 2 5 1 ...
Page 58: ...1 40 System Overview This page is intentionally left blank ...
Page 59: ...Chapter 2 Setting Up Your Server This chapter describes how to set up your server ...
Page 202: ...4 62 Installing the Operating System and Utilities This page is intentionally left blank ...
Page 214: ...5 12 Maintenance This page is intentionally left blank ...
Page 229: ...Troubleshooting 6 15 Memory modules DIMM Group 3 DIMM Group 2 DIMM Group 1 ...
Page 304: ...7 50 Upgrading your Server This page is intentionally left blank ...
Page 305: ...Chapter 8 Internal Cabling Diagrams Internal cable connections of the server are shown below ...
Page 318: ...B 4 IRQ and I O Port Address This page is intentionally left blank ...
Page 326: ...C 8 Installing Windows 2000 This page is intentionally left blank ...
Page 340: ...10 Glossary This page is intentionally left blank ...
Page 345: ...xx ...
Page 346: ... ...


