Group 8
Job Editor
Page 317
JET3up
Release R1.06
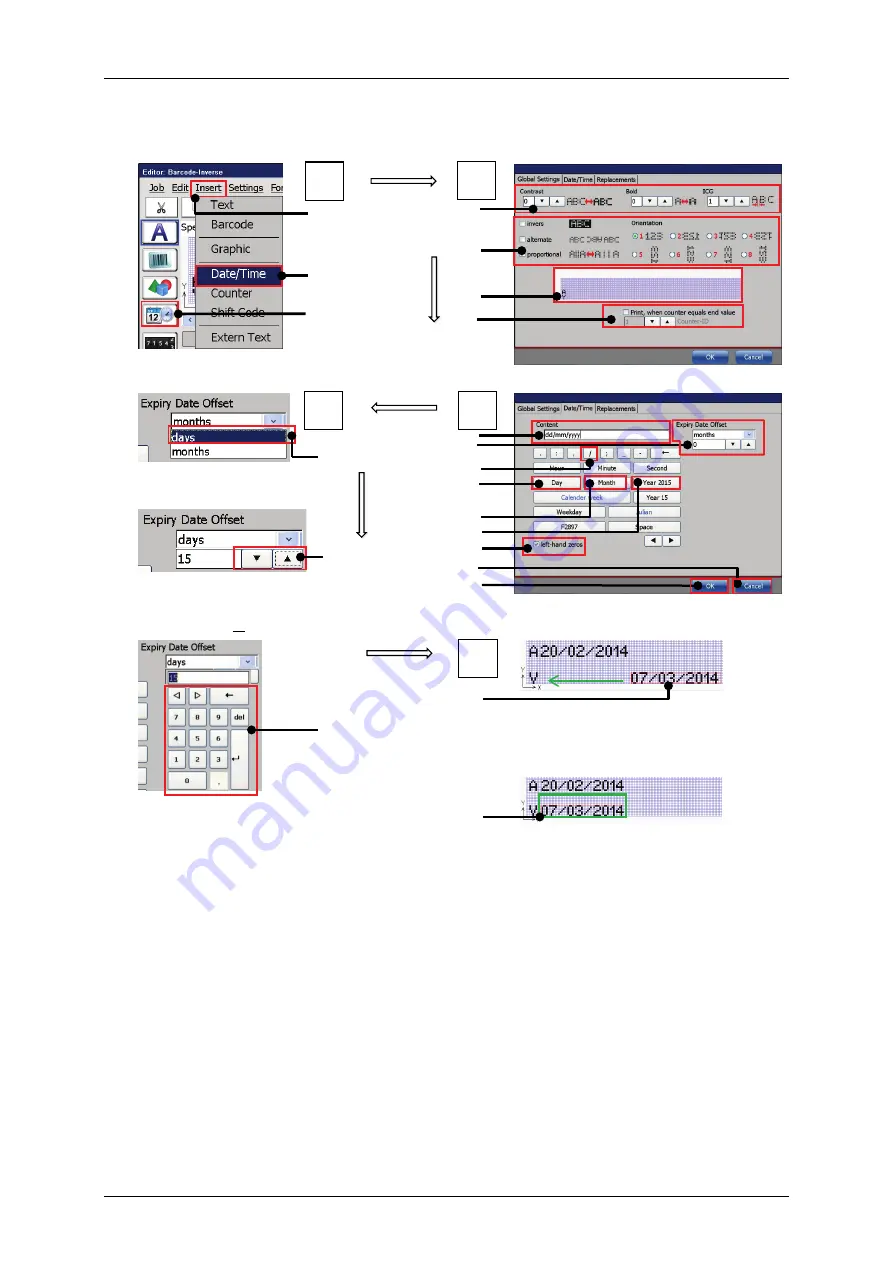
Figure 167 Print elements (Date/time input (Part 2)
Select Date/Time object
Example – Global objects settings
Select “days” from the drop-
down menu
Example – date settings
Set the number of days
stepwise with the arrow keys
or
Set the number of days with
the keypad
The created date object in the editing
window of the job editor. It can be
moved either by drag-and-drop or with
the arrow keys of the editor.
Created date object in its final position.
1 – Menu item <Insert>
11 – Button <Day>
2 – Drop-down menu item <Date/Time>
12 – Button <Month>
3 – Direct button for <Date/Time> object
13 – Button <Year 2014>
4 – Font Settings
14 – Check box <left-hand zeros>
5 – Object attributes & orientation settings
15 – Button <Cancel>
6 – Preview
16 – Button <OK>
7 – Counter assignment settings
17 – Drop down <day>/<month>
8 – Display field <Content>
18 – Data entry arrow keys
9 – Settings <Expiry date offset>
19 – Data entry with keypad
10 – Button </>
20 – Insertion position date object
21 – Final position of the date object
2
3
1
1
6
2
7
4
5
17
4
18
19
20
21
5
3
9
11
12
13
16
15
14
8
10
Summary of Contents for JET3 up
Page 1: ...Operating Manual V1 06 Please keep for future reference ...
Page 2: ......
Page 18: ...Page 16 Introduction Group 1 Release R1 06 JET3up ...
Page 31: ...Group 2 Safety Page 29 JET3up Release R1 06 ...
Page 37: ...Group 3 Accident prevention Page 35 JET3up Release R1 06 ...
Page 42: ...Page 40 Accident prevention Group 4 Release R1 06 JET3up ...
Page 396: ...Page 394 Appendix List of illustrations Group 12 Release R1 06 JET3up 12 4 2 Print head SK 6 ...
Page 398: ...Page 396 Appendix List of illustrations Group 12 Release R1 06 JET3up 12 4 4 Cabinet LJ ...


