Overview
Screen Structure
9
NOTE: This operator’s guide refers to the touch-sensitive fields of the touch-screen
monitor as “buttons.”
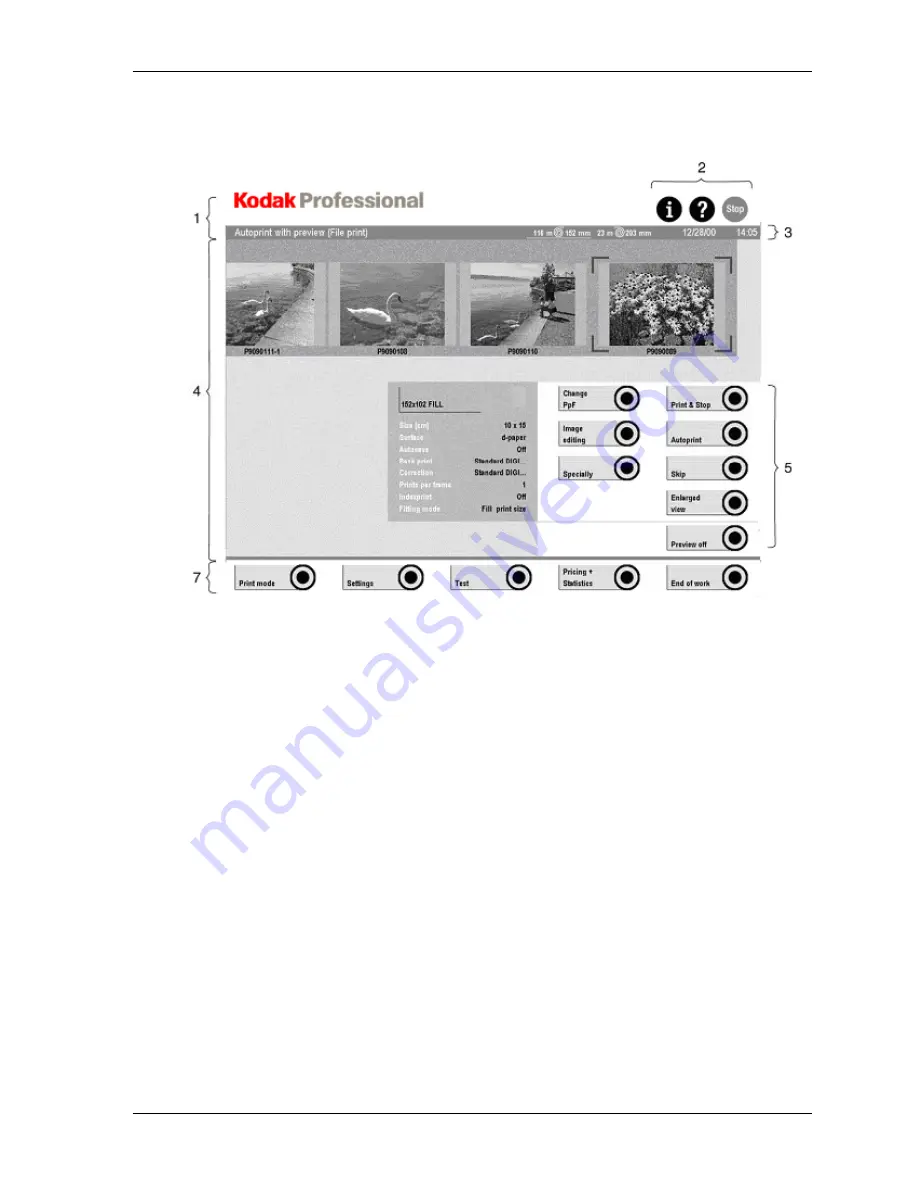
The screen is divided into several areas:
1 Information
area
with
2 fixed
buttons
(i, ?, Stop) and
3 status
line
4 Active screen with
5 buttons
and
6 a popup window, if available (not shown in the above example)
7 Menu bar with five main menus
The areas 1, 2, 3 and 7 are always displayed. However, the menu bar (7) cannot
always be used. When certain errors occur, it is disabled until the errors are
removed.
KODAK PROFESSIONAL SRP 30 Laser Printer
2-21
Summary of Contents for SRP 30
Page 1: ...SRP30 LASERPRINTER OPERATOR S GUIDE ...
Page 2: ...Operator s Guide KODAK PROFESSIONAL SRP 30 Laser Printer P N 6B7503 December 2002 ...
Page 19: ...Operator s Guide 1 4 KODAK PROFESSIONAL SRP 30 Laser Printer ...
Page 54: ...Overview Test Menu Piko KODAK PROFESSIONAL SRP 30 Laser Printer 2 35 ...
Page 56: ...Overview End of Work Menu Login Timer KODAK PROFESSIONAL SRP 30 Laser Printer 2 37 ...
Page 69: ...Operator s Guide 3 2 KODAK PROFESSIONAL SRP 30 Laser Printer ...
Page 159: ...Operator s Guide 5 2 KODAK PROFESSIONAL SRP 30 Laser Printer ...
Page 171: ...Operator s Guide 5 14 KODAK PROFESSIONAL SRP 30 Laser Printer ...
Page 307: ...Operator s Guide 8 54 KODAK PROFESSIONAL SRP 30 Laser Printer ...
Page 308: ......


