


Exinda Network Orchestrator
4 Settings
|
391
When a user on a client computer logs into a Citrix XenApp server (1), their IP address and user name are captured by
the Exinda Citrix XenApp Plugin and sent on to the Exinda AD Connector (2). The connector then sends the user name
and IP address of the XenApp user to the Exinda Appliance to include in reports (3).
Install and configure the Exinda Citrix XenApp Plugin to identify activity by specific users on the XenApp server.
Install the Exinda Citrix XenApp Plugin
The Exinda Citrix XenApp Plugin sends the IP address and username of the user using the application on the XenApp
server to the Exinda AD Connector so the user names can be displayed in reports on the Exinda Appliances. The Exinda
Citrix XenApp Plugin must be installed on each Citrix XenApp server in the network.
NOTE
The Exinda Citrix XenApp Plugin is supported on Citrix XenApp Servers version 6.0.
1.
Download the installer the Exinda Appliance.
a.
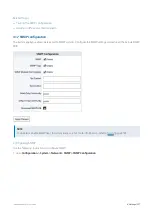
Click
Configuration > System > Network
, and switch to the
Active Directory
tab.
b.
Download the
Microsoft Installer Executable
.
2.
Save the Exinda Citrix XenApp Plugin install to a location that can be accessed by the Citrix XenApp server.
3.
On the server where the Exinda Citrix XenApp Plugin should be installed, locate and double-click installation file.
4.
At the Welcome dialog, click
Next
.
5.
Specify the directory where the Exinda Citrix XenApp Plugin should be installed and click
Next
.
6.
Read the End-User License Agreement. Select
I Agree
and click
Next
.
Summary of Contents for EXNV-10063
Page 369: ...Exinda Network Orchestrator 4 Settings 369 ...
Page 411: ...Exinda Network Orchestrator 4 Settings 411 Screenshot 168 P2P OverflowVirtualCircuit ...
Page 420: ...Exinda Network Orchestrator 4 Settings 420 Screenshot 175 Students OverflowVirtualCircuit ...


