


Exinda Network Orchestrator
4 Settings
|
384
6.
Click
OK
or
Apply
to save the changes.
7.
Restart the service.
Complete the following tasks to continue…
Installing the Active Directory Connector
Installing the Exinda AD Connector
Use the following instructions to install the Exinda AD Connector.
Before you begin
Ensure that you have followed the Installation Requirements.
For more information, refer to
To install the Connector Service
1.
On the server where the Exinda Active Directory Connector should be installed, run the installation file.
2.
Read and accept the end-user license agreement, and then proceed through the screens, making the selections
indicated below, and clicking Next where needed:
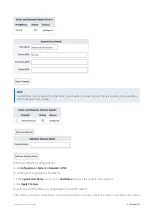
Specify the directory where the Exinda Active Directory Connector should be installed.
Select whether the Active Directory server is on
this server
or
another server
. If the connector is not installed
on the server with Active Directory, type the IP address or hostname of the Active Directory server, and type the
username and password of the Administrator account on the Active Directory server.
IMPORTANT
When the Active Directory server is running Windows Server 2003 R2, the Exinda Active Directory Connector must
be installed on the Active Directory server and cannot be installed on a remote server.
Summary of Contents for EXNV-10063
Page 369: ...Exinda Network Orchestrator 4 Settings 369 ...
Page 411: ...Exinda Network Orchestrator 4 Settings 411 Screenshot 168 P2P OverflowVirtualCircuit ...
Page 420: ...Exinda Network Orchestrator 4 Settings 420 Screenshot 175 Students OverflowVirtualCircuit ...


