background image

126

Adjustment

Room Controller KNX Touch One

 • Status: 29.04.2014 • Errors excepted. Subject to technical changes.

5.8.2.

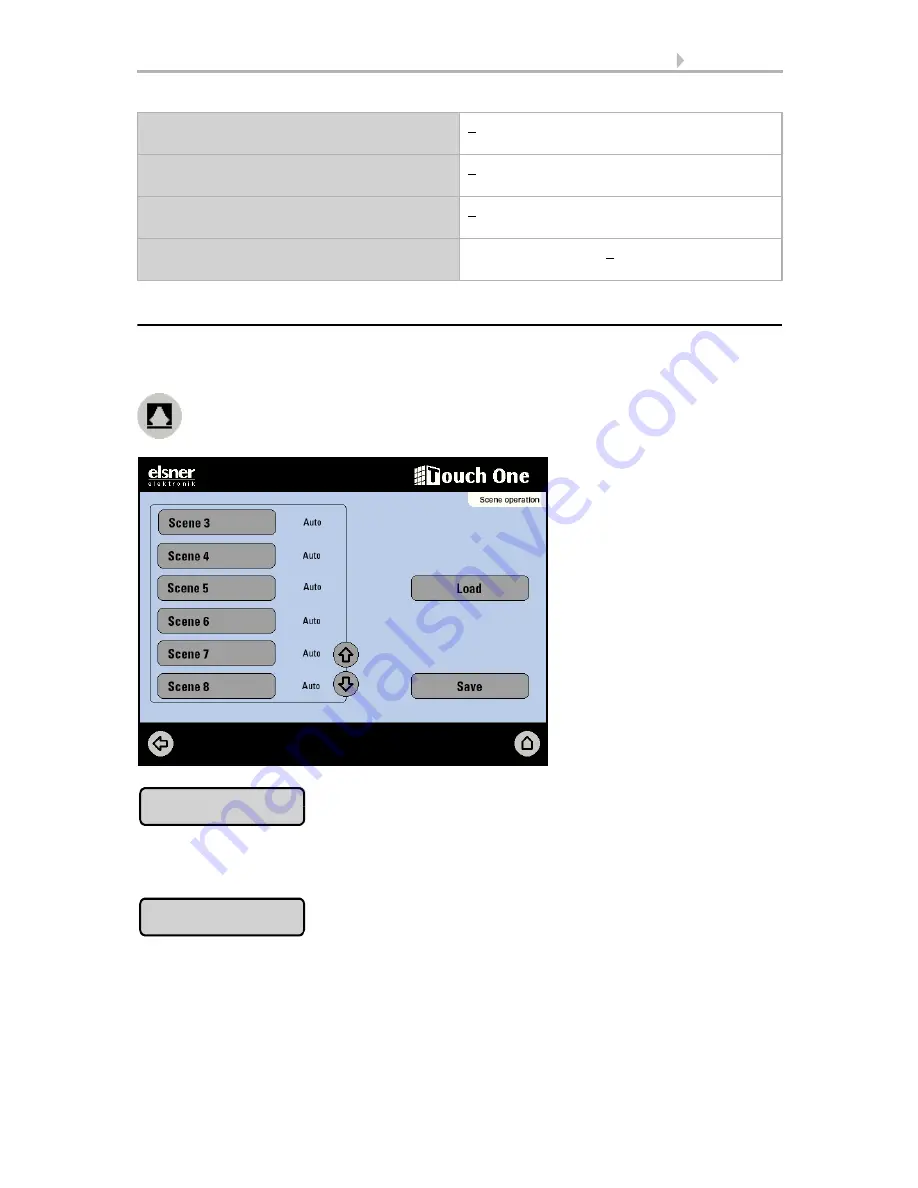
Scene activation at the screen

Up to 16 scenes can be called up or saved in the 

Scene actuation > Scene 1 - 16

menu area. Press the button:


Pressing the 

Load

 buttons sends all of the values allocated in the ETS for objects which

are allocated to the selected scene.

Pressing the 

Saving

 button sends a read message to all of the objects which are as-

signed to the scene. The value of the reply message is used as the new scene value.
Please note that the L-flag is set in the actuator.

Value

(for 

8-bit object type [0...255]”)

0...255

Value

(for 

8-bit object type in %[0...100]”)

0...100

Value

(for 

8-bit object type in ° [0...360]”)

0...360

Value (in 0.1)

(for 

16-bit floating comma object type”)

-6707600...6707600;0

Load

Saving

Summary of Contents for KNX Touch One

Page 1: ...KNXTouch One Touchpanel for Room Automation Installation and Operation EN Item numbers 70195 white 70196 black...

Page 2: ...y operable functions 12 1 4 List of communication objects 12 2 Installation 29 2 1 Installation 30 2 1 1 Installation notes 30 2 1 2 Installation location 30 2 1 3 Installing the device 31 2 1 4 Assig...

Page 3: ...ing the date and time in the ETS 57 Enter the date and time at the screen 59 5 2 5 Location 60 Setting the location using the ETS 61 Setting the location at the screen 61 5 2 6 Display 62 Setting the...

Page 4: ...for automatic functions 94 Setting automatic functions for shading elements 94 Setting automatic functions for windows 101 Setting automatic functions for ventilation units 108 5 5 Temperature control...

Page 5: ...on Instructions that must strictly be observed to ensure the safe operation Safety measures to protect against damage to persons or property Control unit The symbol is followed by a menu path In this...

Page 6: ...5 Description Room Controller KNX Touch One Status 29 04 2014 Errors excepted Subject to technical changes 1 Description...

Page 7: ...eated to ensure the orderly operation and display of the function and object assignments The Remo 8 eight channel wireless remote control can be used with the KNX Touch One for remote control of the d...

Page 8: ...nsation Auxiliary supply 12 40 V DC 14 28 V AC Residual ripple 10 Auxiliary current at 100 display lighting 300 mA at 12 V DC 230 mA at 14 V AC 130 mA at 24 V DC 110 mA at 28 V AC 80 mA at 40 V DC Aux...

Page 9: ...compensates for temperature variations automatically by reducing the actually measured temperature by the intrinsic heat of 1 6 C and displaying this During the 90 minute warm up phase the displayed...

Page 10: ...blind and ventilation functions Automatic functions for up to eight Lighting settings Time switching night switching Switching on for a set period and at night periods brightness values can be set Swi...

Page 11: ...alarm Retract during rainfall can be switched off Travel position can be set Travel delays during extension retraction can be set Automatic functions for up to four Roller shutters Close dependent on...

Page 12: ...or Use ventilator can be switched off Timed ventilation in up to 16 periods with defined force periods can be set ventilation steps can be set on a percentage basis Use TH sensor for ventilator can be...

Page 13: ...mote control Remo 8 Programming button Programming LED phys address Reset 1 3 2 3 Using ETS and display operable functions Settings Language Date and time Location Display Texts Automatic TH sensor ad...

Page 14: ...01 C R T 14 External humidity measurement value Input 9 007 K S U 15 Internal humidity measurement value Output 9 007 C R T 16 Overall humidity measurement value Output 9 007 C R T 17 Temperature requ...

Page 15: ...lay Input Input Output 14 C R W T 52 Start menu function 2 Short term input Output 1 C R T 53 Start menu function 3 Display Input Input Output 14 C R W T 54 Start menu function 3 Short term input Outp...

Page 16: ...C R W T 74 Universal menu page 1 Function 7 Brief Input Output 1 C R T 75 Universal menu page 1 Function 8 Display Input Input Output 14 C R W T 76 Universal menu page 1 Function 8 Brief Input Output...

Page 17: ...W T 96 Universal menu page 3 Function 2 Brief Input Output 1 C R T 97 Universal menu page 3 Function 3 Display Input Input Output 14 C R W T 98 Universal menu page 3 Function 3 Brief Input Output 1 C...

Page 18: ...R W T 118 Universal menu page 4 Function 5 Brief Input Output 1 C R T 119 Universal menu page 4 Function 6 Display Input Input Output 14 C R W T 120 Universal menu page 4 Function 6 Brief Input Outpu...

Page 19: ...R W T 140 Universal menu page 5 Function 8 Brief Input Output 1 C R T 141 Universal menu page 6 Function 1 Display Input Input Output 14 C R W T 142 Universal menu page 6 Function 1 Brief Input Outpu...

Page 20: ...R W T 162 Universal menu page 7 Function 3 Brief Input Output 1 C R T 163 Universal menu page 7 Function 4 Display Input Input Output 14 C R W T 164 Universal menu page 7 Function 4 Brief Input Outpu...

Page 21: ...ut 1 C R T 185 Universal menu page 8 Function 7 Display Input Input Output 14 C R W T 186 Universal menu page 8 Function 7 Brief Input Output 1 C R T 187 Universal menu page 8 Function 8 Display Input...

Page 22: ...Brief Output 1 010 C R T 249 Shutter 2 Travel position Input Output 5 001 C R W T 250 Shutter 2 Slat position Input Output 5 001 C R W T 251 Shutter 2 Safety Output 1 002 C R T 252 Shutter 3 Extended...

Page 23: ...r shutter 1 Brief Output 1 010 C R T 290 Roller shutter 1 Travel position Input Output 5 001 C R W T 291 Roller shutter 1 Safety Output 1 002 C R T 292 Roller shutter 2 Extended Output 1 008 C R T 293...

Page 24: ...R T 342 Temp controller Control variable Heating speed 2 Output 5 001 C R T 343 Temp controller Control variable Heating speed 2 Output 1 001 C R T 344 Temp controller Control variable Cooling speed 1...

Page 25: ...ching output Output 14 C R T 386 Period 14 Switching output Output 14 C R T 387 Period 15 Switching output Output 14 C R T 388 Period 16 Switching output Output 14 C R T 389 Load save scene Input 18 0...

Page 26: ...ng Input Output 3 007 C R W T 424 Button 3 8 bit encoder Output 5 C R T 425 Button 3 16 bit encoder Output 9 C R T 426 Button 3 Scene Output 18 001 C R T 427 Button 4 Extended Output 1 008 C R T 428 B...

Page 27: ...mparator 3 Input 3 Input 5 001 KS 457 Actuating variable comparator 3 Input 4 Input 5 001 KS 458 Actuating variable comparator 3 Input 5 Input 5 001 KS 459 Actuating variable comparator 3 Output Outpu...

Page 28: ...KL 488 UND Logic 1 Blocking Input 1 002 KS 489 UND Logic 2 1 Bit Switching out put Output 1 002 KL 490 UND Logic 2 8 Bit Output A Output 5 010 KL 491 UND Logic 2 8 Bit Output B Output 5 010 KL 492 UND...

Page 29: ...Input 1 002 KS 525 ODER Logic 3 1 Bit Switching out put Output 1 002 KL 526 ODER Logic 3 8 Bit Output A Output 5 010 KL 527 ODER Logic 3 8 Bit Output B Output 5 010 KL 528 ODER Logic 3 Blocking Input...

Page 30: ...29 Installation Room Controller KNX Touch One Status 29 04 2014 Errors excepted Subject to technical changes 2 Installation...

Page 31: ...ediately for possible mechanical damage If it has been damaged in transport inform the supplier immediately The device may only be used as a fixed site installation that means only when assem bled and...

Page 32: ...evice The KNX Touch One refers to a surface mounted unit Ducting and connections should be via a plaster hollow wall box or concrete box see drilling plan Loosen the frame on the upper cor ners by pul...

Page 33: ...es 2 1 4 Assigning connector terminals Terminals 1 2 VCC Auxiliary voltage AC DC Terminal 5 KNX Terminal 6 KNX Terminals 1 2 Button interface 1 Terminals 3 4 Button interface 2 Terminals 5 6 Button in...

Page 34: ...Subject to technical changes 2 1 5 Drill sketch Touch panel external dimensions 164 x 121 mm Ensure a sufficient distance from wall trim door frames etc All dimensions in mm Variations are possible fo...

Page 35: ...34 Installation Room Controller KNX Touch One Status 29 04 2014 Errors excepted Subject to technical changes...

Page 36: ...35 Initial start up Room Controller KNX Touch One Status 29 04 2014 Errors excepted Subject to technical changes 3 Initial start up...

Page 37: ...sfully completed the Control system in the Start menu is in its start position 3 1 2 Check the function of the sensors The current values for the room interior sensors for room temperature and air hum...

Page 38: ...he time is displayed if a drive or light is set but there has still been no time signal reception e g afer a restart Once date and time have been received this message disappears Time and date are the...

Page 39: ...ll be unable to control the required drive in the event of a power failure In the event that a full range of services must be ensured even in the event of a mains power supply failure an emergency pow...

Page 40: ...legram No 3 Date No 4 Time No 11 External temperature measurement value No 14 External humidity measurement value No 29 CO2 measurement value in ppm No 30 Rain No 31 External temperature No 32 Wind fo...

Page 41: ...40 Initial start up Room Controller KNX Touch One Status 29 04 2014 Errors excepted Subject to technical changes...

Page 42: ...41 Operation Room Controller KNX Touch One Status 29 04 2014 Errors excepted Subject to technical changes 4 Operation...

Page 43: ...ting the touch display Setting the display at the screen page 62 Operating the display with long fingernails will not damage the display screen or the touch function Operation using hard or sharp item...

Page 44: ...functions can also be changed on the display Settings Texts Changing text at the screen page 65 Alarm and error messages When malfunction or error messages are displayed the data and time are no longe...

Page 45: ...ata display is a graphical menu for weather and indoor data date and time Drive Menu operation and adjustment of automatic functions Timer setting of periods Temperatur Controller adjustment Universal...

Page 46: ...tuation is shown graphically Intensity Light intensity brightness in Lux lx or Kilolux klx Direction Direction azimuth in degrees Height Elevation over the horizon in degrees Calm up to 2 0 m s Slight...

Page 47: ...eived from the bus the display swtiches to Start Menu Comments about alarm and error messages can be found in the chapter Alarm and error messages page 37 Rain When there is a precipitation report and...

Page 48: ...lect the relevant page The selected page is marked in white You can change the page text and the function names in the ETS and on the display Texts page 65 Operation with the buttons up down If the ob...

Page 49: ...or names and codes page 49 Press OK to send the set text 4 3 Adjustment and operation further options Manual operation and setting of the automatic functions of configured drives and light application...

Page 50: ...1 and 2 have expired The move can be stopped by briefly pushing 4 3 1 Input keyboard for names and codes An input keyboard for names and codes will appear in certain menus Words can be typed in normal...

Page 51: ...enu areas are only accessible after the input of the correct code The code for General Settings protects the menus The code for Automatic Settings protects the menus If an access code has been activat...

Page 52: ...51 Adjustment Room Controller KNX Touch One Status 29 04 2014 Errors excepted Subject to technical changes 5 Adjustment...

Page 53: ...6 7 8 Blind 1 2 3 4 5 6 Awning 1 2 3 4 Shutter 1 2 3 4 Window 1 2 Ventilation unit 5 1 1 2 List of object functions For object function Display the received value text is shown on the display only Fo...

Page 54: ...lease 1 Input Input Up for value 0 Down for value 1 Input Up for value 1 Down for value 0 Input On for value 1 Off for value 0 Input On for value 0 Off for value 1 Input Open for value 1 Close for val...

Page 55: ...Basic settings Basic settings concerning display time location and global settings for the automatic functions are done in the ETS General Settings or at the display in the setting men us Language ET...

Page 56: ...be made there If you transfer parameters the settings which have been made manually on the screen will be overwritten The setting options of the parameters are discribed in the chapters Language Date...

Page 57: ...you to adjust the following general parameters Language Date and time Location Screen brightness switch off colour surface operation touch calibration Texts names for functions in the Start Universal...

Page 58: ...and time 5 2 3 Language The display language can be set to German English French or Italian 5 2 3 1 Setting the language using the ETS Activate the Transfer parameter function for the language in the...

Page 59: ...s are applicable Display seconds No Yes Time zone relative to GMT Hours 12 13 1 Minutes 0 59 Summer time rule Europe USA none user defined Start of Summer Time On the first Sunday After day 25 Month 3...

Page 60: ...d Press the button To set the time consecutively press the hour minute second day month and year fields to set their current values manually using the arrow buttons In order to include the seconds in...

Page 61: ...e Daylight Saving Time Press Time zone and then consecutively the hour and minute fields in order to set the time zone relative to GMT using the arrow buttons Press the button beside Start of summer t...

Page 62: ...t Select Coordinates to input the location using numbers Set the location manually by consecutively selecting the input fields for Easterly longitude and Northerly latitude and then input the values u...

Page 63: ...mgs in the ETS Basic setting in the ETS page 55 Assignment of the object value when switching according to value of object display page selection 0 no switching 1 8 Universal menu pages 1 8 10 Weather...

Page 64: ...room the darker the room the darker the display screen lighting If the brightness of the display is to be controlled via an object select via Object In this case the switch over automation is deactiva...

Page 65: ...he object surface operation is determined by the parameter surface operation object sends in the General settimgs in the ETS Basic setting in the ETS page 55 Please select what will happen if the scre...

Page 66: ...u can set texts for Universal and Scene menu in the ETS s menu Texts Change text for Universal menu pages Change text for Universal menu functions Change text for scene menu 5 2 7 2 Changing text at t...

Page 67: ...lows you to adjust settings that apply to all drives lightapplications Twilight value for shading and light Movement delays for shading Night time re cooling for windows Frost alarm for shading and wi...

Page 68: ...cooling No Yes start when an external temperature of in 0 1 C 100 350 for an extended time which exceeds the following hours 1 72 48 use No Yes use Yes Start frost alarm when an external temperature...

Page 69: ...r protection system from continuously extending and retracting in the event of rap id changes in lighting conditions The brightness must remain uninterrupted above the brightness value set for solar p...

Page 70: ...r the individual blinds and windows The frost alarm is triggered in the following situations The external temperature is below the set frost alarm temperature and it is beginning to rain snow The exte...

Page 71: ...for each drive group and each unit General Automatic Reset Set the time point by selecting the hour and accordingly the minute fields and setting the time using the arrow buttons Default setting 3 00...

Page 72: ...or at the screen Press the buttons The menu is code protected when access code 2 is activated The external temperature must reach percent 0 100 The external humidity must reach percent 0 100 of the TH...

Page 73: ...nfirm your setting using the OK button The intrinsic heat of the unit is already taken into consideration during the temperature measurement Press External component and use the respective arrow butto...

Page 74: ...and beeps Press to return to the menu At the screen of KNX Touch One select the hand transmitter channel you want to program Channels 1 to 8 Select the drives or light applications which you want to o...

Page 75: ...ngs in the ETS Then set the alarm action in the appearing menu 5 2 11 2 Setting an alarm at the screen Press the buttons The menu is code protected when access code 2 is activated You can activate dea...

Page 76: ...menus If an access code has been activated at the touch display but is no longer available for input the unit can be unlocked via the ETS 5 2 13 1 Setting access codes using the ETS Activate the Tran...

Page 77: ...de via the keypad that appears Confirm your setting using the OK button The control system will ask for this new code before displaying the menus This button is deactivated greyed out when no there is...

Page 78: ...estarted 5 2 13 5 Internal area The internal area allows basic unit settings to be changed You are not authorised to make such changes Test mod A function which is only intended for internal company t...

Page 79: ...ring the selected periods at twilight Change general automatic settings using the ETS page 66 5 3 2 Operate and adjust light at the screen Name Light 1 2 3 4 5 6 7 8 Use automatic functions No Yes Lig...

Page 80: ...n arrow buttons Automatic button Settings button The light operation varies by the application type that has been set using the ETS Light as switch On Off buttons Switch the light using the On or Off...

Page 81: ...the time when the lights are reset to automatic after manual operation Pre setting 60 min Settings Automatic Automatic Reset Automatic settings page 66 Press this button to set all light applications...

Page 82: ...a delay of one minute Press the Dimmer value on button in order to set the brightness of the light when it is switched on Pre setting 100 Adjust the value using the arrow buttons Confirm your setting...

Page 83: ...page 66 Date and time page 57 Location page 60 5 4 1 Setting drives using the ETS 5 4 1 1 Safety notes for automatic functions WARNING Risk of injury due to automatically moved components The automati...

Page 84: ...nsfer these parameters the settings which have been made manually on the touch display will be overwritten Settings for Shading Always and Shading Brightness dependent see bottom Use blind No Yes Tran...

Page 85: ...in No Yes Perform Automatic Reset at set time No Yes after the set waiting period following manual operation No Yes Shading Always Movement position in 0 100 Slat position Does not track the sun Slat...

Page 86: ...n in 0 15 0 100 15 30 0 100 80 30 45 0 100 65 45 90 0 100 50 Use internal temperature lock shut off only if an interior temperature lock is used No Yes Allow shading from in 0 1 C 50 400 250 Use exter...

Page 87: ...tion No Yes Use wind alarm No Yes Retract at wind speeds from in 0 1 m s only if wind alarm is used 5 195 60 for longer than in sec only if wind alarm is used 1 5 Retract upon rain No Yes Perform Auto...

Page 88: ...used No Yes Allow shading from in 0 1 C 50 400 250 Use external temperature shut off No Yes Allow shading from in 0 1 C 200 300 50 All sides greater than 0 lower than 360 West greater than 180 lower...

Page 89: ...at set time No Yes after the set waiting period following manual operation No Yes Shading Always Movement position in 0 100 Shading Brightness dependent From a brightness of in klx 1 99 40 Sun directi...

Page 90: ...All sides greater than 0 lower than 360 West greater than 180 lower than 360 South West greater than 135 lower than 315 South greater than 90 lower than 270 South East greater than 45 lower than 225...

Page 91: ...s used 1 5 Close during rain No Yes Use gap opening during rain only when the window closes due to rain No Yes Gap opening in only if gap opening due to rain is used 0 100 5 Perform Automatic Reset at...

Page 92: ...automatic settings using the ETS page 66 When the TH sensor is used Open window until room temp drops below in 0 1 C only if night time re cooling is used 50 500 160 Window opening in only if night ti...

Page 93: ...select the names to the left of the drive or unit which you want to operate Start ventilation from above in 10 ppm only if CO2 is used 50 200 80 Stop ventilation from below in 10 ppm only if CO2 is u...

Page 94: ...rost alarm can be switched off by pressing the frost alarm button for 7 seconds The frost lock will then only be active for this drive again when it is reactivated manu ally or the next time the frost...

Page 95: ...itation warning for automatically controlled windows Some time can pass before falling rain is recognised by the sensors in the system de pending on the rain amount and outdoor temperature Furthermore...

Page 96: ...he alarm functions named above is active Only when the direction and height of the sun agree and there is no active block is the automatic shading by light intensity engaged The automatic blind functi...

Page 97: ...sing the arrow buttons depending on your needs Pre setting 40 klx The drive will always actuate the screen from a set external temperature which you can define using the appropriate button in accordan...

Page 98: ...area Confirm your setting using the OK button Where the date and time are not available Please set the time in the display the blinds are controlled using aperture temperature and alarm messages The...

Page 99: ...or wind alarm is triggered the shade will be retracted despite the outdoor temperature block the alarm has priority over temperature block Manual operation continues to remain possible even when shad...

Page 100: ...your setting using the OK button The limit value which identifies twilight night can be adjusted Settings Automatic Twilight Change automatic settings at the screen page 67 Note on the night time clo...

Page 101: ...tic settings at the screen page 67 When the frost alarm is triggered manual operation of the shade is initially blocked You can only remove the blocks by deactivating the frost alarm or sending an app...

Page 102: ...point in time or following a manual intervention The general Automatic Reset occurs daily at the same time Activate To set the drive to Automatic at a set point in time select Yes default set ting De...

Page 103: ...es over the pre set value for the outdoor temperature block The automatic ventilation according to temperature or relative humidity is only performed if no block is active The automatic window functio...

Page 104: ...e value for the desired room humidity using the arrow but tons Pre setting 80 The window is opened as soon as the air humidity lies above the pre set value it is however closed again once the humidity...

Page 105: ...l system checks every 3 minutes whether the set room temperature and or air humidity is still undercut and then if necessary ex tends this a further step Input the desired number of steps using the ar...

Page 106: ...content Press Select to select the times Activate one or more times on the list These operat ing times can be individually customised Confirm your setting using the OK button To change any of the tim...

Page 107: ...times can be individually customised Confirm your setting using the OK button To change any of the time periods set in the timer press Timer Setting the timer at the screen page 124 Press the button t...

Page 108: ...curity object Even manually opened win dows are closed in the event of a rain alarm Activate If the security object should be sent select Yes Deactivate If the security object should not be sent in th...

Page 109: ...ively the automatic function can be reactivated at a set time following a man ual intervention Activate To perform an Automatic Reset after a manual intervention select Yes Deactivate To switch off th...

Page 110: ...ess the button to set the internal temperature at which the ventilation is opened Setting the temperature Adjust the value for the desired room temperature using the arrow buttons Pre setting 25 0 C S...

Page 111: ...ps from 100 to 10 using the arrow buttons default setting 10 Confirm your setting using the OK button Press the button to set the maximum ventilation force If no interior room sensor is se lected maxi...

Page 112: ...ur ing which ventilation will occur Activate one or more times on the list Confirm your setting using the OK button To change any of the time periods set in the timer press Timer Setting the timer at...

Page 113: ...utomatic Reset Change automatic settings at the screen page 67 5 5 Temperature control The temperature control must be activated in the ETS first before it can be used at the Room Controller KNX Touch...

Page 114: ...al start up Start setpoint in 0 1 C valid till 1st communication 300 800 220 Object value limit min in 0 1 C restricts the input of the reference temperature on the touch display appropriately 300 800...

Page 115: ...alue limit in 0 1 C restricts the input of the reference temperature on the touch display appropriately 300 800 140 K max object value limit in 0 1 C restricts the input of the reference temperature o...

Page 116: ...oor heating 5 C 240 min Convection unit 4 C 90 min Electric heating 4 C 100 min Setpoint difference between steps 1 and 2 in 0 1 C 0 100 40 Control type 2 point control PI control Hysteresis in 0 1 C...

Page 117: ...uld not transmitted send a specific value Value in only if a set value is sent 0 100 The control variable follows the rule upon triggering Application Maximum control variable is reached at setpoint a...

Page 118: ...tent of the last received value Not After reset After reset and programming Attention Do not use during initial start up Initial setpoint in 0 1 C valid till 1st communication 300 800 180 Min object v...

Page 119: ...ore 1st communication OPEN CLOSE Use heat protection Yes Setpoint in 0 1 C 300 800 310 Activation delay according to Window opening so that the controller does not immediately heat in the event of sho...

Page 120: ...he controller type are dis played These values are given in the ETS and can be changed directly on the display This ensures that no unnecessary heating cooling energy is wasted and max min ob ject val...

Page 121: ...you can use day extension Day extension can only be switched on when night time reduction is switched on night time reduction On If you press day extension On the control will switch to day mode and t...

Page 122: ...alue 0 Off for value 1 Display Up for value 1 To for value 0 Display Up for value 0 To for value 1 Display 8 bit value 0 255 Display 8 bit value 0 100 Display 8 bit value 0 360 Display 16 bit floating...

Page 123: ...splay 16 32 bit floating point and Input 16 32 bit floating point you can input the unit as text Additionally you can convert the value by using the factors a floating point and b number 1 65535 Thus...

Page 124: ...week must be set for each time period 5 7 1 Setting the timer using the ETS The time periods for the timer are set in the menu items Timer 1 16 If you transfer these parameters the settings which hav...

Page 125: ...order to adjust a time period The following settings of each time period can be changed Name Press the button to change this name Enter the desired name via the keypad that ap pears Input keyboard for...

Page 126: ...ects is activated here up to 16 objects Scene object 1 16 After that you dfine the individual scene objects e g sending an 8 bit value in for addressing a light dimming actuator in the living room The...

Page 127: ...allocated in the ETS for objects which are allocated to the selected scene Pressing the Saving button sends a read message to all of the objects which are as signed to the scene The value of the reply...

Page 128: ...switch If a button with switch function is assigned to the input select the bus function Selec tor switch and specify if the button should switch when pressed released Use button interface 1 2 3 4 No...

Page 129: ...scene control If scenes are called and saved with the input then choose the Scenes bus function and specify the scene number Command when pressing the button selector switch do not send telegram Comm...

Page 130: ...e positioned re sp stopped incrementally If the drive is to be moved a bit farther then a little longer push is needed longer than time 1 but shorter than time 1 2 The drive stops immediately when rel...

Page 131: ...time 2 expires Stop Release after time 1 2 expired Move into end position Control mode Comfort mode Behavior during button operation Button is pushed and released before time 1 expired stop step held...

Page 132: ...Evaluation of the blocking object 1 block control 0 release control 0 block control 1 release control Value of the blocking object before 1st communication 0 1 Behaviour of the output With blocking d...

Page 133: ...0 255 0 if logic 1 object B value 0 255 1 if logic 0 object B value 0 255 0 Transmission behaviour on change of logic on change of logic to 1 on change of logic to 0 on change of logic and periodical...

Page 134: ...t 1 Switching output sends on change to 0 transmit no message if switching output 0 transmit 0 Switching output send on change and periodically transmit value for current logic status Switching output...

Page 135: ...134 Adjustment Room Controller KNX Touch One Status 29 04 2014 Errors excepted Subject to technical changes...

Page 136: ...135 Tables Room Controller KNX Touch One Status 29 04 2014 Errors excepted Subject to technical changes 6 Tables...

Page 137: ...on of the building and the installation position of the weather station different values may be optimal in order to protect the shade or win dow Observe the response of the awning or blinds or the win...

Page 138: ...evation 0 15 15 30 30 45 45 90 TH sensor Yes No Indoor temperature C Night time closure Timed closure period Frost alarm Outdoor temperature C Wind alarm in m s time overrun Rain alarm Automatic Reset...

Page 139: ...ind alarm Yes No Rain alarm Yes No Gap opening when raining Yes No Gap opening in Automatic Reset Reset following manual actuation No 1 2 Indoor temperature block Yes No Ondoor temperature 0 1 C Air h...

Page 140: ...e lock Yes No Indoor temperature 0 1 C Use air humidity Yes No Air humidity rH Use CO2 Yes No CO2 content 10 ppm Start exhaust ventilation in 10 and increase exhaust ventilation from in 10 Night time...

Page 141: ...ght time re cooling when the external temperature is exceeded by 0 1 C for a period of h Start frost protection when the exterior temperature is exceeded 0 1 C for a set period following precipitation...

Page 142: ...141 Tables Room Controller KNX Touch One Status 29 04 2014 Errors excepted Subject to technical changes 12 13 14 15 16 Name from to Weekday...

Page 143: ...142 Tables Room Controller KNX Touch One Status 29 04 2014 Errors excepted Subject to technical changes...

Page 144: ...Elsner Elektronik GmbH Control and AutomationTechnology Herdweg 7 D 75391 Gechingen Phone 49 0 70 56 93 97 0 info elsner elektronik de Germany Fax 49 0 70 56 93 97 20 www elsner elektronik de...

Reviews: