background image

Reg

ist

ering Destinations in the A

ddr

ess Book (imageRUNNER 1025iF Only)

3-24

Storing/Editing Coded Dial Codes


       Erasing Coded Dial Codes (Group Addresses) 

Erasing Coded Dial Codes (Group Addresses) 

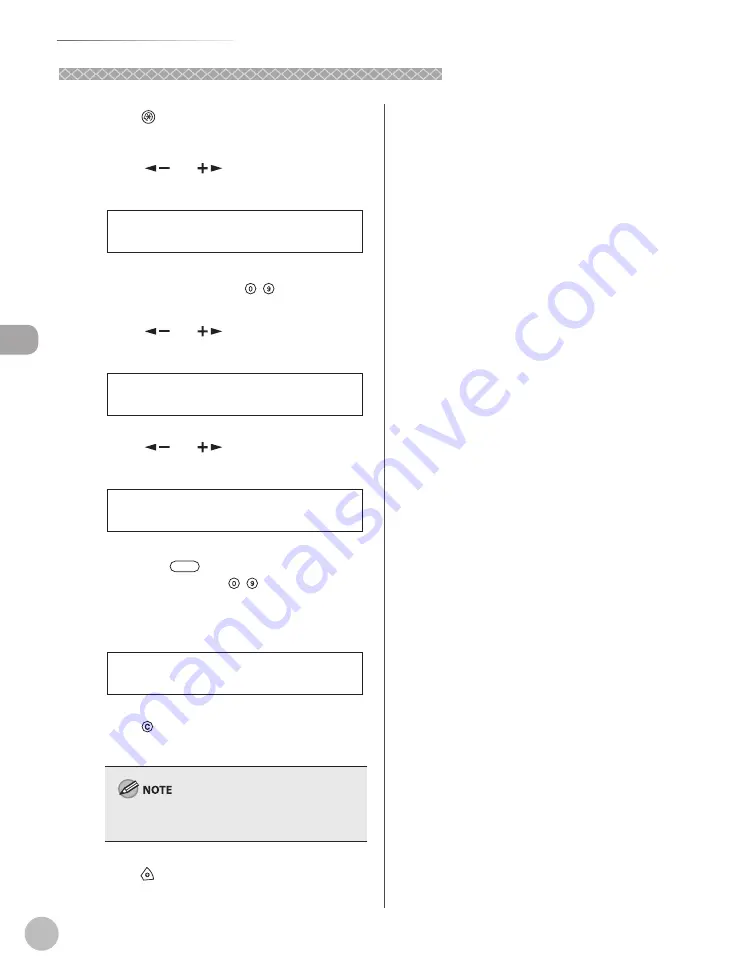
 1


Press 

 [Additional Functions]. 


 2


Press [

] or [

] to select <ADDRESS 

BOOK SET.>, then press [OK]. 


  4 . A D D R E S S   B O O K   S E T .

A D D .   F U N C T I O N S


 If a password has been set for the Address Book, 
enter the password using  –  [numeric keys], 
then press [OK]. 

 3


Press [

] or [

] to select <GROUP 

DIAL>, then press [OK]. 


  4 . G R O U P   D I A L

A D D R E S S   B O O K   S E T .


 4


Press [

] or [

] to select a group to 

delete, then press [OK]. 


[ * 1 0 0 ] G R O U P   D I A L

G R O U P   D I A L


 To select a group stored under the coded dial 
code, press 

 [Coded Dial], then enter the 

three-digit code using  –  [numeric keys]. 

 5


Confi rm that <SELECT ADD/TEL NO> is 
displayed, then press [OK]. 


  1 . S E L E C T   A D D / T E L   N O

G R O U P   D I A L


 6


Press   [Clear] repeatedly until all 
destinations are deleted, then press [OK]. 

When you delete all destinations, the registered 
name is cleared automatically.

 7


Press   [Stop] to return to the standby 
mode. 

Summary of Contents for imageRUNNER 1025

Page 1: ...Mail Printing Scanning Network Settings from a PC System Manager Settings Maintenance Troubleshooting Machine Settings Appendix Basic Operation Guide Basic Operation Guide Please read this guide before operating this product After you finish reading this guide store it in a safe place for future reference ...

Page 2: ...k Copy Fax E mail Specifications Read this manual to learn information about basic operations and machine functions Read the sections of these manuals that correspond to your intended use e Manual Located on Manual CD Copy Fax Print Scan E Mail Remote UI Network Security Troubleshooting Maintenance Specifications Read this manual to learn detailed information about advanced machine operations and ...

Page 3: ...on Guide Copying see on p 4 1 e Manual Copy Faxing In addition to the normal faxing you can send faxes from a computer and send I faxes Basic Operation Guide Fax see on p 5 1 e Manual Fax Printing You can use various print functions by printing from a computer Basic Operation Guide Printing see on p 7 1 e Manual Print Scanning You can store the scanning documents to the computer and the file serve...

Page 4: ... be sent as e mail file attachments Basic Operation Guide E Mail see on p 6 1 e Manual E Mail Remote User Interface You can set and manage this machine easily and quickly from a computer Basic Operation Guide Setting from a PC see on p 10 1 e Manual Setting from a PC Security function You can limit the use of the machine by setting the IDs You can also limit the use of some functions Basic Operati...

Page 5: ...ns xxviii 1 Before Using the Machine 1 1 Machine Components 1 2 External View Front 1 2 External View Back 1 4 Operation Panel 1 5 Main Operation Panel 1 5 Send Operation Panel imageRUNNER 1025iF only 1 8 Display Parts and Functions 1 9 Copy Mode 1 9 Send Mode imageRUNNER 1025iF only 1 9 Scan Mode 1 9 Log In Mode 1 9 Toner Cartridge 1 10 Maintaining the Toner Cartridge 1 11 Entering Characters 1 1...

Page 6: ...d Dial Codes 3 20 Editing Coded Dial Codes 3 21 Editing Coded Dial Codes Group Addresses 3 22 Erasing Coded Dial Codes 3 23 Erasing Coded Dial Codes Group Addresses 3 24 4 Copying 4 1 Overview of Copy Functions 4 2 Basic Copying Method 4 4 Canceling Copy Jobs 4 5 Canceling Scanning or Outgoing Jobs 4 5 Canceling Reserved Jobs 4 5 Selecting Paper Source 4 7 Copying on Papers in Drawers 4 7 Using th...

Page 7: ...ttons 5 34 Registering a Favorites Button 5 34 Erasing a Favorites Button 5 37 Using the Favorites Buttons 5 38 Sending Originals at a Preset Time Delayed Sending 5 39 Standard Send Settings 5 41 Storing the Standard Send Settings 5 41 Restoring the Standard Send Settings to Their Default 5 42 Send Settings 5 43 Adjusting Sharpness 5 44 ECM Transmission 5 45 Redialing Automatically When the Line I...

Page 8: ...UNNER 1025iF Only 8 6 Canceling Scan Jobs 8 8 Canceling Scanning Documents to a Computer 8 8 Canceling Scanning Documents to a File Server imageRUNNER 1025iF Only 8 8 9 Network 9 1 Flowchart for Setting Up Network 9 2 What is the Network 9 3 Overview of Network Functions 9 4 10 Settings from a PC 10 1 Overview of Remote UI 10 2 Starting the Remote UI 10 4 11 System Manager Settings 11 1 Overview o...

Page 9: ... 14 If a Power Failure Occurs 13 16 Service Call Message 13 17 Contacting Your Local Authorized Canon Dealer 13 17 14 Machine Settings 14 1 Machine Settings 14 2 Printing USER DATA LIST 14 2 Accessing the Setting Menu 14 2 Settings Menu 14 4 COMMON SETTINGS 14 4 COPY SETTINGS 14 6 TX RX SETTINGS 14 8 ADDRESS BOOK SET 14 13 PRINTER SETTINGS 14 18 TIMER SETTINGS 14 20 ADJUST CLEANING 14 21 REPORT SE...

Page 10: ...pending on the system configuration and product purchased some features described in the manuals may not be available The table below shows the available features on a product basis available not available opt optional Copy Print UFRII LT Print PCL Scan Fax I Fax E Mail FTP SMB RUI Network Board ADF imageRUNNER 1025 opt opt imageRUNNER 1025N opt imageRUNNER 1025iF opt The Card Reader E1 Cassette F...

Page 11: ...t may lead to death or serious injury if not observed Explains how to avoid actions that could injure you or damage your machine Explains operating restrictions and how to avoid minor difficulties Keys and Buttons Used in This Manual Keys and Buttons Used in This Manual The following symbols and key names are a few examples of how keys to be pressed are expressed in this manual Operation Panel Key...

Page 12: ...in This Manual Unless otherwise mentioned illustrations used in this manual are those taken when no optional equipment is attached to the imageRUNNER 1025iF If there is any difference between the imageRUNNER 1025 1025N or 1025iF it is clearly indicated in the text for instance imageRUNNER 1025iF Only ...

Page 13: ...cts into the slots or openings on the machine since they may touch dangerous voltage points or short out parts This could result in fire or electric shock Do not allow small objects such as pins paper clips or staples to fall into the machine To avoid spillage in or around the machine do not eat or drink near it Keep the machine clean Dust accumulation can prevent the machine from operating proper...

Page 14: ... a cool dry clean well ventilated place Make sure the area is free from dust Make sure the location is not exposed to high temperature or humidity Keep the machine away from direct sunlight as this can damage it If you have to place the machine near a window install heavy curtains or blinds Do not use the machine near water Make sure that no wet or humid objects come into contact with the machine ...

Page 15: ... reach the outlet quickly If you notice anything unusual smoke strange odors noises around the machine unplug the power cord immediately Contact your local authorized Canon dealer Do not allow anything to rest on the power cord and do not place the machine where the cord will be walked on Make sure the cord is not knotted or kinked Power Supply Power Supply During electrical storms unplug the powe...

Page 16: ...ire electric shock and injury to persons including the following 1 Do not use this machine near water i e near a bathtub kitchen sink or laundry tub or in a wet basement or near a swimming pool 2 Avoid using the telephone during an electrical storm as there may be a remote risk of electric shock from lightning 3 Do not use the telephone to report a gas leak in the vicinity of the leak ...

Page 17: ...em in which business proprietors can participate voluntarily The targeted products are office equipment such as computers displays printers facsimiles and copiers The standards and logos are uniform among participating nations Trademarks Trademarks Canon the Canon logo and imageRUNNER are registered trademarks of Canon Inc in the United States and may also be trademarks or registered trademarks in...

Page 18: ...pped transferred or exported into any country 2 LICENSORS retain in all respects the title ownership and intellectual property rights in and to the SOFTWARE Except as expressly provided herein no license or right expressed or implied is hereby conveyed or granted by Canon s licenser to you for any intellectual property of LICENSORS 3 You may use the SOFTWARE solely for use with the Canon product y...

Page 19: ...sion THIS SOFTWARE IS PROVIDED AS IS AND WITHOUT ANY EXPRESS OR IMPLIED WARRANTIES INCLUDING WITHOUT LIMITATION THE IMPLIED WARRANTIES OF MERCHANTABILITY AND FITNESS FOR A PARTICULAR PURPOSE The software was developed by the University of California Berkeley b Copyright 1995 1996 Cygnus Support All rights reserved Redistribution and use in source and binary forms are permitted provided that the ab...

Page 20: ...UDING WITHOUT LIMITATION THE IMPLIED WARRANTIES OF MERCHANTABILITY AND FITNESS FOR A PARTICULAR PURPOSE The software was developed at Cygnus Solutions Disclaimers Disclaimers The information in this document is subject to change without notice CANON INC MAKES NO WARRANTY OF ANY KIND WITH REGARD TO THIS MATERIAL EITHER EXPRESS OR IMPLIED EXCEPT AS PROVIDED HEREIN INCLUDING WITHOUT LIMITATION THEREO...

Page 21: ...about the legality of using your product to scan print or otherwise reproduce any particular document and or of the use of the images scanned printed or otherwise reproduced you should consult in advance with your legal advisor for guidance Paper Money Travelers Checks Money Orders Food Stamps Certificates of Deposit Passports Postage Stamps canceled or uncanceled Immigration Papers Identifying Ba...

Page 22: ...ence to radio or television reception which can be determined by turning the equipment off and on the user is encouraged to try to correct the interference by one or more of the following measures Reorient or relocate the receiving antenna Increase the separation between the equipment and receiver Connect the equipment to an outlet on a circuit different from that to which the receiver is connecte...

Page 23: ... Dial line or IDDD International Direct Distance Dial line if you communicate overseas Canon recommends an individual line following industry standards i e 2 500 touch tone or 500 rotary pulse dial telephones A dedicated extension off a PBX Private Branch eXchange unit without Call Waiting can be used with your facsimile unit Key telephone systems are not recommended because they send nonstandard ...

Page 24: ...compliant telephone line cable and modular plug is provided with this equipment This equipment is designed to be connected to the telephone network or premise wiring using a compatible modular jack that is Part 68 compliant This equipment may not be used on coin service provided by the telephone company Connection to party lines is subjected to state tariffs In Case of Equipment Malfunction Should...

Page 25: ...ay not be a 900 number or any other number for which charges exceed local or long distance transmission charges In order to program this information into your machine you should complete the procedure for registering your name unit s telephone number time and date in the Quick Start Guide Users in Canada Users in Canada Pre Installation Requirements for Canon Facsimile Equipment A Location Supply ...

Page 26: ...he equipment must also be installed using an acceptable method of connection In some cases the company s inside wiring associated with a single line individual service may be extended by means of a certified connector assembly telephone extension cord The customer should be aware that compliance with the above conditions may not prevent deterioration of service in some situations Repairs to certif...

Page 27: ...il Ligne automatique interurbaine ou Ligne automatique internationale si vous communiquez avec les pays étrangers Canon vous conseille d utiliser une ligne individuelle conforme aux normes industrielles à savoir ligne téléphonique 2 500 pour appareil à clavier ou 500 pour appareil à cadran impulsions Il est également possible de raccorder ce télécopieur à un système téléphonique à poussoirs car la...

Page 28: ... interface peut consister en une combinaison quelconque de dispositifs à la seule condition que la somme d indices d équivalence de la sonnerie de tous les dispositifs n excède pas 5 Le nombre d équivalents sonnerie REN de ce produit est 1 0 Les réparations sur un appareil certifié doivent être faites par une société d entretien canadienne autorisée par le Gouvernement canadien et désignée par le ...

Page 29: ... covers the laser beam cannot escape from the machine during any phase of user operation CDRH Regulations CDRH Regulations The Center for Devices and Radiological Health CDRH of the U S Food and Drug Administration implemented regulations for laser products on August 2 1976 These regulations apply to laser products manufactured from August 1 1976 Compliance is mandatory for products marketed in th...

Page 30: ...Operation Panel imageRUNNER 1025iF only 1 8 Display Parts and Functions 1 9 Copy Mode 1 9 Send Mode imageRUNNER 1025iF only 1 9 Scan Mode 1 9 Log In Mode 1 9 Toner Cartridge 1 10 Maintaining the Toner Cartridge 1 11 Entering Characters 1 12 Telephone Line Setting imageRUNNER 1025iF Only 1 13 Timer Settings 1 14 Setting the Sleep Mode 1 14 Setting the Auto Clear Time 1 15 Setting the Daylight Savin...

Page 31: ...ribes the names and functions of all the parts on the outside of the machine Machine components vary depending on the model you purchased For information on the standard features and available options for each model see Available Features on p ix External View Front External View Front ...

Page 32: ...pen the stopper Operation panel Machine controls Paper drawer Holds the paper supply DRAWER 2 is the optional paper drawer Stacking support Helps prevent paper curl on the output tray Open as far as it goes when using curl prone paper Platen glass cover imageRUNNER 1025 only Open this cover when placing a document on the platen glass Left cover Open this cover when replacing the drum unit or clear...

Page 33: ...he USB Universal Serial Bus cable Ethernet port Connect the network cable Telephone line jack imageRUNNER 1025iF only Connect the external telephone cable External device jack imageRUNNER 1025iF only Connect an external device Power socket Connect the power cord Main power switch Turns the power ON or OFF ...

Page 34: ... the Machine 1 5 Operation Panel Operation Panel This section describes the names and functions of the keys on the operation panel Main Operation Panel Main Operation Panel imageRUNNER 1025iF imageRUNNER 1025 1025N ...

Page 35: ...eric keys Enter letters and numbers Clear key Press to clear entered alphanumeric characters Log In Out key Press to operate the machine when the department ID management is activated Also press to enable the department ID management when you finished using the machine Start key Press to start copying scanning and sending faxes Counter Check key Press to display counter status Press again to close ...

Page 36: ...ing documents Copy Ratio key Press to enlarge or reduce copy ratio Density key Press to lighten or darken the copies or documents you send Image Quality key Press to select image quality for copying and sending documents Paper Select key Press to select a paper source paper drawer or stack bypass ...

Page 37: ... Recall key Press to recall previously set send jobs including the destinations scan settings and send settings Coded Dial key Press to specify destinations registered under coded dial codes Address Book key Press to search preregistered destinations under one touch keys or coded dial codes by name number or address One Touch keys Press to specify destinations registered under one touch keys Favor...

Page 38: ... Density Send Mode imageRUNNER 1025iF Send Mode imageRUNNER 1025iF only only F A X S E L E C T S E N D M E T H O D Scan Mode Scan Mode S C A N N I N G M O D E Log In Mode Log In Mode If the Department ID Management or User ID Management is set the Log In screen is displayed For information on the Department ID Management or User ID Management see Security in the e Manual For Department ID Manageme...

Page 39: ... toner to ignite and result in burns or a fire Keep toner and other consumables out of the reach of small children If these items are ingested consult a physician immediately When removing a used toner cartridge remove the toner cartridge carefully to prevent the toner from scattering and getting into your eyes or mouth If the toner gets into your eyes or mouth wash them immediately with cold wate...

Page 40: ...in this machine For optimal print quality and for optimal machine performance and productivity we recommend that you use Genuine Canon Toner Parts and Supplies Contact your Canon Authorized Dealer or Service Provider for Genuine Canon Supplies Be careful of counterfeit toners Please be aware that there are counterfeit Canon toners in the marketplace Use of counterfeit toner may result in poor prin...

Page 41: ...s in the Quick Start Guide Example Enter Canon 1 Press repeatedly until an uppercase C appears C N A M E a 2 Press to move the cursor to the right then press until an a appears C a N A M E a 3 Press until an n appears C a n N A M E a 4 Press to move the cursor to the right then press until an o appears C a n o N A M E a 5 Press to move the cursor to the right then press until an n appears C a n o ...

Page 42: ...t FAX SETTINGS then press OK 2 F A X S E T T I N G S T X R X S E T T I N G S 4 Confirm that USER SETTINGS is displayed then press OK 1 U S E R S E T T I N G S F A X S E T T I N G S 5 Press or to select TEL LINE TYPE then press OK 2 T E L L I N E T Y P E U S E R S E T T I N G S 6 Press or to select the telephone line type then press OK T O U C H T O N E T E L L I N E T Y P E TOUCH TONE Tone dialing...

Page 43: ... then press OK O N A U T O S L E E P T I M E 5 Press or to select the desired interval then press OK 5 M I N A U T O S L E E P T I M E You can set the interval from 3 to 30 minutes in one minute increments You can also enter values using numeric keys 6 Press Stop to return to the standby mode To resume the normal mode from the Sleep mode press Power on the operation panel To enter the Sleep mode m...

Page 44: ... interval then press OK 2 M I N A U T O C L E A R T I M E You can set the interval from 1 to 9 minutes in one minute increments You can also enter values using numeric keys 6 Press Stop to return to the standby mode Setting the Daylight Saving Time Setting the Daylight Saving Time In some countries or areas time is advanced throughout the summer season This is called Daylight Saving Time This sect...

Page 45: ...the day then press OK S U N D A Y D A Y 12 12 Confirm that END DATE TIME is displayed then press OK 2 E N D D A T E T I M E D A Y L I G H T S V T I M E 13 13 Confirm that MONTH is displayed then press OK 1 M O N T H E N D D A T E T I M E 14 14 Press or to select the month then press OK N O V E M B E R M O N T H 15 15 Confirm that WEEK is displayed then press OK 2 W E E K E N D D A T E T I M E 16 1...

Page 46: ...rs are necessary to obtain the license key Checking the License Access Number Check the License Access Number Certificate that is included in the provided package Checking the Machine s Serial Number 1 Press Counter Check 1 0 1 T O T A L 1 0 0 0 7 5 1 C O U N T C H E C K T J W 0 0 2 0 9 The machine s serial number is displayed 2 Press Stop to return to the standby mode Registering a License Key Re...

Page 47: ...enter the correct number If the following screen is displayed press OK then enter the correct license key P R E S S O K K E Y L I C K E Y I N C O R R E C T If the screen is displayed again press OK and cancel license registration Check if the required option or function is properly installed in the machine If the messages INSTALLATION OK and TURN POWER OFF ON appear license registration is complet...

Page 48: ...w to load paper in the paper drawer and stack bypass Originals Requirements 2 2 Scanning Area 2 3 Placing Originals 2 4 On the Platen Glass 2 4 In the ADF 2 5 Paper Requirements 2 6 Printable Area 2 8 Loading Paper 2 9 In the Paper Drawer 2 9 In the Stack Bypass 2 11 Setting Paper Type and Size 2 13 For the Paper Drawer 2 13 For the Stack Bypass 2 15 ...

Page 49: ... 50 to 128 g m2 Two sided scanning 13 to 28 lb bond 50 to 105 g m2 Quantity 1 sheet 50 sheetsmaximum 2 25 sheets maximum for LGL originals 1 When copying transparent originals such as tracing paper or transparencies use a piece of plain white paper to cover the original after placing it face down on the platen glass 2 21 lb bond 80 g m2 paper Do not place the originals on the platen glass or in th...

Page 50: ...2 3 Scanning Area Scanning Area Make sure your originals text and graphics fall within the shaded area in the following diagram Note that the margin widths listed are approximate and there may be slight variations in actual use ...

Page 51: ...nal with the appropriate paper size marks If your original does not match any of the paper size marks align the center of your original with the arrow mark 4 Gently lower the ADF platen glass cover The original is ready for scanning When closing the ADF platen glass cover be careful not to get your fingers caught as this may result in personal injury Do not press down the ADF platen glass cover fo...

Page 52: ...o not add or remove originals while they are being scanned When scanning is complete remove the originals from the originals delivery tray to avoid paper jams Avoid using feeder to scan the same originals more than 30 times When scanned repeatedly originals can become folded or torn which may cause paper jams If the feeder rollers are soiled from scanning originals written in pencil clean them See...

Page 53: ...100 sheets maximum 1 Type Plain 2 Color 2 Recycled 2 Heavy 1 3 Heavy 2 4 Heavy 3 5 Bond 6 3hole punch paper 7 Transparency 8 Labels Envelopes available not available 1 21 lb bond 80 g m2 paper 2 From 17 to 21 lb bond 64 to 80 g m2 3 From 22 to 24 lb bond 81 to 90 g m2 4 From 24 to 28 lb bond 91 to 105 g m2 5 From 28 to 34 lb bond 106 to 128 g m2 6 20 lb bond 75 g m2 7 LTR size only 8 Use only LTR ...

Page 54: ... of paper do not print well Highly textured paper Very smooth paper Shiny paper Make sure the paper is free from dust lint and oil stains Be sure to test paper before purchasing large quantities Store all paper wrapped and on a flat surface until ready for use Keep opened packs in their original packaging in a cool dry location Store paper at 64 4 F 75 2 F 18 C 24 C 40 60 relative humidity Use onl...

Page 55: ...ntable Area Printable Area The shaded area indicates the approximate printable area of LTR paper Note that the margin widths listed are approximate and there may be slight variations in actual use Copy Printable Area Fax Printable Area ...

Page 56: ... to step 2 Make sure all shipping tape packing materials on the machine have been removed 2 Incline the rear paper end guide until it is unlocked then remove it from the paper drawer By default the guide is set to LTR 3 Attach the guide to the slots of the desired paper size Make sure to set the guide to the mark for the size of the paper to be loaded correctly If the guide is positioned incorrect...

Page 57: ...nd guide A the paper stack should not exceed the load limit mark B and the load is under the small fins C on the paper guides The paper drawer holds approximately 500 sheets of paper 21 lb bond 80 g m2 6 Gently insert the paper drawer as far as it will go Be careful not to get your fingers caught In the same manner load the paper into the optional paper drawer For attaching the optional paper draw...

Page 58: ...dows holes perforations cutouts or double flaps Envelopes made with special coated paper or deeply embossed paper Envelopes with peel off sealing strips Envelopes with letters enclosed Make sure to set the correct envelope size in the printer driver See Printing Functions in the e Manual 1 Open the stack bypass 2 Pull out the stack bypass extension until it clicks then open it Do not load the pape...

Page 59: ...which side of the paper to load follow those instructions If problems such as poor print quality or paper jams occur try turning the paper stack over and reload it If you are loading envelopes into the stack bypass Gently load the stack of envelopes with the address side facing down and the flap side to the left Be sure to insert the envelopes as far as they will go When you load the envelopes arr...

Page 60: ... and PLAIN PAPER When you place other sizes and or types of paper follow this procedure to change the settings 1 Press Additional Functions 2 Confirm that COMMON SETTINGS is displayed then press OK 1 C O M M O N S E T T I N G S A D D F U N C T I O N S 3 Press or to select SELECT PAPER TYPE then press OK 7 S E L E C T P A P E R T Y P E C O M M O N S E T T I N G S 4 Confirm that DRAWER 1 is displaye...

Page 61: ...per type for DRAWER 2 6 Confirm that REG PAPER SIZE is displayed then press OK 8 R E G P A P E R S I Z E C O M M O N S E T T I N G S 7 Confirm that DRAWER 1 is displayed then press OK 1 D R A W E R 1 R E G P A P E R S I Z E 8 Press or to select the paper size then press OK L T R D R A W E R 1 You can select from the following paper sizes LTR LGL OFICIO FLSP BRAZIL OFICIO MEXICO OFICIO A4 If you ar...

Page 62: ... 1 C O M M O N S E T T I N G S A D D F U N C T I O N S 3 Press or to select BYPASS STD SET then press OK 1 0 B Y P A S S S T D S E T C O M M O N S E T T I N G S 4 Press or to select ON then press OK O N B Y P A S S S T D S E T If you select OFF you must specify paper size and type every time you load paper on the stack bypass In this case when the display to specify the paper size for the stack by...

Page 63: ...e enter the vertical size in VERTICAL SIZE 76 to 216 mm 3 to 8 1 2 inch with numeric keys then press OK Enter the horizontal size in HORIZONTAL SIZE 127 to 356 mm 5 to 14 1 8 inch with numeric keys then press OK You can also press or to specify the size VERTICAL SIZE represents the length of the paper that feeds into the machine 7 Confirm that SELECT PAPER TYPE is displayed then press OK 2 S E L E...

Page 64: ...erver Addresses in One Touch Keys 3 7 Registering Group Addresses in One Touch Keys 3 9 Editing One Touch Keys 3 10 Editing One Touch Keys Group Addresses 3 11 Erasing One Touch Keys 3 12 Erasing One Touch Keys Group Addresses 3 13 Storing Editing Coded Dial Codes 3 14 Registering Fax Numbers in Coded Dial Codes 3 14 Registering E Mail Addresses in Coded Dial Codes 3 16 Registering I Fax Addresses...

Page 65: ...or coded dial code to this group Registering a destination in the Address Book saves you the effort of entering that destination s address each time you send a job You can also register a destination in favorites buttons together with a specific combination of the scan and send settings One touch keys 01 to 04 can be used for this feature For instructions on registering favorites buttons see Favor...

Page 66: ... 23 for which you want to register the fax number then press OK 0 1 N O T R E G I S T E R E D 1 T O U C H S P D D I A L You can also select a one touch key by pressing the corresponding one touch key 5 Confirm that FAX is displayed then press OK F A X 1 T O U C H S P D D I A L 6 Confirm that NAME is displayed then press OK 1 N A M E 1 T O U C H S P D D I A L 7 Enter the destination name 16 letters...

Page 67: ... select the sending speed 33600 bps 14400 bps 9600 bps or 4800 bps then press OK 3 3 6 0 0 b p s T X S P E E D If transmission errors occur frequently lower the speed 16 16 Confirm that INTERNATIONAL is displayed then press OK 3 I N T E R N A T I O N A L O P T I O N A L S E T T I N G 17 17 Press or to select the most effective transmission option then press OK D O M E S T I C I N T E R N A T I O N...

Page 68: ...E T 4 Press or to select a one touch key 01 to 23 for which you want to register the address then press OK 0 1 N O T R E G I S T E R E D 1 T O U C H S P D D I A L You can also select a one touch key by pressing the corresponding one touch key 5 Press or to select E MAIL then press OK E M A I L 1 T O U C H S P D D I A L 6 Confirm that NAME is displayed then press OK 1 N A M E 1 T O U C H S P D D I ...

Page 69: ... O K S E T 4 Press or to select a one touch key 01 to 23 for which you want to register the address then press OK 0 1 N O T R E G I S T E R E D 1 T O U C H S P D D I A L You can also select a one touch key by pressing the corresponding one touch key 5 Press or to select IFAX then press OK I F A X 1 T O U C H S P D D I A L 6 Confirm that NAME is displayed then press OK 1 N A M E 1 T O U C H S P D D...

Page 70: ... a one touch key 01 to 23 for which you want to register the address then press OK 0 1 N O T R E G I S T E R E D 1 T O U C H S P D D I A L You can also select a one touch key or coded dial code by pressing the corresponding one touch key 5 Press or to select the server protocol FTP or SMB then press OK F T P 1 T O U C H S P D D I A L FTP Select this protocol if you are sending documents to a compu...

Page 71: ...hich the job is to be sent 120 characters maximum using numeric keys then press OK s e r v e r 1 h o m e s h a r e F I L E P A T H a Ex 12 12 Confirm that LOGIN NAME is displayed then press OK 4 L O G I N N A M E 1 T O U C H S P D D I A L 13 13 Enter the login name using numeric keys then press OK c a n o n L O G I N N A M E a Ex You can enter up to 24 characters for the login name 14 14 Confirm t...

Page 72: ... D G R O U P D I A L You can also select a one touch key by pressing the corresponding one touch key 5 Confirm that SELECT ADD TEL NO is displayed then press OK 1 S E L E C T A D D T E L N O G R O U P D I A L 6 Select the destinations you want to register in the group 199 destinations maximum until all destinations are registered then press OK 0 1 C a n o n 0 1 2 X X X X X X X To enter a destinati...

Page 73: ...or SMB NAME HOST NAME FILE PATH LOGIN NAME PASSWORD 6 Press repeatedly to go back to the character or number you want to change then press Clear N A M E a To delete the entire entry press and hold Clear 7 Enter a new character or number using numeric keys then press OK C a n o n N A M E a Ex 8 Repeat step 5 to 7 to edit the desired items 1 Press Additional Functions 2 Press or to select ADDRESS BO...

Page 74: ...OK 4 G R O U P D I A L A D D R E S S B O O K S E T 4 Press or to select a group to edit then press OK 0 2 G R O U P D I A L G R O U P D I A L If you want to add a new destination to the group Press or to select SELECT ADD TEL NO then press OK 1 S E L E C T A D D T E L N O G R O U P D I A L Select the destination you want to add to the group then press OK For details on specifying a destination fro...

Page 75: ...rd has been set for the Address Book enter the password using numeric keys then press OK 3 Press or to select 1 TOUCH SPD DIAL then press OK 2 1 T O U C H S P D D I A L A D D R E S S B O O K S E T 4 Press or to select a one touch key 01 to 23 you want to erase then press OK 0 3 J o h n e m a i l 1 T O U C H S P D D I A L You can also select a one touch key by pressing the corresponding one touch k...

Page 76: ...ric keys then press OK 3 Press or to select GROUP DIAL then press OK 4 G R O U P D I A L A D D R E S S B O O K S E T 4 Press or to select a group to delete then press OK 2 5 G R O U P D I A L G R O U P D I A L 5 Confirm that SELECT ADD TEL NO is displayed then press OK 1 S E L E C T A D D T E L N O G R O U P D I A L 6 Press Clear repeatedly until all destinations are deleted then press OK When you...

Page 77: ... 176 for which you want to register the fax number then press OK 0 0 0 N O T R E G I S T E R E D C O D E D S P D D I A L You can also select a coded dial code by pressing Coded Dial followed by the desired three digit code 5 Confirm that FAX is displayed then press OK F A X C O D E D S P D D I A L 6 Confirm that NAME is displayed then press OK 1 N A M E C O D E D S P D D I A L 7 Enter the destinat...

Page 78: ...o select the sending speed 33600 bps 14400 bps 9600 bps or 4800 bps then press OK 3 3 6 0 0 b p s T X S P E E D If transmission errors occur frequently lower the speed 16 16 Confirm that INTERNATIONAL is displayed then press OK 3 I N T E R N A T I O N A L O P T I O N A L S E T T I N G 17 17 Press or to select the most effective transmission option then press OK D O M E S T I C I N T E R N A T I O ...

Page 79: ...Press or to select a coded dial code 000 to 176 for which you want to register the address then press OK 0 0 0 N O T R E G I S T E R E D C O D E D S P D D I A L You can also select a coded dial code by pressing Coded Dial followed by the desired three digit code 5 Press or to select E MAIL then press OK E M A I L C O D E D S P D D I A L 6 Confirm that NAME is displayed then press OK 1 N A M E C O ...

Page 80: ...E T 4 Press or to select a coded dial code 000 to 176 for which you want to register the address then press OK 0 0 0 N O T R E G I S T E R E D C O D E D S P D D I A L You can also select a coded dial code by pressing Coded Dial followed by the desired three digit code 5 Press or to select IFAX then press OK I F A X C O D E D S P D D I A L 6 Confirm that NAME is displayed then press OK 1 N A M E C ...

Page 81: ...n Solaris 2 6 or later Mac OS X Internet Information Services 5 0 under Windows 2000 Server Windows 2008 Server Internet Information Services 5 1 under Windows XP Professional Internet Information Services 6 0 under Windows 2003 Server Internet Information Services 7 0 under Windows Vista or Red Hat Linux 7 2 SMB Select this protocol if you are sending documents to a computer running UNIX Linux Sa...

Page 82: ...hich the job is to be sent up to 120 characters using numeric keys then press OK s e r v e r 1 h o m e s h a r e F I L E P A T H a Ex 12 12 Confirm that LOGIN NAME is displayed then press OK 4 L O G I N N A M E C O D E D S P D D I A L 13 13 Enter the login name using numeric keys then press OK c a n o n L O G I N N A M E a Ex You can enter up to 24 characters for the login name 14 14 Confirm that ...

Page 83: ...R O U P D I A L You can also select a coded dial code by pressing Coded Dial followed by the desired three digit code 5 Confirm that SELECT ADD TEL NO is displayed then press OK 1 S E L E C T A D D T E L N O G R O U P D I A L 6 Select the destinations you want to register in the group up to 199 destinations until all destinations are registered then press OK 0 0 0 C a n o n 0 1 2 X X X X X X X To ...

Page 84: ...assword using numeric keys then press OK 3 Press or to select CODED SPD DIAL then press OK 3 C O D E D S P D D I A L A D D R E S S B O O K S E T 4 Press or to select a coded dial code 000 to 176 you want to edit then press OK 0 0 1 J o h n F A X C O D E D S P D D I A L You can also select a coded dial code by pressing Coded Dial followed by the desired three digit code 5 Press or to select the ite...

Page 85: ...L A D D R E S S B O O K S E T 4 Press Coded Dial then enter the three digit code using numeric keys 0 0 1 G R O U P D I A L G R O U P D I A L If you want to add a new destination to the group Press or to select SELECT ADD TEL NO then press OK 1 S E L E C T A D D T E L N O G R O U P D I A L Select the destination you want to add to the group then press OK 0 8 J o h n I f a x j o h n i f a x c o m F...

Page 86: ... been set for the Address Book enter the password using numeric keys then press OK 3 Press or to select CODED SPD DIAL then press OK 3 C O D E D S P D D I A L A D D R E S S B O O K S E T 4 Press or to select a coded dial code 000 to 176 for which you want to erase then press OK 0 0 1 J o h n F A X C O D E D S P D D I A L You can also select a coded dial code by pressing Coded Dial followed by the ...

Page 87: ...ress OK 3 Press or to select GROUP DIAL then press OK 4 G R O U P D I A L A D D R E S S B O O K S E T 4 Press or to select a group to delete then press OK 1 0 0 G R O U P D I A L G R O U P D I A L To select a group stored under the coded dial code press Coded Dial then enter the three digit code using numeric keys 5 Confirm that SELECT ADD TEL NO is displayed then press OK 1 S E L E C T A D D T E ...

Page 88: ...e Stack Bypass with Envelopes 4 11 Selecting Image Quality 4 13 Adjusting Density 4 15 Adjusting Automatically 4 15 Adjusting Manually 4 16 Enlarge Reduce Images 4 17 Preset Zoom 4 17 Custom Copy Ratio 4 18 2 Sided Copying 4 19 1 to 2 Sided Copying 4 20 2 to 2 Sided Copying 4 21 2 to 1 Sided Copying 4 22 Collating Copies 4 23 Multiple Originals onto One Sheet 2 on 1 4 25 Erasing Shadows Lines 4 27...

Page 89: ...opy Functions Overview of Copy Functions In addition to enlarging reducing copies you can make 2 sided copies or use the 2 on 1 mode which reduces 2 page originals to fit on one sheet of paper p 4 8 p 4 10 p 4 11 p 4 13 p 4 15 ...

Page 90: ...Copying 4 3 Overview of Copy Functions p 4 17 p 4 19 p 4 25 ...

Page 91: ...y see Originals Requirements on p 2 2 2 Press COPY The COPY indicator lights and the machine enters the copy standby mode If you want to adjust the image quality and density see Selecting Image Quality on p 4 13 and Adjusting Density on p 4 15 3 Enter the desired copy quantity 1 to 99 using numeric keys A T E X T 1 0 0 L T R 01 If you make a mistake when entering values press Clear and enter the c...

Page 92: ...ng the platen glass S T O P K E Y P R E S S E D 3 3 When the CANCEL COPYING message appears press to select YES Y E S N O C A N C E L C O P Y I N G The display will return to the standby mode Canceling Reserved Jobs Canceling Reserved Jobs You can cancel a copy job while it is printing or waiting to be processed 1 Press System Monitor 2 Press or to select COPY STATUS then press OK S E L E C T J O ...

Page 93: ...Copying 4 6 Canceling Copy Jobs 5 Press Stop to return to the standby mode ...

Page 94: ...You need to set up the paper size and type for each paper source in advance For details about configuring the paper size and type see Setting Paper Type and Size on p 2 13 1 Set originals For details see Placing Originals on p 2 4 2 Press COPY 3 Press Paper Select repeatedly to select the paper drawer 1 or the paper drawer 2 D R A W E R 1 P A P E R S E L E C T The paper select indicator of the sel...

Page 95: ...py multiple originals using the platen glass set an original and press Start for each original once for each page Using the Stack Bypass with Standard Paper Sizes Using the Stack Bypass with Standard Paper Sizes This section describes how to copy onto standard size paper using the stack bypass If BYPASS STD SET in COMMON SETTINGS is set to OFF the display to specify the paper size and type for the...

Page 96: ...t the paper type then press OK P L A I N P A P E R S E L E C T P A P E R T Y P E To copy onto standard size paper select the paper type from the followings PLAIN PAPER COLOR RECYCLED HEAVY PAPER 1 HEAVY PAPER 2 HEAVY PAPER 3 BOND 3HOLE PUNCH PAPER TRANSPARENCY LABELS ENVELOPE For details see For the Stack Bypass on p 2 15 7 Enter the desired copy quantity 1 to 99 using numeric keys A T E X T 1 0 0...

Page 97: ... originals For details see Placing Originals on p 2 4 2 Press COPY 3 Press Paper Select repeatedly to select the stack bypass The paper select indicator of the selected paper source lights See Operation Panel on p 1 5 4 Load the paper into the stack bypass 5 Press or to select FREESIZE then press OK F R E E S I Z E S E L E C T P A P E R S I Z E 6 Enter the vertical size in VERTICAL SIZE 76 to 216 ...

Page 98: ...tart for each original once for each page Using the Stack Bypass with Envelopes Using the Stack Bypass with Envelopes This section describes how to copy onto envelopes using the stack bypass If BYPASS STD SET in COMMON SETTINGS is set to OFF the display to specify the paper size and type for the stack bypass appears every time you load paper on the stack bypass If BYPASS STD SET is set to ON copyi...

Page 99: ...select the paper type from the followings COM10 MONARCH DL ISO C5 ISO B5 If you select one of these size ENVELOPE is automatically selected for the paper type For details see For the Stack Bypass on p 2 15 6 Press Start If you want to copy multiple originals using the platen glass set an original and press Start for each original once for each page ...

Page 100: ...ously set mode is canceled If the original is a transparency select the original type then adjust the exposure to the most appropriate level for the original 1 Set originals For details see Placing Originals on p 2 4 2 Press COPY 3 Press Image Quality repeatedly to select the document type TEXT For text documents PHOTO For documents that contain fine text or photos TEXT PHOTO For documents that co...

Page 101: ...ity 4 Enter the desired copy quantity 1 to 99 using numeric keys A T E X T 1 0 0 L T R 01 5 Press Start If you want to copy multiple originals using the platen glass set an original and press Start for each original once for each page ...

Page 102: ...For details see Placing Originals on p 2 4 2 Press COPY 3 Press Density to select AUTO DENSITY then press OK A U T O D E N S I T Y D E N S I T Y The image quality is automatically set to TEXT 4 Enter the desired copy quantity 1 to 99 using numeric keys A T E X T 1 0 0 L T R 01 5 Press Start If you want to copy multiple originals using the platen glass set an original and press Start for each origi...

Page 103: ... manual mode 4 Press or to adjust the copy density then press OK L T D K D E N S I T Y to make light documents darker to make dark documents lighter 5 Enter the desired copy quantity 1 to 99 using numeric keys T E X T 1 0 0 L T R 01 6 Press Start If you want to copy multiple originals using the platen glass set an original and press Start for each original once for each page ...

Page 104: ...Zoom You can enlarge or reduce originals from one standard paper size to another 1 Set originals For details see Placing Originals on p 2 4 2 Press COPY 3 Press Copy Ratio 4 Press or to select the copy ratio then press OK 1 0 0 P R E S E T R A T I O 200 MAX 129 STMT LTR 100 78 LGL LTR 64 LTR STMT 50 MIN When PAPER SIZE GROUP in the COPY SETTINGS menu is set to A or AB the preset copy ratios change...

Page 105: ...s The available copy ratios are from 50 to 200 1 Set originals For details see Placing Originals on p 2 4 2 Press COPY 3 Press Copy Ratio twice You can use or to adjust the zoom ratio To increase the zoom ratio press To decrease the copy ratio press To return the copy ratio to 100 press Copy Ratio repeatedly to display 100 then press OK 4 Enter the desired copy quantity 1 to 99 using numeric keys ...

Page 106: ...ing is OFF This feature can be used together with both Collating Copies see p 4 23 and Multiple Originals onto One Sheet 2 on 1 see p 4 25 If you are copying in the two sided mode align the center of one edge of the original with the red arrow on the left side of the platen glass Paper used to make two sided copies must conform to the following specifications Paper size LGL and LTR A4 loaded on th...

Page 107: ...ont and back sides of the copy will have the opposite top bottom orientation when BOOK TYPE is selected When CALENDAR TYPE is selected the front and back sides of the copy will have the same top bottom orientation 6 Enter the desired copy quantity 1 to 99 using numeric keys A T E X T 1 0 0 L T R 01 7 Press Start If you want to copy multiple originals using the platen glass set an original and pres...

Page 108: ...K T Y P E T Y P E O F O U T P U T BOOK TYPE The front and back sides of the copy will have the same top bottom orientation CALENDAR TYPE The front and back sides of the copy will have opposite top bottom orientations 7 Enter the desired copy quantity 1 to 99 using numeric keys A T E X T 1 0 0 L T R 01 8 Press Start If you want to copy multiple originals using the platen glass set an original and p...

Page 109: ...riginal have the same top bottom orientation CALENDAR TYPE The front and back sides of the original have opposite top bottom orientations 6 Enter the desired copy quantity 1 to 99 using numeric keys A T E X T 1 0 0 L T R 01 7 Press Start If you want to copy multiple originals using the platen glass set an original and press Start for each original once for each page To cancel all settings press Re...

Page 110: ...h both 2 Sided Copying see p 4 19 and Multiple Originals onto One Sheet 2 on 1 see p 4 25 The default setting is OFF 1 Set originals For details see Placing Originals on p 2 4 2 Press COPY If AUTO COLLATE is set to COLLATE in STANDARD SETTINGS in COPY SETTINGS skip step 3 and 4 3 Press Collate 4 Press or to select ON then press OK O N C O L L A T E ...

Page 111: ...ZE is displayed in the display press or to select the original size then press OK 7 Place the next page of the document on the platen glass then press Start Repeat this step to scan all pages The machine prints only one copy of each page 8 Press OK The machine prints the remaining sets of copies To cancel all settings press Reset When scanning multiple page documents MEMORY FULL may appear in the ...

Page 112: ...FF The 2 on 1 mode cannot be used with the Original Frame Erase mode Book Frame Erase mode or Binding Hole Erase mode For details about those modes see Erasing Shadows Lines on p 4 27 The reduction ratio is automatically set so that the originals fit onto the selected paper size 1 Set originals For details see Placing Originals on p 2 4 2 Press COPY 3 Press 2 on 1 4 Press or to select ON then pres...

Page 113: ... L T R 01 8 Press Start If you want to copy multiple originals using the platen glass set an original and press Start for each original once for each page To cancel all settings press Reset When you set the document on the platen glass press Start for each original When scanning is complete press OK A maximum of 1 8 2 to 3 mm margin will be produced between the two reduced originals in 2 on 1 copy...

Page 114: ...nd lines that appear when using various types of originals The following three Frame Erase modes are available Original Frame Erase Book Frame Erase and Binding Hole Erase Combinations of the three Frame Erase modes cannot be set If you select one of these modes the previously set mode is canceled ...

Page 115: ... Press COPY 3 Press Frame Erase 4 Press or to select ORIGINAL FR then press OK O L I G I N A L F R F R A M E E R A S E 5 Press or to select the size of the original then press OK L T R O L I G I N A L S I Z E 6 Press or to set the frame erase width for all four borders then press OK 1 8 A L L F R S A M E W D The width ranges 1 16 to 1 15 16 1 to 50 mm 7 Enter the desired copy quantity 1 to 99 usin...

Page 116: ...ss OK B O O K F R A M E F R A M E E R A S E 5 Press or to select the book size then press OK L T R F A C I N G P A G E S I Z E 6 Press or to set the book frame erase width for all four borders then press OK 1 8 A L L F R S A M E W D The book frame erase width ranges 1 16 to 1 15 16 1 to 50 mm 7 Press or to set the book frame erase width for the center of the book then press OK 3 8 E R A S E W I D ...

Page 117: ...ss or to specify the location of the binding holes LEFT RIGHT TOP or BOTTOM then press OK L E F T B I N D I N G H O L E 6 Press or to set the binding hole erase width then press OK 3 4 E R A S E W I D T H L E F T The width ranges 3 16 to 13 16 3 to 20 mm 7 Enter the desired copy quantity 1 to 99 using numeric keys A T E X T 1 0 0 L T R 01 8 Press Start If you want to copy multiple originals using ...

Page 118: ...Copying 4 31 Erasing Shadows Lines Platen Glass C D A B A LEFT B RIGHT C TOP D BOTTOM ...

Page 119: ... N E S S C O P Y S E T T I N G S 3 5 Press or to select to adjust the sharpness 1 to 9 then press OK 5 S H A R P N E S S The highest sharpness level is 9 and the lowest is 1 To copy text or lines clearly select a high sharpness level To copy originals containing printed images or other halftones select a low sharpness level 6 Press COPY 7 Enter the desired copy quantity 1 to 99 using numeric keys ...

Page 120: ...E OFF TWO SIDED OFF FRAME ERASE OFF PAPER SELECT AUTO 1 Press Additional Functions 2 Press or to select COPY SETTINGS then press OK 2 C O P Y S E T T I N G S A D D F U N C T I O N S 3 Press or to select STANDARD SETTINGS then press OK 2 S T A N D A R D S E T T I N G S C O P Y S E T T I N G S 4 Press or to select the setting item of which mode you want to change then press OK 1 I M A G E Q U A L I ...

Page 121: ...uding standard mode 1 Press Additional Functions 2 Press or to select COPY SETTINGS then press OK 2 C O P Y S E T T I N G S A D D F U N C T I O N S 3 Press or to select INIT COPY SET then press OK 6 I N I T C O P Y S E T C O P Y S E T T I N G S 4 Press or to select ON then press OK O N I N I T C O P Y S E T 5 Press Stop to return to the standby mode ...

Page 122: ...ments even if the machine is currently printing The scanned documents are processed after the current job is complete 1 Set originals 2 Press COPY 3 Set the desired copy mode and quantity 1 to 99 then press Start You can reserve up to 5 copy jobs with different settings for each job ...

Page 123: ...Copying 4 36 ...

Page 124: ...b Recall 5 33 Favorites Buttons 5 34 Registering a Favorites Button 5 34 Erasing a Favorites Button 5 37 Using the Favorites Buttons 5 38 Sending Originals at a Preset Time Delayed Sending 5 39 Standard Send Settings 5 41 Storing the Standard Send Settings 5 41 Restoring the Standard Send Settings to Their Default 5 42 Send Settings 5 43 Adjusting Sharpness 5 44 ECM Transmission 5 45 Redialing Aut...

Page 125: ... Functions Overview of Fax Functions In addition to the Super G3 fax functions you can send faxes I faxes from your computer You can also forward received fax I fax documents to specified destinations p 5 13 p 5 17 p 5 18 p 5 29 p 5 30 p 5 31 p 5 13 ...

Page 126: ...Fax imageRUNNER 1025iF Only 5 3 Overview of Fax Functions p 5 21 p 5 31 p 5 34 p 5 39 p 5 63 p 5 60 ...

Page 127: ... the Receive Mode p 5 11 Your telephone line type Set the type of telephone line that is connected to the machine See Setting the Type of Telephone Line p 5 12 Setting the Current Date and Time Setting the Current Date and Time You can set the current date and time The current date and time settings are used as standard timer settings for functions that require them 1 Press Additional Functions 2 ...

Page 128: ...stering the Machine s Name Your name or company s name must be registered as the machine s name When you send a document the name that you registered is printed as the sender s name on the recipient s paper 5 Confirm that UNIT TELEPHONE is displayed then press OK 1 U N I T T E L E P H O N E U S E R S E T T I N G S 6 Enter your fax telephone number 20 digits maximum including spaces using numeric k...

Page 129: ...x documents You can receive documents automatically or manually Follow the chart below to choose the best fax receive mode for your needs 5 Confirm that UNIT NAME is displayed then press OK 1 U N I T N A M E T X S E T T I N G S 6 Enter the unit name 24 characters maximum using numeric keys then press OK C a n o n U N I T N A M E a Ex 7 Press Stop to return to the standby mode ...

Page 130: ...ice communication Before using this mode All you have to do is set RX MODE to FaxOnly When an incoming call comes in The machine will receive fax documents automatically For telephone calls you cannot talk to the caller in this mode the caller will hear a slow beep tone Setting RX JOB DONE TONE of AUDIBLE TONES to ON enables the machine to ring for helping you find fax documents are being received...

Page 131: ... do the following Connect your extension telephone to the machine See What This Machine Can Do in the e Manual Set RX MODE to FaxTel See Selecting the Receive Mode on p 5 11 When an incoming call comes in Incoming calls will be handled in the following ways The machine will receive fax documents automatically for fax calls The machine will ring for telephone calls Pick up the handset then start yo...

Page 132: ...ing Connect your extension telephone with built in answering machine to the machine See What This Machine Can Do in the e Manual Set your answering machine to answer after 1 through 2 rings Record your message on your answering machine Set RX MODE to AnsMode See Selecting the Receive Mode on p 5 11 When an incoming call comes in Be sure to change the receive mode if you turn off your answering mac...

Page 133: ...tinctive ring patterns to a single telephone line allowing you to have both a fax number s and a telephone number s using only one telephone line Your fax will automatically monitor incoming calls and based on the ring pattern will let you know if the call is a fax or voice call Set the fax ring pattern that matches the pattern assigned by your telephone company Contact your telephone company for ...

Page 134: ...all calls as faxes FaxTel Switches between fax and voice calls automatically For optional settings see TX RX SETTINGS on p 14 8 AnsMode Receives faxes automatically and records voice messages DRPD Distinctive Ring Pattern Detection Distinguishes between fax and voice calls using distinctive ring patterns Select the ring pattern assigned by your telephone company For optional settings see TX RX SET...

Page 135: ...ne dialing system your telephone line uses touch tone or rotary pulse For the setting procedure of this function see Telephone Line Setting imageRUNNER 1025iF Only on p 1 13 Be sure to check the type of telephone line you are using and make the correct setting If this setting is incorrect you will not be able to communicate with other machines TOUCH TONE Tone dialing default ROTARY PULSE Pulse dia...

Page 136: ... If you enter a wrong number when specifying a fax number Go back to the wrong digit with 5 Press Start If the ORIGINAL SIZE message appears press or to select the original size then press Start for each original When scanning is complete press OK to start dialing If you want to cancel sending Press Stop on the operation panel When the STOP KEY PRESSED message appears press OK When the CANCEL DURI...

Page 137: ... E C T S E N D M E T H O D 5 Adjust any necessary settings for your document F a x O n l y F I N E 0 6 3 0 2 0 0 8 M O N 1 5 5 0 You can specify the following settings Image Quality See Selecting Image Quality on p 5 29 Density See Adjusting Density on p 5 30 2 Sided See 2 Sided Originals on p 5 31 6 Press Hook or pick up the handset of your external telephone 7 Dial the recipient s fax telephone ...

Page 138: ...OK F A X S E L E C T S E N D M E T H O D 3 Press Hook Make sure to confirm the dial tone before entering a fax number If you enter the number before the dial tone can be heard the call may not be connected or the wrong number may be dialed 4 Enter the number of the fax information service using numeric keys T E L 0 1 2 X X X X X X X 5 When the recorded message of the information service answers pr...

Page 139: ...necessary press Pause to insert a pause 1 2 3 P F A X N U M B E R Ex The letter p is displayed between the numbers You can enter successive pauses within the fax number to make the pause time longer You can change the length of a pause inserted within the fax number in the PAUSE TIME menu The default setting is two seconds 7 Enter the country code the area code and the fax telephone number of the ...

Page 140: ...r lights up and the machine enters the send standby mode 3 Press or to select I FAX then press OK I F A X S E L E C T S E N D M E T H O D 4 Enter the I fax address using and numeric keys then press OK c a n o n i f a x c o m Ex A D D R E S S a If you enter a wrong character when specifying an I fax address Go back to the wrong character with then press Clear Or press and hold Clear to delete the e...

Page 141: ...plication you are using 3 Select the fax icon Canon iR 1024 1025 FAX then click Print or OK If you want to adjust the fax properties Click Preferences or Properties and adjust the settings 4 Specify the name and fax number in Sending Settings then click Add to Recipient List If you want to send a fax with a cover sheet Click the Cover Sheet tab and set the format for the cover sheet attachment 9 P...

Page 142: ...of the fax driver window to view the online help You can select a recipient from the address book by clicking Address Book See Fax in the e Manual For Windows 2000 XP Server 2003 Vista Server 2008 you can use or edit the address book only if you are permitted access to the folder where the address book file is saved by default Power Users and higher have access to the folder If you are not permitt...

Page 143: ...ansmission 2 When the STOP KEY PRESSED message appears press OK When scanning using the ADF P R E S S O K K E Y S T O P K E Y P R E S S E D When scanning using the platen glass S T O P K E Y P R E S S E D 3 When the CANCEL DURING TX RX message appears press to select YES Y E S N O C A N C E L D U R I N G T X R X For sending jobs remove any unscanned documents from the ADF ...

Page 144: ...ter when specifying an I fax address Go back to the wrong character with then press Clear Or press and hold Clear to delete the entire entry If you specify an I fax address You can enter the optional settings by pressing OK See Send Settings on p 5 43 j o h n i f a x c o m A D D R E S S a Ex If CONFIRM FAX NO in ACCESS TO DEST in SYSTEM SETTINGS is set to ON and you specify a fax number using nume...

Page 145: ... platen glass or load it in the ADF 2 Press SEND 3 Press Address Book If no recipient is registered in Address Book NOT REGISTERED is displayed 4 Press or to select NAME SEARCH or ADD TEL SEARCH then press OK 1 N A M E S E A R C H A D D R E S S B O O K NAME SEARCH searches a destination by name ADD TEL SEARCH searches a destination by address or fax number 5 Enter the first letter of the recipient...

Page 146: ... Density See Adjusting Density on p 5 30 2 Sided See 2 Sided Originals on p 5 31 Using the One Touch Keys Using the One Touch Keys You can specify up to 23 destinations in the one touch Keys To use this feature you must first register destinations in the one touch Keys See Storing Editing One Touch Keys on p 3 3 A maximum of 201 destinations can be specified at the same time Out of the 200 destina...

Page 147: ...he original on the platen glass or load it in the ADF 2 Press SEND 3 Press Coded Dial 4 Enter the desired three digit code 000 to 176 with numeric keys 0 0 1 Ex I N P U T C O D E D N U M B E R If you enter a wrong code Press Clear and try again from step 3 If you specify an I fax address You can enter the optional settings by pressing OK See Send Settings on p 5 43 0 0 1 0 1 2 X X X X X X X J o h ...

Page 148: ...tinations in the one touch keys or coded dial codes This is useful if you want to send the same document to several destinations You can specify up to 199 destinations in one group To use this feature you must store group addresses in the one touch keys or coded dial codes beforehand See Storing Editing One Touch Keys on p 3 3 or Storing Editing Coded Dial Codes on p 3 14 A maximum of 201 destinat...

Page 149: ...FAX SETTINGS in TX RX SETTINGS and if you have specified the destination by any other method than using numeric keys the machine starts scanning automatically without pressing Start after the preset time for this setting is elapsed You can also adjust the following scan settings as necessary using the keys on the operation panel after specifying the destination in step 4 Image Qaulity See Selectin...

Page 150: ...s registered in Address Book you can skip this step 4 Specify the destination Use numeric keys one touch keys coded dial codes favorites buttons or Address Book to specify destinations Only one destination can be specified using the numeric keys For details about how to specify a destination using and numeric keys see Using Numeric Keys on p 5 21 For details about how to specify a destination from...

Page 151: ... numeric keys in the middle of the procedure press SEND select the sending method and then enter the number or address To check all the specified destinations press or to scroll the display 6 Press Start If the ORIGINAL SIZE message appears press or to select the original size then press Start for each original When scanning is complete press OK to start sending ...

Page 152: ...ethod then press OK F A X S E L E C T S E N D M E T H O D If you are specifying the destination registered in one touch keys or coded dial codes you can skip this step 4 Specify the destination 0 1 2 X X X X X X X F A X N U M B E R Ex For instructions on specifying destinations see Specifying Destinations on p 5 21 5 Press Image Quality 6 Press or to adjust the image quality then press OK F I N E ...

Page 153: ... one touch keys or coded dial codes you can skip this step 4 Specify the destination 0 1 2 X X X X X X X F A X N U M B E R Ex For instructions on specifying destinations see Specifying Destinations on p 5 21 5 Press Density 6 Press or to adjust the density then press OK L T D K D E N S I T Y to make light documents darker to make documents lighter 7 Press Start If the ORIGINAL SIZE message appears...

Page 154: ... skip this step 4 Specify the destination 0 1 2 X X X X X X X F A X N U M B E R Ex For instructions on specifying destinations see Specifying Destinations on p 5 21 5 Press 2 sided 6 Press or to adjust the binding type then press OK B O O K T Y P E T W O S I D E D BOOK TYPE The front and back sides of the document have the same top bottom orientation CALENDAR TYPE The front and back sides of the d...

Page 155: ...in memory and try again See Checking Changing the Status of Fax Documents in Memory on p 5 64 1 Load your originals in the ADF 2 Press SEND 3 Press or to select FAX then press OK F A X S E L E C T S E N D M E T H O D 4 Press Direct TX To cancel direct sending press Direct TX again 5 Adjust any necessary settings for your document You can specify the following settings Image Qaulity See Selecting I...

Page 156: ...SEND 3 Press Recall 4 Press or to select 1 BEFORE 2 BEFORE or 3 BEFORE then press OK 1 B E F O R E R E C A L L 5 Confirm that the desired recipient is displayed 0 1 2 X X X X X X X P R E S S S T A R T T O S E N D You can change the recalled scan and send settings if necessary 6 Press Start If the ORIGINAL SIZE message appears press or to select the original size then press Start for each original ...

Page 157: ...ress OK 4 A D D R E S S B O O K S E T A D D F U N C T I O N S If a password has been set for the Address Book enter the password using numeric keys then press OK 3 Press or to select FAVORITES BUTTONS then press OK 1 F A V O R I T E S B U T T O N S A D D R E S S B O O K S E T 4 Press or to select a one touch key 01 to 04 then press OK 0 1 N O T R E G I S T E R E D F A V O R I T E S B U T T O N S I...

Page 158: ... step 20 If you want to set the options for sending faxes select ON 14 14 Confirm that ECM is displayed then press OK 1 E C M O P T I O N A L S E T T I N G 15 15 Press or to select ON or OFF then press OK O N E C M 16 16 Confirm that TX SPEED is displayed then press OK 2 T X S P E E D O P T I O N A L S E T T I N G 17 17 Press or to select the sending speed 33600 bps 14400 bps 9600 bps or 4800 bps ...

Page 159: ...S B U T T O N S 6 Confirm that NAME is displayed then press OK 1 N A M E F A V O R I T E S B U T T O N S 7 Enter the destination s name 16 characters maximum using numeric keys then press OK C a n o n I f a x N A M E a Ex 8 Confirm that I FAX ADDRESS is displayed then press OK 2 I F A X A D D R E S S F A V O R I T E S B U T T O N S 9 Enter the name of the destination s I fax address 120 characters...

Page 160: ...ction describes the procedure for erasing a favorites button 1 Press Additional Functions 2 Press or to select ADDRESS BOOK SET then press OK 4 A D D R E S S B O O K S E T A D D F U N C T I O N S If a password has been set for the Address Book enter the password using numeric keys then press OK 3 Press or to select FAVORITES BUTTONS then press OK 1 F A V O R I T E S B U T T O N S A D D R E S S B O...

Page 161: ...tton on p 5 34 1 Place the original on the platen glass or load it in the ADF 2 Press SEND 3 Press the desired one touch key registered as a favorites button 01 to 04 If you pressed a wrong key press Clear and try again 4 Adjust any necessary settings for your document For details see Specifying Destinations on p 5 21 5 Press Start If the ORIGINAL SIZE message appears press or to select the origin...

Page 162: ... are specifying destinations registered in Address Book you can skip this step 4 Open the one touch panel 5 Press Delayed TX 6 Enter the time you want to start sending using numeric keys then press OK Enter the time in 24 hour military time format Enter all the numbers including zeros 2 0 0 0 T X T I M E S E T T I N G S 7 Specify the destination 0 1 2 X X X X X X X F A X N U M B E R Ex If CONFIRM ...

Page 163: ...al When scanning is complete press OK to start sending When TIME OUT is set to ON in TX SETTINGS in FAX SETTINGS in TX RX SETTINGS and if you have specified the destination by any other method than using numeric keys the machine starts scanning automatically without pressing Start after the preset time for this setting is elapsed If the document cannot be sent at the time specified for delayed sen...

Page 164: ...S E T T I N G S 6 Press or to select the desired setting item then press OK 1 D E N S I T Y S T A N D A R D S E T T I N G S You can specify the following settings DENSITY Sets the default density for the document you send STANDARD standard density DK darkest or LT lightest See TX RX SETTINGS on p 14 8 IMAGE QUALITY Sets the default image quality for the document you send See TX RX SETTINGS on p 14...

Page 165: ... T I N G S A D D F U N C T I O N S 3 Press or to select COMMON SETTINGS then press OK 1 C O M M O N S E T T I N G S T X R X S E T T I N G S 4 Press or to select TX SETTINGS then press OK 1 T X S E T T I N G S C O M M O N S E T T I N G S 5 Press or to select INIT STANDARD SET then press OK 1 1 I N I T S T A N D A R D S E T T X S E T T I N G S 6 Press or to select ON then press OK O N I N I T S T A ...

Page 166: ... as a single file without dividing them ON Separates multiple images and send them as separate files 7 Press or to select the resolution for IMAGE QUALITY then press OK 2 0 0 2 0 0 d p i I M A G E Q U A L I T Y I Fax 200 200dpi 200 100dpi 8 Press or to select the original type for ORIGINAL TYPE then press OK T E X T P H O T O O R I G I N A L T Y P E TEXT PHOTO TEXT PHOTO 9 Press Start When you set...

Page 167: ...creasing the sharpness You can enhance the edges of original images so that faint or fine text is scanned with a sharper contrast by increasing the sharpness This setting is particularly suited for scanning blueprints and faint pencil drawn images 1 Press Additional Functions 2 Press or to select TX RX SETTINGS then press OK 3 T X R X S E T T I N G S A D D F U N C T I O N S 3 Press or to select CO...

Page 168: ...es not operate unless ECM is set in both machines Even when ECM is set errors can sometimes occur due to a poor telephone line connection If there is trouble with the line it will take more time to send the documents 1 Press Additional Functions 2 Press or to select TX RX SETTINGS then press OK 3 T X R X S E T T I N G S A D D F U N C T I O N S 3 Press or to select FAX SETTINGS then press OK 2 F A ...

Page 169: ...ional Functions 2 Press or to select TX RX SETTINGS then press OK 3 T X R X S E T T I N G S A D D F U N C T I O N S 3 Press or to select FAX SETTINGS then press OK 2 F A X S E T T I N G S T X R X S E T T I N G S 4 Press or to select TX SETTINGS then press OK 2 T X S E T T I N G S F A X S E T T I N G S 5 Press or to select AUTO REDIAL then press OK 3 A U T O R E D I A L T X S E T T I N G S 6 Press ...

Page 170: ...ess OK 2 M I N R E D I A L I N T E R V A L 11 11 Confirm that TX ERROR REDIAL is displayed then press OK 3 T X E R R O R R E D I A L A U T O R E D I A L 12 12 Press or to select ON or OFF then press OK O N T X E R R O R R E D I A L ON Resends all pages if an error occurs during transmission OFF Does not redial even if an error occurs during transmission 13 13 Press Stop to return to the standby mo...

Page 171: ...ad intended Setting DIALING LINE CHCK to ON enables you to avoid such sending problems The default setting is OFF For more information on how to turn the main power on and off see Connect Power Cord and Turn on the Machine in the Quick Start Guide 1 Press Additional Functions 2 Press or to select TX RX SETTINGS then press OK 3 T X R X S E T T I N G S A D D F U N C T I O N S 3 Press or to select FA...

Page 172: ...a indicator on the operation panel flashes a green light 2 When document reception is complete the Processing Data indicator on the operation panel maintains a steady green light This indicates that documents are stored in memory The Processing Data indicator flashes or maintains a steady green light even when the machine enters the Sleep mode The Error indicator flashes a red light when either th...

Page 173: ...red in memory are printed If there is no paper on which the received document can be printed the received document is stored in memory Documents which have been stored in memory because the paper has run out are automatically printed when paper is loaded into a paper drawer If a printing error occurs the Error indicator flashes a red light ...

Page 174: ...or to select TX RX SETTINGS then press OK 3 T X R X S E T T I N G S A D D F U N C T I O N S 3 Press or to select COMMON SETTINGS then press OK 1 C O M M O N S E T T I N G S T X R X S E T T I N G S 4 Press or to select RX SETTINGS then press OK 2 R X S E T T I N G S C O M M O N S E T T I N G S 5 Press or to select TWO SIDED PRINT then press OK 1 T W O S I D E D P R I N T R X S E T T I N G S 6 Press...

Page 175: ...S 5 Press or to select RECEIVE REDUCTION then press OK 2 R E C E I V E R E D U C T I O N R X S E T T I N G S 6 Press or to select ON then press OK O N R E C E I V E R E D U C T I O N 7 Press or to select RX REDUCTION then press OK 1 R X R E D U C T I O N R E C E I V E R E D U C T I O N 8 Press or to select AUTO or FIXED REDUCTION then press OK F I X E D R E D U C T I O N R X R E D U C T I O N If y...

Page 176: ... to select VERTICAL ONLY or HORIZ VERTICAL then press OK V E R T I C A L O N L Y R E D U C E D I R E C T I O N VERTICAL ONLY Reduces the document vertically only HORIZ VERTICAL Reduces the document both horizontally and vertically 12 12 Press Stop to return to the standby mode ...

Page 177: ... CONT PRINTING to RX TO MEMORY the machine stores all documents in memory After the toner cartridge is replaced the documents can be printed and the setting can be reset 1 Press Additional Functions 2 Press or to select TX RX SETTINGS then press OK 3 T X R X S E T T I N G S A D D F U N C T I O N S 3 Press or to select COMMON SETTINGS then press OK 1 C O M M O N S E T T I N G S T X R X S E T T I N ...

Page 178: ...perate unless ECM is set in both machines Even when ECM is set errors can sometimes occur due to a poor telephone line connection If there is trouble with the line it will take more time to receive the documents 1 Press Additional Functions 2 Press or to select TX RX SETTINGS then press OK 3 T X R X S E T T I N G S A D D F U N C T I O N S 3 Press or to select FAX SETTINGS then press OK 2 F A X S E...

Page 179: ...ress or to select FAX TEL OPT SET then press OK 3 F A X T E L O P T S E T R X S E T T I N G S 6 Confirm that RING START TIME is displayed then press OK 1 R I N G S T A R T T I M E F A X T E L O P T S E T 7 Specify the period of time 0 to 30 seconds before the machine starts ringing after receiving a voice call using or or numeric keys then press OK 6 S E C R I N G S T A R T T I M E If the machine ...

Page 180: ...ne will take after the ringing ends then press OK R E C E I V E F T S W I T C H A C T I O N If the machine receives a fax the machine does not ring and switches to the receive mode automatically RECEIVE Switches to the receive mode DISCONNECT Disconnects the call 12 12 Press Stop to return to the standby mode ...

Page 181: ... O N S 3 Press or to select FAX SETTINGS then press OK 2 F A X S E T T I N G S T X R X S E T T I N G S 4 Press or to select RX SETTINGS then press OK 3 R X S E T T I N G S F A X S E T T I N G S 5 Press or to select INCOMING RING then press OK 5 I N C O M I N G R I N G R X S E T T I N G S 6 Press or to select ON then press OK O N I N C O M I N G R I N G If you select OFF the telephone does not ring...

Page 182: ...pecified time if MANUAL AUTO of RX SETTINGS in FAX SETTINGS of TX RX SETTINGS is set to ON 1 Press Additional Functions 2 Press or to select TX RX SETTINGS then press OK 3 T X R X S E T T I N G S A D D F U N C T I O N S 3 Press or to select FAX SETTINGS then press OK 2 F A X S E T T I N G S T X R X S E T T I N G S 4 Press or to select RX SETTINGS then press OK 3 R X S E T T I N G S F A X S E T T I...

Page 183: ...to receive fax documents make sure of the following An extension telephone is connected properly Your telephone is set to tone dialing 1 When you receive a call pick up the external telephone 2 Enter the two digit remote reception ID using and numeric keys If the machine is set for pulse dialing press Tone to switch to tone dialing before pressing the remote reception ID 3 When the reception is co...

Page 184: ...System Password have been set enter the System Manager ID and System Password using numeric keys then press Log In Out 3 Press or to select COMMUNICATIONS then press OK 6 C O M M U N I C A T I O N S S Y S T E M S E T T I N G S 4 Press or to select MEMORY LOCK then press OK 3 M E M O R Y L O C K C O M M U N I C A T I O N S If the memory lock password has already been set enter the password using nu...

Page 185: ... R X T I M E M E M O R Y L O C K If you do not need to set the timer for memory lock skip to step 16 11 11 Press or to select ON then press OK O N M E M O R Y R X T I M E 12 12 Confirm that MEM RX START TIME is displayed then press OK 1 M E M R X S T A R T T I M E M E M O R Y R X T I M E 13 13 Enter the start time in 24 hour military time format using numeric keys then press OK 0 0 0 0 M E M R X S...

Page 186: ...I O N S If the System Manager ID and System Password have been set enter the System Manager ID and System Password using numeric keys then press Log In Out 3 Press or to select COMMUNICATIONS then press OK 6 C O M M U N I C A T I O N S S Y S T E M S E T T I N G S 4 Press or to select MEMORY LOCK then press OK 3 M E M O R Y L O C K C O M M U N I C A T I O N S 5 Enter the memory reception password u...

Page 187: ...ecking Transmission Results 1 Press System Monitor 2 Press or to select TX RX LOG then press OK S E L E C T J O B C A N C E L T X R X L O G 3 Press or to view the required transmission result 5 0 0 1 1 5 5 0 R X O K 4 Press Stop to return to the standby mode If you set CHECKING THE LOG to OFF in SYSTEM SETTINGS transmission result does not appear in the display Checking and Deleting Documents Stor...

Page 188: ...s necessary Checking Reception Results 1 Press System Monitor 2 Press or to select TX RX LOG then press OK S E L E C T J O B T O C A N C E L T X R X L O G 3 Press or to view the required reception result 5 0 0 3 1 8 0 0 R X O K 4 Press Stop to return to the standby mode If you set CHECKING THE LOG to OFF in SYSTEM SETTINGS reception result does not appear in the display Checking and Deleting Docum...

Page 189: ...want to cancel the job press to select NO 6 Press Stop to return to the standby mode Printing the Fax Log Printing the Fax Log You can print the results of fax transactions transmission or reception TX REPORT RX REPORT and ACTIVITY REPORT can be set to print automatically You can also print ACTIVITY REPORT manually TX REPORT 5 Press or to select the setting you want then press OK P R I N T E R R O...

Page 190: ...TINGS then press OK 8 R E P O R T S E T T I N G S A D D F U N C T I O N S 3 Confirm that SETTINGS is displayed then press OK 1 S E T T I N G S R E P O R T S E T T I N G S 4 Press or to select RX REPORT then press OK 1 R X R E P O R T S E T T I N G S 5 Press or to select the setting you want then press OK O U T P U T N O R X R E P O R T OUTPUT NO Does not print a report PRINT ERROR ONLY Prints a re...

Page 191: ...PORT SETTINGS then press OK 8 R E P O R T S E T T I N G S A D D F U N C T I O N S 3 Confirm that SETTINGS is displayed then press OK 1 S E T T I N G S R E P O R T S E T T I N G S 4 Press or to select ACTIVITY REPORT then press OK 3 A C T I V I T Y R E P O R T S E T T I N G S 5 Confirm that AUTO PRINT is displayed then press OK 1 A U T O P R I N T A C T I V I T Y R E P O R T 6 Press or to select th...

Page 192: ...printed Transmission logs are listed according to Department ID ST TIME Transmission time DESTINATION TEL ID Destination name and fax number address NO Transaction number MODE Transaction Error correction mode PGS Number of pages sent RESULT Result of transaction transaction duration OK Transaction successful NG Transaction failed If you set LIST PRINT to ACTIVITY REPORT in REPORT SETTINGS you can...

Page 193: ...Fax imageRUNNER 1025iF Only 5 70 ...

Page 194: ...ageRUNNER 1025iF Only This section describes how to use e mail functions Overview of E Mail Functions 6 2 Introduction to Using E Mail Functions 6 4 Basic E Mail Operations 6 5 Sending E Mail Documents 6 5 Canceling Sending E Mail Documents 6 7 ...

Page 195: ...E Mail imageRUNNER 1025iF Only 6 2 Overview of E Mail Functions Overview of E Mail Functions You can send scanned documents as e mail attachments e Manual Refer to E Mail ...

Page 196: ...E Mail imageRUNNER 1025iF Only 6 3 Overview of E Mail Functions ...

Page 197: ...ansmitted as an e mail attachment to the recipient s e mail application This section describes the things that you must do before using e mail functions Be sure to set the following items first Network settings Set the network settings to enable your machine to communicate over the network See Network Settings in the e Manual E Mail settings Set the e mail settings to enable your machine to commun...

Page 198: ...I L B W S E L E C T S E N D M E T H O D If you want to send color images attached to an e mail message select E MAIL COLOR 4 Specify the destination For instructions on specifying destinations see Specifying Destinations E Mail in the e Manual If you want to start sending without adjusting the optional send settings skip to step 10 5 Press OK 6 Press or to select the file format then press OK P D ...

Page 199: ...dpi can be selected for sending color images attached to an e mail message If JPEG is selected as the file format 200 200dpi 300 300dpi 100 100dpi or 150 150dpi can be selected for sending color images attached to an e mail message 9 Press or to select the original type then press OK T E X T P H O T O O R I G I N A L T Y P E TEXT PHOTO TEXT PHOTO If you have selected PDF COMPACT as the file format...

Page 200: ... When the STOP KEY PRESSED message appears press OK When scanning using the ADF P R E S S O K K E Y S T O P K E Y P R E S S E D When scanning using the platen glass S T O P K E Y P R E S S E D 3 When the CANCEL DURING TX RX message appears press to select YES Y E S N O C A N C E L D U R I N G T X R X If you do not want to cancel sending documents Select No with For sending jobs remove any unscanne...

Page 201: ...E Mail imageRUNNER 1025iF Only 6 8 ...

Page 202: ... the Print Functions 7 2 Introduction to Using Print Functions 7 4 Printing Documents from a Computer 7 5 Scaling Documents 7 7 Printing Multiple Pages on One Sheet 7 9 2 Sided Printing 7 10 Checking and Canceling Print Jobs 7 11 Checking Print Jobs 7 11 Canceling Print Jobs 7 11 ...

Page 203: ...rint Functions Overview of the Print Functions You can print on both sides of paper or use the mode that reduces multiple pages to fit onto one sheet of paper To use the PCL printer function the optional PCL Printer Kit is required ...

Page 204: ...Printing 7 3 Overview of the Print Functions p 7 7 p 7 10 p 7 9 ...

Page 205: ...ted to match the output data thus realizing a significant increase in speed through optimization You can update your printer driver software and acquire information about Canon products on the Canon home page http www usa canon com Driver software is usually updated every few months PCL The PCL5e and PCL6 printer drivers can be used with most kinds of business application software The PCL5e printe...

Page 206: ...rint environment it is necessary to install the Canon Driver Information Assist Service in the server Computer in order to set up the printer configuration automatically or to use the Job Accounting feature For instructions on how to install the Canon Driver Information Assist Service see Set up Computers and Software in the Quick Start Guide The machine may not be able to print data such as color...

Page 207: ...Printing 7 6 Printing Documents from a Computer 4 Configure the required settings in the printer driver screen 5 Click Print or OK Printing begins ...

Page 208: ...e to magnify the document Depending on the printer model you are using you may not be able to magnify the document to the optimum ratio for the selected page size If you are using an application that enables you to enlarge or reduce the document configure the settings in the application The display may differ depending on to the operating system as well as the type and version of the printer drive...

Page 209: ...according to the settings made in Page Size and Output Size 4 If you want to increase or decrease the magnification manually select Manual Scaling specify the scaling ratio for Scaling If the ratio is less than 25 or more than 200 the document is printed without scaling on the paper specified in Output Size 5 Click Print or OK ...

Page 210: ...e application you are using do not use it together with this function If you do printing may not be executed correctly You cannot enlarge and reduce manually when using this function The display may differ depending on to the operating system as well as the type and version of the printer driver Most settings of printing are made from the printer driver Although there are some settings which can b...

Page 211: ... may differ depending on to the operating system as well as the type and version of the printer driver Most settings of printing are made from the printer driver Although there are some settings which can be made from the machine the settings from the printer driver has priority 1 Display the Finishing sheet 2 Select 2 sided Printing from Print Style 3 Select binding edge for the paper printout fr...

Page 212: ... 2 Press or to select PRINT STATUS then press OK S E L E C T J O B T O C A N C E L P R I N T S T A T U S 3 Press or to scroll through the job list and check the status of the print jobs D o c u m e n t x l s 0 0 1 0 4 Press Stop to return to the standby mode Canceling Print Jobs Canceling Print Jobs Make sure that the Processing Data indicator is on or blinking When the Processing Data indicator i...

Page 213: ...ng Print Jobs 4 When the print job you want to cancel appears on the display press OK then press to select YES Y E S N O C A N C E L C O P Y I N G If you do not want to cancel the job select NO 5 Press Stop to return to the standby mode ...

Page 214: ...Computer 8 4 Scanning Documents to a File Server imageRUNNER 1025iF Only 8 4 Basic Scanning Operations 8 5 Scanning Documents to a Computer Connected with a USB Cable 8 5 Scanning Documents to a File Server imageRUNNER 1025iF Only 8 6 Canceling Scan Jobs 8 8 Canceling Scanning Documents to a Computer 8 8 Canceling Scanning Documents to a File Server imageRUNNER 1025iF Only 8 8 ...

Page 215: ...anner Functions You can retrieve documents scanned with this machine to your computer connected with a USB cable You can also store the scanned documents to a file server The function of scanning documents to a file server is available only for the imageRUNNER 1025iF ...

Page 216: ...Scanning 8 3 Overview of the Scanner Functions ...

Page 217: ...ware CD ROM in the Quick Start Guide USB connection Connect the machine to your computer with the USB cable See USB Connection in the Quick Start Guide The scanner driver is available only through a USB connection Scanning Documents to a File Server Scanning Documents to a File Server imageRUNNER 1025iF imageRUNNER 1025iF Only Only Network settings Set the network settings to enable your machine t...

Page 218: ...ils on the scanner driver settings see Scan in the e Manual Make sure that your machine is connected to a computer with a USB cable 3 Start iR Toolbox then set the scanning format The mark will be displayed above the button you select For details about the settings see Scan in the e Manual 4 Press Start on the machine Scanning starts When scanning is completed a folder with the scanning date will ...

Page 219: ...fy the file server s address see Specifying Destinations Scan to File Server in the e Manual If you want to start sending without adjusting the optional send settings skip to step 9 4 Press OK 5 Press or to select the file format then press OK P D F F I L E F O R M A T File server FTP and SMB PDF TIFF B W PDF COMPACT JPEG PDF TIFF B W Select for sending images in black and white PDF COMPACT JPEG S...

Page 220: ...ver in the e Manual 7 Press or to select the resolution then press OK 2 0 0 2 0 0 d p i I M A G E Q U A L I T Y File server FTP and SMB 200 200dpi 300 300dpi 400 400dpi 600 600dpi 100 100dpi 150 150dpi 200 100dpi If PDF or TIFF B W is selected as the file format 200 200dpi 300 300dpi 400 400dpi 600 600dpi 150 150dpi or 200 100dpi can be selected If PDF COMPACT is selected as the file format only 3...

Page 221: ... Scanning Documents to a File Server imageRUNNER 1025iF imageRUNNER 1025iF Only Only Follow this procedure to cancel a transmission in progress 1 Press Stop during transmission 2 When the STOP KEY PRESSED message appears press OK When scanning using the ADF P R E S S O K K E Y S T O P K E Y P R E S S E D When scanning using the platen glass S T O P K E Y P R E S S E D 3 When the CANCEL DURING TX R...

Page 222: ...is chapter describes what a network is what you can do with a network and what you have to do to use the machine with a network Flowchart for Setting Up Network 9 2 What is the Network 9 3 Overview of Network Functions 9 4 ...

Page 223: ...owchart below to set up each network function To use the network function with the imageRUNNER1025 the optional network board is required The functions of sending faxes e mails or I faxes or scanning documents to a FTP server or to the sharing folder of a computer are available only for the imageRUNNER 1025iF ...

Page 224: ...N are the two most common words used to refer to networks The Internet is the vast network to which computers all over the world are connected Computers connected to the Internet anywhere in the world can exchange information with one another On the other hand LAN is the abbreviation for Local Area Network and means a network within a limited area in an office for example ...

Page 225: ...Manual Refer to Print E Mail You can send scanned documents as e mail attachments e Manual Refer to E Mail Network PC Fax You can transfer data from your computer to the machine and send them by fax from the machine e Manual Refer to PC Fax File server File sharing You can scan documents to the computer s shared folder e Manual Refer to Scan File server FTP You can send scanned documents to an FTP...

Page 226: ...Settings from a PC 10 Settings from a PC The Remote UI enables you to easily manage the machine from a Computer on the network Overview of Remote UI 10 2 Starting the Remote UI 10 4 ...

Page 227: ...machine s status and manage the machine s functions from a Computer on the network using a web browser Using the computer keyboard the management process such as entering addresses to the address book will be easier To use the Remote UI function with the imageRUNNER1025 the optional network board is required ...

Page 228: ... information from a distant place provides you with easy job management For details see Job Management in the e Manual Editing the Address Book From a Computer The Remote UI enables you to make additions and changes to each item of the address book You can use the keyboard of the computer so entering large amount of addresses to the address book will be easier You can also edit the One touch Speed...

Page 229: ...p the machine for use in a network then connect the machine and the Computer to your network router or a hub For details see Set UP Computers and Software in the Quick Start Guide 2 Start the web browser 3 Enter the IP address of the machine in Address or Location then press Enter on the keyboard For details on how to check the IP address see Setting and Checking IP Address in the e Manual The Rem...

Page 230: ... End User Mode enter the User Name and click OK For Department ID Management mode Enter the Department ID and Password and click OK For User Management mode Enter the User ID and Password and click OK If no password is set you can log on without entering a password 5 Operate the Machine Now you can manage the machine on the web browser For details see Settings from a PC in the e Manual For details...

Page 231: ...Settings from a PC 10 6 ...

Page 232: ...the Department ID Password and Page Limit 11 7 Procedure before Using the Machine 11 9 Changing the Password and Page Limit 11 10 Erasing the Department ID and Password 11 12 Checking Counter Information 11 13 Clearing Page Totals 11 14 Printing Counter Information 11 14 Accepting Print Jobs with Unknown IDs 11 15 Managing User IDs 11 16 Managing ID Cards Optional Equipment 11 17 Procedure before ...

Page 233: ...m Manager settings enable you to set up security and tracking features with passwords You can also register information on your machine Originals Data E Mail Fax I Fax Print Copy System Manager Department ID User ID ID Card Optional Remote UI System Manager ID Department ID User ID p 11 4 p 11 7 p 11 16 p 11 17 ...

Page 234: ...alsfor eachdepartment Setthepagelimitforeachdepartmenttocopy print andscan For details see Department ID Management on p 11 7 Security and Settings from a PC in the e Manual User ID Management The User ID Management is a security feature that restricts operations of the machine on a per individual basis This feature enables you to create User IDs and passwords and manage the machine by limiting it...

Page 235: ...D then press OK 1 S Y S M A N A G E R I D S Y S M A N A G E R I N F O 5 Enter the System Manager ID using numeric keys then press OK 1 2 3 X X X X S Y S M A N A G E R I D Ex You must set a System Manager ID to manage the operations of the machine If you make a mistake when entering a number press and hold Clear to clear the entire number then enter the correct number The maximum number of digits t...

Page 236: ... is stored You cannot store a System Password with only zeros as the number such as 0000000 If you enter a number that begins with zeros the leading zeros are ignored Example If 02 or 002 is entered 0000002 is stored 8 Press or to select SYSTEM MANAGER then press OK 3 S Y S T E M M A N A G E R S Y S M A N A G E R I N F O 9 Enter the System Manager s name using numeric keys then press OK A d m i n ...

Page 237: ... Password using numeric keys then press Log In Out 3 Press or to select DEVICE INFO then press OK 2 D E V I C E I N F O S Y S T E M S E T T I N G S 4 Confirm that DEVICE NAME is displayed then press OK 1 D E V I C E N A M E D E V I C E I N F O 5 Enter a name up to 32 characters using numeric keys then press OK C o p y Ex D E V I C E N A M E a 6 Confirm that LOCATION is displayed then press OK 2 L ...

Page 238: ...hen press OK 3 M A N A G E D E P T I D S Y S T E M S E T T I N G S 4 Press or to select ON then press OK O N M A N A G E D E P T I D 5 Press or to select REGISTER DEPT ID then press OK 1 R E G I S T E R D E P T I D M A N A G E D E P T I D 6 Press or to select the number to which department will be designated then press OK 0 0 0 1 R E G I S T E R D E P T I D 7 Enter the Department ID using numeric ...

Page 239: ...ored Example If 02 or 002 is entered 0000002 is stored 10 10 Press or to select PAGE LIMIT SET then press OK 2 P A G E L I M I T S E T R E G I S T E R D E P T I D 11 11 Press or to select the desired function then press OK 1 T O T A L P R I N T P A G E L I M I T S E T You can select TOTAL PRINT COPY SCAN COLOR SCAN or PRINT TOTAL PRINT is the sum of COPY LIMIT and PRINT LIMIT The pages of received...

Page 240: ...15 15 Enter the maximum number of pages that can be made by the registered Department ID using numeric keys then press OK 0 0 5 0 0 0 P A G E T O T A L S Ex If you make a mistake when entering a number press and hold Clear to clear the entire number then enter the correct number You can set the page limit from 0 to 999 999 pages Once a page limit is reached copying scanning or printing is not poss...

Page 241: ...ess Log In Out 3 Press or to select MANAGE DEPT ID then press OK 3 M A N A G E D E P T I D S Y S T E M S E T T I N G S 4 Press or to select ON then press OK O N M A N A G E D E P T I D 5 Press or to select REGISTER DEPT ID then press OK 1 R E G I S T E R D E P T I D M A N A G E D E P T I D 6 Press or to select the Department ID whose password and page limit you want to change then press OK twice 0...

Page 242: ...en COPY is selected 13 13 Press or to select ON or OFF then press OK O N R E S T R I C T T O T A L OFF Does not set a page limit restriction Skip to step 17 ON Sets a page limit restriction 14 14 Press or to select PAGE TOTALS when TOTAL PRINT is selected then press OK 2 P A G E T O T A L S T O T A L P R I N T The message displayed will vary depending on which function you selected in step 11 Exam...

Page 243: ...ng numeric keys then press Log In Out 3 Press or to select MANAGE DEPT ID then press OK 3 M A N A G E D E P T I D S Y S T E M S E T T I N G S 4 Press or to select ON then press OK O N M A N A G E D E P T I D 5 Press or to select REGISTER DEPT ID then press OK 1 R E G I S T E R D E P T I D M A N A G E D E P T I D 6 Press or to select the Department ID that you want to erase then press OK twice 0 0 ...

Page 244: ... E P T I D 5 Press or to select PAGE TOTALS then press OK 2 P A G E T O T A L S M A N A G E D E P T I D Checking Counter Information Checking Counter Information You can check how much paper was used by each department 6 Press or to select VIEW PAGE TOTALS then press OK 1 V I E W P A G E T O T A L S P A G E T O T A L S If you select CLEAR ALL TOTAL the counter information is deleted 7 Press or to ...

Page 245: ... G E D E P T I D 6 Press or to select CLEAR ALL TOTAL then press OK 2 C L E A R A L L T O T A L P A G E T O T A L S 7 Press or to select ON or OFF then press OK O F F C L E A R A L L T O T A L OFF Does not clear the page totals ON Clears the page totals 8 Press Stop to return to the standby mode Printing Counter Information Printing Counter Information You can print a list of how much paper was us...

Page 246: ...N C T I O N S If the System Manager ID and System Password have been set enter the System Manager ID and System Password using numeric keys then press Log In Out 3 Press or to select MANAGE DEPT ID then press OK 3 M A N A G E D E P T I D S Y S T E M S E T T I N G S 4 Press or to select ON then press OK O N M A N A G E D E P T I D 5 Press or to select PDL JOBS W OUT ID then press OK 3 P D L J O B S...

Page 247: ...r the User ID and password before you set this mode to ON One Department ID can be registered for each User ID 1 Press Additional Functions 2 Press or to select select SYSTEM SETTINGS then press OK 9 S Y S T E M S E T T I N G S A D D F U N C T I O N S If the System Manager ID and System Password have been set enter the System Manager ID and System Password using numeric keys then press Log In Out ...

Page 248: ... p 11 13 Clearing Page Totals See p 11 14 Printing Counter Information See p 11 14 Accepting Print Jobs with Unknown IDs See p 11 15 If the standby display does not appear when the control card is inserted make sure that The control card is inserted in the correct direction The control card is inserted as far as it can go An usable control card is inserted correctly You can not use the cards which...

Page 249: ...sing the Machine Procedure after Using the Machine 1 After you finish using the machine remove the control card The display returns to the screen for inserting the control card Once you have removed the control card you cannot operate the machine until a control card is inserted again ...

Page 250: ...perations and replace toner cartridge Cleaning the Machine 12 2 Exterior 12 2 Interior 12 3 Scanning Area 12 5 Replacing the Toner Cartridge 12 9 When a Message Appears 12 9 Replacing the Toner Cartridge with a New One 12 10 Replacing the Drum Unit 12 13 Transporting the Machine 12 15 ...

Page 251: ...long period of time in a damp dusty or smoky location dust can build up around the power plug and become damp This may cause a short circuit and result in a fire You cannot send or receive documents when the main power switch is turned OFF or the power cord is disconnected If the main power switch is turned OFF all jobs waiting in the print queue will be erased Documents received into memory and d...

Page 252: ...of blank LTR paper into the stack bypass and start cleaning Cleaning the roller takes approximately 100 seconds 1 Press Additional Functions 2 Press or to select ADJUST CLEANING then press OK 7 A D J U S T C L E A N I N G A D D F U N C T I O N S 3 Open the stack bypass 4 Pull out the stack bypass extension until it clicks then open it 5 Load a sheet of blank LTR paper 6 Press or to select FIX UNIT...

Page 253: ...ress OK 1 T R A N S R O L R C L E A N A D J U S T C L E A N I N G Cleaning starts When finished the display returns to the standby mode Cleaning the Drum Unit If print quality decreases the drum in the main unit may be dirty Should this occur use the Drum Cleaning function to clean the drum 1 Press Additional Functions 2 Press or to select ADJUST CLEANING then press OK 7 A D J U S T C L E A N I N ...

Page 254: ...turn OFF the main power switch and disconnect the power cord Failure to observe these steps may result in a fire or electrical shock 1 Open the ADF platen glass cover 2 Clean the platen glass and the underside of the ADF platen glass cover with a cloth dampened with water Then wipe the area with a soft dry cloth Do not dampen the cloth too much as this may tear the document or damage the machine 3...

Page 255: ... tear the document or damage the machine 4 Lift the document feeder tray 5 Clean the rollers B below the document feeder tray with a cloth dampened with water Then wipe the area with a soft dry cloth 6 Lower the document feeder tray Be careful not to get your fingers caught Cleaning the ADF If your documents have black streaks or appear dirty after copying them using the ADF this may be caused by ...

Page 256: ...ass cover 9 Clean the ADF scanning area on the left side of the platen glass and the document feeding roller with a cloth dampened with water Then wipe the area with a soft dry cloth 10 10 Close the ADF platen glass cover Be careful not to get your fingers caught 11 11 Reconnect the power cord and turn ON the main power switch ...

Page 257: ... OK 4 F E E D E R C L E A N I N G A D J U S T C L E A N I N G 4 Load 5 sheets of blank paper into the ADF then press OK ADF cleaning starts When finished the display returns to the standby mode Cleaning the ADF Automatically If your documents have black streaks or appear dirty after scanning them through the ADF clean the ADF roller by repeatedly feeding blank sheets of paper through it Use LTR pa...

Page 258: ...products If the toner is running out during printing a message appears in the display Message When it is Displayed Contents and Remedies OUT OF TONER CHANGE TONER When a toner cartridge needs to be replaced soon Replace the toner cartridge It is recommended that you replace the toner cartridge before printing a large amount of data If you continue copying when the OUT OF TONER CHANGE TONER message...

Page 259: ...e lever A towards you Do not pull the toner cartridge out until the message OUT OF TONER CHANGE TONER appears on the display 3 Turn the lever as far as it will go clockwise 4 Pull the cartridge out of the machine Do not shake the used toner cartridge or hold it in a vertical position Doing so may cause the toner to spill Put the toner cartridge in the original plastic case for disposal ...

Page 260: ...he portions A and B Do not pull out the seal C before inserting the cartridge into the machine as the toner may spill out 7 Pull the toner cartridge lever A towards you and insert the cartridge into the machine with the arrow B pointing towards the machine 8 Holding the cartridge steady with one hand pull out the seal completely with the other hand Do not pull out the seal at an angle ...

Page 261: ...r as it will go counterclockwise 10 10 Push down the lever 11 11 Close the front cover Be careful not to get your fingers caught If you cannot close the front cover do not force it to close Open the front cover and pull out the toner cartridge then reinsert the cartridge into the machine ...

Page 262: ...e If you use the machine without inserting the drum unit INSERT THE DRUM appears on the display In this case turn OFF the main power and install the drum unit into the machine 1 Open the left cover 2 Holding the grips on the drum unit slightly lower and remove it from the machine Do not touch the fixing assembly as it becomes very hot during use 3 Open the package of the new drum unit and remove t...

Page 263: ...h the unit into the machine as far as it will go Do not touch the fixing assembly as it becomes very hot during use 6 After the unit is completely inserted remove the orange paper 7 Close the left cover Be careful not to get your fingers caught Do not touch the surface of the drum A as the image quality of printouts may deteriorate ...

Page 264: ...ition 3 Pick up the machine using the provided hand grips on the left and right sides Be sure at least two people carry the machine Do not lift the machine by any of its attachments Dropping the machine can cause personal injury If you are using the Cassette Feeding Module N2 optional transport the machine and the Cassette Feeding Module N2 separately If you transport the machine with the Cassette...

Page 265: ...12 16 Maintenance ...

Page 266: ...ginal Jams 13 2 Stack Bypass 13 4 Inside the Machine and Paper Drawers 13 5 Error Messages 13 7 Error Codes imageRUNNER 1025iF Only 13 10 If CHANGE PAPERSIZE is displayed 13 14 Reloading the Paper 13 14 Changing the Paper Size Setting 13 14 If a Power Failure Occurs 13 16 Service Call Message 13 17 Contacting Your Local Authorized Canon Dealer 13 17 ...

Page 267: ...hine do not allow necklaces bracelets or other metal objects to touch the inside of the machine as this may result in burns or electrical shock Do not force a jammed document or paper out of the machine Contact your local authorized Canon dealer for assistance if needed Original Jams Original Jams When CHECK DOCUMENT or DOCUMENT TOO LONG appears on the display remove a jammed document from the ADF...

Page 268: ...feeder tray 4 Remove any jammed originals 5 Lower the document feeder tray and close the ADF cover Be careful not to get your fingers caught 6 Open the ADF cover and remove any jammed documents 7 Close the ADF cover Be careful not to get your fingers caught ...

Page 269: ...R JAM appears on the display remove the jammed paper from the stack bypass tray P A R E R J A M 1 Remove all paper from the stack bypass 2 Remove any jammed paper If you cannot remove the jammed paper follow the procedures in Inside the Machine or Paper Drawers on p 13 3 ...

Page 270: ... a flat surface before loading it in the machine Check that the paper you are using meets the requirements for use See Originals Requirements on p 2 2 Make sure you have removed any scraps of paper from inside the machine 1 Open the left cover 2 Carefully pull the jammed paper out of the machine Do not touch the fixing assembly A as it becomes very hot during use If you tear the paper remove any s...

Page 271: ...ly for 2 sided copying 5 Close the left cover Be careful not to get your fingers caught 6 If you use the optional paper drawer open the cover on the left side of the optional paper drawer Remove any jammed paper then close the cover 7 Pull out the paper drawer and push the corners of the stack under the tabs 8 Gently push the paper drawer back into the machine until it clicks Be careful not to get...

Page 272: ...e paper specified in REG PAPER SIZE or BYPASS STD SET in the COMMON SETTINGS menu Change the paper size setting The paper ran out during the print job Load paper in the paper drawer or stack bypass CHECK DOCUMENT A document jam may have occurred in the ADF Remove the jammed document CLOSE COVER FRONT OR LEFT COVER A cover is open Close the cover shown on the lower line of the display DATA ERROR Th...

Page 273: ...TX RX jobs that can be stored in memory reached the maximum The maximum numbers of jobs that can be stored in memory are as follows Based on the condition that the other party sends the fax by the image RUNNER 1025iF with ITU T No 1 Chart standard mode Up to 70 jobs for sending or 90 jobs for receiving or 95 fax jobs including sending and receiving jobs Wait for the machine to send any documents i...

Page 274: ... the toner cartridge or clear the paper jams For more information see the following Setting Paper Type and Size on p 2 13 Replacing the Toner Cartridge on p 12 9 Clearing Jams on p 13 2 START AGAIN A transmission error occurred because the line condition was poor Check the line condition then try again The paper jammed or ran out during printing a report Clear the paper jam or replenish the paper ...

Page 275: ... document takes a long time to send because it contains too much data Reduce the scanning resolution before sending A document takes a long time to receive Contact the other party and ask them to reduce their scanning resolution or divide the document into smaller parts for sending 0005 The other fax machine did not respond within 35 seconds Send the document again Contact the other party and have...

Page 276: ...solution If you are using I fax decrease the number of pages containing images that you are sending each time so that you do not exceed the Maximum TX Data Size Set DIVIDE INTO PAGES to ON in send settings 0751 The server is not functioning The network is down the server is unable to connect to the network or was disconnected Check the recipient s address Check that the network is up 0752 The SMTP...

Page 277: ...assword was specified for the sending of a file to a file server Change the user name or password An incorrect destination was specified for the sending of an e mail message or I fax Check the e mail or I fax address 0808 A timeout error occurred while the machine was communicating with the FTP server Check that the FTP server is functioning normally Check the network status The FTP server returne...

Page 278: ... sender to resend the data 0827 You have received data that cannot be processed contains MIME information that is not supported Check the settings and then ask the sender to resend the data 0828 You have received HTML data Ask the sender to use a file format other than HTML and then resend the data 0829 Data containing more pages that the machine can hold in the memory is received Print the receiv...

Page 279: ... N2 is attached For print jobs you need to specify the paper size from your computer Reloading the Paper Reloading the Paper 1 Load the correct size paper as shown on the display The machine restarts printing Changing the Paper Size Setting Changing the Paper Size Setting For the Stack Bypass If you set the standard settings for stack bypass tray follow the procedures below to change paper size 1 ...

Page 280: ...COM10 MONARCH DL ISO C5 ISO B5 FREESIZE A4 B5 A5R LGL 7 Press Stop to return to the standby mode 1 Press Additional Functions 2 Confirm that COMMON SETTINGS is displayed then press OK 1 C O M M O N S E T T I N G S A D D F U N C T I O N S 3 Press or to select REG PAPER SIZE then press OK 8 R E G P A P E R S I Z E C O M M O N S E T T I N G S 4 Press or to select DRAWER 1 or DRAWER 2 then press OK 1 ...

Page 281: ... settings Any sent or received documents stored in memory are backed up for about 60 minutes During a power outage functions are limited as follows You cannot send receive copy or print documents You may not be able to make telephone calls using an external telephone depending on the type of telephone you use You can receive telephone calls using an external telephone depending on the type of tele...

Page 282: ...occurs and the machine cannot operate normally service call messages appear on the display Follow the procedure described on the next page to solve the problem If you turn OFF the main power when there is any stored job its data will be deleted Do not connect or disconnect the power cord with wet hands as this may result in electrical shock Always grasp the power plug portion when disconnecting th...

Page 283: ...ack ON 2 If the machine still does not operate normally follow the procedure below and contact your local authorized Canon dealer Turn OFF the main power Disconnect the power cord from the wall outlet When contacting your local authorized Canon dealer check the following Model name Problem and status of the machine Error code on the display ...

Page 284: ...tings Machine Settings 14 2 Printing USER DATA LIST 14 2 Accessing the Setting Menu 14 2 Settings Menu 14 4 COMMON SETTINGS 14 4 COPY SETTINGS 14 6 TX RX SETTINGS 14 8 ADDRESS BOOK SET 14 13 PRINTER SETTINGS 14 18 TIMER SETTINGS 14 20 ADJUST CLEANING 14 21 REPORT SETTINGS 14 22 SYSTEM SETTINGS 14 24 ...

Page 285: ...ST then press OK 4 U S E R D A T A L I S T L I S T P R I N T Accessing the Setting Menu Accessing the Setting Menu 1 Press Additional Functions 2 Press or to select the menu you want to access then press OK 3 T X R X S E T T I N G S A D D F U N C T I O N S COMMON SETTINGS COPY SETTINGS TX RX SETTINGS ADDRESS BOOK SET PRINTER SETTINGS TIMER SETTINGS ADJUST CLEANING REPORT SETTINGS SYSTEM SETTINGS T...

Page 286: ...Settings Machine Settings 5 When finished press Stop to return to the standby mode If you press Stop before pressing OK the setting will not be registered Press Additional Functions to return to the previous display ...

Page 287: ...tivated e Manual Introduction of the Machine INITIAL FUNCTION Sets to return standby display that is selected in DEFAULT SETTINGS SELECTED FUNCTION Sets to return standby display of the current mode 3 AUDIBLE TONES Sets whether to sound audible tones and adjusts their volume 1 ENTRY TONE Beeps when pressing the keys on the operation panel ON 1 3 1 OFF 2 ERROR TONE Beeps when an error e g a paper j...

Page 288: ...Sets whether to activate the Auto Drawer Select function when printing 1 DRAWER 1 ON OFF 2 DRAWER 2 ON OFF 2 3 RECEIVE Sets whether to activate the Auto Drawer Select function when receiving fax I fax documents 1 DRAWER 1 ON OFF 2 DRAWER 2 ON OFF 2 3 STACK BYPASS OFF ON 4 OTHER Sets whether to activate the Auto Drawer Select function when printing a report or list 1 DRAWER 1 ON OFF 2 DRAWER 2 ON O...

Page 289: ...RINT SIDE The machine starts printing on the side of paper loaded facing down Print speed becomes slower for one sided printing 3 DRAWER 2 2 Selects the paper feed method for paper drawer 2 SPEED PRIORITY Print speed has priority PRINT SIDE The machine starts printing on the side of paper loaded facing down Print speed becomes slower for one sided printing 12 DISPLAY LANGUAGE Selects the language ...

Page 290: ...UTO COLLATE Sets whether to collate the copies automatically OFF COLLATE p 4 23 6 TWO SIDED Sets the type of two sided copying OFF 1 2 SIDED 2 2 SIDED 2 1 SIDED p 4 19 7 FRAME ERASE Sets the type of Frame Erase copying OFF ORG FRAME ERASE BOOK FRAME ERASE BINDING HOLE p 4 27 8 PAPER SELECT Sets the paper source for copying DRAWER 1 DRAWER 2 1 AUTO p 4 7 3 SHARPNESS Adjusts the sharpness of the cop...

Page 291: ...s the number of retry attempts for sending jobs to an e mail I fax or file server address 0 5 4 SCANNING DENSITY Adjusts the scanning density for sending documents 1 9 p 5 41 5 STANDARD SETTINGS Sets the default settings for sending documents 1 DENSITY Sets the default density for the document you send STANDARD DK LT 2 IMAGE QUALITY Sets the default image quality for the document you send 200 200d...

Page 292: ...efixes your number I fax address with the abbreviations FAX IFAX or TEL in your sender information FAX TEL 8 COLOR TX GAMMA Sets the gamma value for color scanned data If the set value corresponds to the gamma value at the recipient s machine the scan exposure of the output data at the recipient s machine is automatically adjusted to the level best suited to the quality of the original GAMMA 1 8 G...

Page 293: ...GS Sets the fax features 1 USER SETTINGS Specifies the basic operation settings in the fax mode 1 UNIT TELEPHONE Registers your fax number 20 characters maximum including spaces Quick Start Guide Register User Telephone Number and Unit Name 2 TEL LINE TYPE Selects the telephone line type TOUCH TONE ROTARY PULSE Quick Start Guide Select the Receive Mode that Suits Your Needs 3 OFFHOOK ALARM Sets wh...

Page 294: ...cifying the destination This function is not available when you dial with numeric keys OFF ON 5 DIALING LINE CHCK Sets whether to check the telephone line condition OFF ON p 5 48 3 RX SETTINGS Sets the reception features p 5 55 1 ECM RX Sets whether the ECM Error Correction Mode reception is activated ON OFF 2 RX MODE Selects the receive mode FaxOnly FaxTel AnsMode DRPD Manual p 5 11 3 FAX TEL OPT...

Page 295: ...n external telephone is connected RING COUNT Sets the number of incoming rings before the machine answers 1TIMES 99TIMES 6 REMOTE RX Sets whether to use remote receiving p 5 59 ON The machine enables remote receiving REMOTE RX ID You can dial a code on remote extension to start receiving a document A combination of two characters using 0 to 9 and is possible OFF The machine disables remote receivi...

Page 296: ...h key registered in the machine OFF The optional setting is not set for this destination ON The optional setting is set for this destination 1 ECM Selects whether to use ECM Error Correction Mode ON OFF 2 TX SPEED Select the transmission speed 33600bps 14400bps 9600bps 4800bps 3 INTERNATIONAL Selects a mode for documents you are sending DOMESTIC LONG DISTANCE 1 LONG DISTANCE 2 LONG DISTANCE 3 E MA...

Page 297: ...ividing them ON Separates multiple images and send them as separate files 4 IMAGEQUALITY Sets the resolution of the document you send 200 200dpi 200 400dpi 300 300dpi 400 400dpi 600 600dpi 100 100dpi 150 150dpi 200 100dpi 5 ORIGINAL TYPE Sets the original type for the document you send TEXT PHOTO TEXT PHOTO FTP Registers FTP addresses e Manual Scanning Documents to a File Server 1 NAME Registers t...

Page 298: ...ver 120 characters maximum 4 LOGIN NAME Registers the login name to access the file server 24 characters maximum 5 PASSWORD Registers the password to access the file server 14 characters maximum 6 IMAGE FORMAT Sets the file format PDF TIFF B W PDF COMPACT JPEG 7 DIVIDE INTO PAGES Sets if multiple images are sent as separate files or as a single file OFF Sends multiple images as a single file witho...

Page 299: ... IFAX Registers I fax addresses p 3 6 1 NAME Registers the recipient s name 16 characters maximum including spaces 2 I FAX ADDRESS Registers the recipient s I fax address 120 characters maximum FTP Registers FTP addresses p 3 7 1 NAME Registers the recipient s name 16 characters maximum including spaces 2 HOST NAME Registers the name of the file server 120 characters maximum 3 FILE PATH Registers ...

Page 300: ...bps 3 INTERNATIONAL Selects a mode for documents you are sending DOMESTIC LONG DISTANCE 1 LONG DISTANCE 2 LONG DISTANCE 3 E MAIL Registers e mail addresses p 3 16 1 NAME Registers the recipient s name 16 characters maximum including spaces 2 E MAIL ADDRESS Registers the recipient s e mail address 120 characters maximum IFAX Registers I fax addresses p 3 17 1 NAME Registers the recipient s name 16 ...

Page 301: ...ters maximum including spaces 1 Only for the imageRUNNER 1025iF PRINTER SETTINGS PRINTER SETTINGS Setting Item Description Applicable Page 1 DEFAULT PAPERSIZE Sets the default paper size when no paper source is specified LTR STMT EXECUTIV ISO B5 ISO C5 COM10 MONARCH DL A4 B5 A5 LGL e Manual Printer Settings from the Machine 2 DEFAULT PAPERTYPE Sets the default paper type for print jobs This machin...

Page 302: ...TTINGS to the defaults OFF ON 10 PCL SETTINGS 1 Sets the PCL printer setting 1 ORIENTATION Sets the paper orientation PORTRAIT LANDSCAPE 2 FONT NUMBER Sets the default font typeface for the printer function using the corresponding font numbers 0 120 3 POINT SIZE Specifies a point size for the default font This item appears when the number in FONT NUMBER is that of a proportionally spaced scalable ...

Page 303: ...y The PCL6 printing is not supported OFF All the area on a page 1 8 4 23 mm from the top bottom left and right edges is available for printing on A4 paper ON All the area on a page 1 8 4 23 mm from the top and bottom edges and 1 8 3 30 mm from the left and right edges is available for printing on A4 paper Only the width increases 10 BarDIMM 2 Sets whether to use the bar code printing function ENAB...

Page 304: ...IME Sets the end date 1 MONTH 2 WEEK 3 DAY ADJUST CLEANING ADJUST CLEANING Setting Item Description Applicable Page 1 TRANS ROLR CLEAN Cleans the transcription roller e Manual Maintenance 2 DRUM CLEANING Cleans the drum 3 FIX UNIT CLEANING Cleans the fuser roller p 12 3 4 FEEDER CLEANING 1 Cleans the ADF p 12 8 5 SPECIAL MODE M Sets to improve print quality or fix irregular print density If print ...

Page 305: ...ever it is possible that a previously printed image may be printed faintly on the next output 9 CONT PRINT MODE Sets whether to prevent the back edge of the previous page from appearing on the following page during continuous printing of half tone prints or photographs OFF ON 10 BACK EDGE MODE Sets whether to prevent back edge of paper from smudging OFF ON 11 LARGE PAPER MODE Sets whether to impro...

Page 306: ...tion report and selects its type p 5 68 1 AUTO PRINT Sets whether an activity report is printed automatically every 40 transactions OUTPUT YES OUTPUT NO 2 TX RX SEPARATE Sets whether an activity report is printed separately for sending and receiving OFF ON 2 LIST PRINT Prints reports lists e Manual Introduction of the Machine 1 ACTIVITY REPORT 1 Prints the transaction report last 40 transactions m...

Page 307: ...ION Registers the machine location 32 characters maximum including spaces 3 MANAGE DEPT ID Sets if the Department ID management is used p 11 7 OFF The Department ID management is not used ON The Department ID management is used 1 REGISTER DEPT ID Registers the Department ID 0001 1000 1 PASSWORD Registers the Department ID management password 2 PAGE LIMIT SET Sets page limits for scans prints and c...

Page 308: ...NT 2 COPY 3 SCAN 4 RESTRICT CLR SCAN 5 PRINT 2 CLEAR ALL TOTAL Clears counter information OFF ON p 11 14 3 PRINT LIST Prints counter information 3 PDL JOBS W OUT ID Sets if print jobs from computers with unknown IDs are accepted or rejected e Manual Security ON Accepts print jobs from computers with unknown IDs OFF Rejects print jobs from computers with unknown IDs 4 MANAGE USER ID Sets if the Use...

Page 309: ...s the WINS settings to resolve a name with WINS 1 WINS RESOLUTION Sets whether to resolve a name with WINS OFF ON 2 WINS SERVER Registers the IP address of a WINS server 7 USE LPD Sets whether to use LPD as the print application ON OFF 8 RAW SETTINGS Sets whether to use RAW as the print application ON Enables to use RAW 1 USE BIDIRECTIONAL Sets whether to use bidirectional communication ON OFF OFF...

Page 310: ...s range START IP ADDRESS and END IP ADDRESS must be entered for each setting 1 IP ADDRESS 1 2 IP ADDRESS 2 3 IP ADDRESS 3 4 IP ADDRESS 4 15 RX MAC ADD SET Sets whether to activate a MAC address filter OFF Disables a MAC address filter ON Specifies a MAC address filter to access A MAC address must be entered for each setting 1 PERMIT RX ADD1 2 PERMIT RX ADD2 3 PERMIT RX ADD3 4 PERMIT RX ADD4 5 PERM...

Page 311: ...IVER Specifies the type of network connection 1 AUTO DETECT Selects the detection method of Ethernet driver AUTO Sets the machine to determine the communication mode Half duplex Full duplex and Ethernet type 10Base T 100Base TX automatically MANUAL Sets the communication mode and Ethernet type manually 1 DUPLEX Selects the communication mode HALF DUPLEX FULL DUPLEX 2 ETHERNET TYPE Selects the Ethe...

Page 312: ...ether to use the SMTP server requires SMTP Authentication method for authenticating users who have logged in the POP server before sending e mail OFF ON 8 STARTUP TIME SET Sets the time period required to delay the startup of network communications for the machine 0 300SEC 6 COMMUNICATIONS 2 Sets the fax e mail and I fax communication e Manual Fax I Fax E Mail 1 E MAIL I FAX Sets the e mail I fax ...

Page 313: ...RINT Sets whether to print out the image if forwarding fails ON OFF 2 STORE TO MEMORY Sets whether to store the image in memory if forwarding fails OFF ON 8 REMOTE UI 1 Sets whether to activate the Remote UI function to operate the machine and change the settings from a network computer using a web browser ON OFF p 10 4 9 ACCESS TO DEST 2 Sets restriction of the access to destinations e Manual Sec...

Page 314: ...p 5 64 p 5 65 ON Enables confirmation of logs using System Monitor OFF Disables confirmation of logs using System Monitor Activity Report will not be printed automatically 11 LICENSE REGISTRA Enter a license key using numeric keys to activate the bar code printing function p 1 17 12 USE DEVICE USB Sets whether to restrict jobs through the USB interface ON OFF e Manual Security 1 Only for the image...

Page 315: ...14 32 Machine Settings ...

Page 316: ...General 15 2 Copier 15 3 Printer 15 3 Scanner 15 3 Facsimile imageRUNNER 1025iF Only 15 4 Telephone imageRUNNER 1025iF Only 15 4 Send imageRUNNER 1025iF Only 15 5 Cassette Feeding Module N2 Optional 15 6 Card Reader E1 Optional 15 6 Index 15 7 ...

Page 317: ... lb 22 0 kg including drum unit excluding toner cartridge imageRUNNER 1025N 1025iF Approx 53 1 lb 24 1 kg including drum unit excluding toner cartridge Dimensions imageRUNNER 1025 14 7 8 H 18 D 20 1 2 W 378 mm H 457 mm D 520 mm W 19 7 8 H 18 D 20 1 2 W 506 mm H 457 mm D 520 mm W with optional paper drawer imageRUNNER 1025N 1025iF 17 7 8 H 18 D 20 1 2 W 453 mm H 457 mm D 520 mm W 22 7 8 H 18 D 20 1...

Page 318: ...od On demand fixing Paper Handling Paper drawer 500 sheets 1 drawer 21 lb 80 g m2 Stack Bypass 100 sheets 21 lb 80 g m2 Paper Delivery 100 sheets 17 to 21 lb bond 64 to 80 g m2 Print Speed See Copy Speed on p 15 3 Printing Resolution 1200 dpi enhanced 600 dpi Number of Tones 256 Toner Cartridge p 1 10 Scanner Type Color scanner Max Scanning Size 8 14 216 mm 356 mm Scanning Resolution 25 9600 dpi S...

Page 319: ... 3 85 lines mm Dialing Speed dialing One touch speed dialing 23 destinations Coded speed dialing 177 destinations Group dialing 199 destinations in a group maximum Address Book dialing with Address Book key Regular dialing with numeric keys Automatic redialing Manual redialing with Recall key Sequential broadcast 201 destinations Automatic reception Remote reception by telephone Default ID 25 ACTI...

Page 320: ...face USB 2 0 100BASE TX 10BASE T Color Mode Color B W black and white Original Type Text Text Photo Photo E Mail and I Fax Features 1 Communication Protocol SMTP POP3 I FAX Simple mode Resolution For Sending E Mail 100 100 dpi 150 150 dpi 200 100 dpi 200 200 dpi 200 400 dpi 300 300 dpi 400 400 dpi 600 600 dpi For Sending I Fax 200 100 dpi 200 200 dpi Format E Mail TIFF B W PDF B W JPEG Color PDF C...

Page 321: ...2 W 158 mm H 440 mm D 520 mm W Weight Approx 11 46 lb 5 2 kg Card Reader E1 Optional Available Cards Magnetic type card Optical type card Card Readout Method Magnetic Optical readout Magnetic Card Reading Direction Inserting Direction Store Replay Replay Power Source From the main unit Dimensions 1 1 4 H 4 D 3 1 2 W 32 mm H 100 mm D 88 mm W Weight Approx 5 8 lb 295 g Specifications are subject to ...

Page 322: ...x documents 5 20 Canceling Copy Jobs 4 5 Canceling Print Jobs 7 11 Canceling Scan Jobs Canceling Scanning Documents to a Computer 8 8 Canceling Scanning Documents to a File Server 8 8 Card Reader Specifications 15 6 Card Reader E1 15 6 Cassette Feeding Module Specifications 15 6 Cassette Feeding Module N2 15 6 Change Paper Size Changing the Paper Size Setting 13 14 Checking Fax reception results 5...

Page 323: ... addresses 3 11 Entering Characters 1 12 Erasing coded dial codes 3 23 Erasing coded dial codes group addresses 3 24 Erasing one touch keys 3 12 Erasing one touch keys group addresses 3 13 Erasing Shadows Lines 4 27 Binding Hole Erase 4 27 4 30 Book Frame Erase 4 27 4 29 Original Frame Erase 4 27 4 28 Error codes 13 10 Error indicator 1 6 Error messages 13 7 Ethernet port 1 4 External device jack ...

Page 324: ...g Paper 2 9 In the Paper Drawer 2 9 In the Stack Bypass 2 11 Log In Out key 1 6 M Machine component External View Back 1 4 External View Front 1 2 Main Operation Panel 1 5 Main Power indicator 1 6 Main power switch 1 4 Maintenance Replacing the Toner Cartridge 12 9 When a Message Appears 12 9 Manuals for the Machine i Multiple Originals onto One Sheet 2 on 1 4 25 N Numeric keys 1 6 O OK key 1 6 On...

Page 325: ...UI 10 4 Replacing the Drum Unit 12 13 Reset key 1 6 RX REPORT 5 67 S Safety Instructions xii Scaling Documents 7 7 Scanner Specifications 15 3 Scanning Area 2 3 12 5 Send Specifications 15 5 Send Operation Panel 1 8 Send Settings 5 43 Setting Paper Type and Size 2 13 For the Paper Drawer 2 13 For the Stack Bypass 2 15 Sharpness Copy 4 32 Fax 5 44 Slide guides 1 3 Slide guides for stack bypass 1 3 ...

Page 326: ...eys Editing one touch keys 3 10 Editing one touch keys group addresses 3 11 Erasing one touch keys 3 12 Erasing one touch keys group addresses 3 13 Registering E Mail addresses 3 5 Registering Fax numbers 3 3 Registering File server addresses 3 7 Registering group addresses 3 9 Registering I Fax addresses 3 6 Symbols Used in This Manual x System Manager Settings 11 4 T Telephone Specifications 15 ...

Page 327: ...ur regional dealer CANON LATIN AMERICA INC 703 Waterford Way Suite 400 Miami Florida 33126 U S A CANON AUSTRALIA PTY LTD 1 Thomas Holt Drive North Ryde Sydney N S W 2113 Australia CANON CHINA CO LTD 15F Jinbao Building No 89 Jinbao Street Dongcheng District Beijing 100005 China CANON SINGAPORE PTE LTD 1 HarbourFront Avenue 04 01 Keppel Bay Tower Singapore 098632 CANON HONGKONG CO LTD 19 F The Metr...

Reviews: