1-2
BE1-BPR General Information
Breaker Reclosing
BPR relays can be configured as multiple shot reclosing relays that operate in parallel and independently from
the breaker failure function.
Three major factors should be considered when establishing a reclosing philosophy.
&
Desired number or reclosure attempts.
&
Time delay between breaker opening and reclosure.
&
Supervisory control.
The first major factor is the desired number of reclosure attempts. Where most faults are attributable to
heavy tree exposure, as in distribution networks, multiple reclosure attempts are common. This is possible
because of low voltage levels and is desirable considering customer inconvenience during outages. BE1-
BPR relays are programmable for up to three reclosure attempts per sequence. This allows tailoring of the
reclosing sequence to the specific needs of the circuit.
The second major factor is the time delay between breaker opening and reclosure. On subtransmission and
distribution networks, it is necessary to ensure that motors are no longer running and that local generation
is off-line prior to attempting reclosure. At the same time, a rapid reclosure minimizes damage, ionization,
and system shock in transmission networks. After the first reclosure attempt, additional attempts are
generally delayed to allow for de-ionization of the interrupter. BE1-BPR relays have three reclosing shots
and each shot has a programmable time delay. Three outputs are available. They are CLOSE, RECLOSE
FAIL, and LOCKOUT.
A third major factor to be considered in reclosing is supervisory control. Supervisory control allows the
operator to maintain control of the system at all times. BE1-BPR relays have two supervisory inputs (WAIT
and LOCKOUT). WAIT stops the reclose sequence at any point and allows the sequence to continue when
the WAIT input is removed. LOCKOUT drives the reclose function immediately to lockout status and takes
precedence over all other inputs.
Timing Diagnostics
To perform the typical breaker failure operation previously described, the breaker failure relay must be
informed by a breaker failure initiate (BFI) contact that the breaker is being opened. One or more timers, in
conjunction with the overcurrent element, determines if the breaker failure output (BFO) picks up.
Typically one or more delay timers are used to delay the BFO until the primary protection scheme has had
enough time to operate. A control timer may be also be used to turn off the BFO after the backup protection
has had enough time to operate.
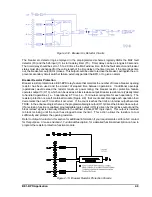
Calculation of the correct timer values is an important part of setting up the relay. You must know how long
it takes for the internal and external devices to operate. Typical timing sequences are listed in the following
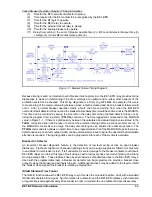
paragraphs and shown in Figure 1-1. Parentheses in the listed timing information indicate related times in
Figure 1-1. Specific timing data for BE1-BPR relays is provided in the latter part of this section.
Normal Breaker Operation Required Timing Information
(1)
Time for protective relays to operate — (this includes sending a trip signal to the breaker and
sending a BFI signal to the BE1-BPR).
(2)
Time required for the breaker to open.
(3)
Time required for the BE1-BPR overcurrent detector to drop out.
(4)
Margin to allow for variations in normal sequence timing plus a safety factor.
(12) Control timer setting = the length of time to maintain the breaker failure operating window. Control
timer setting must coordinate with the high speed reclose delay (13).
(13) Time to allow for arc de-ionization.
Содержание BE1-BPR
Страница 1: ...Publication 9 2720 00 990 Revision E 12 98 INSTRUCTION MANUAL for BE1 BPR BREAKER PROTECTION RELAY...
Страница 31: ...BE1 BPR Application 2 17...
Страница 41: ...BE1 BPR Human Machine Interface 3 3 Figure 3 3 BE1 BPR Relay Horizontal Mount Front And Rear Views...
Страница 42: ...3 4 BE1 BPR Human Machine Interface Figure 3 4 BE1 BPR Relay Vertical Mount Front View...
Страница 43: ...BE1 BPR Human Machine Interface 3 5 Figure 3 5 BE1 BPR Relay Vertical Mount Rear View...
Страница 49: ...4 6 BE1 BPR Functional Description Figure 4 2 Enhanced BE1 BPR Menu Display Screens...
Страница 50: ...BE1 BPR Functional Description 4 7 Figure 4 3 Standard BE1 BPR Menu Display Screens...
Страница 94: ...5 4 BE1 BPR BESTlogic Figure 5 1 BESTlogic Function Blocks...
Страница 120: ...7 2 BE1 BPR Installation Figure 7 1 Overall Dimensions Figure 7 2 Cutout Dimensions Panel Mount...
Страница 121: ...BE1 BPR Installation 7 3 Figure 7 3 Overall Dimensions Vertical Mount...
Страница 122: ...7 4 BE1 BPR Installation Figure 7 4 Overall Dimensions Side View Vertical Mount...
Страница 123: ...BE1 BPR Installation 7 5 Figure 7 5 Panel Drilling Diagram Vertical Mount...

