


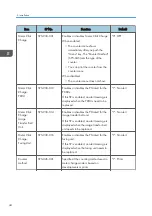


Item
SP No.
Function
Default
Service Tel:
Telephone /
Facsimile
SP5-812-001 and
-002
-001: shows or sets the telephone
number of the service representative.
-002: shows or sets the fax number of
the service station. The number is printed
on the counter list when the "Meter Click
Charge" is enabled. User can send a fax
message with the counter list.
-
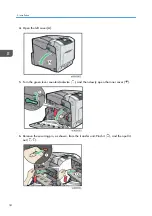
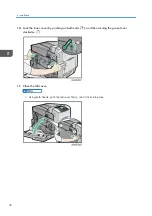
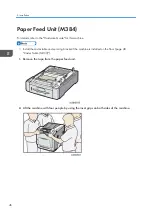
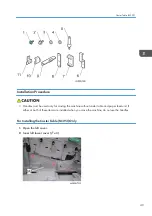
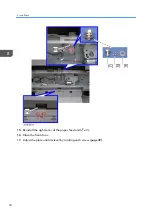
Moving the Machine
This section shows you how to manually move the machine from one floor to another floor. See the
section "Transporting the Machine" if you have to pack the machine and move it a longer distance.
• Remove all trays from the optional paper feed unit.
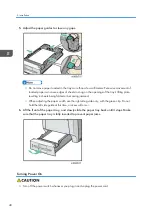
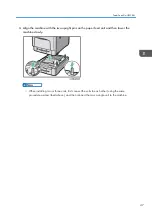
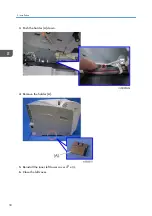
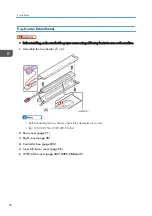
Transporting the Machine
1.
Make sure there is no paper left in the paper trays. Then fix down the bottom plates with
a sheet of paper and tape.
2.
Do one of the following:
• Attach shipping tape to the covers and doors.
• Shrink-wrap the machine tightly.
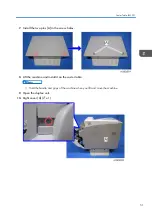
• After you move the machine, make sure you do the "Auto Color Registration" as follows. This
optimizes color registration.
• 1) Do the "Forced Line Position Adj. Mode c" (SP2-111-3).
• 2) Then do the "Forced Line Position Adj. Mode a" (SP2-111-1).
• To check if SP 2-111-1 was successful, watch the screen during the process. A message is
displayed at the end. Also, you can check the result with SP 2-194-10 to -12.
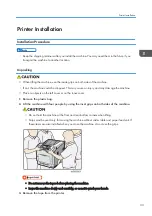
Printer Installation
45
Summary of Contents for Z-P2
Page 1: ...Model Z P2 Machine Codes M257 Field Service Manual April 2015 ...
Page 2: ......
Page 30: ...1 Product Information 28 ...
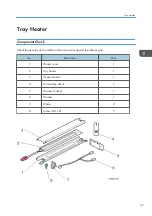
Page 73: ...9 Install the securing holder E 10 Reassemble the machine Tray Heater 71 ...
Page 86: ...3 Preventive Maintenance 84 ...
Page 92: ...5 Left cover B Right Cover 1 Open the duplex unit A 4 Replacement and Adjustment 90 ...
Page 128: ...5 Open the upper cover A 4 Replacement and Adjustment 126 ...
Page 131: ...4 The left stay A x 4 5 Rear holder bracket A x 2 Image Transfer 129 ...
Page 139: ...3 Remove the two screws 4 ID sensor board bracket A x 1 Image Transfer 137 ...
Page 141: ...4 Exit the SP mode Image Transfer 139 ...
Page 146: ...2 Temperature Humidity sensor A x 1 x 1 4 Replacement and Adjustment 144 ...
Page 187: ...3 Bracket A x 1 4 Release the paper feed unit A x 1 Paper Feed 185 ...
Page 201: ...5 Inner left upper cover page 94 6 Paper exit unit holder A x 1 Paper Exit 199 ...
Page 211: ...6 Release the left arm A x 1 Duplex Unit 209 ...
Page 215: ...3 Duplex lower guide plate A 4 Duplex upper guide plate A x 7 Duplex Unit 213 ...
Page 220: ...8 Right and left arms A x 2 each 4 Replacement and Adjustment 218 ...
Page 221: ...9 Duplex By pass motor bracket with the frame A x 6 10 Guide plate A x 4 Duplex Unit 219 ...
Page 245: ...5 Disconnect the connector 6 Disconnect the six connectors x 1 Electrical Components 243 ...
Page 254: ...4 Replacement and Adjustment 252 ...
Page 564: ...5 System Maintenance Reference 562 ...
Page 637: ...Model Z P2 Machine Codes M257 Appendices February 2015 ...
Page 638: ......
Page 640: ...2 ...
Page 648: ...1 Appendix Specifications 10 ...
Page 652: ...MEMO 14 ...
Page 653: ...MEMO 15 ...
Page 654: ...MEMO 16 EN ...