42
Getting Started
CD/DVD Drive
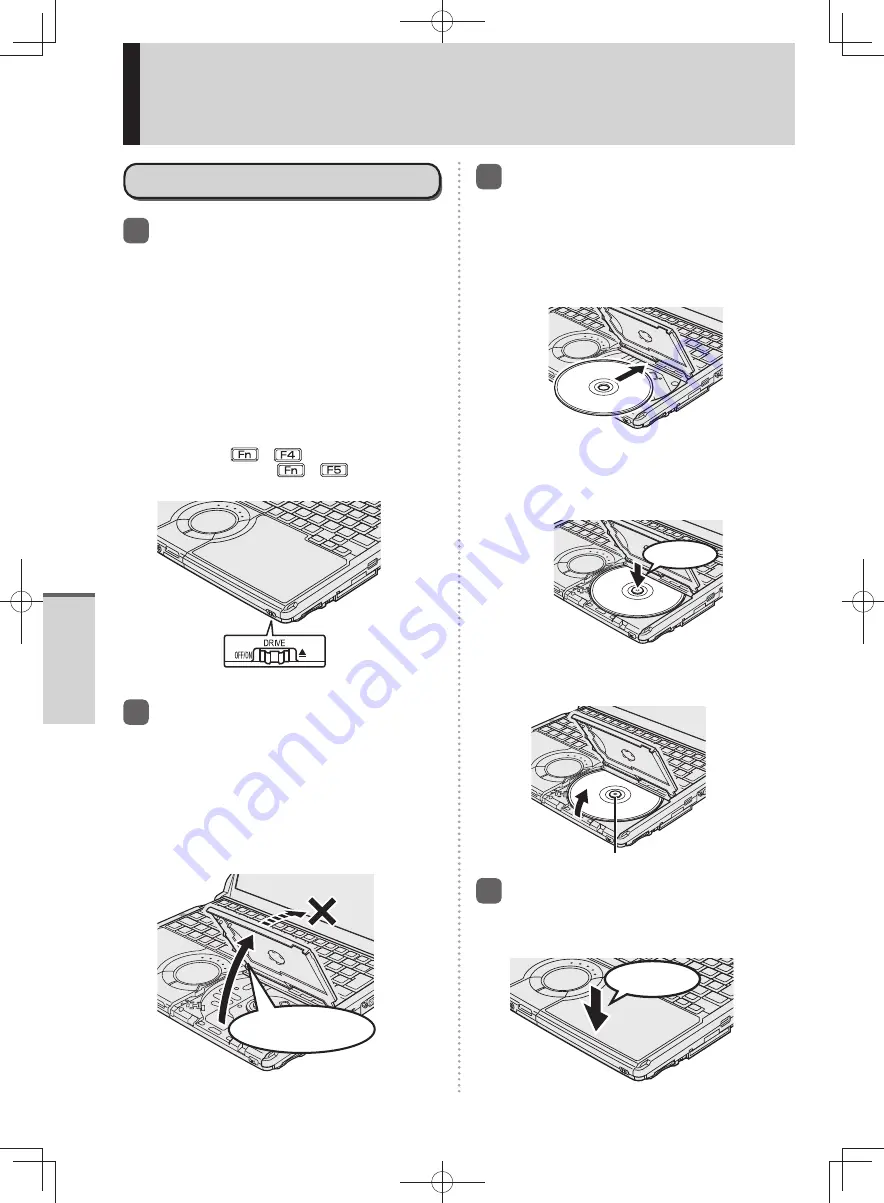
Inserting/Removing a Disc
1
Turn on the computer and slide
the drive power/open switch to
the right.
If the [Optical Drive] in the [Advanced] menu
of the Setup Utility is set to [Disabled], you
cannot use the drive power/open switch.
It will take some time for the drive power to
turn on, and for the disc cover to open. Wait
for a moment.
A “beep” will sound, and the disc cover will
open slightly. It will take some time for the disc
cover to open. Wait for a moment.
(When the speaker function is disabled, e.g.,
by pressing
+
, there will be no
sound. By pressing
+
, there will be
lower sound.)
Drive Power/Open Switch
2
Raise the disc cover a little.
The disc cover can be opened up to an
•
angle that will automatically open to this
maximum open position. Do not attempt to
force it open any further.
If the disc cover cannot open if a hand is on
•
the disc cover or the display is closed, the
drive will not be accessed correctly. In this
case, open and close the disc cover once or
restart the computer.
Do not attempt to
open the cover further
after it stops.
3
Insert/Remove a disc.
When inserting or removing a disc, be careful
not to touch the lens and other parts of the
laser pickup.
To insert
•
1
With the title side of the disc facing up,
insert the disc under the keyboard.
Do not use deformed discs.
2
Push down on the center of the disc until
it clicks in place.
Insert the disc securely. If the disc cover is
closed without securely inserting the disc,
the disc may be damaged.
Set securely
To remove
•
Press on the center spindle and carefully lift
up the edge of the disc.
center spindle
4
Close the disc cover.
Press down the center of the disc cover
(position of the arrow) to ensure that the cover
is locked.
Lock securely
DFQW5600ZA̲BasicManual̲CF-S10.indb 42
DFQW5600ZA̲BasicManual̲CF-S10.indb 42
2011/11/15 14:08:09
2011/11/15 14:08:09


