


75
The Workstation Installation/Operation Manual Version 2 Document 51540 Rev. B1 4/8/02
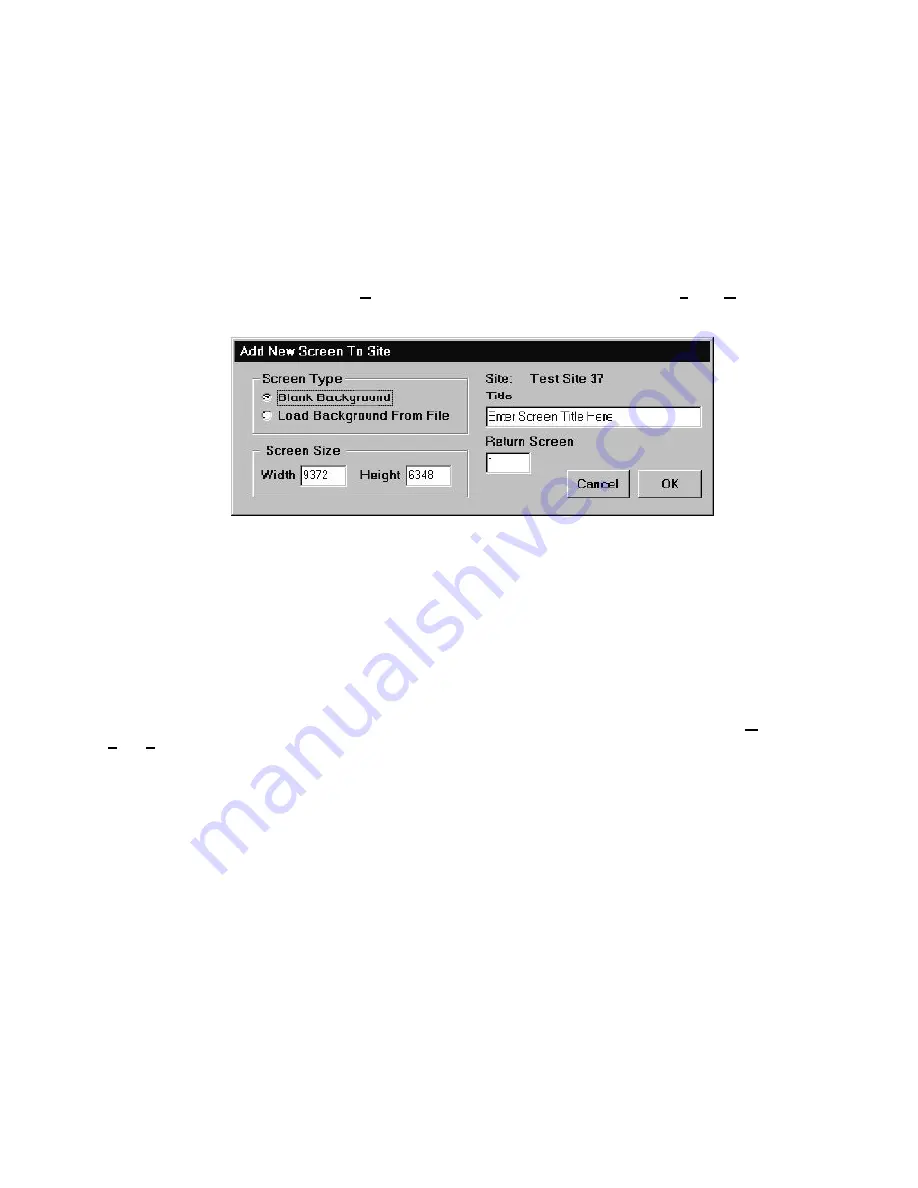
This form gives the initial settings for the new screen. Follow these procedures for entering this information:
• The
Screen Type
section allows selection of either starting with a blank background (upon which vector
graphics can be added) or starting with a loaded background. The workstation can load files of type
.BMP and .WMF. BMP is used for background bitmapped images and .WMF is generally used for vector
based floor plan drawings. Select the screen type desired for the new screen. Background images affect
screen loading times, so smaller files work better.
Editing a Site
The information for a site can also be edited at any point after it has been created. To do this, select
Graphics,
Edit, Site Information
. This will open the same dialog box used to add a new site. Simply edit the desired
information and again, click
Apply
and
OK
.
• The
Screen Size
section contains the dimensions of the new screen in logical units. The default value for
these fields is 9372 x 6348. This value of logical units is roughly one full screen display at full view in the
floor plan display. These values can be modified or left at their default value. Regardless of the dimensions
used, the floor plan display will still show the full screen when it is in full view mode.
• The
Site
field contains the name of the site for which the new screen will be added. Below the Site field is
the
Title
field. Enter the name of the new screen to be created in the
Title
text box.
• The
Return Screen
box contains the screen number that the system will return to when a bitmap based
keymap is clicked on with the mouse.
• Once the information has been entered and verified, click
OK
to confirm the addition of the new screen
or
Cancel
to abort.
If
Load Background from File
is selected, a file selection window will now open, allowing selection of the
bitmap or vector drawing to use as the background. Select a file of the appropriate type and select
OK
. The
selected file is copied into the screen database, therefore the original source file does not need to be preserved in
any way.
Figure 3-10: Add New Screen to Site Form
3.2.3 Adding and Editing Screens
Screens are the fundamental visual interface between sites and the operator. Screens are displayed in the
Floor
Plan Area
of the main display. Each site can contain numerous screens, and screens can contain floor plans,
graphics, and/or devices.
When a site is created automatically, a screen titled Autocreated is made by default. If the site is manually created,
the user is prompted to enter a site name. This screen has a standard layout and contains all devices that have
been detected on that particular site. This screen can be edited to fit the needs of the system, or it can be deleted
and a new screen can be created.
Adding a New Screen to a Site
To add a new screen to a site first select
Add A New Screen to this Site
in the
Add Screen, Graphics
portion of the main screen pull down menu. This will open the
Add New Screen to Site
form (see figure
below).
Summary of Contents for UniNet 2000
Page 14: ...14 The Workstation Installation Operation Manual Version 2 Document 51540 Rev B1 4 8 02 NOTES...
Page 36: ...36 The Workstation Installation Operation Manual Version 2 Document 51540 Rev B1 4 8 02 NOTES...
Page 62: ...62 The Workstation Installation Operation Manual Version 2 Document 51540 Rev B1 4 8 02 NOTES...
Page 86: ...86 The Workstation Installation Operation Manual Version 2 Document 51540 Rev B1 4 8 02 NOTES...
Page 102: ...102 The Workstation Installation Operation Manual Version 2 Document 51540 Rev B1 4 8 02 NOTES...
Page 118: ...118 The Workstation Installation Operation Manual Version 2 Document 51540 Rev B1 4 8 02 NOTES...
Page 122: ...122 The Workstation Installation Operation Manual Version 2 Document 51540 Rev B1 4 8 02 NOTES...
Page 128: ...128 The Workstation Installation Operation Manual Version 2 Document 51540 Rev B1 4 8 02 NOTES...
Page 130: ...130 The Workstation Installation Operation Manual Version 2 Document 51540 Rev B1 4 8 02 NOTES...
Page 136: ...136 The Workstation Installation Operation Manual Version 2 Document 51540 Rev B1 4 8 02 NOTES...
Page 150: ...150 The Workstation Installation Operation Manual Version 2 Document 51540 Rev B1 4 8 02 NOTES...
Page 168: ...168 The Workstation Installation Operation Manual Version 2 Document 51540 Rev B1 4 8 02 Notes...
Page 170: ...170 The Workstation Installation Operation Manual Version 2 Document 51540 Rev B1 4 8 02 NOTES...
Page 186: ...186 The Workstation Installation Operation Manual Version 2 Document 51540 Rev B1 4 8 02 NOTES...
Page 197: ...197 The Workstation Installation Operation Manual Version 2 Document 51540 Rev B1 4 8 02 NOTES...
Page 198: ...198 The Workstation Installation Operation Manual Version 2 Document 51540 Rev B1 4 8 02 NOTES...
Page 199: ...199 The Workstation Installation Operation Manual Version 2 Document 51540 Rev B1 4 8 02 NOTES...


