background image

366

Nortel Networks Symposium Web Center Portal

Managing Web Communications

Standard 2.0

!

Cookies must be enabled on the customer’s web browser. For more 
information about cookies, refer to your Internet Explorer documentation.

!

By default, only .jsp and .html pages are tracked.

!

Keyword tracking is not supported.

To turn Click Stream Tracking on

1

Log on to the Portal Administrator.

2

In the Symposium Web Center Portal Administrator window, double-click 
Web Collaboration.

Result: 

The Web Communication Manager logon window appears.

3

Enter your user ID and password. The default user ID is “SysAdmin,” and 
the default password is “Nortel.”

Result: 

The SWCP : Administration window appears.

4

Double-click ClickStream Admin Page.

Result: 

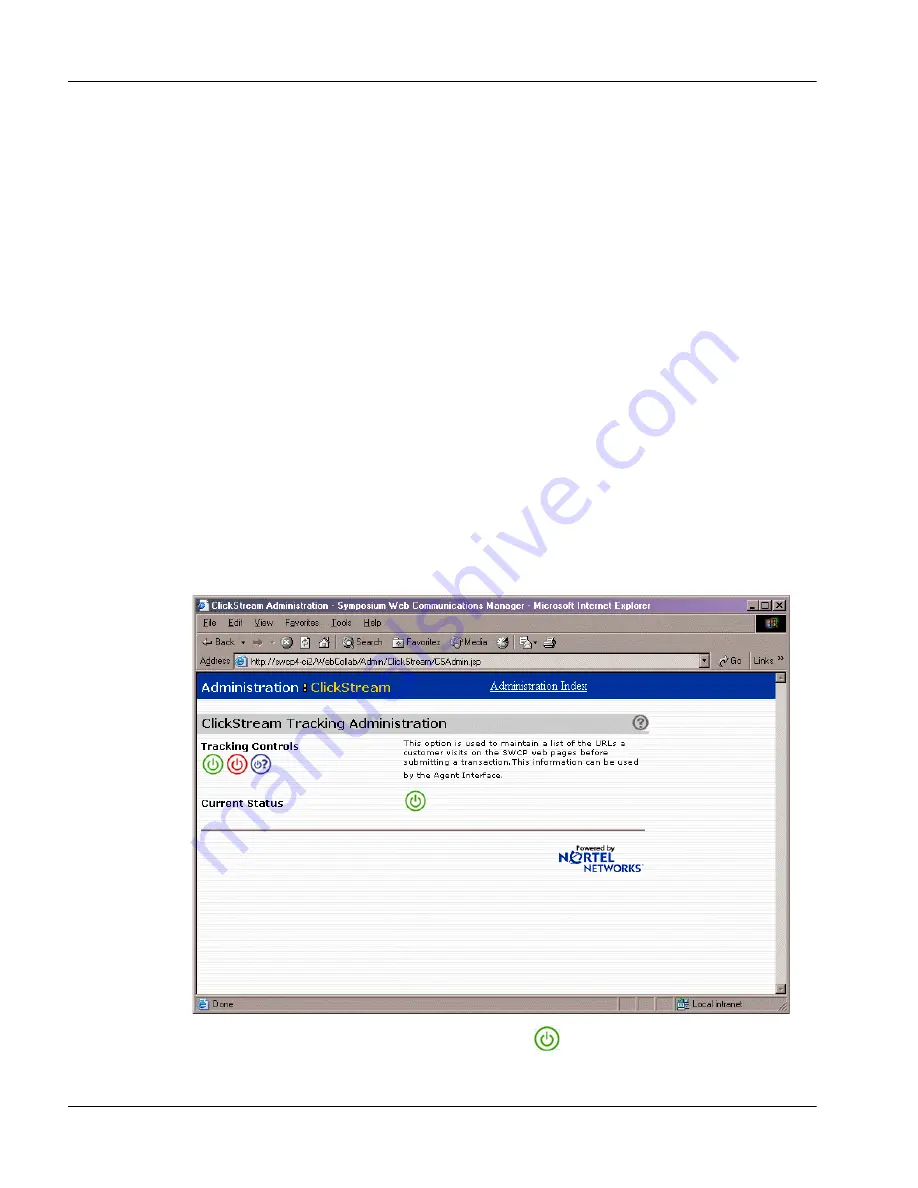
The Administration : ClickStream window appears.

5

Click the green Tracking Control On icon 

.

Summary of Contents for Symposium Web Center Portal

Page 1: ...Nortel Networks Symposium Web Center Portal Installation and Administration Guide Release 4 0 SU05 Standard 2 0 July 2004 297 2183 225 ...

Page 2: ......

Page 3: ...of the user license unless specifically authorized in writing by Nortel Networks prior to such use Violations of the license by alternative usage of any portion of this process or the related hardware constitutes grounds for an immediate termination of the license and Nortel Networks reserves the right to seek all allowable remedies for such breach Nortel Networks the Nortel Networks logo the Glob...

Page 4: ......

Page 5: ...y 2004 The Standard 2 0 issue of the Symposium Web Center Portal Installation and Administration Guide Release 4 0 SU05 is released November 2003 The Standard 1 0 issue of the Symposium Web Center Portal Installation and Administration Guide Release 4 0 is released ...

Page 6: ...vi Symposium Web Center Portal Publication history Standard 2 0 ...

Page 7: ...41 Installing the Portal Server component 85 Installing the Portal Administrator component 102 Configuring the Symposium Web Center Portal license 114 Installing the Portal Agent Interface component 118 Configuring the Portal Agent Interface 126 Installing software Service Updates and PEPs 134 Shutting down the Symposium Web Center Portal services 140 3 Installing and configuring the External Web ...

Page 8: ...29 Overview 230 Configuring mailboxes for Symposium Web Center Portal 233 Configuring outbound mailboxes 237 Barring e mail addresses 241 Configuring the e mail settings 243 Adding and deleting an e mail server 245 Setting up an auto response 248 Setting up personalized signatures 254 Configuring e mail attachment directories 256 Running the Symposium Email Manager 259 Adding string filters 262 Sy...

Page 9: ... 357 Configuring Web On Hold 359 Configuring Click Stream Tracking 365 Changing the Web Communications timers 368 10 Migrating and uninstalling 371 Overview 372 Migrating Symposium Web Center Portal 373 Installing the Database Migration Utility 376 Migrating the Symposium Web Center Portal database 382 Running the one step database migration 383 Running the two step database migration 397 Uninstal...

Page 10: ...Explorer 515 Troubleshooting the Portal Desktop 516 Troubleshooting archiving 517 Recovering from a power outage during installation 518 A Installation and configuration checklists 521 Overview 522 Installation sequence checklist 523 Symposium Web Center Portal checklists 526 Sybase installation checklist 529 Portal Server checklist 530 Portal Administrator checklist 532 Portal Agent Interface che...

Page 11: ...d utility 601 Dashboard utility limitations 608 Uninstalling the Dashboard utility 609 E Installing the External Web server components on Linux 611 Installing and configuring the External Web server on Linux 612 F Installing the External Web Server components with JRun and IIS 625 Overview 626 External Web server checklist for IIS and JRun 627 Installing the Java 2 Standard Edition environment wit...

Page 12: ...xii Symposium Web Center Portal Contents Standard 2 0 ...

Page 13: ...ation and Administration Guide 13 C h a p t e r 1 Getting started In this chapter About this guide 14 Skills you need 16 About Symposium Web Center Portal 17 What s new in this release 21 Technical support 26 ...

Page 14: ...05 software You can view this guide online using Acrobat Reader or you can print the guide in whole or in part for individual use Related documentation Once you install Symposium Web Center Portal to learn how to use the Agent Interface use the Nortel Networks Symposium Web Center Portal User Guide for Agents and the Nortel Networks Symposium Web Center Portal User Guide for Supervisors available ...

Page 15: ...er Release 4 2 with Service Update SU06 NS040206SU06S or later This guide does not provide installation or configuration instructions for these applications For instructions refer to the documentation that comes with these applications Additionally this guide assumes that your switch and agent PCs are configured for use with TAPI For instructions refer to your TAPI Service Provider documentation W...

Page 16: ...lation and configuration Microsoft Windows 2000 with Service Pack 4 installation and configuration Nortel Networks TAPI configuration e mail server installation and configuration Nortel Networks Symposium Call Center Server or Symposium Express Call Center configuration Microsoft Internet Explorer 5 5 or later installation and configuration your network configuration ATTENTION Only qualified infor...

Page 17: ...ors can view real time displays of call center activities as well as run historical reports You can use Symposium Web Center Portal with either Symposium Call Center Server Release 4 2 with Service Update SU09 NS040206SU09S or later or Symposium Express Call Center Release 4 2 with Service Update SU06 NS040206SU06S or later For the purpose of this guide all references to Symposium Call Center Serv...

Page 18: ...enter Portal database The DTH scans the database for any new unprocessed transactions When the DTH finds a new transaction it creates a TAPI call to the switch This call is presented to the Symposium Call Center Server controlled CDN or ACD DN if you are using Symposium Call Center Server configuration Symposium Call Center Server can use the Host Data Exchange HDX lookup to request the system to ...

Page 19: ... are sent to the e mail server Portal Agent Interface This component is installed on the Portal server Agents use Internet Explorer to connect to the Agent Interface to view and respond to e mails and web requests Portal Administrator This component is installed on the Symposium Web Center Portal server or on both the Portal Server and on a separate PC for remote access The Portal Administrator pr...

Page 20: ...Center Server TAPI Server ELAN CLAN Existing Call Center Solution Symposium Web Center Portal Portal Server Email Manager Transaction Monitor Portal Administrator DTH Rules Engine IMH OMH Database OA M HDX Client Agent Interface E Mail Server POP3 SMTP DTH Lines External Web Server Internet based Customers Web E mail Transaction E mail Customer Java Business Objects Web Communications Customer Int...

Page 21: ...ensing The new system requires a keycode with the switch ID For more information refer to Configuring the Symposium Web Center Portal license on page 114 Migration from Symposium Web Center Portal 3 0 to Symposium Web Center Portal 4 0 Symposium Web Center Portal Release 4 0 provides a migration tool to facilitate the migration from Symposium Web Center Portal Release 3 0 to Symposium Web Center P...

Page 22: ... For more information about Symposium Call Center Server scripting refer to the Nortel Networks Symposium Call Center Server Scripting Guide You have access to the Symposium Call Center Server scripts through the HDX interface if the Symposium Call Center Server is running with CCS 200 level software For more information refer to Configuring the Host Data Exchange service on page 216 Symposium Web...

Page 23: ...ver Pages ASP used in Symposium Web Center Portal Release 3 0 For more information refer to Customizing the Customer Interface on page 551 The Customer Interface administrator can use business objects to access the Symposium Web Center Portal Release 4 0 system For more information refer to Implementation of the Sample Customer Interface on page 555 International characters In Symposium Web Center...

Page 24: ... Web Center Portal Release 4 0 SU05 as part of a networked environment New Sample Customer Interface and Web Communications installation Symposium Web Center Portal Release 4 0 SU05 installs the Sample Customer Interface and Web Communications components together however you can only use the Web Communications component if you have purchased the license to activate it For more information about li...

Page 25: ...ation Guide 25 July 2004 Getting started External Web server on Linux Symposium Web Center Portal Release 4 0 SU05 allows you to install the Sample Customer Interface and Web Communication components on a Linux operating system ...

Page 26: ...ing sure the computers conform to the specifications listed in the Nortel Networks Symposium Web Center Portal Planning and Engineering Guide for Release 4 0 and the Nortel Networks Symposium Portfolio Server and Operating System Requirements Guide P 2003 0381 Global provided on the Partner Information Center web site You must also ensure that the operating system is installed and functioning prop...

Page 27: ...us software on Symposium Web Center Portal servers 39 Installing Sybase Adaptive Server Enterprise and Sybase Client 41 Installing the Portal Server component 85 Installing the Portal Administrator component 102 Configuring the Symposium Web Center Portal license 114 Installing the Portal Agent Interface component 118 Configuring the Portal Agent Interface 126 Installing software Service Updates a...

Page 28: ...rtner Information Center web site This chapter provides information about supported configurations installation sequence installation data requirements network configuration ATTENTION Do not install Symposium Web Center Portal components over a network Install Symposium Web Center Portal from the Symposium Web Center Portal CD ROM If necessary you can copy the component installation directory to t...

Page 29: ...alling Sybase Adaptive Server Enterprise and Sybase Client installing the Portal Server component installing the Portal Administrator component configuring the Symposium Web Center Portal license installing the Portal Agent Interface configuring the Portal Agent Interface installing software PEPs and Service Updates shutting down the Symposium Web Center Portal services ...

Page 30: ...and TAPI requirements mentioned in the Nortel Networks Symposium Web Center Portal Planning and Engineering Guide and the Nortel Networks Symposium Portfolio Server and Operating System Requirements Guide P 2003 0381 Global provided on the Partner Information Center web site Configuration requirements Note For the purpose of this guide all references to Windows 2000 also apply to Windows 2000 Adva...

Page 31: ...udes the database Portal Agent Interface Portal Administrator External Web server optional The External Web server is an optional component of your system The Sample Customer Interface and Web Communications are installed on the External Web server If you do not plan to use these components then you do not need an External Web server Windows 2000 Server with Service Pack 4 or the latest service pa...

Page 32: ...ymposium Web Center Portal software Standard 2 0 Agent PC Windows 2000 Professional with Service Pack 4 or Windows XP Professional with Service Pack 1 Internet Explorer 5 5 or later Portal Desktop Java Runtime Environment J2SE 1 4 2_03 Example of the configuration ...

Page 33: ...re you install Symposium Web Center Portal you must configure your switch For more information about switch configuration refer to your switch documentation and Symposium Web Center Portal Agent thin client and DTH application on page 543 You must also configure the agent PCs for use with TAPI For more information about TAPI refer to Symposium Web Center Portal Agent thin client and DTH applicatio...

Page 34: ...rtal Agent Interface Portal Administrator Migration Utility Dashboard Utility Sample Customer Interface Web Communications Portal Desktop Check for any Installation Addenda Before performing an installation upgrade or conversion check for any Installation Addenda on your regional Symposium Web Center Portal technical web site http www nortelnetworks com ...

Page 35: ...ortal components Before you install the Symposium Web Center Portal components ensure that your system meets the requirements listed in the Symposium Web Center Portal checklist For more information refer to Symposium Web Center Portal checklists on page 526 Note Before you begin ensure that your system meets the Meridian 1 and TAPI requirements mentioned in the Nortel Networks Symposium Web Cente...

Page 36: ...ter Portal and are therefore permitted Exceptions include utilities such as screen savers which may cause system problems and degrade performance Antivirus software is classified as a utility and is subject to the generic guidelines listed below as well as a specific series of recommendations detailed in this section For more information refer to Antivirus software on Symposium Web Center Portal s...

Page 37: ... the results of the testing during fault diagnosis As part of the fault diagnosis process the distributor or end user may be asked to remove third party software IIS Lockdown and URLScan When you install IIS Lockdown you add additional security features to an IIS server such as the Portal server IIS Lockdown works by turning off unnecessary features such as the news service or file transfer servic...

Page 38: ...ng the Portal Shutdown icon 4 Download the IIS Lockdown tool from Microsoft For more information refer to the documentation provided by Microsoft 5 Run the IIS Lockdown tool For more information refer to the documentation provided by Microsoft 6 When you are prompted to select a template select the Dynamic Web Server ASP template 7 Ensure that installation of the URLScan Filter is enabled 8 In the...

Page 39: ... the antivirus software after you complete the installation of the Symposium Web Center Portal PEP Set virus scans to run during off peak hours Do not configure the antivirus software to automatically fix infected files If you have an infected file contact your local Nortel Networks customer support representative for assistance He or she can determine if the file s are part of the application or ...

Page 40: ...e Questions or problems on antivirus software should be directed to the appropriate vendor The above recommendations are intended as guidelines only and do not constitute a guarantee of compatibility Nortel Networks does not plan to perform ongoing compatibility testing or testing on other antivirus packages If performance or functionality issues are raised to Nortel Networks support personnel as ...

Page 41: ...ium Web Center Portal as the only database Before you begin the installation of Sybase Adaptive Server Enterprise ensure you complete all of the items listed on the Sybase checklist see Sybase installation checklist on page 529 Notes You can only install the Sybase Adaptive Server Enterprise Sybase SQL Server database on one computer For more information about Sybase 12 5 refer to the Sybase docum...

Page 42: ...ty policy To disable the Just In Time Compiler 1 On the desktop right click the My Computer icon and then choose Properties Result The System Properties window appears 2 Click the Advanced Tab 3 Click Environment Variables Result The Environment Variables window appears CAUTION Risk of malfunction If you are installing Sybase on a Pentium IV or XEON you must disable the Just In Time JIT Compiler ...

Page 43: ...on of DirectX DirectX is installed as part of Windows 2000 however you must have DirectX 9 0b or later installed on your computer If you do not have DirectX 9 0b or later installed you must upgrade to DirectX 9 0b or later Follow the procedure below to ensure that you have the correct version of DirectX 1 Log on to the External Web server with your local Administrator user ID 2 From the Windows St...

Page 44: ...o Windows using the Local Administrator user ID 2 Insert the Nortel Networks Symposium Web Center Portal Sybase Distribution CD ROM into the CD ROM drive Result The following window appears ATTENTION When you configure Sybase Adaptive Server two files are created master dat and sybprocs dat By default they are created in the default Sybase folder usually C Sybase If you want to create these files ...

Page 45: ...n Guide 45 July 2004 Installing the Symposium Web Center Portal software 3 Click 3rd Party Software Result The following window appears 4 Click Sybase Adaptive Server 12 5 Server Software Result The Installation Type window appears ...

Page 46: ...ard 2 0 5 Select Standard Install and then click Next Result The Choose Directory window appears 6 Choose the location in which you want to install Sybase and then click Next Result The Summary window appears 7 Review the installation summary and then click Next Result The Create Directory window appears ...

Page 47: ...es Result The Installing window appears When the files finish unloading the following Sybase License Management window appears Note You do not need a certificate to install Sybase 9 Click No Result The following License Management window appears 10 Click No Result The Sybase Installer Confirmation window appears ...

Page 48: ...iguration Utility starts up automatically when you restart the computer To configure Sybase Adaptive Server Before you configure Sybase you must know the host name of the computer on which you installed Sybase Note When you configure the database the Symposium Web Center Portal setup procedure uses the sa account with no password Do not change or remove the sa account The sa account is disabled af...

Page 49: ...tility Result The Enter the Sybase directory window appears 3 Confirm the name of the directory for the configuration and then click Next Result The Build or Upgrade ASE Backup and Monitor Servers window appears 4 Select Build Upgrade servers and then click Next Result The Configuring window appears and then the Configure Sybase Servers window appears The Configuring window stays open for the dura...

Page 50: ...esult The Adaptive Server Name window appears 6 In the Adaptive Server Name box type SWCP_SQLSRV and then click Continue Result The Server Page Size window appears ATTENTION Symposium Web Center Portal works only when the Adaptive Server is named SWCP_SQLSRV Do not use the default name If you do use it Symposium Web Center Portal will not work ...

Page 51: ...that you select 2k Result The Set Master Device Size Location window appears 8 Verify the path to the master dat file and in the Master Device Size box accept the default 30 Mbytes 9 Click Continue Result The Set System Procedures Device Size Location window appears 10 Verify the path to the sybprocs dat file and in the System Procedures Device Size box accept the default size of 100 Mbytes ...

Page 52: ...e Result The Adaptive Server Options window appears 12 Verify the Error Log Path for example C Sybase ASE 12_5 install errorlog where C is the drive on which you installed Sybase Adaptive Server and then click Network Addresses Result The Network Connections window appears 13 Click Add Result The Enter Connection window appears ...

Page 53: ... Portal software 14 In the Connection Info box type the host name of the server followed by the Port number and then click OK Note The port number is 5005 for example hostname 5005 Result The Network Connections window appears 15 Click OK Result The Adaptive Server Options window appears ...

Page 54: ...the Symposium Web Center Portal software Standard 2 0 16 Click Configure Default XP Server Result The Configure Default XP Server window appears 17 Ensure System Account is selected and then click Network Addresses Result The Network Connections window appears ...

Page 55: ...e 18 Click Add Result The Enter Connection window appears 19 In the Connection Info box type the host name of the server and the Port number and then click OK Note The port number cannot be between 5000 5008 for example hostname 5009 is a valid port number Result The Network Connections window appears ...

Page 56: ...Symposium Web Center Portal Installing the Symposium Web Center Portal software Standard 2 0 20 Click OK Result The Configure Default XP Server window appears 21 Click OK Result The Adaptive Server Options window appears ...

Page 57: ...k Continue Result The Status window appears It can take several minutes to finish the configuration of the adaptive server and then the New Adaptive Server Complete window appears 23 Click Continue Result The Configure Sybase Servers window appears 24 Click Exit Result The Configuration complete window appears ...

Page 58: ...aster Database 1 On the Windows Start menu choose Programs Sybase Sybase Central Java Edition Result The Sybase Central Java Edition window appears CAUTION Risk of malfunction If you do not convert the database default character set to UTF 8 before you install the Symposium Web Center Portal server the database will not work For more information refer to To convert the database default character s...

Page 59: ...ptive Server 12 5 EBFs d Extract the zipped 10580 EBF file to a temporary folder on the server e Open the EBF 10580 folder and then copy the scjview bat file from the Server directory into C Sybase Sybase Central 3 2 where C Sybase is the location in which you installed Sybase f When prompted click Yes to copy over the existing file with the same name Result The Sybase Central Java Edition utility...

Page 60: ...posium Web Center Portal software Standard 2 0 5 Leave the Password box blank and then click OK Result The Sybase Central Java Edition window appears with your server listed under Adaptive Server Enterprise 6 Double click SWCP_SQLSRV sa 7 Expand the Databases folder ...

Page 61: ...ware 8 Right click master and then click Properties Result The Database Properties window appears 9 Click the Devices tab 10 Highlight master and then click Edit Result The Device Size window appears 11 In the Add Space drop down box type 16 The Total Space Allocation should be 22 Mbytes 12 Click OK ...

Page 62: ... server and then click Disconnect 16 Close the Sybase Central Java Edition Tool and continue with the next procedure Sybase shortcut properties error If when you run the Sybase Server Config utility you receive a Sybase Setup error message such as the one below the shortcut properties may be set incorrectly Follow the next procedure to set the shortcut properties To set the shortcut properties 1 C...

Page 63: ...nfig and then click Properties Result The Server Config Properties window appears 4 Click the Shortcut tab Result The following window appears 5 In the Start in box type the path to the SYCONFIG exe file for example C sybase ASE 12_5 bin 6 Click Apply to save your settings 7 Click OK to exit the Server Config Properties window ...

Page 64: ...ter set to UTF 8 and configure the sort order 1 From the Windows Start menu choose Programs Sybase Server Config Result The Configure Sybase Servers window appears 2 Click Configure Adaptive Server Result The Existing Servers window appears 3 Select SWCP_SQLSRV and then click Continue Result The Enter the System Administration Password window appears ...

Page 65: ...004 Installing the Symposium Web Center Portal software 4 Leave sa in the SA Login box 5 Leave the SA Password box blank 6 Click Continue Result The Configure Adaptive Server window appears 7 Click Language Result The Language Options window appears ...

Page 66: ...osium Web Center Portal software Standard 2 0 8 Under Character Set click Add Remove Result The Install Character Sets window appears 9 Select Unicode 3 0 1 UTF 8 Character Set and then click Add Result The Unicode 3 0 1 UTF 8 Character Set appears in the Selected box ...

Page 67: ...ation Guide 67 July 2004 Installing the Symposium Web Center Portal software 10 Click OK Result The Language Options window appears 11 Under Character Set click Set Default Result The Change Default Character Set window appears ...

Page 68: ... Portal Installing the Symposium Web Center Portal software Standard 2 0 12 Select Unicode 3 0 1 UTF 8 Character Set and then click OK Result The Language Options window appears 13 Click OK Result The Configure Adaptive Server window appears ...

Page 69: ...take several minutes The Configure Sybase Servers window appears 15 On the Configure Sybase Servers window click Configure Adaptive Server Result The Existing Servers window appears 16 Select SWCP_SQLSRV and then click Continue Result The Enter the System Administrator Password window appears 17 Leave sa in the SA Login box 18 Leave the SA Password box blank ...

Page 70: ... the Symposium Web Center Portal software Standard 2 0 19 Click Continue Note The password is updated when you install the Portal server component Result The Configure Adaptive Server window appears 20 Click Language Result The Language Options window appears ...

Page 71: ...ymposium Web Center Portal software 21 Under Sort Order click Set Default Result The Select Default Sort Order window appears 22 Select Case insensitive ordering for use with any UTF 8 based 8 bit environment and then click OK Result The Language Options window appears ...

Page 72: ...0 23 Click OK Result The Configure Adaptive Sever window appears 24 Click Save CAUTION Risk of malfunction It may take up to 10 minutes for the status window or the Configure Sybase Servers window to appear You must wait until the Configure Sybase Servers window appears before you can continue to the next step ...

Page 73: ...ernal Web server or a standalone computer see To install the Sybase Client on a standalone PC optional on page 102 To install the Sybase Client 1 Log on to Windows using the Local Administrator user ID 2 If the Nortel Networks Symposium Web Center Portal Sybase Distribution CD ROM is not in the CD ROM drive insert the CD into the CD ROM drive CAUTION Risk of malfunction If you do not restart the c...

Page 74: ...posium Web Center Portal software Standard 2 0 If the Installation program does not start up right away browse to the CD ROM drive and then double click the CD ROM icon Result The following window appears 3 Click 3rd Party Software Result The following window appears ...

Page 75: ...y 2004 Installing the Symposium Web Center Portal software 4 Click Sybase Adaptive Server 12 5 Client Software Result The Installation Type window appears 5 Select Customized Install and then click Next Result The Choose Directory window appears ...

Page 76: ...rtal software Standard 2 0 6 Choose the installation directory for Sybase Client and then click Next Result The Component Selection window appears 7 On the Component Selection window ensure that Sybase ASE OLE DB Provider is selected select jconnect 5 5 and keep the rest of the defaults ...

Page 77: ...oftware 8 Click Next Result The Summary window appears 9 Confirm that the information on the Summary window is correct and then click Next Result The Component Overwrite window appears 10 Click Yes to All 11 If you are asked if you want to copy over any other existing files click Yes to continue ...

Page 78: ...For more information about the EBFs refer to the Readme txt file provided in the EBF folder on the Symposium Web Center Portal Sybase Distribution CD ROM 1 Log on to Windows using the Local Administrator user ID 2 Ensure that none of the Sybase services are running These services only appear if you have already installed Sybase Adaptive Server a From the Start menu choose Programs Administrative T...

Page 79: ...515 folder and then copy the ODBC and OLE folders into C Sybase directory where C is the directory on which you installed Sybase When prompted click Yes to copy over the existing files with the same names 8 Open the EBF 10580 folder and then copy all the folders from the Server directory into C Sybase When prompted click Yes to copy over the existing files with the same names 9 Open the EBF 10580 ...

Page 80: ...on page 85 To verify the connection to the database using Sybase Central Java Edition Follow this procedure to ensure that the database you just created can be accessed 1 Log on to Windows using the Local Administrator user ID 2 Ensure that the Sybase services Sybase SQLServer_SWCP_SQLSRV and Sybase BCKServer_SWCP_SQLSRV_BS are running From the Start menu choose Programs Administrative Tools Servi...

Page 81: ...r Portal software 4 Click Tools Connect Result The Connect to Adaptive Server Enterprise window appears 5 In the User name box type sa 6 Leave the Password box blank and then click OK Result The Sybase Central Java Edition appears with your server listed under Adaptive Server Enterprise ...

Page 82: ...e Sybase UTF 8 settings Before you install the Portal server component you must ensure that your Sybase UTF 8 settings are correct 1 From the Windows Start menu choose Programs Sybase Server Config Result The Configure Sybase Servers window appears 2 Click Configure Adaptive Server Result The Existing Servers window appears ...

Page 83: ...eb Center Portal software 3 Select SWCP_SQLSRV and then click Continue Result The Enter the System Administration Password window appears 4 Leave sa in the SA Login box 5 Leave the SA Password box blank and then click Continue Result The Configure Adaptive Server window appears ...

Page 84: ...ow appears 7 Ensure that the you have the following settings in the Language Options window Language english Character Set utf8 Sort Order nocase 8 If your settings are correct click OK and close the Sybase Configuration tool If your settings are not correct follow the procedure on page 64 to change your settings What s next Install the Portal Server component ...

Page 85: ...omponent ensure that you complete the steps listed in the Portal Server checklist see Portal Server checklist on page 530 To install J2SE 1 4 1 JRE J2SE 1 4 1 JRE for Windows all languages including English supplied on the CD ROM is required to run Java applications and applets on Windows You must install J2SE 1 4 1 JRE on the Portal Server and Agent PCs 1 Log on to Windows using the Local Adminis...

Page 86: ...mposium Web Center Portal Installing the Symposium Web Center Portal software Standard 2 0 3 Click 3rd Party Software Result The following window appears 4 Click Java 2 Platform SE 1 4 1 Result The License Agreement appears ...

Page 87: ...e 5 Read the License Agreement and then click Yes Result The Setup Type window appears 6 Choose Typical and then click Next Result The Setup Status window appears 7 When the Setup Status window closes the installation is complete 8 Continue with the next procedure to install the Portal Server component ...

Page 88: ...1 If you are not logged on to the Portal server do so now using the Local Administrator user ID 2 Insert the Nortel Networks Symposium Web Center Portal Server and Client Software CD ROM into the CD ROM drive If the installation program does not start automatically run Setup exe from the CD Result The Symposium Web Center Portal Install window appears ...

Page 89: ...inistration Guide 89 July 2004 Installing the Symposium Web Center Portal software 3 Click Install Components Result The following window appears 4 Click Portal Server Result The InstallShield Wizard Welcome window appears ...

Page 90: ...Web Center Portal Installing the Symposium Web Center Portal software Standard 2 0 5 Click Next Result The License Agreement window appears 6 Click Yes to accept the License Agreement Result The Customer Information window appears ...

Page 91: ...nd Administration Guide 91 July 2004 Installing the Symposium Web Center Portal software 7 Type your name and the name of the company and then click Next Result The Symposium Web Center Portal Servers window appears ...

Page 92: ...name of the servers on which you are installing the Portal Server the database Portal Agent Interface and External Web server components and then click Next Note If you are not planning to use an External Web server in your system leave the External box blank Result The Symposium TAPI Service Provider Information window appears ...

Page 93: ...tware 9 In the Server box type the host name of the TAPI server and then click Next Result The Nortel Networks Symposium Call Center Products window appears 10 Select the type of call center product you are using and then click Next Result The Symposium Call Center Server Information window appears ...

Page 94: ...of the Symposium Call Center Server software you are running and then click Next Note Symposium Web Center Portal requires that you have at least Symposium Call Center Server Release 4 2 with SU09 NS040206SU09S or later installed you are installing Symposium Web Center Portal with Symposium Express Call Center type the host name of the Symposium Express Call Center server and the version number of...

Page 95: ... the LDAP server optional and then click Next Result The following window appears Note By default the installation program points to the location where you installed the master dat and sybprocs dat files during the Sybase installation If you do not want to create your Symposium Web Center Portal database in the same location as these files you must point to the correct location now ...

Page 96: ...ted database partition If you did not already create a folder in which you want to store the Symposium Web Center Portal database for example F SWCPDB where F is the drive on which you want to store the database do so now 14 Click Next Result The following window appears 15 Click OK Result The Choose Destination Location window appears ...

Page 97: ...tration Guide 97 July 2004 Installing the Symposium Web Center Portal software 16 Confirm the path for the installation files of Symposium Web Center Portal and then click Next Result The Start Installing Files window appears ...

Page 98: ...90 18 Select No I will restart my computer later and then click Finish 19 On the desktop double click the Portal Server Shutdown icon 20 When the Portal Server shutdown is complete restart the computer Result You have completed the Portal Server installation Notes You can verify your connection to the database with the Sybase Central Java Edition When you log on to the Sybase Central Java Edition ...

Page 99: ...em For more information refer to Installing the Dashboard utility on page 594 Verifying the connection to the database Follow this procedure to ensure that the database you just created can be accessed 1 Log on to Windows using the Local Administrator user ID 2 Ensure that the Sybase services Sybase SQLServer_SWCP_SQLSRV and Sybase BCKServer_SWCP_SQLSRV_BS are running From the Start menu choose Pr...

Page 100: ... Adaptive Server Enterprise window appears 5 In the User name box type SWCP_ADMIN 6 In the Password box type nortel admin 7 Click OK Result The Sybase Central Java Edition window appears with your server listed under Adaptive Server Enterprise Note You can also test the OLE DB connection For more information see To test the OLE DB connectivity on page 486 ...

Page 101: ...Installation and Administration Guide 101 July 2004 Installing the Symposium Web Center Portal software What s next Install the Portal Administrator component ...

Page 102: ...9S or later or Symposium Express Call Center Release 4 2 with Service Update SU06 NS040206SU06S or later clients Before you begin ensure that you complete the steps listed in the Portal Administrator checklist see Portal Administrator checklist on page 532 To install the Sybase Client on a standalone PC optional 1 Log on to the External Web server using the Local Administrator user ID 2 If the Nor...

Page 103: ...2004 Installing the Symposium Web Center Portal software does not start up right away browse to the CD ROM drive and then double click the CD ROM icon Result The following window appears 3 Click 3rd Party Software Result The following window appears ...

Page 104: ...nstalling the Symposium Web Center Portal software Standard 2 0 4 Click Sybase Adaptive Server 12 5 Client Software Result The Installation Type window appears 5 Select Customized Install and then click Next Result The Choose Directory window appears ...

Page 105: ...g the Symposium Web Center Portal software 6 Choose the installation directory for Sybase Client and then click Next Result The Component Selection window appears 7 Ensure Sybase ASE OLE DB Provider and jconnect 5 5 are selected and keep the rest of the defaults ...

Page 106: ...are Standard 2 0 8 Click Next Result The Summary window appears 9 Confirm that the information on the Summary window is correct and then click Next Result The Create Directory window appears 10 Click Yes Result The Installing window appears and then the Microsoft COMCTL32 DLL Update window appears ...

Page 107: ...w the procedure below to apply the Sybase EBFs To apply the Sybase Adaptive Server EBFs You must apply the Sybase EBFs from the Symposium Web Center Portal Sybase Distribution CD ROM on the computer on which you installed the Sybase Client For more information about the EBFs refer to the Readme txt file provided in the EBF folder on the Symposium Web Center Portal Sybase Distribution CD ROM 1 Log ...

Page 108: ...515 folder and then copy the ODBC and OLE folders into C Sybase directory where C is the directory on which you installed Sybase When prompted click Yes to copy over the existing files with the same names 7 Open the EBF 10580 folder and then copy all the folders from the PC Client directory into C Sybase When prompted click Yes to copy over the existing files with the same names 8 Restart the comp...

Page 109: ...inistrator 1 Insert the Nortel Networks Symposium Web Center Portal Server and Client Software CD ROM into the CD ROM drive If the installation program does not start automatically run Setup exe from the CD Result The Symposium Web Center Portal Install window appears 2 Click Install Components Result The following window appears ...

Page 110: ... Symposium Web Center Portal Installing the Symposium Web Center Portal software Standard 2 0 3 Click Administration Tools Result The following window appears 4 Click Portal Administrator Result The Welcome window appears ...

Page 111: ... Guide 111 July 2004 Installing the Symposium Web Center Portal software 5 Click Next Result The License Agreement window appears 6 Click Yes to accept the terms of the license agreement Result The Customer Information window appears ...

Page 112: ...the name of the company and then click Next Result The Symposium Web Center Portal Servers window appears 8 Type the host names of the computers on which you installed the Portal Server database Portal Agent Interface component and External Web server components and then click Next Result The Choose Destination Location window appears ...

Page 113: ...am and then click Next Result The Ready to Install the Program window appears 10 Click Install 11 When the Install Complete window appears click Finish Result You have completed the Portal Administration installation What s next Configure the Symposium Web Center Portal license For more information refer to Configuring the Symposium Web Center Portal license on page 114 ...

Page 114: ...n After you install all of the components on the Symposium Web Center Portal server you must configure the Symposium Web Center Portal license To configure the Symposium Web Center Portal license 1 From the Windows Start menu choose Programs Nortel Networks Symposium Web Center Portal Portal Server License Configurator Result The SWCP 4 0 License Configuration window appears ...

Page 115: ...u may have a connectivity issue with the server in Symposium Call Center Server You must verify the network the name the version number and the release of the Symposium Call Center Server For more information refer to your Symposium Call Center Server documentation 3 In the Keycode box type the 16 character keycode 4 Click Test Keycode Result If a valid serial number from the switch and keycode we...

Page 116: ... window appears The SWCP License Features box contains the Symposium Web Center Portal features and number of agents licensed to the user 6 Click Apply Keycode to store the keycode information in the Symposium Web Center Portal system Result The SWCP 4 0 License Configuration window appears 7 Click OK Result The Symposium Web Center Portal license is in the system ...

Page 117: ...Center Portal software 8 Click OK to exit the License Configurator Result You have completed the License configuration What s next Proceed to the next step to install the Portal Agent Interface For more information refer to Installing the Portal Agent Interface component on page 118 ...

Page 118: ...r for the web pages the agent uses You can install the Portal Agent Interface on the Symposium Web Center Portal Server behind a firewall Agents do their work using a web browser such as Internet Explorer 5 5 or later The Portal Agent Interface component is installed on the Portal server It is not installed on each agent s PC Before you install the Portal Agent Interface ensure that you complete t...

Page 119: ...rver on which you plan to install the Portal Agent Interface component using the Local Administrator user ID 2 Insert the Nortel Networks Symposium Web Center Portal Server and Client Software CD ROM into the CD drive If the installation program does not start automatically run Setup exe from the CD Result The Symposium Web Center Portal Install window appears ...

Page 120: ... Symposium Web Center Portal Installing the Symposium Web Center Portal software Standard 2 0 3 Click Install Components Result The following window appears 4 Click Portal Agent Interface Result The Welcome window appears ...

Page 121: ...e 121 July 2004 Installing the Symposium Web Center Portal software 5 Click Next Result The software License Agreement window appears 6 Click Yes to accept the terms of the license agreement Result The Customer Information window appears ...

Page 122: ... 7 Type your name and the name of the company and then click Next Result The Symposium Web Center Portal Servers window appears 8 Type the host name of the server on which you installed the database and the host name of the External Web server and then click Next Result The Webserver Root Directory window appears ...

Page 123: ...tware 9 Confirm the path to the Agent Interface server root directory usually C Inetpub wwwroot and then click Next Result The Choose Destination Location window appears 10 Confirm the location to install the Agent Interface and then click Next Result The Ready to Install the Program window appears ...

Page 124: ...he Symposium Web Center Portal software Standard 2 0 11 Click Install Result The Setup Status window appears The following window appears 12 Select No I will restart my computer later and then click Finish 13 On the desktop click the Portal Server Shutdown icon ...

Page 125: ...Symposium Web Center Portal software 14 When the Portal Server shutdown is complete restart the computer Result You have completed the installation of the Portal Agent Interface component What s next Proceed to the next procedure to configure the Portal Agent Interface ...

Page 126: ...directory on the Portal Agent Interface server access to the Portal Agent Interface for a domain user To configure the Agent virtual directory 1 Log on to the server on which you installed the Portal Agent Interface using the Local Windows Administrator user ID 2 On the Windows Start menu choose Programs Administrative Tools Internet Services Manager Result The Internet Information Service window ...

Page 127: ...ware 5 Right click the Agent folder and then choose Properties Result The Agent Properties window appears 6 In the Execute Permissions box select Scripts and Executables 7 Click Create Result The Create button changes to Remove 8 Click Configuration Result The Application Configuration window appears ...

Page 128: ...agent s session can be idle and still remain logged on Nortel Networks recommends that you enter the time in minutes equal to or greater than the duration of the agent s workday 12 Click OK to exit the Application Configuration window 13 Click OK to exit the Agent Properties window 14 Continue with the next procedure ATTENTION If the session timeout value is too short it is possible that the agent...

Page 129: ...main Controller using the Domain Administrator user name and password 2 From the Windows Start menu choose Programs Administration Tools Active Directory Users and Computers 3 Create a user called uploads_user a Right click the Users folder and then choose New User b The New Object User window appears c Enter the required information and then click Next Result The following window appears ...

Page 130: ...rm the password for the user e Select User cannot change password and Password never expires and then click Next f If you are using an Exchange mail server the Create an Exchange Mailbox window appears Click Next If you are not using an Exchange mail server you can skip this step Result The following window appears g Click Finish ...

Page 131: ...lder on the computer on which you installed the Portal Agent Interface component a On the server on which you installed the Portal Agent Interface from the Windows Start menu choose Programs Administrative Tools Internet Services Manager Result The Internet Information Service window appears b Click the plus sign beside the host name of the server on which you installed the Agent Interface c Click...

Page 132: ...Authentication Methods window appears g Select Anonymous access and then click Edit Result The Anonymous User Account window appears h Browse to the user you created type the password for the user and then click OK i Confirm the password and then click OK j Click OK 6 Exit the Internet Information Manager window Result You have completed the configuration for the Portal Agent Interface component ...

Page 133: ...enter Portal is complete You must now continue with the following tasks Install any of the required Service Updates For more information refer to Installing software Service Updates and PEPs on page 134 Install the Portal Desktop For more information refer to Chapter 4 Installing and configuring agent PCs If you are planning to install the Sample Customer Interface or the Web Communications compon...

Page 134: ...reviously installed Service Update when you uninstall a single component on the server If you uninstall one or more components after you install the Service Update or if you add one or more components after you install the Service Update then you must ensure that the Service Update is uninstalled and then reapply the Service Update Notes If you want to go back to using an earlier Service Update yo...

Page 135: ...b Center Portal software 4 Select the Service Update or PEP you want to remove and then click Change Remove Result The following window appears 5 Select Remove and then click Next Result The following window appears 6 Click Yes Result A warning window like the one below may appear ...

Page 136: ...ll the PEPs in the same manner as you install and uninstall Service Updates To install Service Updates and PEPs on the server or client PC Before you can install a PEP or Service Update from the web site you must have a SAM ID and a valid password 1 Log on with Administrative privileges 2 Shut down all applications including screen savers 3 Browse to the web site on which the PEP is located http t...

Page 137: ...mposium Web Center Portal software 6 Check the readme file in the PEP directory for any special instructions or dependencies before you install the PEP 7 Double click the Setup exe file Result The following window appears 8 Click Next Result The following window appears ...

Page 138: ...Symposium Web Center Portal Installing the Symposium Web Center Portal software Standard 2 0 9 Click Yes to accept the License Agreement Result The following window appears 10 Click Next Result The following window appears ...

Page 139: ...r Result The installation of the Service Update or PEP is complete Note The first time you restart your computer after you install SU05 you must double click the SWCP Startup icon to start the Symposium Web Center Portal services on your computer You do not need to perform this task every time you restart the computer After this initial restart the services will start up automatically when you res...

Page 140: ... reason If you do not use the method provided to shut down Symposium Web Center Portal Windows error messages may appear Before you shut down your database server you must shut down the Portal Server component To shut down the Portal Server 1 On the desktop double click the Portal Server Shutdown icon Result The Portal Server shutdown DOS window appears The Portal Server services and processes sto...

Page 141: ...nstalling and configuring the External Web server In this chapter Overview 142 Installing the Java 2 Standard Edition environment 145 Installing the required web server software 148 Installing the Sample Customer Interface and Web Communications components 160 ...

Page 142: ...rtal provides an interface for web users to submit requests to a contact center through a web browser The Sample Customer Interface is a sample application you can use to see this functionality The sample application is fully customizable It is based on a Financial Services organization and has been created using Java technology in an N tier architecture For more information about creating your ow...

Page 143: ...IIS This guide provides the steps for installing the External Web server components on both a Windows and Linux operating system For more information about installing these components on Linux refer to Appendix E Installing the External Web server components on Linux To verify your version of DirectX DirectX is installed as part of Windows 2000 however you must have DirectX 9 0b or later installed...

Page 144: ...144 Nortel Networks Symposium Web Center Portal Installing and configuring the External Web server Standard 2 0 What s next Install the Java 2 Standard Edition environment ...

Page 145: ...more information refer to External Web server checklist on page 534 The requirements listed in this section are for Apache 4 x If you are using Apache 5 x refer to the Apache 5 x documentation http jakarta apache org for information about any additional requirements To install J2SE 1 4 2 SDK You install J2SE 1 4 2 SDK on the External Web server You must uninstall any prior versions of Java 2 Stand...

Page 146: ...dk1 4 2 bin a On the desktop right click the My Computer icon and then choose Properties Result The System Properties window appears b Click the Advanced Tab c Click Environment Variables Result The Environment Variables window appears d Under System variables select Path and then click Edit Result The Edit System Variable window appears ATTENTION If the current version of J2SE SDK on the web site...

Page 147: ...he installation folder a On the desktop right click the My Computer icon and then choose Properties Result The System Properties window appears b Click the Advanced Tab c Click Environment Variables Result The Environment Variables window appears d Under System variables click New Result The New System Variable window appears e In the Variable Name box type JAVA_HOME f In the Variable Value box ty...

Page 148: ...st download Apache Web Server 2 0 from the Apache web site http httpd apache org Note If you are deploying the Customer Interface on a Windows environment using Fully Qualified Domain Names you must ensure that your site is accessible using full host names Verify your DNS settings and make any necessary changes to your Apache configuration file httpd conf in the apache conf folder The ServerName s...

Page 149: ...art Administrative Tools Services b Double click World Wide Web Publishing c Click Stop d In the Startup type drop down box select Disabled This prevents IIS from starting up on your computer when you restart Only one service IIS or Apache can run on port 80 at a time e Click OK 2 Download the current MSI Installer for example apache_2 0 49 win32 x86 no_ssl msi for Apache 2 0 using a mirror site f...

Page 150: ...Center Portal Installing and configuring the External Web server Standard 2 0 4 Click Next Result The License Agreement window appears 5 Read and accept the license agreement and then click Next Result The Read This First window appears ...

Page 151: ...ternal Web server 6 Read the information in this window and then click Next Result The Server Information window appears 7 In the Network Domain box keep the default value 8 In the Server Name box keep the default value 9 In the Administrator s Email Address box type your e mail address ...

Page 152: ...tal Installing and configuring the External Web server Standard 2 0 10 Choose Install Apache for all users on port 80 and then click Next Result The following window appears 11 Choose Typical and then click Next Note The following window appears ...

Page 153: ... the External Web server 12 Click Next to accept the default installation path Result The following window appears 13 Click Install Result The installation begins The installer starts Apache by default When the installation is complete the following window appears 14 Click Finish ...

Page 154: ...upports the use of JRun as a servlet engine to deploy the Sample Customer Interface and Web Communications components For more information about installing configuring and deploying the Sample Customer Interface and Web Communications components with JRun refer to Appendix F Installing the External Web Server components with JRun and IIS To install Apache Tomcat Note If you are installing a later ...

Page 155: ...y 2004 Installing and configuring the External Web server 3 Click OK Result The License Agreement window appears 4 Click I Agree Result The following window appears 5 Ensure that you select NT Service NT 2k XP only You can keep the other defaults ...

Page 156: ...er Portal Installing and configuring the External Web server Standard 2 0 6 Click Next Result The following window appears 7 Keep the default path and click Install Result The installer starts copying the files The following window appears ...

Page 157: ...ptions window appears 8 Leave the port number as 8080 9 Enter a user name and password Make note of the password you enter here you may need it later 10 Click Next Result The following window appears 11 Click Close 12 You can verify that the Tomcat Service is running by navigating to http localhost 8080 Result The Apache Tomcat web site appears ...

Page 158: ... connector for your web server For example mod_jk so usually found at http apache roweboat net jakarta tomcat connectors jk2 binaries win32 jakarta tomcat connectors jk2 0 4 win32 apache2 0 49 zip 2 Unzip the file you downloaded 3 Navigate to the Modules folder 4 Copy the mod_jk2 so file to the APACHE_HOME modules folder where APACHE_HOME is the location in which you installed the Apache Web Serve...

Page 159: ... apache coyote tomcat4 CoyoteConnector port 8080 minProcessors 5 maxProcessors 75 enableLookups true redirectPort 8443 acceptCount 100 debug 0 connectionTimeout 20000 useURIValidationHack false disableUploadTimeout true 12 Save the changes to the server xml file To test the JK2 configuration From the Start menu choose Programs APACHE HTTP SERVER 2 0 49 Configure Apache Server Test Configuration Re...

Page 160: ...license to activate it For more information about licenses contact your distributor You must complete the prerequisite installation and configuration of your web server Apache and a J2SE environment Apache Tomcat before you can install the Sample Customer Interface component Nortel Networks recommends that you accept the default installation path for the Sample Customer Interface component You mus...

Page 161: ...ator user ID 2 Stop Apache Tomcat a From the Start menu choose Programs Apache Tomcat 4 1 Stop Tomcat 3 Perform one of the following tasks Insert the Nortel Networks Symposium Web Center Portal SU05 CD ROM into the CD ROM drive Browse to the folder in which you downloaded SU05 4 Double click the setup exe file Result The Symposium Web Center Portal Welcome window appears ...

Page 162: ...posium Web Center Portal Installing and configuring the External Web server Standard 2 0 5 Click Next Result The License Agreement window appears 6 Click Yes to accept the license agreement Result The following window appears ...

Page 163: ...ase and then click Next Result The following window appears 8 Select the setup type you are using and then click Next Note Nortel Networks recommends that you use Apache Web Server and Tomcat servlet engine If you are using any other web server refer to the documentation provided with your web server and skip to step 14 For more information about installing Symposium Web Center Portal with IIS and...

Page 164: ...guring the External Web server Standard 2 0 JRun refer to Appendix F Installing the External Web Server components with JRun and IIS Result The following window appears 9 Select the version of Tomcat you are using and then click Next Result The following window appears ...

Page 165: ...al Web server 10 Verify the path to Tomcat and then click Next Result The following window appears 11 Type the version number of the Apache Web Server you installed and then click Next Note Nortel Networks recommends that you use Apache Web Server 2 0 49 Result The following window appears ...

Page 166: ...alling and configuring the External Web server Standard 2 0 12 Verify the path to the Apache2 directory and then click Next Result The following window appears 13 Verify the path and then click Next Result The Ready to Install the Program window appears ...

Page 167: ...nfigured your workers2 properties and jk2 properties files you must merge your existing files with the files provided with Symposium Web Center Portal For more information refer to the Apache and JK2 documentation provided on the jakarta apache org web site 17 Install all of the necessary Symposium Web Center Portal PEPs and SUs and then continue with the next procedure to configure Tomcat For mor...

Page 168: ...serCredCol admin_password userRoleTable administrator_details roleNameCol tomcat_role 3 Save your changes in the server xml file 4 Restart the Apache Web Server 5 Restart the Apache Tomcat service To test the Apache Web Server Apache Tomcat configuration Browse to http localhost examples jsp index html to verify the Tomcat examples available on port 80 If you can execute the Tomcat examples succes...

Page 169: ...Internet Explorer on the computer on which you installed Apache Tomcat to browse to http localhost swcp ci login html 7 Enter your details as a new customer and submit them 8 Choose one of the skillsets that you entered in step 3 and enter a query 9 Choose the callback method Telephone Result If you receive verification of the query then the Customer Interface is configured correctly ...

Page 170: ...170 Nortel Networks Symposium Web Center Portal Installing and configuring the External Web server Standard 2 0 ...

Page 171: ...tion Guide 171 C h a p t e r 4 Installing and configuring agent PCs In this chapter Overview 172 Configuring agent PCs for the TAPI Service Provider 173 Installing the Portal Desktop 177 Configuring the Agent Roaming feature 190 ...

Page 172: ...ontact center to allow agents to use the Agent Workbook Before you can use the Agent Workbook make sure the agent PCs meet the requirements found in the Nortel Networks Symposium Portfolio Server and Operating System Requirements Guide P 2003 0381 Global provided on the Partner Information Center web site and in Supported configuration on page 30 You must also make sure that you follow the steps i...

Page 173: ...ce Provider documentation Network Managers Guide for Symposium TAPI Service Provider for Succession 3 0 Before you begin Before you begin you must complete the following tasks Ensure that the TAPI Service Provider is installed on the TAPI server and that the telephone lines on the switch are assigned correctly to the call center agents For more information refer to your TAPI documentation Disable ...

Page 174: ... appears Note This message does not indicate that TAPI is working properly You must continue to verify the connection to the TAPI server and test the lines 4 Restart the computer To test the TAPI lines 1 Verify the TAPI lines with the phone dialer accessory on the PC a From the Windows Start menu click Run b In the Open box type dialer Result The Phone Dialer window appears 2 Choose Internet Direc...

Page 175: ...ption button 6 In the Phone Calls drop down box check to see if any of the lines you created appear Note If phone lines appear in the drop down list box under Line then TAPI is configured 7 If no lines appear in the Phone Calls drop down list box check your TAPI configuration 8 Select the line that you use to make calls and then click OK ...

Page 176: ...rd 2 0 9 On the Phone Dialer window click Dial Result The Dial window appears 10 Under Dial As select Phone Call 11 Type the number you want to call and then click Place Call Result The following window appears and the phoneset rings The test is complete What s next Install the Portal Desktop ...

Page 177: ...r on that computer For more information refer to To modify permissions on the SWCPLog folder on page 187 If you do not want the agent to have access to the SWCPLog files you must remove his or her permissions on the SWCPLog folder Read Write and Modify The SWCPLog folder is usually located in C SWCPLog where C is the drive on which you installed the Symposium Web Center Portal components For more ...

Page 178: ... a Symposium Web Center Portal Service Update from the Symposium Web Center Portal Service Update CD ROM it installs J2SE 1 4 2_03 Do not install a later version of the J2SE ATTENTION If you are installing J2SE on a computer with Windows XP installed as the operating system you must remove the Hotfix 328310 before you proceed with the installation After you successfully install J2SE you must reapp...

Page 179: ... agent PCs 1 Log on to Windows using the Local Administrator user ID 2 Insert the Nortel Networks Symposium Web Center Portal Server and Client Software CD ROM into the CD ROM drive Result The following window appears 3 Click 3rd Party Software Result The following window appears ...

Page 180: ...sium Web Center Portal Installing and configuring agent PCs Standard 2 0 4 Click Java 2 Platform SE 1 4 1 Result The License Agreement appears 5 Read the License Agreement and then click Yes Result The Setup Type window appears ...

Page 181: ...d Administration Guide 181 July 2004 Installing and configuring agent PCs 6 Choose Typical and then click Next Result The Setup Status window appears 7 When the Setup Status window closes the installation is complete ...

Page 182: ...esktop 1 Log on to Windows using the Local Administrator user ID 2 Insert the Nortel Networks Symposium Web Center Portal Server and Client Software CD ROM into the CD ROM drive If the installation program does not start automatically run Setup exe from the CD Result The Symposium Web Center Portal Install window appears ...

Page 183: ...nd Administration Guide 183 July 2004 Installing and configuring agent PCs 3 Click Install Components Result The following window appears 4 Click Portal Desktop Result The InstallShield Wizard Welcome window appears ...

Page 184: ...m Web Center Portal Installing and configuring agent PCs Standard 2 0 5 Click Next Result The License Agreement window appears 6 Click Yes to accept the terms of the license agreement Result The Customer Information window appears ...

Page 185: ...t PCs 7 Type your name and the name of the company and then click Next Result The Portal Agent Interface Server window appears 8 Type the host name of the computer on which you installed the Agent Interface Server and then click Next Result The Meridian1 Switch Details window appears ...

Page 186: ...number associated with the computer on which you are installing the Portal Desktop and then click Next Result The Choose Destination Location window appears 10 Confirm the path to the destination location and then click Next Result The Ready to Install the Program window appears 11 Click Install Result The Setup Status window appears ...

Page 187: ... Center Portal generated inquiries agents must have a compatible web browser installed on their workstations After you install the Symposium Web Center Portal software including the Agent Interface component you use the Portal Desktop to log on to the Agent Workbook Before agents can log on to the Agent Interface server you must create the agent in Symposium Call Center Server The password for the...

Page 188: ... not marked as safe is set to Enable 5 Click OK to exit the Security Settings window 6 Click Yes to accept the security settings change 7 Click OK to exit the Internet Options window 8 Exit Internet Explorer Verifying the Portal Desktop installation Follow this procedure to verify that you can log on as a Symposium Web Center Portal agent Note If the Agent PCs have Internet access do not allow Int...

Page 189: ...m is configured the first time you log on you are required to enter either a default password the same as your agent ID or no password The system administrator defines which initial password you should use After the agent logs on he or she can change the password For more information refer to your Nortel Networks Symposium Web Center Portal User Guide for Agents 4 Click Login Result The system ver...

Page 190: ...ing You can allow the agent to monitor more than one line through the TAPI server For more information refer to your TAPI documentation You can also use the Agent Roaming feature to change the name of the Symposium Web Center Portal Agent Interface server To run the Agent Roaming configuration utility 1 Log on to the agent s PC as the Local Administrator 2 From the Windows Start menu choose Progra...

Page 191: ...rt menu choose Programs Nortel Networks Symposium Web Center Portal Portal Desktop Agent Roaming Configuration Result The Agent Roaming Configurator window appears 3 In the Please enter the new name of the Portal Agent Interface server box type the host name of the server you want to use as the Portal Agent Interface server 4 Click Update What s next Proceed to Chapter 5 Configuring Symposium Web ...

Page 192: ...192 Nortel Networks Symposium Web Center Portal Installing and configuring agent PCs Standard 2 0 ...

Page 193: ...ntegration In this chapter Overview 194 Configuring the DTH for TAPI 195 Configuring the DTH and the Transaction Monitor parameters 203 Configuring the Host Data Exchange service 216 Network configuration 219 Changing the default values for the Portal Agent Interface 225 Configuring the handling of canceled transactions 226 ...

Page 194: ...ntegration using the procedures in this chapter Follow the Symposium Web Center Portal configuration checklist on page 535 to ensure that you complete all of the required configuration tasks in this chapter This chapter explains how to complete the following tasks configuring the DTH for TAPI configuring the DTH and the Transaction Monitor parameters configuring the Host Data Exchange service chan...

Page 195: ...ified CDNs or ACD DNs controlled by Symposium Call Center Server or agents Before you configure the DTH you must have configured each of the agent s phonesets and the TAPI Service Provider on the TAPI server for the Contact Center agents Follow the procedures in this section to configure the Dynamic Transaction Handler DTH Note Before you begin you must disable the Remote Access Auto Connection Ma...

Page 196: ...account is only used by the DTH a Log on to the Domain Controller b From the Start menu choose Programs Administrative Tools Active Users and Computers c Click Local Users and Groups and then click Users d From the Action menu click New User e Enter a user name and password for the new user f Clear the User must change password at next logon box g Check User cannot change password and Password nev...

Page 197: ... domain controller 1 The Domain Administrator must create a new user account on the domain a From the Start menu choose Programs Administrative Tools Active Users and Computers b Click Local Users and Groups and then click Users c From the Action menu click New User d Enter a user name and password for the new user e Check User cannot change password and Password never expires 2 Log on to the Port...

Page 198: ...main a Browse to the account you just created Note You must have a password for this account b Reenter the account password for this account and then click Apply c Click OK Note Make sure no domain policy overrides this policy 14 You must assign TAPI lines to the new account you created For more information refer to your TAPI documentation Network Managers Guide for Symposium TAPI Service Provider...

Page 199: ...name of the server where the TAPI Service Provider is installed Result The TAPI Administration Setup window appears 4 Click OK 5 Restart the computer To test the TAPI lines For more information about TAPI refer to your TAPI documentation 1 Assign the Local Administrator a temporary line on the TAPI server 2 Run the phone dialer on Portal Server a From the Windows Start menu click Run b In the Open...

Page 200: ...plus sign beside People f From the Edit menu choose Options Result The Options window appears g Click the Phone option button h In the Phone Calls drop down box check to see if any of the lines you created appear Result If phone lines appear in the drop down list box under Line then TAPI is configured 3 If no lines appear in the Phone Calls drop down list box check your TAPI configuration ...

Page 201: ...e If at any time you need to stop the DTH service use the following procedure Symposium Call Center Server Call Presentation Class DTH mode Forced Keep Mode Decline option is grayed out The agent phoneset stays connected when accepting The phoneset goes on hold when an agent makes an outbound call from the Agent Interface The phoneset is connected again when the agent hangs up the second outbound ...

Page 202: ...istrative Tools Services 2 Right click SWCP Dynamic Transaction Handler and then click Stop To start the DTH service If at any time you need to start the DTH service use the following procedure 1 From the Start menu choose Programs Administrative Tools Services 2 Right click Dynamic Transaction Handler and then click Start What s next Configure the DTH and the Transaction Monitor ...

Page 203: ... of Contacts Acquired The maximum number of contacts acquired during one polling interval Nortel Networks recommends that you keep the default value of 2 in the Number of Contacts Acquired box This ensures that one contact is acquired per skillset while the other contact is in a Queued state If you want to change this value contact Nortel Networks Call Mode Determines if the DTH is running in Drop...

Page 204: ...egged Notes Nortel Networks supports TAPI 3 0 with Symposium Web Center Portal The DTH refreshes the Skillset and Not Ready Reason code information every 15 minutes Therefore any updates made to the Skillset or Not Ready Reason code information in the DTH will take up to 15 minutes to take effect DTH load balancing The following is a list of requirements to prevent skillset starvation The number o...

Page 205: ...Monitor settings The Transaction Monitor is a Windows service It scans the Symposium Web Center Portal database at regular intervals for transactions where the Maximum Acquired Maximum Queued and Maximum Open timers have expired It updates these transactions so they can be reprocessed by the DTH Nortel Networks recommends that you do not change the default parameter for the polling interval The po...

Page 206: ... the Portal Server choose Programs Nortel Networks Symposium Web Center Portal Portal Server DTH Transaction Monitor Configurator Result The DTH Transaction Monitor Configurator window appears 2 Enter the Transaction Monitor and DTH settings you require Note Nortel Networks recommends that you keep the default for the Polling Interval If you do make any changes to this value you must restart the D...

Page 207: ...m Queued Duration Time Out on page 210 If you use the Symposium Call Center Server scripts to handle the Maximum Queued Duration Time Out then you must ensure that the scripts drop the call using the same timeout as is configured for the Maximum Queued Duration You can configure the scripts using the AGE OF CALL intrinsic For more information refer to Scripts controlled Maximum Queued Duration Tim...

Page 208: ...indow appears 6 In the Call back Window box enter the maximum time in minutes that contacts are acquired and queued before their call back time to ensure that the contact makes its way through the Symposium Call Center Server queuing to an agent in time for the call back If you have a busy call center with voice contacts prioritized above multimedia contacts you may need to increase this value ...

Page 209: ... a reasonable amount of time The default is 60 minutes The maximum open duration allowed is 10080 minutes 1 week Maximum Acquired Duration The maximum time in minutes that a contact can be acquired by the DTH but not presented to Symposium Call Center Server for queuing to an agent When the Maximum Acquired Duration expires the DTH releases the contact and executes its prioritization algorithm aga...

Page 210: ...1440 minutes For more information refer to Configuring the Maximum Queued Duration Time Out on page 210 9 Click OK 10 Click the Service Status tab to view the status of the Transaction Monitor the Dynamic Transaction Handler and Telephony services Result The following window appears 11 Click OK Configuring the Maximum Queued Duration Time Out The Maximum Queued Duration Time Out defines the maximu...

Page 211: ...ciated with the dropped transaction is pegged in the Symposium Call Center Server statistics under the Symposium Web Center Portal application as an abandoned call If the status of the dropped transaction is changed to New the DTH Service may re acquire the transaction and re queue it to Symposium Call Center Server Note In the Symposium Express Call Center environment the DTH must control the Max...

Page 212: ...onfiguring the DTH Scheduler The DTH Scheduler uses the DTH and skillset status information from the server in Symposium Call Center Server to determine what contacts are queued to Symposium Call Center Server The DTH Scheduler receives information about the status of the skillsets whether a skillset is In Service or Out of Service A skillset goes Out of Service when either the last agent serving ...

Page 213: ...ights in Symposium Call Center Server and that the User ID and Password information are confirmed in Symposium Web Center Portal 4 0 using the DTH and Transaction Monitor Configurator For more information refer to the Nortel Networks Symposium Call Center Server Administrator s Guide The DTH is informed by Symposium Call Center Server whenever a skillset state change occurs and this information is...

Page 214: ...nter Portal for e mail and telephony integration Standard 2 0 1 From the Start menu on the Portal Server choose Programs Nortel Networks Symposium Web Center Portal Portal Server DTH Transaction Monitor Configurator Result The DTH Transaction Monitor Configurator window appears ...

Page 215: ...b Result The following window appears 3 Select either Enabled or Disabled for Schedule by DTH 4 In the SCCS User ID box enter the user ID you created on the Symposium Call Center Server 5 In the SCCS User Password box enter the password for this user 6 In the Confirm SCCS User Password box reenter the password 7 Click OK What s next Configure the Host Data Exchange ...

Page 216: ...Reply to a Closed or Pending transaction is received by Symposium Web Center Portal the Agent ID of the last agent to deal with the transaction is retrieved by HDX allowing the Symposium Call Center Server scripts to route the call directly to that agent It is possible that when the New Reply arrives the agent who dealt with the transaction last time may not be currently operating as a multimedia ...

Page 217: ...e the SCCS Servername box contains the host name of the Symposium Call Center Server 4 You can configure the Port box as per the details in the properties file from Symposium Call Center Server SU09 onwards The Provider ID is a script defined variable It must be unique If a customer is using other HDX clients Symposium Web Center Portal or otherwise each client must be registered with its own ID a...

Page 218: ...tes a file called NIDXServer_ior ref on drive C You can copy the file over manually either by floppy or network share and use it to connect Symposium Web Center Portal to Symposium Call Center Server It changes every time TFA is restarted The Symposium Web Center Portal HDX tries to connect to Symposium Call Center Server three times If you cannot connect to Symposium Call Center Server confirm yo...

Page 219: ...ed to a network it still behaves largely as though connected to a single standalone node Networking requirements For Symposium Web Center Portal to work in a networked environment the following assumptions are made Symposium Web Center Portal is configured and operational with a single Symposium Call Center Server site The Symposium Call Center Server to which it is connected becomes the Primary n...

Page 220: ...ymposium Web Client You must also assign the multimedia agents to the network skillsets defined above These are dummy agents which are displayed as Not Connected at the Primary node Note Adding the agents to the network skillsets on the Primary node ensures that Symposium Web Center Portal recognizes these agents and allows them to log on to the system It also allows the users on remote nodes to s...

Page 221: ...d SCCS3 Each of the nodes has the following set of agents The administrator wants to create a multimedia based Symposium network consisting of three nodes For the sake of clarity information about voice only skillsets is not presented Node SCCS1 Node SCCS2 Node Users SCCS1 1001 1002 1003 1004 1005 1006 1007 1008 SCCS2 2001 2002 2003 2004 SCCS3 3001 3002 3002 Skillset Skillset type Agents MM_Sales ...

Page 222: ... above example the skillsets assigned to an SCCS1 agent are the skillsets they see on the workbook Skillsets are determined by SCCS1 The agent logon IDs must be unique within the network call center For example you cannot have agent logon ID 4007 on two Symposium Call Center Server nodes in a network If you assign the agents to all of the multimedia skillsets and you have restricted or sensitive i...

Page 223: ...s engine In Drop Mode the trunk call is dropped as soon as the contact is accepted by a remote agent In Keep Mode the trunk call is held up until the agent closes the contact 2 The DTH generates a call from one of its TAPI lines to the Primary Symposium Call Center Server node 3 The call triggers a script which sends an HDX query to Symposium Web Center Portal for more information about the transa...

Page 224: ...t duplicate the addition or removal of agents on the remote Symposium Call Center Server servers on the Primary node the node on which Symposium Call Center Server is connected to Symposium Web Center Portal If you are using ITG cards as trunks with Voice Activity Detection enabled then only the network bandwidth for signaling is consumed on the WAN as the speech path is silent for these network c...

Page 225: ... you do not use automatic refresh or that you use it sparingly Frequent refreshing uses system resources and can cause network congestion and decrease server performance To change the default values 1 Navigate to the default directory C Inetpub wwwroot Agent 2 Open the UserDefs vbs file with a text editor such as Notepad 3 Change the values as required 4 Save the file Feature Default value auto re...

Page 226: ...ef vbs 2 Open the UserDef vbs file with Notepad 3 Locate the following section of the file Flag variable used to indicate what status a transaction is set to when an agent closes down the transaction page without saving when they click on the swcp close button or the IE browser close button The default behaviour flag is true is for a New New Reply or Pending transaction to go to Pending status The...

Page 227: ...NG_DEFAULT_BEHAVIOUR true to Const TXN_CLOSING_DEFAULT_BEHAVIOUR false 5 When you set the TXN_CLOSING_DEFAUL_BEHAVIOR parameter to false canceled transactions that are not saved first are returned to their original state New or New Reply and are returned to the queue 6 Save the changes you made to the file The changes you made take effect immediately ...

Page 228: ...228 Nortel Networks Symposium Web Center Portal Configuring Symposium Web Center Portal for e mail and telephony integration Standard 2 0 ...

Page 229: ...ortal 233 Configuring outbound mailboxes 237 Barring e mail addresses 241 Configuring the e mail settings 243 Adding and deleting an e mail server 245 Setting up an auto response 248 Setting up personalized signatures 254 Configuring e mail attachment directories 256 Running the Symposium Email Manager 259 Adding string filters 262 Symposium Email Manager Memory Management utility 263 ...

Page 230: ... you configure the Email Manager you must start the Email Manager service For more information refer to Running the Symposium Email Manager on page 259 Functionality Symposium Email Manager provides the following functionality the ability of the contact center to receive e mail requests from multiple mailboxes for presentation to agents as Symposium Web Center Portal transactions intelligent routi...

Page 231: ...sed the capability to auto acknowledge e mails on a per skillset basis giving reassurance to customers of successful receipt of their e mails the ability for supervisors to automatically append an auto signature to outbound agent e mails for example a disclaimer Auto signature is on a per skillset basis To log on to the Email Manager 1 From the Windows Start menu choose Programs Nortel Networks Sy...

Page 232: ...ium Web Center Portal Configuring e mail for Symposium Web Center Portal Standard 2 0 3 Click the plus sign next to E mail Administration and then double click E Mail Configuration Result The E Mail Configuration window appears ...

Page 233: ...om and info company2 com are forwarded You want to route these e mails to two different skillsets MM_Company1 and MM_Company2 based on their To addresses To do so you must configure two new inboxes in addition to the general mailbox you have already configured and enabled info company1 com and info company2 com and clear the Enabled checkbox This tells Symposium Web Center Portal that they are ali...

Page 234: ...ium Web Center Portal Configuring e mail for Symposium Web Center Portal Standard 2 0 3 Click the plus sign next to E mail Administration and then double click E Mail Configuration Result The E Mail Configuration window appears ...

Page 235: ...ppear in the e mail From address for example Sales Department Password Enter the password for the Windows Domain User account that has been specified as the owner of that mailbox Note When you change a password you must update this password in the Symposium Web Center Portal Administrator Confirm Password Type the same password you typed in the Password box Inbound Mail Threshold Enter the maximum...

Page 236: ...rver with a different user name than the one you configured as the inbox name Note You can use the SMTP Login when you are configuring an inbox as an alias and it is marked as disabled If SMTP authentication is enabled the SMTP server rejects the alias inbox name and instead you must use the logon name of the actual mailbox The skillsets mapped to this inbox log on to the SMTP server using the alt...

Page 237: ... up automatically to match inbound mailboxes You can create a general mailbox account for outbound mail so that customers see your reply coming from a mailbox name representing your company For example customers who send inquiries to sales letronix com and support letronix com may both see responses generated from info letronix com Setting the From address as the Original Delivery Address You have...

Page 238: ... login it must be specified on the Inbox tab In the event that aliases are used problems may occur Consider the following scenario An e mail arrives from customer work com to info letronix com inquiring about a problem The e mail is forwarded to letronix emailoutsourcing com At the e mail outsourcing site the inbox letronix is polled by Symposium Web Center Portal Letronix wants to respond with th...

Page 239: ...d mailboxes 1 Log on to the Portal Administrator 2 Click the plus sign next to E mail Administration 3 Double click E mail Configuration 4 Click the Outbox Setup tab Result The following window appears 5 Select a skillset and then click Set Mapping Result The Configuring the Originating Address for Outbound Email window appears ...

Page 240: ...et you want to map to the outbox is selected 7 Select or de select the Set the From Address as the Original Delivery Address as necessary 8 In the Alternately and when agents initiate contacts in this skillsets box ensure the skillset you want to map to the outbox is selected 9 In the Set the originating address as box select the address to which you want to map the skillset 10 Click Apply ...

Page 241: ...Portal to bar certain e mail addresses Barring e mail addresses prevents automatic replies and agents from sending e mails to specified addresses such as System Administrator accounts To bar e mail addresses 1 Log on to the Portal Administrator 2 Click the plus sign next to E mail Administration 3 Double click E mail Configuration 4 Click the Barred Outbound Addresses tab Result The following wind...

Page 242: ... Configuring e mail for Symposium Web Center Portal Standard 2 0 5 Click New Address Result The Barred Email Address window appears 6 Type the e mail address you want to block and then click Save 7 The address appears in the list of Barred Addresses ...

Page 243: ...ngs for the mailbox parameters mailbox scan interval and the attachment files To configure the mailbox parameters 1 Log on to the Portal Administrator 2 Click the plus sign next to E mail Administration 3 Double click E mail Configuration 4 Click the Settings tab Result The following window appears AutoNumber Outbound Mails Check this box if you want agent replies to include a transaction ID for t...

Page 244: ...Symposium Email Manager scans the database for inbound e mail and outbound e mail at set intervals The interval between scans depends on your needs and your system resources Frequent scanning can place an unnecessary load on your server Infrequent scanning can mean that messages are not transferred to agents quickly enough Inbound Ensure the path to the SWCPMail Inbound directory appears in this b...

Page 245: ...or each other with identical mailbox names passwords and SMTP authentication settings Each polling iteration of the Email Manager attempts to poll the primary e mail server first if it cannot connect to the server it attempts to connect to the secondary e mail server In this way recovery is automatic However in the event that e mail is duplicated in each e mail server and a failure occurs the e ma...

Page 246: ...Symposium Web Center Portal Standard 2 0 4 Click the Email Servers tab Result The following window apprears 5 Click New Server Result The Email Server window appears 6 Enter the following information Primary Hostname Type the host name of the e mail server you want to add ...

Page 247: ...Enter the host name for your alternate secondary e mail server SMTP Authentication The status of the SMTP Authentication appears 7 Click Apply 8 Click Close To delete an e mail server 1 Log on to the Portal Administrator 2 Click the plus sign next to E mail Administration 3 Double click E mail Configuration 4 Click the Email Servers tab 5 Highlight the sever you want to delete 6 Click Delete Serve...

Page 248: ...sign an auto response to a rule it becomes an auto reply When a rule succeeds the transaction is assigned to a skillset For more information about auto replies refer to To assign an auto reply to a new rule on page 300 If after the auto reply is sent to the customer you want to close the transaction you can do so by checking the Close Transaction box in the Rule Administration see To assign an aut...

Page 249: ... auto response Note When you add text to an auto response ensure that you use plain text fixed font 1 Log on to the Portal Administrator 2 Click the plus sign next to E mail Administration 3 Double click Auto Responses Result The Auto Responses window appears 4 Click New Result The New Auto Responses window appears ...

Page 250: ...ed to the skillset or rule Subject Type the subject of the e mail to be sent as an auto reply or auto acknowledgment Body Type the message to be sent in the e mail as an auto reply or auto acknowledgement 6 Click Save To insert data into an auto response message 1 Log on to the Portal Administrator 2 Click the plus sign next to E mail Administration 3 Double click Auto Responses Result The Auto Re...

Page 251: ... code for the date or time appears in the message Symposium Email Manager inserts the current date or time when it sends the message 8 Choose Insert Data Item Result The Data Item window appears 9 From the Data Item drop down list select the box into which you want to insert the transaction number or the customer s e mail address 10 In the Alternative Text box type the text that should appear if t...

Page 252: ...xt files 1 Open the attachment txt file in Notepad 2 From the File menu select Save As 3 From the Encoding drop down menu choose UTF 8 4 Click Save Note Ensure that when you create new attachment txt files you save them with UTF 8 encoding as well To add an attachment to an auto response 1 Log on to the Symposium Web Center Portal Administrator 2 Click the plus sign next to E mail Administration A...

Page 253: ... Select the auto response to which you want to add an attachment 5 Click Edit Result The Edit Auto Response window appears 6 Choose Insert Attach files 7 Browse to the file you want to attach and then click Open Note You can only add attachments from the designated outbound mail folder You cannot add attachments from sub folders 8 Click Save 9 Exit the Auto Responses window ...

Page 254: ...onal information to every message Note Agents do not see the personalized signature as they are composing a message You can create a different signature for each skillset You can also create a template for personalized signatures that you can use for different skillsets To create personalized signatures 1 Log on to Symposium Web Center Portal Administrator 2 Click the plus sign next to E mail Admi...

Page 255: ... click Open Result The template text is automatically inserted into the Personalized Signatures box 6 Click Save Changes and then click Close To create a personalized signature template 1 Log on to the Symposium Web Center Portal Administrator 2 Click the plus sign next to E mail Administration 3 Double click Personalized Signatures 4 Choose File New Template Result The New Template window appears...

Page 256: ...do so You can also further restrict permissions on the e mail folder For more information refer to To create an attachments directory on page 257 If you want to change any of the default settings of the SWCPMail folder you must ensure that the agents have access rights to the attachment file directories to view or process the attached files You must also allow sharing permissions on the directorie...

Page 257: ... configure the attachments directory To configure the attachments directory You must enable sharing on your attachments directory When you enable sharing on the attachments directory ensure that the shared directory is the top level directory in which you store the inbound and outbound attachments For example within the SWCPMail directory there are two subdirectories Inbound and Outbound You only ...

Page 258: ...istrator with the User ID SysAdmin the Password Nortel and the Access Class Administrator and then click OK 3 Click the plus sign next to E mail Administration and then double click E Mail Configuration 4 Click the Settings tab 5 Click Browse beside the Inbound box and then select the computer name and the shared folder directory for inbound file attachments Note To ensure that the path is entered...

Page 259: ...of the Email Manager and the default and delivery failure rules you must set the Email Manager service to run as an automatic startup and give it the appropriate logon credentials Note You must configure the rules before you start the Email Manager service For more information see Creating rules on page 292 To configure the settings to run the Symposium Email Manager Note Before you configure the ...

Page 260: ...ortal Standard 2 0 1 From the Windows Start menu choose Programs Administrative Tools Services 2 Right click the SWCP Email Manager service and then click Properties Result The SWCP Email Manager Properties Local Computer window appears 3 Choose Startup type as Automatic 4 Click the Log On tab ...

Page 261: ... default setting if the location of the attachment directory is on the same domain as the Symposium Web Center Portal server If the Email Manager and the attachment directory are in separate domains you must specify an account on the domain where the attachment directory exists and supply a user name and password for the user on that domain to give him or her permissions to the attachment folders ...

Page 262: ...settings are used These values are used to replace specific character sequences found in e mails with an alternative By default no filters are configured Note Filter strings allow regular expressions For more information about regular expressions refer to the Java Sun web site 1 Navigate to the mailfilter xml file usually found in C Program Files Nortel Networks Symposium Web Center Portal Portal ...

Page 263: ...es a limit on the maximum size of a given e mail that is capable of being processed The Email Manager has a memory manager that ensures that memory limits are not broken This section details how the memory manager calculates these limits and how to determine the maximum size e mail supported Note Large e mail attachments may degrade the e mail throughput If you want the system to receive e mails g...

Page 264: ...5 Click Yes Maximum attachment size formula The formulas below use the following variables Encoding adjustment The factor by which the attachment size increases when encoded and put in an e mail Memory adjustment The factor by which the encoded size increases when loaded into the internal representation of the e mail in memory Buffer memory The memory required by the parts of the application not i...

Page 265: ...tachments Also the size of the body of an e mail lowers the supported attachment size by the size of the text However in most cases the body text of an e mail is negligible compared to large attachment sizes Maximum attachment size formula JVM size Buffer memory Memory adjustment Encoding adjustment Maximum attachment size Minimum JVM size formula Attachment size Encoding adjustment Memory adjustm...

Page 266: ...rtel Networks Symposium Web Center Portal Configuring e mail for Symposium Web Center Portal Standard 2 0 50 98 60 113 6 70 129 2 80 144 8 90 160 4 100 176 500 800 Attachment sizes Mbytes Min JVM sizes Mbytes ...

Page 267: ...67 C h a p t e r 7 Symposium Web Center Portal Rules Administration In this chapter Overview 268 Rule administration 271 Keyword groups 276 Creating a default rule 281 Creating delivery failure rules 287 Creating rules 292 Editing rules 302 ...

Page 268: ... Call Center Server enables information gathered during the rules execution for example To address From address Keywords Skillset and Last Agent to pass to Symposium Call Center Server scripting Note Symposium Call Center Server scripting is not required to route initial e mail contacts therefore e mails can be routed based on any criteria that the creator of the scripts chooses For more informati...

Page 269: ...sion making up a rule is true From address The originating address of the e mail optional Searched for by the rule If an e mail matches one of the inputs listed above the following attributes are set for the rule and a response is generated Skillset If the rule succeeds then this skillset is assigned to the inbound e mail Application If the rule succeeds then an Application is also assigned to the...

Page 270: ...270 Nortel Networks Symposium Web Center Portal Symposium Web Center Portal Rules Administration Standard 2 0 ...

Page 271: ...ion e mails are not sent an auto reply This can cause e mail loops which would fill up the system with delivery failure notification e mails You must create a rule to search for delivery failure keywords such as Undeliverable Delivery Report failure Delivery Failure Returned mail Unknown Recipient and Non Remis in the Subject field of an e mail Default rule Applied when all other rules fail Determ...

Page 272: ...r 1 All delivery failure rules these will be listed under All in order of sequence 2 Any other rules under All in order of sequence The All rule matches a To address to a skillset Nortel Networks recommends that you create an All rule for every To address into which the system receives e mails 3 Rules matching the e mail To address in order of sequence 4 Default rule If none of the rules listed in...

Page 273: ...ined Ensure that any of these more specific rules are higher in sequence order than the default To address rules created in step 3 5 Create further All rules as required These should be used sparingly as they are applied to all e mails arriving in the contact center and may place a high load on the system if they are overly complex Note Ensure that you give rules clear descriptive names This makes...

Page 274: ...heir advertising for a specific stock fund product such as Super 100 stock fund If the customer sends an e mail to info financialservices com with the phrase Super 100 stock fund in the Subject field he or she receives a brochure about the product You can set up a rule so that when the info financialservices com To address matches the phrase Super 100 stock fund in an e mail it automatically respo...

Page 275: ...lation and Administration Guide 275 July 2004 Symposium Web Center Portal Rules Administration reason for this is determined you must change the rules to block similar e mails from getting to the default rule ...

Page 276: ...eated This list is sorted alphabetically This section provides the procedures to create and remove a keyword group Note The Rule Administrator only supports and wildcard characters in keywords Wildcard characters are not supported at the beginning of a keyword or in expressions The Rule Administrator does not support the following wildcard characters If you use any of these characters in your keyw...

Page 277: ...ion and Administration Guide 277 July 2004 Symposium Web Center Portal Rules Administration 3 Click the plus sign next to Rule Configurator Result The following window appears 4 Double click Rule Administration ...

Page 278: ...ter Portal Rules Administration Standard 2 0 5 Click the Keyword Groups tab Result The following window appears 6 Click New Result The New Keyword Group window appears 7 In the Keyword Group Name box type a unique name for the keyword group maximum 64 characters long ...

Page 279: ...Result The keyword or expression is added to the list and the Keyword Group is created Note You must assign at least one keyword to a keyword group before you can save the keyword group 10 Click Save To remove a keyword from a keyword group 1 Log on to the Portal Administrator 2 Click the plus sign next to Symposium Web Center Portal 3 Click the plus sign next to Rule Configurator 4 Double click R...

Page 280: ...ration Standard 2 0 6 Select a keyword group from the list provided and then click Edit Result The New Keyword Group window appears including a list of the keywords currently associated with the keyword group 7 Select the keyword or expression from the list and then click Remove 8 Click Save ...

Page 281: ...ration to create any other rules To create a default rule You must create a default rule to route any e mails that do not match any other rules in the system You can assign an application and an auto reply to the default rule 1 Log on to the Portal Administrator 2 Click the plus sign next to Symposium Web Center Portal 3 Click the plus sign next to Rule Configurator 4 Double click General Rule Set...

Page 282: ...n click Apply Result If an auto acknowledgment is assigned to the skillset the name of the auto acknowledgment appears in the Assigned Auto Acknowledgement box on the Select Skillset window 7 Click View to see the content of the auto acknowledgement Result The Auto Response window appears 8 Exit the Auto Response window 9 Click Save Result You can now select an application for the default rule opt...

Page 283: ...ab click Select Auto Reply optional Note To simplify the configuration of the rules ensure that you choose a descriptive name for your auto responses Result The Select Auto Reply window appears 13 Select a reply and then click Apply ATTENTION Do not check the Reply and Close box You must monitor for any e mails that arrive using the default rule and determine why the other rules did not apply to t...

Page 284: ...assign to the rule 16 Click Save To search for keywords in e mails Symposium Web Center Portal can search an e mail for keywords in the subject text and body text The number of characters to search in the message body can be entered in the message body section of the Message Search tab The default is 160 characters The maximum number of characters that can be searched is 3200 1 Log on to the Porta...

Page 285: ...on and Administration Guide 285 July 2004 Symposium Web Center Portal Rules Administration 3 Click the plus sign next to Rule Configurator Result The following window appears 4 Double click General Rule Settings ...

Page 286: ...tion Standard 2 0 5 On the General Rule Settings window click the Message Search tab Result The following window appears 6 Check Search Message Body 7 In the Message Body section of the Message Search tab enter the number of characters you want to search in the body of the e mail 8 Click Save ...

Page 287: ...t Failure Delivery Failure Returned mail Unknown Recipient Non Remis Note Adding keywords used in different contexts such as unknown to the delivery failure rule may cause valid e mail to be marked as undeliverable In this case you should use specific phrases instead of individual words To create a delivery failure rule 1 Log on to the Portal Administrator 2 Click the plus sign next to Symposium W...

Page 288: ...works Symposium Web Center Portal Symposium Web Center Portal Rules Administration Standard 2 0 3 Click the plus sign next to Rule Configurator Result The following window appears 4 Double click General Rule Settings ...

Page 289: ...DTH priority for the rule that will be assigned to the transaction Note The transactions assigned with the highest DTH priority are retrieved from the database first The highest priority is 1 The lowest priority is 5 The default is 5 The transactions are retrieved from the database on the basis of their DTH priority and then by transaction number 8 Check the Delivery Failure Rule box 9 Click the K...

Page 290: ...y failure loops occur if delivery failure messages are responded to or if you get a Denial of Service attack A delivery failure loop results in multiple e mails being received from the same source in a number of minutes If you suspect a loop you must prevent an auto response from being sent until a specified amount of time has expired You can configure the number of e mails X and the number of min...

Page 291: ...ues X and Y are 10 and 3 therefore if you receive 10 e mails in 30 minutes from the same source the 10th and subsequent e mails are not responded to The responses recommence when 30 minutes expires 3 Configure these parameters as necessary 4 Save your changes Note If you set both values to zero loop detection is disabled A warning appears in the log file ...

Page 292: ...reate a new rule When you create a new rule you must assign at least a skillset and a To address You can also assign a keyword group an application a From address and an auto reply To create a new rule 1 Log on to the Portal Administrator 2 Click the plus sign next to Symposium Web Center Portal 3 Click the plus sign next to Rule Configurator Result The following window appears ...

Page 293: ...n 4 Double click Rule Administration Result The Rule Administration window appears Note The All option at the top of the list applies to the rules that are assigned to all the e mail messages regardless of the To address 5 On the Rule Administration window click New Result The New Rule window appears ...

Page 294: ...highest priority is 1 The lowest priority is 5 The default is 5 The transactions are retrieved from the database on the basis of their DTH priority and then by transaction number 8 If you want to enable the rule check the Enabled checkbox If you want to disable the rule clear the Enabled checkbox By default this box is checked 9 You must now configure the To address for the new rule Note You only ...

Page 295: ...ield at the bottom of the window 4 If necessary create a new inbox for the rule a Click New to create a new inbox for the rule Result The New Mailbox window appears b Fill in the properties for the mailbox and then click Save For more information refer to To configure the outbound mailboxes on page 239 c The new mailbox appears in the list d Select an address from the list provided and then click ...

Page 296: ...e Type keyword group From address Skillset Application Auto Reply and Priority 2 Select a rule from the list and then click the up or down arrows to move the rule To select a keyword group for a new rule 1 On the New Rule window click the Keyword Group tab Result The following window appears 2 Select a keyword group you want from the list provided and then click the arrow button Note You can selec...

Page 297: ...ress tab Result The following window appears 2 If you know the exact address you want to use type the address in the Selected Address box If you do not know the exact address you want to use proceed with the next steps Note The From address search only supports the wildcard character The wildcard can be placed at the start or the end of the From address but not in the middle for example support no...

Page 298: ...s appears in the Username Group and Domain boxes You can edit this information as required 5 Use the checkboxes associated with Username Group and Domain to determine which attributes are included in the selected address 6 If you want to change the Selected Address click Clear and then search for another From address 7 Continue with the next procedure to select a skillset to assign to the new rule...

Page 299: ... an auto reply optional To select an application for a new rule Selecting an application is an optional element of a rule Consult with the administrator of your switch before you choose an application for your rule A script is a set of instructions that relates to a particular type of call caller or set of conditions such as time of day or day of week If you choose an application for a rule the sc...

Page 300: ...ts returned through HDX are for Gold use only This is the script to which the call is transferred in Symposium Call Center Server The Master script checks the CDNs and executes the MM_SWCP_Sales script The script performs an HDX lookup to the Symposium Web Center Portal database It is determined that this customer is a Gold customer and should receive special treatment To assign an auto reply to a...

Page 301: ...f the window 3 If you want to close the transaction after you send the auto reply check the Close Transaction box For more information about creating a new auto reply refer to To create an auto response on page 249 Note The Close Transaction function is an option for every rule and is not related to the auto reply function You can configure a rule to close a transaction without sending a reply for...

Page 302: ... Editing rules Introduction Follow the procedures in this section to edit enable disable or delete rules To edit a rule 1 On the Rule Administration window select a rule from the list provided and then click Edit Result The Edit Rule window appears 2 Make the appropriate changes to the rule and then click Save ...

Page 303: ...he list provided and then click Edit Result The Edit Rule window appears 2 On the Edit Rule window check or clear the Enabled checkbox as required 3 Click Save To delete a rule You cannot delete a rule that is being used to assign transactions 1 On the Rule Administration window select a rule from the list provided and then click Delete 2 Click Yes to confirm that you want to delete the rule ...

Page 304: ...304 Nortel Networks Symposium Web Center Portal Symposium Web Center Portal Rules Administration Standard 2 0 ...

Page 305: ... classes 307 Logging on to the Portal Administrator 309 Managing skillsets 312 Closed Reason Codes 318 Managing users 320 Changing passwords in Symposium Web Center Portal 326 Administering customer details 328 Configuring the Spell Checker feature 330 Configuring the settings for Symposium Web Center Portal servers 334 Configuring the Address Book feature 338 ...

Page 306: ...Symposium Call Center Server or Symposium Express Call Center along with other configuration items for example application names agent to skillset mapping and agent to supervisor mapping The Symposium Web Center Portal Operations and Administration Maintenance OAM client component allows this import functionality to take place The OAM client reads the data from the Symposium Call Center Server dat...

Page 307: ...Center access classes refer to your Symposium Express Call Center documentation Call Center Agent created with the Symposium Call Center Server Classic Client To set up a user in Symposium Call Center Server to act as an agent in Symposium Web Center Portal you must assign the Call Center Agent access class to the user in the Classic Client For more information refer to your Symposium Call Center ...

Page 308: ...enter you must give them the access class of both the Call Center Agent and Call Center Supervisor A Symposium Web Center Portal supervisor can perform the following tasks Use the Portal Desktop to log on to the Agent Workbook View associated transactions Respond to customer inquiries View all transactions of any status and the agents assigned to them Modify the ownership of a transaction from an ...

Page 309: ...the default Administrator logon user ID SysAdmin Default user ID The first time you log on to the Portal Administrator use the default user ID SysAdmin and the password Nortel You should create a user ID with administrative privileges for future use To log on to the Portal Administrator 1 From the Windows Start menu choose Programs Nortel Networks Symposium Web Center Portal Administration Tools P...

Page 310: ...ct access class and that the database server is online 4 Click OK Result The Symposium Web Center Portal Administration window appears To log off of the Portal Administrator Choose File Exit To change font options You can change the font options to support internationalization on your personal signatures auto responses and keywords 1 Log on to the Symposium Web Center Portal Administrator window 2...

Page 311: ...ymposium Web Center Portal Administrative tools 3 In the Font Name box select the font you want to use 4 In the Font Size box select the size of font you want to use 5 In the Font Alignment drop down menu select the Alignment you want to use 6 Click Apply ...

Page 312: ... can assign only agents and supervisors who have been created as a supervisor agent to skillsets You cannot assign administrators to skillsets When you create Symposium Web Center Portal skillsets in Symposium Call Center Server they must begin with MM_ For more information refer to the Nortel Networks Symposium Call Center Server Scripting Guide You cannot use the euro symbol in a skillset name o...

Page 313: ...k Skillsets Result The Skillsets window appears 5 Select a skillset and then click Properties Result The Skillset Properties window appears The skillsets are retrieved from Symposium Call Center Server The priority is defined in the rule assigned to the skillset You can assign an auto acknowledgement to a skillset ...

Page 314: ...d 2 0 To assign an auto acknowledgment to a skillset 1 Log on to the Portal Administrator 2 Click the plus sign next to Symposium Web Center Portal 3 Click the plus sign next to System Administration 4 Double click Skillsets Result The Skillsets window appears 5 Select a skillset and then click Properties ...

Page 315: ...allation and Administration Guide 315 July 2004 Symposium Web Center Portal Administrative tools 6 The Skillset Properties window appears 7 Click the Acknowledgement tab Result The following window appears ...

Page 316: ... auto acknowledgement you selected click Apply If you want to change the auto acknowledgement you selected click Clear and then repeat steps 7 to 9 10 Click Save To assign a CDN to a skillset You must assign a CDN to a skillset for skill based routing to function properly 1 Log on to the Portal Administrator 2 Click the plus sign next to Symposium Web Center Portal 3 Click the plus sign next to Sy...

Page 317: ... do so you must provision the phantom DN on the switch and define the default call forward DN DCFW to be an acquired CDN in Symposium Call Center Server Configure the phantom DN in Symposium Call Center Server as a CDN but do not attempt to acquire the phantom DN as acquisition of the resource will fail Since the phantom DN is configured as a CDN Symposium Web Center Portal picks up the DN and mak...

Page 318: ...agent to select another Closed Reason Code You cannot save with a Closed Reason Code with the value of 0 Follow the procedure in this section to add Closed Reason Codes to appear on the agent s transaction detail window The closed code is saved with the transaction for reporting later To add a Closed Reason Code 1 Log on to the Portal Administrator 2 Click the plus sign next to Symposium Web Cente...

Page 319: ...state you created appears in the list in this window To delete a Closed Reason Code 1 Log on to the Portal Administrator 2 Click the plus sign next to Symposium Web Center Portal 3 Click the plus sign next to System Administration 4 Click the plus sign next to System Administration 5 Double click Closed Reason Codes Result The Closed Reason Codes window appears 6 Select a Closed Reason Code from t...

Page 320: ...nd supervisors and add or delete Administrator IDs from Symposium Web Center Portal Follow the procedures in this section to use the Symposium Web Center Portal Administrator to manage the users in your system To view and edit the agent and supervisor details 1 Log on to the Portal Administrator with the Administrator ID 2 Click the plus sign next to Symposium Web Center Portal 3 Click the plus si...

Page 321: ...er and then click Properties Result The Edit Agent window appears Note You cannot edit the information on this window The information in this window is configured in Symposium Call Center Server 7 Click the Contact Details tab Result The following window appears 8 View or edit the contact information for the Agent ...

Page 322: ... the Skillset tab Result The following window appears 10 View the skillsets assigned to the agent and then click Save To add administrators 1 Log on to the Portal Administrator with the Administrator ID 2 Click the plus sign next to Symposium Web Center Portal 3 Click the plus sign next to User Customer Administration ...

Page 323: ...Portal Administrative tools 4 Double click Users Result The Users window appears 5 Click New 6 The New Administrator window appears 7 Enter the identification details for the new Symposium Web Center Portal administrator 8 Click Set Password 9 Enter and confirm your password ...

Page 324: ...ct Details tab Result The following window appears 11 Enter the contact details for the new administrator and then click Save To delete administrators 1 Log on to the Portal Administrator with the Administrator ID 2 Click the plus sign next to Symposium Web Center Portal 3 Click the plus sign next to User Customer Administration ...

Page 325: ...on Guide 325 July 2004 Symposium Web Center Portal Administrative tools 4 Double click Users Result The Users window appears 5 Select the administrator you want to delete and then click Delete 6 Click Close to exit the Users window ...

Page 326: ... From Symposium Web Center Portal you can view the status of the agent in the call center and you can change the passwords of the agents in the call center To change a user s password 1 Log on to the Portal Administrator with the Administrator user ID 2 Click the plus sign next to Symposium Web Center Portal 3 Click the plus sign next to User Customer Administration 4 Double click Users 5 Click th...

Page 327: ...Click Properties Result The following window appears 8 Click Reset Password Result The Set Password window appears 9 Type the new password and then confirm the new password Result For security reasons asterisks replace the password characters as you type 10 Click Save 11 On the Edit Agent window click OK ...

Page 328: ...ration 4 Double click Customer Listing Result The Customer Listing window appears 5 Use the Search Criteria to find the customer You can search by the customer s name ID e mail address or telephone number 6 Highlight the Customer whose details you want to view Note You can click the headings in the table to sort the list of customers alphabetically or in ascending or descending order 7 Click Prope...

Page 329: ...Administrative tools 7 Click Properties Result The Customer Properties window appears 8 Make the required changes to the information about the customer Note You cannot edit the information in the Customer ID box and the Username box 9 Click Save 10 Close the Customer Listing window ...

Page 330: ...Internationalization For this release of Symposium Web Center Portal the Agent Interface can display international character sets for inbound correspondence from the Web or e mail as well as for outbound agent to customer replies in the form of an e mail or general response Agents can read and write e mail text and subject lines in any supported international language The agent can also switch bet...

Page 331: ... PC must have the appropriate local fonts installed and the agent s web browser must be configured to display Unicode UTF 8 If Unicode UTF 8 is not already the default character set then agents must change this setting each time they log on To set the Internet Explorer default character set to Unicode UTF 8 1 Log on to the computer using the agent s user ID and password 2 Open Internet Explorer an...

Page 332: ...ion Details window then his or her phoneset status is reset to Ready if Not Ready reason codes have been enabled on the system This can result in the agent having multiple transactions appear on his or her desktop The default encoding on all Agent Workbook pages is UTF 8 however in some cases it may be necessary for multilingual agents to change the encoding setting For example if an agent views a...

Page 333: ... Word box type the word you want to add Note The words you add to this list are also applied as additional lexicon to all of the language specific lexicons supported by Symposium Web Center Portal 3 Click Add word Result The word is added to the list on the window To delete a word from the spell checker 1 From the Windows Start menu choose Programs Spell Check Administration Result The Maintain Us...

Page 334: ...ll the Symposium Web Center Portal components you can verify and edit the host name and port number of a server To configure the settings for a Symposium Web Center Portal server 1 Log on to the Portal Administrator 2 Click the plus sign next to Symposium Web Center Portal 3 Click the plus sign next to Server Administration 4 Double click Server Configuration Result The Server Configuration window...

Page 335: ...server and the port number of the server as required 7 Click Save Result The Confirm Cancellation window appears 8 Click OK To change the host name of the Symposium Call Center Server Follow the procedure below if the host name of your Symposium Call Center Server changed 1 Log on to the Portal Administrator 2 Click the plus sign next to Symposium Web Center Portal 3 Click the plus sign next to Se...

Page 336: ...ck Server Configuration Result The Server Configuration window appears 5 Double click the Call Center Server Result The Server Properties window appears 6 Change the name of the Symposium Call Center Server and the port number of the server as required 7 Click Save Result The Confirm Cancellation window appears 8 Click OK ...

Page 337: ... that the name in the SCCS Sitename box is correct Note The SCCS Sitename box is case sensitive 11 In the SCCS Servername box type the new name of the server in Symposium Call Center Server 12 You can configure the Port box as per the details in the properties file from Symposium Call Center Server SU09 onwards 13 Open the SCCS_DB IDS file usually found in Program Files Common Files Nortel Network...

Page 338: ...Book to meet their requirements You can use the Portal Administrator to log on to the Address Book administration window and configure the LDAP settings to set a user name and password for connecting to the LDAP server test the LDAP server connection set and change the search criteria set and change the time limit of a search configure the polling interval which determines how often the LDAP servi...

Page 339: ...change the address of the server click Edit Server Result The Server Properties window appears Note The Server Port number 3268 as shown in the example above is only for MS Exchange 2000 Mail server This number should be set to 389 for all other supported mail servers a Type the new information and then click Save b Click Yes to confirm your change 6 Check or clear the Enabled checkbox to determin...

Page 340: ...when you configured the user such as Bob Simpson on the e mail server 8 Nortel Networks recommends that you leave the Search Base Value box blank the Address Book uses the default value to search from the root node of the LDAP server 9 Keep the default value in the Size Limit box You do not need to set the size limit on the Address Book client You may need to configure the settings on your e mail ...

Page 341: ...u configure the Address Book and the test LDAP connection returns a successful message you must start the SWCP Address Book Manager service on the Portal Server and set it to automatic a From the Start menu choose Programs Administrative Tools Services b Right click the SWCP Address Book Manager and then click Start c Right click the SWCP Address Book Manager and then click Properties d Choose Sta...

Page 342: ...342 Nortel Networks Symposium Web Center Portal Symposium Web Center Portal Administrative tools Standard 2 0 ...

Page 343: ... Web Communications In this chapter Overview 344 Configuring Text Chat options 347 Configuring chat log options 351 Configuring Page Push 353 Sharing forms 357 Configuring Web On Hold 359 Configuring Click Stream Tracking 365 Changing the Web Communications timers 368 ...

Page 344: ...on and set timers for Web On Hold waiting timeout Connection timeout For more information about these timers refer to Configuring Click Stream Tracking on page 365 Sample web sites Web pages are one source of the Internet transactions that Symposium Web Center Portal handles People who are browsing the Internet can fill out and submit a form on the Web that is then collected by Symposium Web Cente...

Page 345: ...on window 1 Log on to the Portal Administrator 2 In the Symposium Web Center Portal window double click WebCollaboration Administration Result The Web Communication Manager window appears 3 Type your user ID and password The default user ID is SysAdmin and the default password is Nortel Note These values are case sensitive ...

Page 346: ...346 Nortel Networks Symposium Web Center Portal Managing Web Communications Standard 2 0 4 Click Submit Result The SWCP Administration window appears ...

Page 347: ...gents can open multiple chat sessions with different customers concurrently but each session is in a separate window Agents cannot conference in another agent or supervisor Agents cannot transfer an ongoing chat session with a customer to another agent The canned scripts are not based on skillsets Supervisors cannot monitor chat live The maximum number of characters including spaces in a one line ...

Page 348: ...descriptive name for the response This name appears in the list of predefined responses in the agent s Web Communications window for example Thank you 8 In the Enter message to display box type the text of the response This is the text that appears in the Text Chat log The text appears in the customer s window The text must be less than 64 characters for example Thank you for using our services 9 ...

Page 349: ...he response you want to delete 3 Click the Delete icon To define agent information for Text Chat In a Text Chat session an agent identifier is automatically added to the beginning of any text added by the agent Set this identifier in the UserDef vbs file on the Agent Interface server The identifier can be one of the following variables full_name agent s first and last name full_name_agent_id agent...

Page 350: ...Center Portal Managing Web Communications Standard 2 0 For example to use the agent s first name only as the identifier replace full_name with first_name Result The line is now Const AGENT_CHAT_PREFIX first_name 4 Save the file and exit ...

Page 351: ...o select whether chat logs are saved to the database e mailed to the customer To configure chat log options 1 On the SWCP Administration window click System Options Admin Page Result The Administration System options window appears 2 Under the heading Email chat log to customer click On if you want to save a log of chat sessions between the agent and customer ...

Page 352: ...ons Standard 2 0 3 Under the heading Save chat log to database click On if you want to automatically e mail a log of the chat session to the customer 4 Click Save to save your chat log options Note Later you can search for the chat logs in the trans_id table in the database ...

Page 353: ...ook different from the customer s pages because they have different cookies Cookies are not shared between the customer and the agent Push Displayed Page is not supported for pages located on a remote web server Push Displayed Page is not supported for framed pages A framed page is defined by multiple URLs a frameset Secure pages are not supported by the Push Displayed Page feature the first time ...

Page 354: ...tname is the name of the External Web server 2 Enter your user ID and password The default user ID is SysAdmin and the default password is Nortel 3 Click Submit 4 On the SWCP Administration window double click Page Push Admin Page 5 Click Submit Result The Administration Page Push window appears 6 From the Choose Skillset drop down list choose a skillset that you want to associate with the URL ...

Page 355: ...t 1 In the list of Available URLs at the top of the Administration Page Push window click the desired URL Result The description of the page appears in the URL Description box 2 To preview the selected page click the Preview icon Result The page opens in a separate browser window 3 From the Choose Skillset drop down list select the skillset you want to associate with the URL 4 Click the Active ico...

Page 356: ...t to the list of Available URLs To delete a URL 1 On the Administration Page Push window in the Available URLs list select the URL you want to delete 2 Click Delete ATTENTION A URL may be associated with more than one skillset When you delete a URL you remove it from all skillsets to which it is associated If you want to remove the URL from only one skillset remove it from the list of active URLs ...

Page 357: ...ut the relevant parts of the form and click the Form Share icon to send the form back and forth until the form is complete Then the customer submits the form Agents and customers must coordinate with each other for example using Text Chat to confirm that the other is ready to accept the form Form sharing supports all form elements such as text boxes text areas option buttons password fields check ...

Page 358: ... Sharing secure pages For security reasons Symposium Web Center Portal Web Communications only allows you to share forms downloaded from the Symposium Web Center Portal External Web server You can share secure forms with Symposium Web Center Portal however you must type the URL of the secure form in the URL box and then click the Page Push icon When you push a secure form the control frame changes...

Page 359: ... clips Quick Time or audio files MPEG3 However the customer s browser must be capable of playing these formats Any plug ins needed to execute multimedia files are the responsibility of the customer Web On Hold pages cannot be framebusters A framebuster is a page that checks whether the web page is inside a frame and if so reloads the page in a frameless window You can create one Web On Hold sequen...

Page 360: ...aging Web Communications Standard 2 0 To add new URLs for Web On Hold 1 On the SWCP Administration window double click Web On Hold Admin Page Result The Administration Web On Hold window appears 2 If necessary scroll down to view the Add new URL section ...

Page 361: ...he number of seconds that you want the URL you chose to display to the customer 5 In the URL Description box type a description of the page 6 If you want to preview the page or test that you entered the URL correctly click the Preview icon located below the URL Description box Result The page opens in a separate browser window 7 Click the Save icon Result The URL is added to the list of Available ...

Page 362: ... URL sequence 2 In the list of Available URLs select the first URL to appear in the sequence Result The description of the page appears in the URL Description box 3 To preview the selected page click the Preview icon Result The page opens in a separate browser window 4 Click the Active icon to move the URL to the list of Active URLs 5 To add subsequent URLs repeat steps 2 to 4 ATTENTION Be sure to...

Page 363: ...nt to change 2 Do one of the following In the Active URLs box select a URL that you want to remove from the sequence and then click the Available icon Result The URL is moved from the Active URLs list to the list of Available URLs In the Available URLs box select a URL that you want to include in the sequence and then click the Active icon Result The URL is moved from the Available URLs list to th...

Page 364: ...anges and then click the Save icon To delete a URL 1 If the URL you want to delete is an active URL select the skillset and URL and then move the URL to the list of Available URLs 2 In the Available URLs list select the URL you want to delete 3 Click the Delete icon Result The URL is permanently deleted CAUTION Risk of losing data When you delete a URL you delete that URL for every skillset global...

Page 365: ...ns and the Sample Customer Interface components must be installed on the same machine and preferably configured for the same servlet engine for example Apache Tomcat Note If the Customer Interface and Web Communications are configured for different servlet engines you will not be able to turn Click Stream Tracking on or off dynamically for example it requires a restart of the Customer Interface se...

Page 366: ...rted To turn Click Stream Tracking on 1 Log on to the Portal Administrator 2 In the Symposium Web Center Portal Administrator window double click Web Collaboration Result The Web Communication Manager logon window appears 3 Enter your user ID and password The default user ID is SysAdmin and the default password is Nortel Result The SWCP Administration window appears 4 Double click ClickStream Admi...

Page 367: ...Admin Page Result The Administration Click Stream window appears 2 Click the red Tracking Control Off icon to stop tracking the selected URLs To view the status of the Click Stream Tracking On the Administration ClickStream window click the blue Tracking Control Status icon Result The Click Stream Tracking Status window opens and displays the status of Click Stream Tracking ...

Page 368: ... both the agent s and customer s browser stating Connection Closed If a timer times out the event is added to the log file found at WebCollab install Dir Logs The default file name is webCollab TraceLog txt You can use the trace admin utility to change the directory or the file name of the log file All timeouts appear in this file To change the Web Communications timer defaults 1 Use Windows Explo...

Page 369: ...on and Administration Guide 369 July 2004 Managing Web Communications 3 Change the values for webOnHoldTimeout or connectionTimeout as needed Note All time units are expressed in seconds 4 Save the file and exit ...

Page 370: ...370 Nortel Networks Symposium Web Center Portal Managing Web Communications Standard 2 0 ...

Page 371: ...In this chapter Overview 372 Migrating Symposium Web Center Portal 373 Installing the Database Migration Utility 376 Migrating the Symposium Web Center Portal database 382 Running the one step database migration 383 Running the two step database migration 397 Uninstalling the software 417 ...

Page 372: ... complete the following tasks migrating Symposium Web Center Portal installing the Database Migration Utility migrating the Symposium Web Center Portal database running the one step database migration running the two step database migration uninstalling the Symposium Web Center Portal software uninstalling the Sybase software ...

Page 373: ...procedure if you are migrating your Symposium Web Center Portal Release 3 0 data onto a new system Use the two step procedure if you plan to reuse your existing hardware If you choose the two step method you must store the Symposium Web Center Portal Release 3 0 data in an intermediate file until the Symposium Web Center Portal Release 4 0 software is installed Note The database size on the new ha...

Page 374: ...are migrating Back up the Symposium Web Center Portal Release 3 0 database again This is a backup of the data you want to migrate Space requirements for the Migration Utility Before you start the migration ensure that your system meets the space requirements for the following files Space for the migration log files approximately 250 kbytes Space for the migration BCP files these files contain the ...

Page 375: ...ring the migration Before you start the migration ensure that your system meets the space requirements for the following files Any transactions and associated data These would be test transactions created during the Release 4 0 setup and testing phase Any customer details These would be the test customers you created to test your Release 4 0 system ...

Page 376: ... 4 0 system you must install the Database Migration Utility on your Release 4 0 Portal server If you plan to reuse your existing hardware you must install the Migration Utility on a separate computer To install the Database Migration Utility 1 Insert the Nortel Networks Symposium Web Center Portal Server and Client Software CD ROM into the CD ROM drive If the installation program does not start au...

Page 377: ...stallation and Administration Guide 377 July 2004 Migrating and uninstalling 2 Click Install Components Result The following window appears 3 Click Administration Tools Result The following window appears ...

Page 378: ...s Symposium Web Center Portal Migrating and uninstalling Standard 2 0 4 Click Database Migration Tool Result The Database Migration Utility Welcome window appears 5 Click Next Result The License Agreement window appears ...

Page 379: ...y 2004 Migrating and uninstalling 6 Read the License Agreement and then click Yes Result The Customer Information window appears 7 Type your name and the name of the company and then click Next Result The Choose Destination Location window appears ...

Page 380: ...nstalling Standard 2 0 8 Confirm the path for the installation files of Symposium Web Center Portal and then click Next Result The Ready to Install the Program window appears 9 Click Install Result The Setup Status window appears and then the following window appears ...

Page 381: ...lation and Administration Guide 381 July 2004 Migrating and uninstalling 10 Click Finish Result The installation of the Database Migration Utility is complete What s next Continue with the database migration ...

Page 382: ...gration procedure Use the one step migration if you plan to use new hardware The one step migration exports the data directly to the new database Use the two step migration if you plan to reuse your Symposium Web Center Portal Release 3 0 hardware The data from the Symposium Web Center Portal Release 3 0 database is stored in a temporary location while you upgrade your system When the new Symposiu...

Page 383: ...ne step database migration migrate attachments migrate skillsets To run the one step database migration 1 Log on to the Symposium Web Center Portal server with local Administrative privileges 2 From the Windows Start menu choose Programs Nortel Networks Symposium Web Center Portal Portal Administrator Tools Database Migration Utility Result The Nortel Networks SWCP 3 12 to 4 0 Migration Utility wi...

Page 384: ...ks Symposium Web Center Portal Migrating and uninstalling Standard 2 0 3 Click 1 Migrate Database Result The SWCP DB Migrator Introduction window appears 4 Click Next Result The SWCP DB Migrator Migration window appears ...

Page 385: ...ck One Step Migration and then click Next Result The SWCP DB Migrator Migration Output Directory window appears 6 Browse to the directory in which you want to store the migration output files and log files and then click Next Result The SWCP DB Migrator ORIGINAL Database window appears ...

Page 386: ...rd 2 0 7 Enter the connection details for the Symposium Web Center Portal Release 3 0 database and then click Next Note The Username must be all lowercase It is case sensitive You must keep the default Network Protocol Result The SWCP DB Migrator DESTINATION Database window appears ...

Page 387: ...stalling 8 Enter the other connection details for the Symposium Web Center Portal Release 4 0 database and then click Next Note Keep the default values for the Username and Network Protocol Result The SWCP DB Migrator Migration Database Information Summary window appears ...

Page 388: ...can take up to three hours to migrate the database You can view the master log file located in the Output directory you pointed to in step 6 to check the status of the migration Result When the migration is complete the SWCP DB Migrator Migration Finished window appears 10 You can click Display Report as HTML or Display Report as Text to view the report for the migration ...

Page 389: ... Result The database migration is complete 12 Continue with the next procedure to migrate the attachment files To migrate attachments 1 From the Nortel Networks SWCP 3 12 to 4 0 Migration Utility window click 2 Migrate Attachments Result The SWCP Attachment Migrator Introduction window appears ...

Page 390: ...ter Portal Migrating and uninstalling Standard 2 0 2 Click Next Result The SWCP Attachment Migrator Migration window appears 3 Click One Step Migration and then click Next Result The SWCP Attachment Migrator Output Directory window appears ...

Page 391: ...ment migration output files and log files and then click Next Result The SWCP Attachment Migrator CURRENT Attachment Directory window appears 5 Browse to the directory in which you store your Symposium Web Center Portal Release 3 0 attachment files and then click Next Result The SWCP Attachment Migrator NEW Attachment Directory window appears ...

Page 392: ...posium Web Center Portal Release 4 0 attachment files and then click Next Result The SWCP Attachment Migrator Attachment Directory Summary window appears 7 Review the information on the window and then click Next Result The SWCP Attachment Migrator Migration Finished window appears 8 Continue with the next procedure to migrate the skillsets ...

Page 393: ...rom Symposium Web Center Portal Release 3 0 to the new skillsets in Symposium Web Center Portal Release 4 0 1 From the Nortel Networks SWCP 3 12 to 4 0 Migration Utility window click 3 Reassign Skillsets Result The SWCP Skillset Mapper Introduction window appears 2 Click Next Result The SWCP Skillset Mapper Output Directory window appears ...

Page 394: ... which you want to store the skillset migration output files and log files and then click Next Result The SWCP Skillset Mapper Map Skillsets window appears 4 Drag the skillsets from the Old Skillsets list and drop them under the new Symposium Web Center Portal Release 4 0 skillsets listed in the New Skillsets section ...

Page 395: ...ing and uninstalling 5 When you have added all the Release 3 0 skillsets to the new Release 4 0 skillsets click Next Result The SWCP Skillset Mapper Skillset Mapping Summary window appears 6 Click Next Result The SWCP Skillset Mapper Processing window appears ...

Page 396: ...lick Next Result The SWCP Skillset Mapper Migration Finished window appears 8 If you want to view a detailed report of the process click Display Report as HTML or Display Report as Text The HTML option opens the report in the default HTML browser while the text option opens the report in the default text editor 9 Click Exit ...

Page 397: ...achments migrate skillsets To run the two step database migration Note Ensure that you have installed the Database Migration Utility on the Portal server For more information refer to Installing the Database Migration Utility on page 376 1 From the Windows Start menu choose Programs Nortel Networks Symposium Web Center Portal Administrator Tools Database Migration Utility Result The Nortel Network...

Page 398: ...ks Symposium Web Center Portal Migrating and uninstalling Standard 2 0 2 Click 1 Migrate Database Result The SWCP DB Migrator Introduction window appears 3 Click Next Result The SWCP DB Migrator Migration window appears ...

Page 399: ...uide 399 July 2004 Migrating and uninstalling 4 Click Two Step Migration and then click Next Result The following window appears 5 Choose Step 1 and then click Next Result The SWCP DB Migrator Migration Output Directory window appears ...

Page 400: ...nd log files and then click Next Result The SWCP DB Migrator ORIGINAL Database window appears 7 Enter the connection details for the Symposium Web Center Portal Release 3 0 database and then click Next Note The Username must be all lowercase It is case sensitive You must keep the default Network Protocol Result The Migration Database Information Summary window appears ...

Page 401: ...esult The status window appears When the migration is complete the SWCP DB Migrator Migration Finished window appears 9 You can click Display Report as HTML or Display Report as Text to view the report for the migration 10 Click Exit Result The database migration is complete You can begin the second phase of the migration ...

Page 402: ...rom the Windows Start menu choose Programs Nortel Networks Symposium Web Center Portal Administrator Tools Database Migration Utility Result The Nortel Networks SWCP 3 12 to 4 0 Migration Utility window appears 12 Click 1 Migrate Database Result The SWCP DB Migrator Introduction window appears ...

Page 403: ...Installation and Administration Guide 403 July 2004 Migrating and uninstalling 13 Click Next 14 Click Two Step Migration and then click Next Result The following window appears ...

Page 404: ...0 15 Choose Step 2 and then click Next Result The SWCP DB Migrator Migration Output Directory window appears 16 Browse to the directory in which you want to store the migration output files and log files and then click Next Result The SWCP DB Migrator DESTINATION Database window appears ...

Page 405: ...etails for the Symposium Web Center Portal Release 4 0 database and then click Next Note Choose the same directory as you selected in the first step of the migration Result The Migration Database Information Summary window appears 18 Confirm the details and then click Next Result The status window appears ...

Page 406: ...ete the SWCP DB Migrator Migration Finished window appears 19 Continue to the next procedure to migrate the attachment files To migrate the attachment files 1 From the Nortel Networks SWCP 3 12 to 4 0 Migration Utility window click 2 Migrate Attachments Result The SWCP Attachment Migrator Introduction window appears ...

Page 407: ...on and Administration Guide 407 July 2004 Migrating and uninstalling 2 Click Next 3 Choose Two Step Migration and then click Next Result The SWCP Attachment Migrator Two Step Migration Choose Step window appears ...

Page 408: ...tep 2 and then click Next Result The SWCP Attachment Migrator Output Directory window appears 5 Browse to the directory in which you want to store the attachment migration output files and log files and then click Next Result The SWCP Attachment Migrator CURRENT Attachment Directory window appears ...

Page 409: ...elease 3 0 attachment files and then click Next Result The SWCP Attachment Migrator Attachment Directory Summary window appears 7 Click Next Result The SWCP Attachment Migrator Migration Finished window appears 8 If you want to view a detailed report of the process click Display Report as HTML or Display Report as Text The HTML option opens the report in the ...

Page 410: ...ninstalling Standard 2 0 default HTML browser while the text option opens the report in the default text editor 9 Click Next Result The following window appears 10 Click Step 2 and then click Next Result The SWCP Attachment Migrator Output Directory window appears ...

Page 411: ... migration output files and log files and then click Next Result The SWCP Attachment Migrator NEW Attachment Directory window appears 12 Browse to the directory in which you store your Symposium Web Center Portal Release 4 0 attachment files and then click Next Result The SWCP Attachment Migrator Attachment Directory Summary window appears ...

Page 412: ...port of the process click Display Report as HTML or Display Report as Text The HTML option opens the report in the default HTML browser while the text option opens the report in the default text editor 15 Click Exit 16 You must continue with the next procedure to migrate skillsets To migrate the skillsets You must map all of the skillsets from Symposium Web Center Portal Release 3 0 to the new ski...

Page 413: ...rating and uninstalling 1 From the Nortel Networks SWCP 3 12 to 4 0 Migration Utility window click 3 Reassign Skillsets Result The SWCP Skillset Mapper Introduction window appears 2 Click Next Result The SWCP Skillset Mapper Output Directory window appears ...

Page 414: ... which you want to store the skillset migration output files and log files and then click Next Result The SWCP Skillset Mapper Map Skillsets window appears 4 Drag the skillsets from the Old Skillsets list and drop them under the new Symposium Web Center Portal Release 4 0 skillsets listed in the New Skillsets section ...

Page 415: ...ing and uninstalling 5 When you have added all the Release 3 0 skillsets to the new Release 4 0 skillsets click Next Result The SWCP Skillset Mapper Skillset Mapping Summary window appears 6 Click Next Result The SWCP Skillset Mapper Processing window appears ...

Page 416: ...lick Next Result The SWCP Skillset Mapper Migration Finished window appears 8 If you want to view a detailed report of the process click Display Report as HTML or Display Report as Text The HTML option opens the report in the default HTML browser while the text option opens the report in the default text editor 9 Click Exit ...

Page 417: ...rver 4 Stop the IIS Admin service this also stops the FTP Publishing Service Microsoft SMTP Service and World Wide Web Publishing Service 5 Disable the Startup for IIS Admin Service to make sure it does not start automatically during the upgrade 6 Stop the SYSAM service If you did not register Sybase Adaptive Server during the installation this service does not appear CAUTION Risk of malfunction U...

Page 418: ...er SWCP_SQLSRV service 12 Stop the Sybase BCK Server SWCP_SQLSRV_BS service 13 Shut down the Portal desktop and TAPI Agent on the agent PCs To stop services 1 From the Windows Start menu select Start Administrative Tools Services 2 Select the service you want to stop 3 Click Stop 4 Repeat steps 2 and 3 for every service you want to stop 5 Exit the Services window To uninstall the Symposium Web Cen...

Page 419: ...nd Administration Guide 419 July 2004 Migrating and uninstalling 3 Double click Add Remove Programs Result The Add Remove Programs window appears ATTENTION You must uninstall the Portal Server database component last ...

Page 420: ...ation Wizard Complete window appears click Finish Result The application files are deleted from your computer 7 Repeat steps 2 to 6 for each of the Symposium Web Center Portal applications that you want to uninstall 8 Restart the computer Manual cleanup of Symposium Web Center Portal Delete the following folders C Program Files Common Files Nortel Networks Symposium Web Center Portal C Program Fil...

Page 421: ...erver_SWCP_SQLSRV is not present 5 Stop BCKServer_SWCP_SQLSRV_BS Note Ignore this step if BCKServer_SWCP_SQLSRV_BS is not present 6 Close the Services window 7 On the taskbar click Start Program Sybase Server Config 8 The Configure Sybase Servers window appears 9 Under Products select Adaptive Server and then click Remove Adaptive Server ATTENTION If you uninstall the Symposium Web Center Portal d...

Page 422: ...OK Result The Removing Backup Server Continue message appears Click Yes The Exit SyConfig and Reboot now message appears Click OK 13 Under Products select Monitor Server and then click Remove Monitor Server 14 Highlight the server you want to remove and then click OK Result The Removing Monitor Server Continue message appears Click Yes The Exit SyConfig and Reboot now message appears Click OK 15 C...

Page 423: ...d Administration Guide 423 July 2004 Migrating and uninstalling 18 Click Yes Result The Uninstall Component Selection window appears 19 Click Select All and then click Next Result The Uninstall Summary window appears ...

Page 424: ... perform the manual cleanup of Sybase server 1 In the default directory delete the Sybase folder 2 Delete the Master dat sybprocs dat and errorlog files 3 Delete the folder in which you installed the Symposium Web Center Portal database Result The manual cleanup is complete To uninstall Sybase Client 1 Log on to the computer with the Local Administrator user ID 2 From the Start menu choose Program...

Page 425: ...nd Administration Guide 425 July 2004 Migrating and uninstalling 4 Click Yes Result The Uninstall Component Selection window appears 5 Click Select All and then click Next Result The Uninstall Summary window appears ...

Page 426: ...stalling window appears and then the following window appears 7 Click OK Result The following window appears 8 Click OK 9 The following window appears 10 Click OK and then restart the computer 11 You must manually delete the Sybase folder for example C Sybase where C is the drive on which you installed Sybase Client ...

Page 427: ...database In this chapter Overview 428 Archiving and restoring Symposium Web Center Portal data 429 Backing up and restoring the Symposium Web Center Portal database 435 Configuring a network database backup 445 System recovery and platform migration 448 Purging the database 450 ...

Page 428: ...an restore it to the original location in the database For more information refer to Archiving and restoring Symposium Web Center Portal data on page 429 Backup and restore backs up the contents of your entire database Nortel Networks recommends that you back up your database on a regular basis to allow you to recover your data in the event of a catastrophic failure of the system or the hardware Y...

Page 429: ..._tab table attachments as referenced in the attachment _tab files acknowledgements_attachments table Once the data is archived the existing records of this information are deleted from the database including the archived attachments The customer details are only deleted if there are no existing contacts remaining for that customer Acknowledgment attachments are not deleted as they may be used by o...

Page 430: ...application to which you are archiving For example Excel has a limit of 65 536 rows of data therefore you can only archive 65 536 contacts or less at one time If you set the archive interval at 50 000 contacts then a busy period with a transaction arrival rate that is higher than usual is unlikely to cross the 65 536 boundary When archiving your transactions Nortel Networks recommends that you use...

Page 431: ...x type the name of the directory where you want to store the archived files for example hostname share dir where hostname is the name of the computer on which you want to store the archived file Note If you archive data to the same location as your previously archived data a message appears stating that your original archived data will be deleted and replaced by the new archived data You have the ...

Page 432: ...hiving utility must search through all of the contacts to extract the relevant data 6 If you want to store information about the customers check the Include Customer Data check box optional 7 In the Comment box type a comment about the contacts you plan to archive 8 If you want to log a record of the status messages that occur during the archive process check the Log Status Messages box 9 Click Ar...

Page 433: ...tel Networks Symposium Web Center Portal Portal Server Database Archive Result The following information appears when you select the folder containing the data you want to restore Comments Contains the comments that were entered when the archive was performed Contact ID Range The range of the contact ID numbers that will be restored You can only select contacts within the selected archive Date Ran...

Page 434: ...illset used in the archived data no longer exists 6 Choose one of the following options Restore all the Archived Contacts Restores all the contacts in the Archive folder you selected Restore Contacts with ID Allows you to restore contacts with specific IDs Restore Contacts for the following Customers Allows you to restore contacts for a specific customer Restore Contacts for the following Skillset...

Page 435: ... hcl default asp The backup and restore feature of Symposium Web Center Portal allows you to perform a manual backup on request schedule a daily or weekly backup of the Symposium Web Center Portal database cancel the scheduled backup restore a previous backup If you select Log File on either of the backup and restore utility windows the progress and success or failure of the backup or restore is l...

Page 436: ...n only schedule one weekly backup for a particular execution time unless the device to which the data will be backed up is the same for each of the multiple backups It is possible to schedule daily backups if the backup device on those days is the same either tape drive or network location Note You cannot schedule a backup to a tape drive one day and then to a network location the next day To sche...

Page 437: ...ox type the path to the tape drive A valid path to the tape drive is tapen where n is the number of the tape drive The first tape installed on a system is by default tape0 Note You can use the alias tapedump1 instead of tape0 you are backing up to a network location in the Backup box type name of the network computer shared directory name on the network computer swcpdb dmp For example if the netwo...

Page 438: ...ter the time you want the backup to start 6 Click Schedule To clear a scheduled backup 1 From the Start menu choose Programs Nortel Networks Symposium Web Center Portal Database Backup and Restore Result The SWCP Backup and Restore Utility window appears 2 Click Backup Result The Backup SWCP Database window appears ...

Page 439: ...led task you want to cancel If you do not know the task ID click Console Result A list of scheduled tasks and the corresponding ID appears In the AT schedule task box type the ID of the task you want to cancel 5 Click OK To back up the Symposium Web Center Portal database 1 From the Start menu choose Programs Nortel Networks Symposium Web Center Portal Database Backup and Restore Result The SWCP B...

Page 440: ...box type a path and valid device name such as tapedump1 For more information see To catalog the database on page 444 Result The Status window appears Note If you do not have a tape drive installed the tape is write protected the tape drive is not ready or the tape drive is empty the backup or restore will not be executed and an error message appears on the screen ...

Page 441: ...on choose Log File or Console Result If you choose Console the output looks like the example below If you choose Log File the Operation Details window appears when the operation is complete 5 Scroll to the end of the Operation Details window to ensure that the backup was successful and then click OK ...

Page 442: ... Interface until the restore is complete 2 From the Start menu choose Programs Administrative Tools Services and then restart the Sybase SQLServer_SWCP_SQLSRV and Sybase BCKServer_SWCP_SQLSRV_BS services 3 From the Start menu choose Programs Nortel Networks Symposium Web Center Portal Portal Server Database Backup and Restore Result The SWCP Backup and Restore Utility window appears CAUTION Risk o...

Page 443: ...e Restore SWCP Database window appears 5 Browse to the backup file you want to restore and then click Restore Result When the restore is complete the Operation Details window appears 6 Scroll to the end of the Operation Details window check for any error messages and then click OK 7 Restart the computer ...

Page 444: ... to find out the date time and the name of the device used to create the backup tape 1 From the Start menu choose Programs Nortel Networks Symposium Web Center Portal Database Backup and Restore Result The SWCP Backup and Restore Utility window appears 2 Click Restore Result The Restore SWCP Database window appears 3 Click Catalog Result A list of the contents of the previously backed up database ...

Page 445: ... take the server off line The server remains in service and copies the Symposium Web Center Portal database to a remote share point location 1 Select a user account It should be a domain account from the Portal server s domain This can be a new account for example SALES swcp_backup_user or an existing one for example EUROPE johnsmith Note If you are creating a new account ensure that the User must...

Page 446: ...database on page 439 13 Use name of the network computer shared directory name on the network computer swcp_db dmp to select the network share For example if the network computer name is NETWORKPC and the shared directory name is SWCP_BACKUP then type networkpc swcp_backup swcp_db dmp To restore the database from a network computer 1 Shut down all Symposium Web Center Portal applications 2 Stop Sy...

Page 447: ...d Administration Guide 447 July 2004 Maintaining the database is SWCP_BACKUP and the name of the database dump file that was saved in the database backup is swcp_db dmp then you enter networkpc swcp_backup swcp_db dmp ...

Page 448: ...ity to back up the database For more information refer to Backing up and restoring the Symposium Web Center Portal database on page 435 3 Make a copy of the Master dat and Sybprocs dat files 4 Make a copy of the e mail attachments folder 5 Export the registry key Nortel Networks Symposium Web Center Portal to a file To recover a Symposium Web Center Portal system from a system backup Note You must...

Page 449: ...t you exported in the previous procedure 6 Restart the computer 7 Restore the database backup For more information refer to Configuring a network database backup on page 445 You must also back up the Customer Interface separately by performing a Windows copy to the network or by using a third party utility ...

Page 450: ...ion from it For more information about backing up the database refer to Backing up and restoring the Symposium Web Center Portal database on page 435 If you want to save attachments associated with closed contacts you must run the archive utility For more information refer to Archiving and restoring Symposium Web Center Portal data on page 429 You do not have to run the purge utility after you run...

Page 451: ...rs 4 Choose a date You cannot choose the current date The purge feature deletes all the information up to and including the date you select 5 Click Purge 6 When the Purge Confirmation window appears click Yes Result If there are any inbound attachments associated with the contacts you are purging the following window appears 7 Perform one of the following tasks Click OK to delete the attachments ...

Page 452: ...ult If there are any outbound attachments associated with the contacts you are purging the following window appears 8 Perform one of the following tasks Click OK to delete the attachments Click Cancel to leave the attachments where they are Result The Purge Successful window appears 9 Click OK 10 Exit the Database Purge window ...

Page 453: ...Installation and Administration Guide 453 C h a p t e r 1 2 Installing and configuring pcAnywhere In this chapter Overview 454 Installing pcAnywhere 455 ...

Page 454: ...control the server as though you were directly connected to it Note Remote access is required to allow your distributor or Nortel Networks customer support to remotely log on to your server to provide support Before you install pcAnywhere you must ensure that you have DirectX 9b or later installed on your computer For more information see To verify your version of DirectX on page 143 If you have a...

Page 455: ...licy of your organization If you are upgrading from a previous version of the software and the installation wizard asks if you want to preserve configuration data select No Configuration data from previous versions of pcAnywhere is incompatible with pcAnywhere 11 0 1 CAUTION Risk of system failure Before you install pcAnywhere make sure that the server PC is using the correct video driver Failure ...

Page 456: ...e program finds the setup exe file on the CD 8 Click Next Result The pcAnywhere 11 0 launchpad appears 9 Click Symantec pcAnywhere Result The Windows Installer window appears and then the installation Welcome window appears This may take a few moments 10 Click Next Result The License Agreement window appears 11 Accept the terms of the license agreement and then click Next Result The Customer Infor...

Page 457: ... ensure optimum speed when using pcAnywhere before starting the program configure the Active Desktop settings on the server as follows a Right click anywhere on the server desktop b On the resulting pop up menu highlight Active Desktop until another pop up menu appears c On this pop up menu ensure that Show Web Content is not selected 1 Log on to Windows as Administrator 2 From the Windows Start m...

Page 458: ...propriate users for example Nortel Networks support personnel and distributors To configure pcAnywhere 11 0 1 or later as a host Note If you are using a modem connection with pcAnywhere you must have the modem configured before you perform this procedure 1 Log on to the server as Administrator 2 From the Windows Start menu choose Programs Symantec pcAnywhere Note If the system asks you to register...

Page 459: ...enu and then choose New Item Use Wizard Result The Host Setup Wizard window appears 5 From the Connection type for this host drop down box select your modem if you are using a modem connection with pcAnywhere otherwise choose TCP IP 6 From the Optimized for drop down list choose Low bandwidth modem connection ...

Page 460: ...ring pcAnywhere Standard 2 0 7 Click Next Result The following Wizard window appears 8 Ensure that Launch with Windows and Run minimized are checked and leave all other default settings as shown in the above graphic 9 Click Next Result The following Wizard window appears ...

Page 461: ...w appears 12 In the Login name box type a name for the caller account You can choose any name or use a name that is familiar to you such as NGenDist 13 In the Password box type the password for the caller account Tip If you typed NGenDist for the login name you can use the same NGenDist password that is used in Symposium Call Center Server or you can use a password of your choice 14 In the Confirm...

Page 462: ... from the resulting pop up menu Result The Host Properties account name window appears 19 Click the Callers tab 20 In the Caller list box highlight the caller account that you just created its name appears blank until you finish configuring it with the following steps and then click the Properties icon Result The Caller Properties window appears 21 Click the Privileges tab 22 Click the Superuser o...

Page 463: ...ain IP address automatically are selected 28 Click Apply to save your settings 29 Click the Protect Item tab if you want to assign a password to control who can modify the Network icon settings Otherwise skip to the next step 30 Click OK to save all pcAnywhere Host settings Result The Hosts window reappears ATTENTION If you select the Required to modify properties option on the Protect Item tab yo...

Page 464: ... password that is used in Symposium Call Center Server or you can use a password of your choice 32 Close the Symantec pcAnywhere window To start pcAnywhere 11 0 1 or later 1 Log on to Windows as Administrator 2 From the Windows Start menu choose Programs Symantec pcAnywhere Note If the system asks you to register pcAnywhere select Skip and then choose Yes when asked to confirm 3 In the pcAnywhere ...

Page 465: ...r 476 Troubleshooting the database 485 Troubleshooting the Portal Administrator 499 Troubleshooting the Symposium Email Manager 500 Troubleshooting Web Communications 503 Troubleshooting the Sample Customer Interface 508 Troubleshooting the Portal Agent Interface 512 Troubleshooting the HDX 514 Troubleshooting Internet Explorer 515 Troubleshooting the Portal Desktop 516 Troubleshooting archiving 5...

Page 466: ...is section provides troubleshooting information for Symposium Web Center Portal For each problem mentioned in this section it suggests possible solutions This section also provides information about the maintenance tools you can use to ensure Symposium Web Center Portal is running smoothly ...

Page 467: ...nce required by Symposium Web Center Portal 1 Check the e mail server mailboxes for any mail that was not processed by the Inbound Mail Handler IMH Log on to the e mail server and look at the number of e mails in each skillset s inbox This number should reduce each time the IMH runs Nortel Networks recommends that the administrator add the Symposium Web Center Portal mailboxes to the e mail client...

Page 468: ...he agent s phone to test the line connection 1 Copy the TAPI Browser application from the TAPI Server to the local hard drive on the agent s computer 2 Run the TAPI Browser pcAnywhere Symposium Web Center Portal provides pcAnywhere on the pcAnywhere 11 CD ROM For more information about the software see Installing pcAnywhere on page 455 1 Install the pcAnywhere software on both the Symposium Web Ce...

Page 469: ...the Portal server If the installation of the Portal server appears to hang and the application log has a message indicating not enough temporary database log space the Master dat master transaction log may be full You must purge the data from the transaction log To purge data from the transaction log during the Portal server component installation 1 Navigate to Sybase sqladv 12_5 2 Double click th...

Page 470: ...Result The Connect window appears 4 In the Login box type sa 5 Leave the Password box blank 6 Click Connect Result A window like the one below appears 7 From the drop down menu select master In the Session 1 window type the following command dump transaction master with no_log 8 Click the Execute icon ...

Page 471: ...e files you may need to stop the Sybase services for more information refer to To apply the Sybase Adaptive Server EBFs on page 78 If the services are stopped and you receive an error message indicating that the system cannot update the EBF file because the file is in use you must perform the following tasks 1 Search for the file that the system cannot overwrite 2 Rename the file that the system c...

Page 472: ...u want to view the logs Only the components installed on the server appear in the list A log file is created for each of the components the directory in which the system stores the log files The verbosity ranges from 1 to 6 as follows 1 Critical errors only Only critical errors Critical errors require immediate action to resolve a system failure 2 Critical and major errors All critical and major e...

Page 473: ...he current log file is full it becomes a backup file and a new log file appears When the second log file is full the backup file is deleted and the second log file becomes the backup file Reading the Symposium Web Center Portal trace file Each trace file provides the following information for each of the event codes timestamp date and time component event code log level process ID description modu...

Page 474: ...2 Check the Log File box for the components you want to filter The default for all of the components is off 3 Browse to the directory in which you want to store the log 4 Click OK To open the SWCP Log Configuration utility on an agent s computer 1 Browse to C Program Files Common Files Nortel Networks Symposium Web Center Portal where C is the drive on which you installed the Portal Desktop applic...

Page 475: ... bottom of the Symposium Web Center Portal Administration window The number of alarm messages appears in the middle of the status bar Tip You can double click the number of messages on the status bar to view details Interpreting error messages The most frequent error is an unassigned skillset This error means that no agents have been assigned to the skillset Customer requests that are routed to un...

Page 476: ...andling The DTH handles any communications errors with the TAPI server as a result of CTI link loss TAPI server congestion TAPI server restarts switch errors switch restarts and network problems All errors are reported in the Symposium Web Center Portal Event logs Local Administrator and Domain Administrator password issues Ensure that you have different passwords for your Local Administrator and ...

Page 477: ...ive datafill The Administrative datafill for Symposium Web Center Portal must be correct for the phone number and priority The phone number for each skillset must be a valid phone number and the phoneset must be where you can hear it ring for testing The database must be active and there must be valid transactions in the database that are candidates for the DTH The status of the transaction must b...

Page 478: ...is working correctly It is attempting to place calls but TAPI is not allowing the calls to go through This is not a problem with DTH or Symposium Web Center Portal To ensure that the TN in question is configured properly 1 Have the switch administrator check that AST is set properly in the switch The following example is an extract from a line showing that AST has been enabled on two keys 0 and 8 ...

Page 479: ...s d Click the plus sign beside My Network e Click the plus sign beside People f Choose Edit Options Result The Options window appears g Click the Phone option button h In the Phone Calls drop down box check to see if any of the lines you created appear Result You should see the lines you assigned to the Administrator ...

Page 480: ...ick OK and then press Not Ready on the phoneset Error stating an invalid agent state If you use the same TAPI lines assigned to the agent for any other telephony service the Portal Desktop and the agent s phoneset may not remain synchronized To synchronize the Portal Desktop and the phoneset on the agent PC 1 When a synchronization error message appears click OK 2 Change the status of the phoneset...

Page 481: ...o a call You can solve this problem by changing the call data lifespan on the TAPI server To change the call data lifespan for TAPI 2 3 1 From the Start menu choose Programs Nortel Networks Symposium TAPI Service Provider for M1 Configure Database 2 Click Preview Database Result The Database Configuration window appears 3 Click Provider 4 Change the Call Data Life Span parameter to a higher value ...

Page 482: ...you experience communication problems with the TAPI call data over the network you can design a dedicated CLAN to be used only between the Symposium Web Center Portal server the TAPI server and the agent PCs The DTH presents calls in bursts and then remains idle The DTH presents calls to the CDNs continuously until all the DTH TAPI lines are in use Once this occurs the DTH waits until a line becom...

Page 483: ...llset to which too few agents are assigned it may take time before these transactions are processed and the DTH is free to acquire more transactions Meanwhile agents assigned to other skillsets may have to wait until the DTH runs again before they receive new transactions to process You must ensure that the agent skillset assignment is balanced properly Symposium Call Center Server Call Routing ca...

Page 484: ... few new transactions the TxnMonitor controls the number of transactions that may be routed to available agents Ring Timeout is not working If the DTH Ring Timeout is not working properly you must verify that the TAPI Service Provider SP does not have necessary control DNs in particular the CDN that is used by the DTH to place a call with Symposium Call Center Server The TAPI SP tries to acquire t...

Page 485: ...database If the system cannot access the database perform the following tasks Ensure that the Sybase services are running Ensure that you can connect to the database for more information refer to To verify the connection to the database using Sybase Central Java Edition on page 80 Test the OLE DB connectivity using the Sybase OLE DB Provider Configuration Manager For more information refer to To t...

Page 486: ...ium Web Center Portal Troubleshooting Standard 2 0 To test the OLE DB connectivity 1 From the Windows Start menu choose Programs Sybase OLE DB Provider Configuration Manager Result The Sybase Configuration Manager window appears ...

Page 487: ... Administration Guide 487 July 2004 Troubleshooting 2 Double click SWCP_DB Result The Sybase ASE OLE DB Provider Setup window appears 3 Click Test Connect Result The Sybase ASE OLE DB Provider Connection window appears ...

Page 488: ...ng appears in the windows event viewer under the application logs Can t allocate space for object syslogs in database master because logsegment segment is full has no free extents If you ran out of space in syslogs dump the transaction log This problem occurs when the temporary log space used within Sybase is full The log space is used during database system operations to store temporary informati...

Page 489: ...qladv 12_5 2 Double click the sqladv icon Result A window like the one below appears 3 Choose Server Connect Result The Connect window appears 4 In the Login box type SWCP_ADMIN Note If you have changed the default login name and password you must use these new credentials to log on For more information refer to your system administrator ...

Page 490: ...action master with no_log 8 Click the Execute icon 9 Log off SQL Advantage 10 Restart the computer Result The Symposium Web Center Portal services start up Installation hangs during the installation of the Portal server If the installation of the Portal server appears to hang and the application log has a message indicating not enough temporary database log space the Master dat master transaction ...

Page 491: ...e transaction logs from the database during the Portal server component installation 1 Navigate to Sybase sqladv 12_5 2 Double click the sqladv icon Result A window like the one below appears 3 Choose Server Connect Result The Connect window appears 4 In the Login box type sa ...

Page 492: ...master 7 In the Session 1 window type the following command dump transaction master with no_log 8 Click the Execute icon 9 Log off SQL Advantage Result The installation of the database resumes Installation hangs during the installation of the Service Update If the installation of the SU appears to hang and the application log has a message indicating not enough temporary database log space the Mas...

Page 493: ... transaction logs from the database during the Service Update SU installation 1 Navigate to Sybase sqladv 12_5 2 Double click the sqladv icon Result A window like the one below appears 3 Choose Server Connect Result The Connect window appears 4 In the Login box type SWCP_ADMIN ...

Page 494: ...enu select master 7 In the Session 1 window type the following command dump transaction master with no_log 8 Click the Execute icon 9 Log off SQL Advantage Result The installation of the SU resumes Sybase shortcut properties error If when you run the Sybase Server Config utility you receive a Sybase Setup error message such as the one below the shortcut properties may be set incorrectly ...

Page 495: ...ig and then click Properties Result The Server Config Properties window appears 4 Click the Shortcut tab Result The following window appears 5 In the Start in box type the path to the SYCONFIG exe file for example C sybase ASE 12_5 bin 6 Click Apply to save your settings 7 Click OK to exit the Server Config Properties window Updating the Database ini file If the database user name or password is c...

Page 496: ...date it with the new details Then save and close the file When installed the Database ini file looks like this The database driver class needs to be changed for Oracle etc DRIVER com sybase jdbc2 jdbc SybDriver The driver protocol PROTOCOL jdbc sybase Tds The host name or host name of the database server HOST The port the database server listens on PORT 5005 The username of the database user USER ...

Page 497: ...se server is installed when there are existing servers a new port number may be assigned If this is the case you must manually update the Database ini file To check the port number setting 1 On the Windows Start menu on the database server click Start Programs Sybase DSEdit Result The dsedit window appears 2 Double click Server Address 3 Look at the entries for SWCP_SQLSRV ...

Page 498: ...498 Nortel Networks Symposium Web Center Portal Troubleshooting Standard 2 0 4 Select the entry with port 5000 5 Click Delete 6 Click OK 7 Restart the computer ...

Page 499: ...can occur with the Portal Administrator For each problem it suggests possible solutions Cannot log on to the Administrator If you cannot log on to the Administrator verify that the database is running ODBC error If you receive an ODBC error wait a few minutes and then perform the task again This error appears when there is a delay in the database startup ...

Page 500: ...onnection tool to verify your connections to the e mail server Note You can use the Email Connection tool to validate connections to a single e mail server at a time This tool does not support multiple e mail servers To verify more than one e mail server you must configure each e mail server separately test using the tool and then remove it before the next e mail server is set up and tested 1 Brow...

Page 501: ...verify the user names on the server 1 From the Start menu choose Run 2 Type telnet mailserver 110 where 110 is the port number for POP3 and then press Enter 3 Log on to the e mail server Result If the logon is successful a message like this one appears OK X1 NT POP3 Server mail009 IMail 7 04 997957 16 user billing OK send your password pass abc123 OK maildrop locked and ready If the logon was not ...

Page 502: ...gement or an e mail response to the customer Verify the following Auto acknowledgement is set up in the Symposium Web Center Portal Administrator SMTP service is running on the e mail server Symposium Email Manager service is running on the Symposium Web Center Portal server The customer s e mail address is correct ...

Page 503: ... allows you to simulate a web session You do not need to install any of the other Symposium Web Center Portal components to test this feature To test that it is working you can sign on as the customer and the agent You can then perform the following tasks Ask for live help Assist a waiting customer Create a callback web transaction Join a specific transaction You can then use the other section of ...

Page 504: ...nnect to the database 2 Verify that the DB URL line contains the correct user name Trace setup Use the Trace Setup found at http hostname WebCollab Debug index jsp where hostname is the name of the External Web server to modify the trace setup properties You can modify the trace level the log file name the location of the log and the maximum size of the file The trace log is Program Files Nortel N...

Page 505: ...ctionPool page allows you to view the number of database connections open in the Web Communications component at any one time Session state The Session State page displays all sessions that are not involved in a transaction JVM memory The JVM Memory page allows you to view the amount of memory being used by the system and the amount of memory not being used Verify database access The Verify Databa...

Page 506: ...le click Server Configuration Result The Server Configuration window appears 5 Double click the External Web server Result The Server Properties window appears 6 Change the name of the server and the port number of the server as required 7 Click Save Result The Confirm Cancellation window appears 8 Click OK Cannot install the Web Communications component If the Web Communications component will no...

Page 507: ...the folder in which you installed the Sample Customer Interface component Result A window like the one below appears 2 Modify the property WEBCOLLABURL in the web xml file to point to the full URL for the WebCollab servlet You must change the default host name in the URL to the host name of your External Web server 3 Save your changes ...

Page 508: ...le and that the web xml deployment descriptor file in the application s WEB INF subfolder has a valid reference to db properties To verify the Database Connection Parameters 1 Edit the swcp ci WEB INF web xml file and locate the DBPROPSFILE entry in the context param section Verify that its param value entry is the correct location of the db properties file 2 Edit the db properties file and ensure...

Page 509: ...is section may appear on systems deployed with JRun If when you try to log on to the Web Communications Administration window you receive an error message stating that you have entered an invalid user name or that you cannot connect to the database perform the following tasks 1 Clear the cache in Internet Explorer and then try to log on again to the Web Communications Administration window 2 If yo...

Page 510: ...descriptor file web xml you will find this located in the installation target WEB INF folder 4 Change the web site located in the DOCTYPE tag from http java sun com j2ee dtds web app_2_2 dtd to point to your hosted location for example http myserver resources web app_2_2 dtd Result You will now be able to deploy the web application Cannot verify the connection to the database using JRun If you can...

Page 511: ... folder a new xml file is created jrun web xml This xml file references a dtd file from the macromedia web site jrun web dtd This file can be found locally in C JRun4 docs descriptordocs dtds 1 Copy the dtd file to http myserver resources and change all references to it in the xml file to point to this location 2 For the Web Communications Manager deployments deploy the WEBCOLLAB web application I...

Page 512: ...ent exists in the Symposium Call Center Server database you have a license and you have not exceeded the limits of the license the Agent virtual directory was created the web application is running the user ID and password match The agent s screen freezes after selecting Load All If the call center experiences very high numbers of transactions then you must disable the Load All feature To disable ...

Page 513: ...vice 3 Click restart The agent s transaction window is empty The agent s transaction window may be empty when one of the following events occurs The database does not contain a New New Reply or Pending transaction The agent is not assigned to the correct skillset to view the transactions The database is not running You do not have a license or you exceeded the limits for your license Agent respons...

Page 514: ...ient settings and verify your Symposium Call Center Server settings For more information about Symposium Call Center Server refer to your Symposium Call Center Server documentation To verify the CLAN settings on your Symposium Call Center Server system 1 Choose Start Settings Network and Dialup Connections 2 From the Advanced Menu choose Advanced Settings Adapters and Bindings 3 Ensure that the ne...

Page 515: ...hooting Troubleshooting Internet Explorer Problems starting Internet Explorer If you experience problems starting Internet Explorer ensure your version of Internet Explorer meets the minimum requirements as specified in Installation data requirements on page 35 ...

Page 516: ...transaction on Option 11c systems you may be using old line cards in the slots where Phantom TNs for DTH are allocated To fix this problem you must use a Digital Line Card NT8D02GA Rel 7 introduced in 1999 or later Alternatively you can leave the slot unpopulated with CLS FLXA applied to any configured TNs to ensure that they are not audited and disabled by the Meridian Audit routines or use the u...

Page 517: ...g Troubleshooting archiving Archiving attachments You must install the appropriate language patch for Windows 2000 to successfully archive transactions that have attachment names in languages that are not installed by the default English Windows 2000 operating system ...

Page 518: ...nt Software CD ROM and then perform a fresh install of the component For more information about installing Symposium Web Center Portal refer to Chapter 2 Installing the Symposium Web Center Portal software To recover from a power outage during Symposium Web Center Portal database installation 1 Use the Nortel Networks Symposium Web Center Portal Server and Client Software CD ROM to uninstall the S...

Page 519: ...e Programs since you cannot predict at which stage the installation was interrupted All of the necessary uninstall files may not have been installed properly to allow a successful uninstall through Windows Add Remove Programs 3 Uninstall Sybase 4 Perform a fresh install of Sybase See Installing Sybase Adaptive Server Enterprise and Sybase Client on page 41 5 Perform a fresh install of the Symposiu...

Page 520: ...stall the particular component using the Nortel Networks Symposium Web Center Portal Server and Client Software CD ROM 2 Perform a manual cleanup if necessary of any files that were left over 3 Perform a fresh install of the component ATTENTION Do not attempt to continue with an interrupted installation once the server is running doing so may cause the server to become unstable and behave unpredic...

Page 521: ...list 523 Symposium Web Center Portal checklists 526 Sybase installation checklist 529 Portal Server checklist 530 Portal Administrator checklist 532 Portal Agent Interface checklist 533 External Web server checklist 534 Symposium Web Center Portal configuration checklist 535 Portal Desktop checklist 536 Email Manager checklist 537 Pre migration checklist 538 ...

Page 522: ... information and to help you complete all of the required tasks for a successful installation of Symposium Web Center Portal Before you install Symposium Web Center Portal you must also ensure that your system meets the minimum requirements mentioned in the Nortel Networks Symposium Portfolio Server and Operating System Requirements Guide P 2003 0381 Global provided on the Partner Information Cent...

Page 523: ...r Portal components on a US English version of Windows 2000 Server If you wait to change the operating system to US English after the installation you may encounter operational issues Component External Web server Portal Server Step Database x Install Sybase Adaptive Server Sybase Client and the required Emergency Bug Fixes EBFs See Installing Sybase Adaptive Server Enterprise and Sybase Client on...

Page 524: ... Portal license See Configuring the Symposium Web Center Portal license on page 114 Agent Interface x Install the Agent Interface See Installing the Portal Agent Interface component on page 118 x Configure the Portal Agent Interface See Configuring the Portal Agent Interface on page 126 Sample Customer Interface and Web Communications x Install J2SE v 1 4 2 SDK for Windows all languages including ...

Page 525: ...mation refer to Installing software Service Updates and PEPs on page 134 x Install the Customer Interface See Installing the Sample Customer Interface and Web Communications components on page 160 Component Step Agent Desktop Ensure that Internet Explorer 5 5 or later is installed and working Install J2SE v 1 4 1_02 JRE for Windows all languages including English supplied on the CD ROM See To inst...

Page 526: ... in your system Refer to Supported configuration on page 30 Ensure that the network administrator removes all system policies on the network for all of the servers The installation may be restricted by these policies if they are not removed Ensure that Internet Explorer 5 5 or later and all the security updates are installed on the Portal Server Agent PCs Administration server optional and the Ext...

Page 527: ...nt Ensure you have WinZip installed on your computers Component Required information Database the drive on which you plan to install the database It must be at least 20 Gbytes the host name of the server on which you plan to install the database the host name site name case sensitive and version number of the server in Symposium Call Center Server or Symposium Express Call Center the host name of ...

Page 528: ...he Tomcat download Apache Tomcat 4 1 x if you are planning to use Apache Tomcat as your servlet engine to deploy the Customer Interface web application download the Apache 2 0 files and the Apache 2 0 documentation if you are not using IIS and you plan to install the Web Communications component on your External Web server Web Communications the JRE bin directory path download the Apache 2 0 files...

Page 529: ...etwork connections If you are installing Sybase on a Pentium IV ensure that you disable the JIT Compiler before you start installing Sybase For more information refer to To disable the Just In Time Compiler on page 42 If you want to create the master dat and sybprocs dat files in a folder other than the default folder you must create this folder for example D Sybase data before you start the insta...

Page 530: ...h you plan to create your database create one now for example F SWCPDB Ensure that you have DirectX 9 0b or later installed on the computer For more information see To verify your version of DirectX on page 143 Ensure you know the host name site name and release number of your Symposium Call Center Server or your Express Call Center Server Ensure you know the host name of your e mail server for bo...

Page 531: ...allation and Administration Guide 531 July 2004 Installation and configuration checklists Install the Portal Server component For more information see To install the Portal Server component on page 88 Steps ...

Page 532: ...installing the Portal Administrator component on a computer other than the computer on which you installed the database you must install Sybase Open Client and the appropriate Sybase EBFs For more information see Installing the Sybase Open Client on page 73 Install the Portal Administrator component See To install the Portal Administrator on page 109 ...

Page 533: ...t installing IIS refer to your Microsoft documentation Note After you install IIS you must reinstall Service Pack 4 Ensure that you have DirectX 9 0b or later installed on the computer For more information see To verify your version of DirectX on page 143 Ensure you know the host name of the External Web server Ensure you know the path to the Agent Interface server root directory This is usually c...

Page 534: ...ion environment on page 145 Install Apache Tomcat 4 1 18 or later For more information refer to Installing Apache Tomcat on page 154 Install Apache 2 0 if you are installing the Sample Customer Interface without the Web Communications component For more information see To install the Apache Web Server on page 148 Configure Apache Tomcat and Apache optional For more information see To configure Apa...

Page 535: ...ssed web based or e mail transactions You must configure the DTH to enable transactions to be pushed to agents For more information refer to Configuring the DTH for TAPI on page 195 Transaction Monitor The Transaction Monitor scans the Symposium Web Center Portal database for transactions in an invalid state It updates these transactions so they are available for processing by an agent You must co...

Page 536: ...ows all languages including English supplied on the Symposium Web Center Portal CD ROM For more information see To install J2SE 1 4 1 JRE on page 178 Ensure that Internet Explorer 5 5 or later is installed and working Install the Portal Desktop component For more information see To install the Portal Desktop on page 182 Change the ActiveX controls and plug ins on the agent PCs For more information...

Page 537: ...n page 102 Ensure you configured the DTH For more information refer to Configuring the DTH for TAPI on page 195 Configure the Symposium Web Center Portal Email Manager For more information see Configuring e mail for Symposium Web Center Portal on page 229 Configure a default rule and a delivery failure rule For more information refer to Symposium Web Center Portal Rules Administration on page 267 ...

Page 538: ...b Center Portal Release 4 0 database is deleted by the migration For more information refer to Updates made to the Symposium Web Center Portal Release 4 0 system during the migration on page 375 Decide on which server you want to run the Migration Utility and then install it on this server You must install the Migration Utility on the Symposium Web Center Portal Release 4 0 database server Ensure ...

Page 539: ...hat there is enough room in the Symposium Web Center Portal Release 3 0 database to store the temporary files created during the migration For more information refer to Space requirements for the Migration Utility on page 374 Stop the OAM service on the Release 4 0 Portal server Stop all Symposium Web Center Portal services except the SQL services on the Release 4 0 Portal server Steps ...

Page 540: ...540 Nortel Networks Symposium Web Center Portal Installation and configuration checklists Standard 2 0 ...

Page 541: ...de 541 A p p e n d i x B Symposium Web Center Portal telephony components In this appendix Overview 542 Symposium Web Center Portal Agent thin client and DTH application 543 Symposium Web Center Portal and the call center environment 547 ...

Page 542: ...with Symposium Web Center Portal This section also provides an overview of TAPI and how it works with Symposium Web Center Portal the workflow logic of the DTH configuring the switch and information about the Transaction Monitor For more information about Meridian 1 Succession 1000 and TAPI requirements refer to the Nortel Networks Symposium Web Center Portal Planning and Engineering Guide ...

Page 543: ... transaction blended media on the desktop The DTH can place Symposium Web Center Portal web based transactions in the ACD queue by creating a TAPI call with attached data This allows Symposium Web Center Portal transactions to blend with ACD traffic for presentation to the agent s desktop The Symposium Web Center Portal HDX application sends a request for information For more information refer to ...

Page 544: ...ries the database to find the oldest transactions with new status The order by which the transactions are sorted in this query is based on the priority and callback time This method of handling transactions is valid for the transactions submitted in the database since the polling took place You can change the polling interval using the DTH Configuration Utility Transactions with a higher priority ...

Page 545: ...implementation must allow for variable call flow to function properly 8 If there is Symposium Web Center Portal data attached to the call the Portal Desktop component determines what to do with the agent s phone to prevent more CTI events from occurring A pop up dialog box appears on the agent interface The agent can accept or decline the transaction 9 Subsequently portions of the call data are po...

Page 546: ...oneset to Not Ready or Busy If the DTH has pushed a request to the agent s desktop then the thin client can be utilized to change the state of the transaction from New to Pending When the agent accepts the request it is then usually marked as Open When the transaction is completed the agent can leave it in a Pending or Closed state If there is no Symposium Web Center Portal data attached to the ca...

Page 547: ...ter Server does not support HDX Symposium Call Center Server requirements Your Symposium Call Center Server setup must meet the requirements listed in the following checklist Symposium Call Center Server Ensure that the Host Data Exchange HDX service is running You can verify this by ensuring that the TFA_Service and Name Service are started in the Windows Service Control Panel Note HDX is only av...

Page 548: ... Call Center Server You can verify this by performing one of the following tasks If you are unsure of the current port being used open the HDX properties file D nortel vbrt51 properties HDX properties in a text editor The line vbroker se iiop_tp scm iiop_tp listener port indicates the port number being used If you are using the IOR file rather than the Naming Service retrieve the IOR file For more...

Page 549: ...to the appropriate skillset and thereby to the appropriate agent To achieve this several factors must be considered CDNs must be mapped in the Symposium Web Center Portal administration section of the Symposium Web Center Portal Agent Setup The CDNs associated with Symposium Web Center Portal skillsets are ultimately controlled by the Symposium Express Call Center and its scripts Calls routed to t...

Page 550: ...rtal web calls Since the scripts of the Symposium Express Call Center are generated automatically after the setup and configuration is completed in the Symposium Express Call Center the scripts then are not permitted to be edited the call flows for both types of calls must be mapped prior to the setup of the Symposium Express Call Center You do not route both types of calls in the same way For mor...

Page 551: ...ing the Customer Interface In this appendix Overview 552 Implementation of the Sample Customer Interface 555 Using Java business objects in a Java application 563 Customizing the Sample Customer Interface 567 Customizing the Customer Interface for Web Communications 574 ...

Page 552: ...ormation to allow you to implement the application as it is or to modify it to suit your needs You can also use this section as a starting point to write your own applications For more information about installing the Sample Customer Interface refer to Installing the Sample Customer Interface and Web Communications components on page 160 For information about deploying the Customer Interface see T...

Page 553: ...ooses e mail he or she is prompted to enter query text The request is submitted to the contact center s Symposium Web Center Portal server and an agent is assigned to the transaction The agent views the customer information and the nature of the query and can initiate an e mail response to the customer Text Chat response If the customer prefers to talk to an agent online in real time using Text Ch...

Page 554: ...peration and the time zone in which the contact center is located Any transactions received outside the hours of operation are not processed until the DTH starts the next day Note Symposium Web Center Portal uses a timestamp based on the time zone in which the Portal server is located When you create your customer web pages you can either translate the customer s local time to the Portal server ti...

Page 555: ...iles required by the application are placed in a location where the servlet engine can readily locate them When you start writing the code for the application you must refer to the database You do this through the Java classes provided in the businessobjects jar and dbconnector jar files These files are located in the application s WEB INF lib if you are using Apache or inetpub wwwroot if you are ...

Page 556: ...to the Login jsp page passing a command value of 2 to register a new user The JavaScript functions are provided to validate the entries made to the form You can customize this page User registration and logon The Login jsp page allows you to collect the user s personal details check his or her password and enter all the information into the database to allow a new user to register for the first ti...

Page 557: ...to identify themselves you create a special form in the Login html page The data from the form is submitted to the Login jsp page It checks the details against the database and redirects the user accordingly The Login jsp page is called with a command value of 0 and with the following parameters cust_surname Customer s last name cust_phone_intl Customer s international code cust_phone_area Custome...

Page 558: ...word Customer s password registered Data Description trans_skillset_name The name of the skillset to which the transaction will be routed trans_pref_callback_media Preferred callback media type for example e mail or telephone defined by the customer trans_objective Objective text of the transaction for example the body of an e mail callback_time_hour The hour in which a scheduled callback will be ...

Page 559: ...fault_Skillset Default_Skillset OPTION OPTION value MM_Orders MM_Orders OPTION OPTION value MM_Sales MM_Sales OPTION OPTION value MM_Support MM_Support OPTION For example if you wanted to add a new skillset for MM_Help then you would add the following line OPTION value MM_Help MM_Help OPTION Special handling for Web On Hold and Text Chat If the user selects Text Chat as the preferred callback opti...

Page 560: ...to enter his or her personal details the nature of his or her query and the preferred callback method only The InsertTransAndCust jsp page is designed to handle such a request This page is similar to the InsertTrans jsp page Like InsertTrans jsp it takes in parameters formats the parameters and stores the data in the database The following information is required skillset query text or objective p...

Page 561: ...nsertTransAndCust jsp page gives an error For more information about these fields refer to the Nortel Networks Symposium Web Center Portal User Guide for Supervisors Note Some of these fields can be hidden fields in the source form The JSP page inserts a record into the transaction table and produces a confirmation HTML page that displays the transaction details for the user Even though a customer...

Page 562: ...562 Nortel Networks Symposium Web Center Portal Customizing the Customer Interface Standard 2 0 Note The user ID must be unique ...

Page 563: ...libraries You must have certain JAR files Java libraries in your applications classpath to access the Symposium Web Center Portal components from your Java application The core libraries that you require which contain the publicly exposed and documented APIs supported by Nortel Networks are dbconnector jar Nortel Library businessobjects jar Nortel Library You must also have several additional libr...

Page 564: ...e Nortel Networks Symposium Web Center Portal Sample Customer Interface web inf lib Before you use any of the components mentioned in the previous section you must load this configuration file For more information refer to the Javadoc documentation provided for the DBConnector library supplied on the Nortel Networks Symposium Web Center Portal Server and Client Software CD ROM You can configure th...

Page 565: ... this file in your application Dlog4j configuration log4j properties You configure the LOG4J propterties file to change the maximum log file size and change the number of backup files you want to keep To change to maximum log file size 1 Navigate to the LOG4J properties file 2 Under Set the maximum log file size enter size you require in kbytes 3 Save your changes to the file To change to the numb...

Page 566: ... output log file To do this or to override the configuration programmatically from within your code consult the LOG4J documentation http jakarta apache org log4j docs ATTENTION If you do not configure the LOG4J as detailed the Symposium Web Center Portal components still function normally but no logging is provided You must enable logging to receive support from Nortel Networks for any third party...

Page 567: ...The following table provides a summary of what you can customize in each page Page What to customize Login html This is a pure HTML page You can customize this page You should keep the link to Login jsp Login jsp There are three HTML response pages generated from this page The first page contains a form that allows the user to submit a transaction The second page responds to the user if the logon ...

Page 568: ...a customer s interactive session with the application The public interfaces are documented using Sun s Javadoc tool which produces a fully indexed and hyperlinked set of HTML files that can be examined with any web browser For more information refer to the Symposium Web Center Portal Javadoc on the Nortel Networks Symposium Web Center Portal CD ROM InsertTrans jsp InsertTransAndCust jsp These are ...

Page 569: ...be unique identifiers within the database it validates them first This is done with an instance of the Customer business object that instance is created in the code by the line Customer objCust new Customer where objCust is the identifier by which it accesses the object To be able to refer to the Customer class in this way the JSP page must import the Customer class in the line of code page import...

Page 570: ...hosen e mail address is already in use login jsp does this by giving the customer an invalid ID value and then setting a failure code for inspection later If you determine that the customer has chosen a valid username and e mail combination then you can proceed with registering the customer This involves creating the customer record in the Symposium Web Center Portal database You register a custom...

Page 571: ...ng the code in errorpage jsp this method returns void nothing If the create method succeeds the customer session can proceed as normal Therefore you add the customer s registration data to the session so that it can be readily accessed in subsequent pages The relevant section of login jsp reads as follows iCmd Integer parseInt request getParameter command Customer objCust new Customer if iCmd 2 ne...

Page 572: ...ust_phone_area objCust setPhoneNumber request getParameter cust_phone_no objCust setEmail strCustEmail objCust setAddress1 request getParameter cust_address_1 objCust setAddress2 request getParameter cust_address_2 objCust setAddress3 request getParameter cust_address_3 objCust setAddress4 request getParameter cust_address_4 objCust setAddress5 request getParameter cust_address_5 objCust setPostco...

Page 573: ...tribute cust_phone_area objCust getPhoneArea session setAttribute cust_phone_number objCust getPhoneNumber session setAttribute cust_email objCust getEmail session setAttribute cust_address_1 objCust getAddress1 session setAttribute cust_address_2 objCust getAddress2 session setAttribute cust_address_3 objCust getAddress3 session setAttribute cust_address_4 objCust getAddress4 session setAttribute...

Page 574: ...ommunications Text Chat request must be immediate it cannot be scheduled The Web Communications confirmation page and Web On Hold display pages must be in two different browser windows The Web On Hold display window should contain a scroll bar and be resizable but it should not contain the toolbar so that the web user cannot wander out of the displayed page If required the request for Text Chat pa...

Page 575: ...llback scenario to operate correctly The session ID consists of the transaction ID plus a four digit password This page extracts the transaction ID and password from the session ID and passes the following URL parameters to the servlet using the WebCollab Joinconnection post method Field name case sensitive Description conn_id The Symposium Web Center Portal transaction ID Username The web user s ...

Page 576: ...to the following files CustJoin html CustJoin jsp Non real time scenario no existing transaction Refer to the following files TransAndAgent html InsertTransAndAgent jsp TransAndAgentConfirm html New web pages Help html This web page is an example of what is required for pages that allow customers to click to contact an agent This web page should include the following JavaScript functions setCookie...

Page 577: ...lready initiated the web session This page should include the JavaScript function joinConn The page must have a noscript and noscript tag section to inform the web user that the page requires that JavaScript be enabled on the browser and that it gracefully failed the request The three hidden fields are parameters needed to pass to the Web Communications servlet WebCollab JoinConnection A message s...

Page 578: ...hat is required for a confirmation page to an agent who has submitted a Symposium Web Center Portal transaction for a telephony customer Java scripts The following information is a standard set of javascript functions used to manage customer session information and the web communication utilities setCookie name value expire Parameters name The name of the cookie value The URL of the page where the...

Page 579: ...e cookie specified Code function getCookie name var cname name var dc document cookie if dc length 0 var begin dc indexOf cname if begin 1 begin cname length var end dc indexOf begin if end 1 end dc length return unescape dc substring begin end return null isCookieEnable Parameters None Description This function checks the cookie setting on the browser If set return true otherwise return false ...

Page 580: ... navigator appName substr 0 3 if myBrowser Net This is a Netscape browser var cookieName _Symposium Web Center Portal_CookieCheck var cookieValue checkCookie setCookie cookieName cookieValue Check to see if able to create cookie var myCookie getCookie cookieName if myCookie null return false else return true else This is a IE if navigator cookieEnabled return true else return false ...

Page 581: ... if isCookieEnable Create a cookie name _Symposium Web Center Portal_StartPage and expire in an hour var exp new Date exp setTime exp getTime 60 60 1000 var cookieName _Symposium Web Center Portal_StartPage var cookieValue window location href setCookie cookieName cookieValue exp window location Symposium Web Center Portal html login html else Cookie is not enabled on browser alert This page requi...

Page 582: ...value of cust_firstname The mainURL will get the value of the cookie named _Symposium Web Center Portal_StartPage This function calls servlet WebCollab JoinConnection to open a separate window without a toolbar to display the Web On Hold pages Code function WebOnHold var form document webonhold form conn_id value trans_id_value form skillset value skillset_name_value form userName value cust_first...

Page 583: ... The html form where this function is called Description This function calls the Web Communications API It joins the customer to the agent s initiated Web Communications session Code function joinConn form var d new Date var winName A d getMilliseconds form target winName window open winName height 495 width 450 resizable yes return true New JSP files CustJoin jsp This page connects to the Symposi...

Page 584: ...onnection with the parameter s transaction ID user name and password InsertTransAndAgent jsp This page connects to the Symposium Web Center Portal database It calls the getCustId stored procedure to get a customer ID The username should be the customer s first name customer s last name currentDateAndTime It includes the new customer ID the username the customer s first name the customer s last nam...

Page 585: ...for tracing purposes LoginFail jsp Processes a failure to logon InsertTransAndC ust jsp siteclose html errorPage jsp SWCPLog jsp WebOnHoldConfir m jsp TransAndCustConf irm jsp A web site does not always require that a customer log on to submit a transaction This page creates a skillset object for a skillset specified by the user creates a new customer object for the details submitted by the custom...

Page 586: ...merdet ails jsp UpdateCustConfir m jsp Retrieves and supplies the customer details that require updating and then updates the Customer record updatecustomerd etails jsp UpdateCustomer js p login jsp transhist jsp logout jsp Sets up the html for the update customer page it calls updatecustomer jsp to fill the data in the table of this html page UpdateCustConfi rm jsp login jsptranshist js plogout j...

Page 587: ...splays the information in an html table When in the transhistory of a customer if you click on the transid the response history appears CustJoin jsp swcp_CustJoinFail html WrongTransId html Splits the trans id into trans id and password gets the customer id creates a cusomter object and gets the customer details for this object Gets the WebCollab page and sends it InsertTransAndA gent jsp TransAnd...

Page 588: ...D of the chat session 42 450 chatdspl html Chat display 125 450 agtchatcntrl html Chat controls 125 450 sep html Divider 5 450 agtpagetools html Page tools 145 450 sep html Divider 5 450 swcpident html SWCP logo 30 450 Page Description Height Width custctl jsp Customer Main Chat Window 477 450 ident html Nortel Networks logo 50 450 sep html Divider 5 450 sessid jsp ID of the chat session 42 450 ch...

Page 589: ...ls html Page tools 150 450 sep html Divider 5 450 swcpident html Symposium Web Center Portal logo 30 450 Page Description Height Width agentwait html Bottom toolbar of the Web On Hold window 80 Not specified ConnClose html Displayed to customer when Text Chat session ends same as the Main Chat window Not specified HoldTimeOut html Displayed to customer when the Web On Hold times out same as the Ma...

Page 590: ...590 Nortel Networks Symposium Web Center Portal Customizing the Customer Interface Standard 2 0 ...

Page 591: ...1 A p p e n d i x D Dashboard utility In this appendix Overview 592 User accounts and privileges 593 Installing the Dashboard utility 594 Using the Dashboard utility 601 Dashboard utility limitations 608 Uninstalling the Dashboard utility 609 ...

Page 592: ...m components in terms of network connectivity services logged error events memory and database usage and mailbox status It also checks for ASP handling server time differences general network health and available TAPI lines and their status You can install and run the Dashboard on any of the Symposium Web Center Portal servers the Symposium Web Center Portal server Agent server External Web server...

Page 593: ...posium Web Center Portal server The user running the Dashboard must have User permissions on the Symposium Web Center Portal server and the External Web server For more information refer to your Windows documentation Note You can also enable the guest account on the External Web server Contact your network administrator before you enable the guest account If the remote computer does not reside in ...

Page 594: ... following requirements Windows 2000 Server Advanced Server or Professional Sybase Open Client J2SE1 4 1_0x provided on the CD ROM To install the Dashboard utility 1 Insert the Nortel Networks Symposium Web Center Portal Server and Client Software CD ROM into the CD ROM drive If the installation program does not start automatically run Setup exe from the CD Result The Symposium Web Center Portal I...

Page 595: ...Installation and Administration Guide 595 July 2004 Dashboard utility 2 Click Install Components Result The following window appears 3 Click Administration Tools Result The following window appears ...

Page 596: ...596 Nortel Networks Symposium Web Center Portal Dashboard utility Standard 2 0 4 Click Dashboard Result The InstallShield Wizard window appears 5 Click Next Result The License Agreement window appears ...

Page 597: ...ashboard utility 6 Click Yes to accept the license agreement Result The Customer Information window appears 7 Type your name and the name of the company and then click Next Result The Symposium Web Center Portal Choose Destination Location window appears ...

Page 598: ...pt the destination folder for the Dashboard program and then click Next Result The Ready to Install the Program window appears 9 Click Install Result The Dashboard software is installed and the required registry entries and shortcuts are created The InstallShield Wizard Complete window appears ...

Page 599: ...tart the computer To start the Dashboard utility 1 On the Windows Start menu click Programs Nortel Networks Symposium Web Center Portal Administration Tools Dashboard Result The Settings window appears 2 In the Portal Server box enter the host name of the Symposium Web Center Portal server 3 Select the Refresh Interval and logging and error options For more information refer to Settings on page 60...

Page 600: ...Web Center Portal Dashboard utility Standard 2 0 4 Click OK Result The Dashboard attempts to connect to the specified server If the server is valid and can be contacted and all the privileges are correct the Dashboard window appears ...

Page 601: ...services or processes updates the event log and checks the status of the Agent Interface and the External Web servers The Dashboard monitors the network statistics generated from this activity and displays the results in the following window The Dashboard periodically performs a full update including logging on to mailboxes checking memory usage and the number of transactions and checking the time...

Page 602: ...omputer on which it resides The name of the Symposium Web Center Portal server to which the Dashboard is connected appears and is pinged at regular intervals Transactions Reports the current number of transactions in the database If this figure grows beyond the Transaction Threshold an error is reported and the status changes to red In this case you should back up and purge the database You should...

Page 603: ...s If usage is greater than 75 percent an amber warning appears If usage moves above 90 percent a red warning is flagged Mailbox The Dashboard retrieves the current list of mailboxes from the database each time an update cycle occurs It logs on to each mailbox in turn to determine that it is valid and active To prevent excessive load a limit of one mailbox per 2 minutes is imposed This means that f...

Page 604: ...te a more extensive report on the available TAPI lines The additional information includes the applications using the line the userID under which they are running and the TAPI Service Provider CI Server This section relates to the External Web server The only tests carried out on the server are a ping to verify its network connectivity and a check of the time which is compared against that of the ...

Page 605: ...If the RMI Registry or Java Console processes are not present the status is set to red Network The Network section reports on the status of all the computers in the network For example it pings the server in Symposium Call Center Server and pings the LDAP server if enabled The statistics are generated from the pings of the various servers during each sanity or full system check Avg Reply Time This...

Page 606: ...f the status of each section and gives general pointers as to what may be the root cause of any reported errors Use it in conjunction with the Dashboard log file in investigating any reported problems Settings Click Settings to open the window in which you can change the following Dashboard settings Portal Server The host name of the Symposium Web Center Portal server to which you want to connect ...

Page 607: ...lt value appears This should be accepted unless a change has been recommended by Nortel Networks customer support Note You can click OK to initiate an update with the new values you entered Tray icon You can minimize the Dashboard while it is running Right click the tray icon to provide a menu option allowing you to hide the Dashboard window The tray icon continues to reflect the status of the Sym...

Page 608: ...I checks are executed but reflect the status of the locally assigned lines rather than the DTH TAPI lines The Dashboard can only determine if the service or process is stopped or started If it is changed to a paused state manually the Dashboard does not display a change of status Ping checks are in place however if remote servers suddenly become unavailable during a Dashboard update attempts that ...

Page 609: ...om the Windows Start menu click Settings Control Panel Add Remove Programs 2 Select Symposium Web Center Portal Dashboard 3 The Symposium Web Center Portal Dashboard window appears 4 Select Uninstall the current version and then click Next 5 Follow the prompts to uninstall the Dashboard utility Note You must uninstall Sybase and MDAC separately ...

Page 610: ...610 Nortel Networks Symposium Web Center Portal Dashboard utility Standard 2 0 ...

Page 611: ...Installation and Administration Guide 611 A p p e n d i x E Installing the External Web server components on Linux In this appendix Installing and configuring the External Web server on Linux 612 ...

Page 612: ...ations Java Developer Kit j2sdk 1_4_1_06 linux i586 rpm bin or later from java sun com Tomcat jakarta tomcat 4 1 29 tar gz or later from jakarta apache org Apache2 apache2 2 0 47 1 7 2 i386 rpm or later from jakarta apache org Mod_jk2 Connector mod_jk2 ap20 2 0 1 1jpp i386 rpm or later from jakarta apache org Installing the Java Developer Kit 1 Log on to the External Web server as the root user 2 ...

Page 613: ...ME directory path to Java installation d Save and close the profile file 9 On the shell prompt type the following command to verify that JAVA_HOME was set correctly echo JAVA_HOME Result The path to the Java directory appears Note If the directory in which Java was installed does not appear you must correct it before you install Apache2 Installing Apache2 Apache 2 is a refactoring of the original ...

Page 614: ...9 96B rpm rpm ivh OPENSSL096 09 9 6B rpm 6 If you already have a version Apache installed on your computer remove it now Type the following command to remove your version of Apache rpm e apache 7 Copy the Apache2 rmp file to the directory where you want to install Apache2 and then run the following command rpm ivh apache2 2 0 47 1 7 2 i386 rpm where apache2 2 0 47 1 7 2 i386 rpm is the version of ...

Page 615: ...mbolic link to the jakarta tomcat directory to shorten the name of the installation folder 4 Go to the etc directory 5 Use the gedit command to open the profile file 6 Add the following line to edit the environment variable export TOMCAT_HOME directory path to Tomcat installation 7 Add the following line to add CATALINA_HOME as an environment variable export CATALINA_HOME directory path to Tomcat ...

Page 616: ...usr lib libapr 0 so 0 9 3 usr lib libapr so 0 Note If the libapr so 0 file already existis you must rename this file before you create the symbolic link 3 Navigate to the directory in which you downloaded the mod_jk2 rpm 4 Run the following command rpm ivh nodeps mod_jk2 ap20 2 0 1 1jpp i386 rpm 5 Create the following symbolic link ln s usr lib apache2 jkjni so libjkjni so 6 Go to the etc httpd2 c...

Page 617: ...httpd2 logs jk2 shm channelSocket address 127 0 0 1 channelSocket port 8009 13 Save and close the jk2 properties file 14 Copy workers2 properties from the SU location to the etc httpd2 conf directory This file is used to configure mod_jk2 Its contents appear below The URL patterns specified at the end of the file are handled by Tomcat servlet container logger level DEBUG config file etc httpd2 con...

Page 618: ...n jk2 shm size 1000000 debug 0 disabled 0 workerEnv info Global server options timing 1 debug 0 Default Native Logger apache2 or win32 can be overriden to a file logger useful when tracing win32 related issues logger logger file 0 channel socket localhost 8009 info Ajp13 forwarding over socket debug 0 tomcatId localhost 8009 status info Status worker displays runtime informations vm info Parameter...

Page 619: ... Xmx128M OPT Djava compiler NONE disabled 1 uri jkstatus info Display status information and checks the config file for changes group status uri examples servlets uri examples jsp uri examples uri examples servlets HelloW uri ci servlet uri ci jsp uri ci uri WebCollab servlet uri WebCollab jsp uri WebCollab 15 Navigate to the opt TOMCAT_HOME conf directory 16 Copy the server xml file to another lo...

Page 620: ...ave the changes to server xml Installation checkpoint Follow this procedure to ensure that the mod_jk2 is working properly 1 Start the Tomcat service Note If it already started then stop it and restart it 2 Start the Apache2 service Note If it already started then stop it and restart it 3 Verify Tomcat examples available on port 80 at http localhost examples jsp index html If you can execute the T...

Page 621: ...dCol admin_password userRoleTable administrator_details roleNameCol tomcat_role 4 Copy the swcp_ci tar file and swcp_webcomms tar file from the Service Update folder location to the opt directory 5 Type the following command to expand the contents of swcp_ci tar tar xvf swcp_ci tar 6 Type the following command to expand the contents of swcp_webcomms tar tar xvf swcp_webcomms tar 7 This creates a d...

Page 622: ...the full URL for the WebCollab servlet You will need to change the default host name in the URL to the host name of your External Web server 14 Open the db properties file This should be located at opt nortelnetworks swcp ci WEB INF lib Change the default host name of the database server to the host name of your database server Save your changes and close the file 15 Open the log4j properties file...

Page 623: ...and Administration Guide 623 July 2004 Installing the External Web server components on Linux 18 Go to http localhost ci login html Result If the page is displayed correctly you have correctly followed the procedure ...

Page 624: ...624 Nortel Networks Symposium Web Center Portal Installing the External Web server components on Linux Standard 2 0 ...

Page 625: ...view 626 External Web server checklist for IIS and JRun 627 Installing the Java 2 Standard Edition environment with IIS 630 Configuring IIS as your web server 633 Installing JRun optional 639 Installing the Sample Customer Interface component 646 Installing the Web Communications component 655 Deploying the Sample Customer Interface on JRun 663 ...

Page 626: ...eb server and JRun as your servlet engine Before you install these components ensure that you complete the steps listed in the External Web server checklist see External Web server checklist for IIS and JRun on page 627 This appendix explains how to complete the following tasks configuring IIS for the Sample Customer Interface installing JRun installing the Sample Customer Interface component inst...

Page 627: ...the Java 2 Standard Edition environment with IIS on page 630 x x x Ensure that IIS is installed on you computer if you are planning to use it as your Web server x x Install Apache 2 0 if you are using Apache 2 0 as your Web server x Install Apache Tomcat 4 1 18 or later For more information refer to To install Apache Tomcat for IIS on page 633 x Install Jrun For more information refer to Installin...

Page 628: ...ctX Diagnostic Tool window appears 5 Ensure that the DirectX Version number is 9 0b or later Edit the Customer Interface web xml deployment descriptor file For more information see To edit the web xml file for the Sample Customer Interface on page 652 x x x Edit the Customer Interface db properties file For more information refer to To edit the db properties file on page 653 x x x Edit the Custome...

Page 629: ...rnal Web Server components with JRun and IIS 6 If the DirectX Version is not 9 0b or later you must download the latest version from the Microsoft web site For more information refer to your Microsoft Windows documentation What s next Install the J2SE environment with IIS ...

Page 630: ... Apache 4 x If you are using Apache 5 x refer to the Apache 5 x documentation http jakarta apache org for information about requirements To install J2SE 1 4 2 SDK You install J2SE 1 4 2 SDK on the External Web server You must uninstall any prior versions of Java 2 Standard Edition and Software Development Kits before you install J2SE 1 4 2 SDK 1 Download J2SE SDK from the Java Sun web site http ja...

Page 631: ...stallation directory for example C j2sdk1 4 2 bin a On the desktop right click the My Computer icon and then choose Properties Result The System Properties window appears b Click the Advanced Tab c Click Environment Variables Result The Environment Variables window appears d Under System variables select Path and then click Edit Result The Edit System Variable window appears ...

Page 632: ... Variable JAVA_HOME and point it to the installation folder a On the desktop right click the My Computer icon and then choose Properties Result The System Properties window appears b Click the Advanced Tab c Click Environment Variables Result The Environment Variables window appears d Under System variables click New Result The New System Variable window appears e In the Variable Name box type JAV...

Page 633: ...ws 2000 Server It is not installed as part of Windows 2000 Advanced Server If it is not installed on your computer install it now For more information about installing IIS refer to your Microsoft documentation Note After you install IIS you must reinstall Service Pack 4 To install Apache Tomcat for IIS Note If you are installing a later version of Tomcat than the one mentioned in the procedure bel...

Page 634: ...ng the External Web Server components with JRun and IIS Standard 2 0 3 Click OK Result The License Agreement window appears 4 Click I Agree Result The following window appears 5 Ensure that you select NT Service NT 2k XP only You can keep the other defaults ...

Page 635: ...5 July 2004 Installing the External Web Server components with JRun and IIS 6 Click Next Result The following window appears 7 Keep the default path and click Install Result The installer starts copying the files The following window appears ...

Page 636: ...Installer Options window appears 8 Leave the port number as 8080 9 Enter a user name and password Make note of the password you enter here you may need it later 10 Click Next Result The following window appears 11 Click Close 12 You can verify that the Tomcat Service is running by navigating to http localhost 8080 Result The Apache Tomcat web site appears ...

Page 637: ... HKEY_LOCAL_MACHINE SOFTWARE Apache Software Foundation Jakarta Isapi Redirector 1 0 7 In the 1 0 directory add a string value with the name extension_uri and a value of jakarta isapi_redirect dll 8 In the 1 0 directory add a string value with the name log_file and a value pointing to where you want your log file to be for example TOMCAT_HOME logs isapi log 9 In the 1 0 directory add a string valu...

Page 638: ...roperties file and add the following lines swcp ci swcp_worker swcp ci swcp_worker swcp ci jsp swcp_worker swcp ci servlet swcp_worker WebCollab swcp_worke WebCollab jsp swcp_worker WebCollab servlet swcp_worker examples swcp_worker examples jsp swcp_worker examples servlet swcp_worker 15 Edit the workers2 properties file and add the following text worker list swcp_worker worker swcp_worker host h...

Page 639: ... You can purchase JRun from the Macromedia Corporation http www macromedia com software jrun After you install JRun you must download and install the recommended service packs from the Macromedia web site For more information refer to the JRun documentation If you are using Tomcat as your servlet engine follow the procedures in To install Apache Tomcat for IIS on page 633 To install JRun 4 0 1 Ins...

Page 640: ...stalling the External Web Server components with JRun and IIS Standard 2 0 2 Click Next Result The License Agreement window appears 3 Select I accept the terms in the license agreement and then click Next Result The Customer Information window appears ...

Page 641: ...External Web Server components with JRun and IIS 4 Enter the required information and then click Next Result The Select Java Virtual Machine JVM window appears 5 Ensure that the path of the JVM is correct and then click Next Result The Destination Folder window appears ...

Page 642: ...Web Center Portal Installing the External Web Server components with JRun and IIS Standard 2 0 6 Click Next Result The Setup Type window appears 7 Select Complete and then click Next Result The User Name and Password window appears ...

Page 643: ...Web Server components with JRun and IIS 8 Type your user name and password and then click Next Result The Install JRun Services window appears ATTENTION You must remember this user name and password You will use this user name and password to access the JRun Management Console ...

Page 644: ...er components with JRun and IIS Standard 2 0 9 Ensure you select Install JRun as a Windows service and then click Next Result The Ready to Install the Program window appears 10 Click Install Result The JRun Status window appears and then the Install Wizard Completed window appears ...

Page 645: ...checkboxes except for Launch the JRun Servers and then click Finish Result The JRun installation is complete You must download and install any necessary JRun patches For more information refer to the Macromedia web site http www macromedia com software jrun Continue with the next procedure to install the Sample Customer Interface ...

Page 646: ...ybase Open Client and the required EBFs the web server Apache or IIS and a J2SE environment JRun before you can install the Sample Customer Interface component To install the Sample Customer Interface 1 Log on to the External Web server using the Local Windows Administrator user ID 2 Insert the Nortel Networks Symposium Web Center Portal Server and Client Software CD ROM into the CD ROM drive If t...

Page 647: ...e 647 July 2004 Installing the External Web Server components with JRun and IIS 3 Click Install Components Result The following window appears 4 Click Sample Customer Interface Result The Symposium Web Center Portal Welcome window appears ...

Page 648: ...enter Portal Installing the External Web Server components with JRun and IIS Standard 2 0 5 Click Next Result The License Agreement window appears 6 Click Yes to accept the license agreement Result The Customer Information window appears ...

Page 649: ... External Web Server components with JRun and IIS 7 Type your user name and the name of your company and then click Next Result The Choose Destination Location window appears 8 Verify the path and then click Next Result The Ready to Install the Program window appears ...

Page 650: ...nformation refer to Installing software Service Updates and PEPs on page 134 To configure the Customer Interface installation folder for IIS If you are using IIS as your web server you must configure the Customer Interface component installation folder 1 Log on to the server on which you installed the Customer Interface using the Local Windows Administrator user ID 2 Right click the folder in whic...

Page 651: ...mer Interface component you must configure the Sample Customer Interface When you install the Sample Customer Interface component the jsp html and css files are copied into the swcp ci folder and the subfolders WEB INF WEB INF classes and WEB INF lib are created There is also a db properties file that configures the database connectivity parameters and a log4j properties file that configures loggi...

Page 652: ... paths to the db properties and log4j properties files listed in the web xml file are correct a Perform a search for both the db properties file and log4j properties file Verify the path to each of these files and compare them to the paths listed in the web xml file b Edit the web xml file as necessary Ensure you enter the full path and file name starting with the drive letter c Ensure that if you...

Page 653: ...igate to the db properties file 2 Open the db properties file in Notepad Result A window like the one below appears 3 Ensure that all the information in the file is correct database name SWCP_DB database server the host name of your Portal server and database port number 5005 Note You must change the default host name of the database server to the host name of your database server 4 Edit the file ...

Page 654: ...ndow like the one below appears 3 You must create a new path to location in which you want to store the log file for example C Program Files Nortel Networks Symposium Web Center Porta swcp ci swcplogs swcp log The swcp log is not created during the installation It is generated when the Sample Customer Interface component is activated 4 Save your changes Note For more information about the log4j pr...

Page 655: ...mmunications is installed on the External Web server You must successfully install the Customer Interface on the External Web server before you install the Web Communications component This section assumes that you successfully deployed the Sample Customer Interface with either Apache or IIS and that you are using JRun as your servlet engine You must follow the installation sequence listed the Web...

Page 656: ...ram does not start automatically run Setup exe from the CD Result The Symposium Web Center Portal Install window appears Ensure you installed the Sample Customer Interface component and that it was successfully deployed For more information refer to Installing the Sample Customer Interface and Web Communications components on page 160 Note The Web Communications component requires that you install...

Page 657: ...ministration Guide 657 July 2004 Installing the External Web Server components with JRun and IIS 3 Click Install Components Result The following window appears 4 Click Web Communications Result The Welcome window appears ...

Page 658: ...enter Portal Installing the External Web Server components with JRun and IIS Standard 2 0 5 Click Next Result The License Agreement window appears 6 Click Yes to accept the license agreement Result The Customer Information window appears ...

Page 659: ...nts with JRun and IIS 7 Type your user name and the name of your company and then click Next Result The Symposium Web Center Portal Servers window appears 8 Type the host names of the Portal server and the External Web server and then click Next Result The Webserver Root Directory window appears ...

Page 660: ...IIS Standard 2 0 9 Perform one of the following tasks 10 Click Next Result The Choose Destination Location window appears IF THEN you chose IIS as your web server ensure the root directory points to Inetpub wwwroot you chose Apache 2 0 as your web server ensure the root directory points to APACHE_HOME htdocs ...

Page 661: ...tion can take several minutes to finish The InstallShield Complete window appears 13 Click Finish Note When the installation of the Web Communications Component is complete you must install Service Update 05 or later on the External Web server to ensure that the Web Communications Administration works properly Result The Web Communications installation is complete You must install all of the neces...

Page 662: ...lt host name in the URL to the host name of your External Web server 4 You can now install the latest Service Update on the External Web server For more information refer to Installing software Service Updates and PEPs on page 134 Note Once you install Service Update 05 or later you must add clickstream jar to the ClassPath To add clickstream jar to the ClassPath 1 On the desktop right click the M...

Page 663: ...n to deploy the Sample Customer Interface with JRun 4 0 Note Once you successfully deploy the Sample Customer Interface on JRun you must install SU05 To set up the services for JRun 1 From the Start menu select Programs Macromedia JRun 4 JRun Launcher Note Ignore any DOS windows if they appear Result The JRun Launcher window appears ATTENTION The boxes in the Web Application Information window are...

Page 664: ...s If the default or admin servers are not started start them now Select the server and then click Start 3 From the Start menu choose Programs Macromedia JRun 4 Web Server Configuration Tool Result The JRun Web Server Configuration window appears ATTENTION Every time you restart your computer use the procedure above to ensure that the JRun servers are started ...

Page 665: ...er drop down list choose Apache In the Configuration Directory drop down list browse to the Apache Configuration folder usually located in Program Files Apache Group Apache Conf Click Advanced The Advanced Setting window appears In the Path to server binary box browse to Apache exe usually located in Programs Apache Group Apache apache exe and then click OK On the Advanced Settings window click OK...

Page 666: ...gure JRun for the Sample Customer Interface To configure JRun for the Sample Customer Interface 1 From the Start menu choose Programs Macromedia JRun 4 JRun Management Console 2 Use the user name and password you created in step 16 in the procedure To configure IIS with Tomcat on page 637 Result The JRun Management Console window appears you want to use IIS as your web server from the Web Server d...

Page 667: ...d Administration Guide 667 July 2004 Installing the External Web Server components with JRun and IIS 3 On the server list click the plus sign beside default 4 Click Settings Result The Java VM Settings window appears ...

Page 668: ...the location where you installed the Sample Customer Interface for example C inetpub wwwroot swcp ci WEB INF lib and then add the following files to the Classpaths businessobjects jar dbconnector jar jconn2 jar log4j jar swcpcore jar Note After you install Service Update 3 or later you must add clickstream jar to the Classpath For more information about Service ...

Page 669: ... the External Web Server components with JRun and IIS Update 3 refer to Installing software Service Updates and PEPs on page 134 6 Click Update to save your changes 7 Continue with the next procedure to create a web application for the Customer Interface with JRun ...

Page 670: ...ions box click Add Result The Deployment Files window appears 3 Browse to the location where you installed the Sample Customer Interface component The location of the Sample Customer Interface installation files is different depending on the web server you are using If you are using Apache as your web server browse to Program Files Nortel Networks Symposium Web Center Portal Sample Customer Interf...

Page 671: ...sing IIS as your web server browse to intepub wwwroot swcp ci where swcp ci is the folder in which you installed the Sample Customer Interface component 4 Click Open 5 Click Deploy Result The following windows appear 6 Enter the following information Context Path Host The host name of the External Web server Context Path swcp ci ...

Page 672: ...nf file 7 Ensure you select Enable File Serving and leave the defaults already checked 8 Click Apply to save these settings Note If an error appears restart the computer Log back onto the JRun Management Console Under the default branch click the SWCP CI link If the context path host is not saved reenter the information and then click Apply To verify the deployment using JRun 4 0 1 From the Start ...

Page 673: ...ent Console window click default Services Security Result The JRun Security window appears 2 Ensure the Control Flag for both the User Modules and Role Modules is set to Optional a On User Modules double click JRun Default User Module Result The following window appears b From the Control Flag drop down box choose optional c Click Apply ...

Page 674: ...d IIS Standard 2 0 d On Role Modules double click JRun Default Role Module Result The following window appears e From the Control Flag drop down box choose optional f Click Apply 3 On the User Modules box click Add Result The JDBC Users window appears 4 Enter the following information Control Flag optional ...

Page 675: ...or_details Username Column admin_logon_id Password Column admin_password 6 Click Apply to save your changes 7 On the Role Modules box click Add Result The JDBC Roles window appears 8 Enter the following information Control Flag optional Database JNDI Name SWCP_DB 9 Select Use Details and then enter the following information Table Name administrator_details Username Column admin_logon_id Role Colum...

Page 676: ...so now For more information refer to To install the Web Communications component on page 656 To configure JRun for the Web Communications component 1 From the Start menu choose Programs Macromedia JRun 4 JRun Management Console 2 Use the user name and password you created in step 16 on page 638 to log on to the JRun Management Console Result The JRun Management Console window appears 3 On the serv...

Page 677: ...the New Classpath box browse to C Program Files Nortel Networks Symposium Web Center Portal WebCollab WEB INF classes encryption jar and then click Open 8 Click Add 9 In the New JNI Library Path box browse to C Program Files Nortel Networks Symposium Web Center Portal WebCollab WEB INF classes com nortel util log and then click Open 10 Click Add 11 Click Update to save your changes 12 Continue wit...

Page 678: ...the Web Communications component with JRun 4 0 1 On the JRun Management Console click J2EE Components Result The J2EE Components on default window appears 2 On the Web Applications box click Add Result The Deployment Files window appears 3 Browse to Program Files Nortel Networks Symposium Web Center Portal WebCollab and then click Open ...

Page 679: ...llaboration Manager window and the General Settings for SWCP Web Collaboration Manager window appear 5 Enter the following information Context Path Host The host name of the External Web server Context Path WebCollab Document Root Program Files Nortel Networks Symposium Web Center Portal Web Collab 6 Ensure you select Enable File Serving and leave the defaults already checked ...

Page 680: ...enter the details 8 Close the JRun Console 9 Restart the computer 10 Follow the next procedure to verify the deployment To verify the deployment using JRun 4 0 From the Start menu choose Programs Macromedia JRun 4 JRun Management Console Result SWCP Web Collaboration Manager appears in the list under the default server To set up security with JRun 4 0 If you installed the Web Communications compon...

Page 681: ...ick Resources JDBC Data Source Result The Add JDBC Data Source window appears 3 In the Data Source Name box type SWCP_DB 4 In the Database Driver drop down box select Sybase 5 Click Add Result The Data Source Settings window appears 6 Enter the following information Data Source Name SWCP_DB JNDI Name SWCP_DB Database Name SWCP_DB Server IP Hostname The hostname of the Portal Server Server Port 500...

Page 682: ...rtel admin again 11 Click Submit to save your changes 12 Click the Verify icon to test the connection Result A message appears indicating the connection to the database was successful To restart the JRun server 1 From the Start menu choose Programs Macromedia JRun 4 JRun Launcher Result The JRun Launcher window appears 2 From the JRun Servers column select admin and then click Restart 3 From the J...

Page 683: ...ll See Automatic call distribution call ACD DN See Automatic call distribution directory number activity code A number that an agent enters on his or her phoneset during a call Activity codes provide a way of tracking the time agents spend on various types of incoming calls They are also known as Line of Business LOB codes For example the activity code 720 might be used to track sales calls Agents...

Page 684: ...the development process by providing commonly used programming procedures Automatic call distribution A means of automatically distributing an organization s incoming calls among a number of answering positions ACD agents Automatic call distribution is useful in operations where callers want a service rather than a specific person Calls are serviced in the order they arrive and are distributed so ...

Page 685: ... log on to any phoneset within their ACD subgroup The supervisor must log on to the supervisor phoneset to monitor his or her assigned agents C call destination The site to which an outgoing network call is sent See also call source call presentation class A collection of preferences that determines how calls are presented to an agent A call presentation class specifies whether a break time betwee...

Page 686: ...equires to run an application CLAN See Customer local area network CLID See Calling Line Identification client The part of Symposium Call Center Server that runs on a personal computer or workstation and relies on the server to perform some operations See also server command A building block used with expressions variables and intrinsics to create scripts Commands perform distinct functions such a...

Page 687: ... have not been queued to a skillset or a specific agent by the end of a script desktop user A configured user who can log on to Symposium Web Center Portal from a client PC Dialed Number Identification Service An optional service that allows Symposium Call Center Server to identify the phone number dialed by the incoming caller An agent can receive calls from customers calling in on different DNIS...

Page 688: ...a network embedded local area network A dedicated Ethernet TCP IP LAN that connects the server in Symposium Call Center Server and the switch G global settings Settings that apply to all skillsets or IVR ACD DNs that are configured on your system global variable A variable that contains values that can be used by any script on the system You can only change the value of a global variable in the Sc...

Page 689: ...a 32 bit numeric address written as four values separated by periods Each value can be 0 to 255 For example 1 160 10 240 could be an IP address IP address See Internet Protocol address IVR See Interactive voice response J JAR A Java archive file This is the standard library format used by Java applications and it is the format in which all of Symposium Web Center Portal s Java components are packa...

Page 690: ... API utilized by Symposium Web Center Portal s Java components M M1 Meridian 1 switch Master script The first script executed when a call arrives at the Symposium Web Center Portal A default Master script is provided with Symposium Web Center Portal but it can be customized by an authorized user It can be deactivated but not deleted See also network script primary script script secondary script Me...

Page 691: ...r Server calls forwarded from one site to another for customers using NSBR The network script is a system defined script provided with Symposium Web Center Portal but it can be customized by an authorized user It can be deactivated but not deleted See also Master script primary script script secondary script network skillset A skillset that is common to every site on the network Network skillsets ...

Page 692: ...ming calls cannot be queued to the skillset See also local skillset network skillset skillset P PEP See Performance Enhancement Package Performance Enhancement Package A Symposium Call Center Server supplementary software application that enhances the functionality of previously released software by improving performance adding functionality or correcting a problem discovered since the original re...

Page 693: ...Emergency key on the phoneset the emergency call is presented to the agent s reporting supervisor See also Automatic call distribution route A group of trunks Each trunk carries either incoming or outgoing calls to the switch router A device that connects two LANs Routers can also filter messages and forward them to different places based on various criteria S sample script A script that is instal...

Page 694: ...Windows NT structure and requirements A service provides system functionality Simple Network Management Protocol A systematic way of monitoring and managing a computer network The SNMP model consists of four components managed nodes which are any device such as hosts routers and printers capable of communicating status to the outside world via an SNMP management process called an SNMP Agent manage...

Page 695: ...has the highest priority SNMP See Simple Network Management Protocol source site The site from which an incoming network call originates supervisor A user who manages a group of agents See also Automatic call distribution reporting supervisor switch The hardware that receives incoming calls and routes them to their destination switch resource A device that is configured on the switch For example a...

Page 696: ...ternet TCP IP is the standard protocol for transmitting data over networks U utility A program that performs a specific task usually related to managing system resources Operating systems contain a number of utilities for managing disk drives printers and other devices V validation The process of checking a script to ensure that all the syntax and semantics are correct A script must be validated b...

Page 697: ...tion Guide 697 July 2004 Glossary Wide area network A computer network that spans a relatively large geographical area Typically a WAN consists of two or more local area networks LANs The largest WAN in existence is the Internet ...

Page 698: ...698 Nortel Networks Symposium Web Center Portal Glossary Standard 2 0 ...

Page 699: ...7 Apache Web Server 148 154 configuring 158 archive 430 archiving data 429 restoring data 432 archive utility 429 attachment encoding 252 attachment directories configuring 258 designating 258 sharing 257 auto acknowledgement 248 automatic refresh 225 auto reply 248 auto response adding attachments 252 creating 249 inserting data 250 setting up 248 B backup clearing a scheduled backup 438 database...

Page 700: ...nse 249 keyword groups 276 rules 292 templates for personalized signatures 255 CTI 476 customer details 328 customer details 328 Customer Interface 552 customizing 552 installing 160 646 troubleshooting 508 511 customer queries managing 558 customer response e mail response 553 telephone callback 553 Text Chat response 553 customers changing details 328 viewing the list of 328 customize the Sample...

Page 701: ... error messages interpreting 475 errors 472 475 External Web server 142 169 configuration 31 F features 17 filter 472 font options 310 form sharing 357 forms 357 G guidelines 40 archiving 429 for antivirus software 39 for Click Stream Tracking 365 for customizing the Customer interface 574 for Page Push 353 for sharing forms 357 for Text Chat 347 for Web On Hold 359 utility class software applicat...

Page 702: ... Keep mode 203 keyword group creating 276 removing 279 selecting for a rule 296 keywords 284 L LDAP 338 libraries 563 license 114 licensing 21 links adding links to pages 560 Linux 25 612 checkpoint 620 installing Apache2 613 installing the Java Developer Kit 612 installing the mod_jk2 connector 616 installing the Sample Customer Interface and Web Communications 620 623 installing Tomcat 615 requi...

Page 703: ...ackages PEPs installing 134 uninstalling 134 permissions 177 modifing for the SWCPLog folder 187 personalized signatures 254 creating templates for 255 port number setting verifying 497 Portal Administrator installing 102 109 113 troubleshooting 499 Portal Agent virtual directory 126 Portal Agent Interface 118 225 access for a domain user 129 changing the host name 191 configuring 126 132 default ...

Page 704: ...57 sharing forms guidelines 357 shutting down Portal Server 140 skillset auto acknowledgement 314 CDN 316 properties 312 skillsets managing 312 migrate 393 412 software CD ROM 33 uninstalling 418 spell checker 333 deleting words 333 starting Portal Server 140 status bar 475 string filters 262 supervisors adding 322 324 support tools 468 supported configuration 30 supported international languages ...

Page 705: ...s creating for personalized signatures 255 Terminal Service 456 Text Chat 347 349 553 559 administration 347 configuring 347 guidelines 347 predefined response 349 third party application class 36 utility class 36 third party software 35 timestamp 554 TN configuration 478 To Address configuring for a rule 294 trace file 473 trace information 472 Trace Setup 504 transaction closing 226 transaction ...

Page 706: ...W WAN 224 web application 670 Web Communications 18 143 administration 344 installing on Linux 620 623 installing with JRun 655 682 managing 343 pages 589 timers 368 troubleshooting 503 507 windows 587 Web On Hold 359 559 troubleshooting 506 web pages 576 web pages samples 344 web server configuring 633 IIS 633 637 WEBCOLLABURL 662 windows Web Communications 587 Windows Event Viewer 488 ...

Page 707: ..._______________________________ _______________________________________________________________________________ 5 What information if any was missing from this book _______________________________________________________________________________ _______________________________________________________________________________ ___________________________________________________________________________...

Page 708: ...Reader Response Form Reader Response Form ...

Page 709: ......

Page 710: ...aging between the Meridian 1 and Symposium Web Center Portal is proprietary to Nortel Networks Any other use of the data and the transmission process is a violation of the user license unless specifically authorized in writing by Nortel Networks prior to such use Violations of the license by alternative usage of any portion of this process or the related hardware constitutes grounds for an immedia...

Reviews: