


86
Chapter 4: Animation
•
The Speed settings control how Director moves a sprite between each keyframe. The Sharp
Changes option is the default setting. Using this option, Director calculates how to move the
sprite between each pair of keyframes separately. If a sprite’s keyframes are separated by unequal
numbers of frames in the Score, or by different amounts of space on the Stage, abrupt changes
in speed may occur as the sprite moves between keyframe locations. Smooth out these speed
changes by selecting the Smooth Changes option.
Sprite with modified ease-in and ease-out settings
To change the acceleration or deceleration of a sprite:
1
Use one of the tweening methods to create a moving sprite.
2
Select View > Sprite Overlay > Show Paths to see how far the sprite moves between each frame.
3
Select the sprite and select Modify > Sprite > Tweening.
4
Use the Ease-In and Ease-Out sliders to specify the percentage of the sprite’s path through
which the sprite should accelerate or decelerate.
5
Select one of the following speed settings:
Sharp Changes
moves the sprite between keyframe locations without adjusting the speed.
Smooth Changes
adjusts the sprite’s speed gradually as it moves between keyframes.
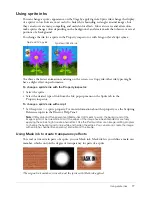
Tweening other sprite properties
In addition to tweening a sprite’s path, Director can tween the size, rotation, skew, blend, and
foreground and background color of a sprite. Tweening size works best for vector-based cast
members created in the Vector Shape window or in Macromedia Flash MX 2004 (bitmaps can
become distorted when resized). Director can tween all of these properties at once.
To make a sprite fade in or out, you can tween blend settings. To make sprites spin or tilt, use
rotation. To create gradual shifts in color, you can tween color settings.
Note:
To prevent Director from tweening a certain sprite property, select Modify > Sprite > Tweening
and turn off any of the tweening options.
To tween sprite properties:
1
If the Score isn’t open, select Window > Score.
2
Position a sprite on the Stage and make sure it spans all the frames in which you want the
sprite to change.
3
Select the start frame of the sprite in the Score.
4
To tween size, scale the sprite or resize the sprite on the Stage. For more information, see
“Resizing and scaling sprites” on page 71
.
Summary of Contents for DIRECTOR MX 2004-USING DIRECTOR
Page 1: ...DIRECTOR MX 2004 Using Director...
Page 16: ...16 Chapter 1 Introduction...
Page 82: ...82 Chapter 3 Sprites...
Page 98: ...98 Chapter 4 Animation...
Page 134: ...134 Chapter 5 Bitmaps...
Page 242: ...242 Chapter 10 Sound and Synchronization...
Page 274: ...274 Chapter 11 Using Digital Video...
Page 290: ...290 Chapter 12 Behaviors...
Page 302: ...302 Chapter 13 Navigation and User Interaction...
Page 334: ...334 Chapter 15 The 3D Cast Member 3D Text and 3D Behaviors...
Page 392: ...392 Chapter 16 Working with Models and Model Resources...
Page 418: ...418 Chapter 18 Movies in a Window...
Page 446: ...446 Chapter 22 Managing and Testing Director Projects...