


Importing cast members
45
•
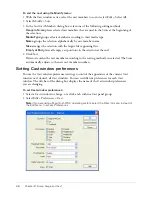
To retrieve media from the Internet during playback, Director requires that the projector
include certain Xtra extensions. To include these Xtra extensions automatically, click Add
Network in the Movie Xtras dialog box. Movies playing in web browsers do not require these
Xtra extensions.
Note:
Select Edit > Preferences > Network to define standard network settings for the Director
authoring environment. If you are using a Macintosh OS X operating system, select the Director
menu, instead of the Edit menu, to access Preferences.
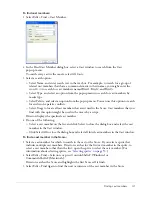
Choosing import image options
If you import a bitmap cast member with a color depth or color palette that is different from that
of the Stage (the current movie), Director lets you select the image’s color depth and color palette.
You can choose to import the bitmap at its original color depth or at the Stage color depth. (The
Stage color depth is the same as the system color depth.) You can also choose to import the
image’s color palette or remap the image’s colors to a palette in the movie.
In many cases, it’s easiest to change the image’s color depth to the depth of the movie and remap
the image to the color palette that is used in the rest of the movie. For more information about
controlling color in Director, see
Chapter 7, “Color, Tempo, and Transitions,” on page 145
.
If you change 16-, 24-, or 32-bit cast members to 8 or fewer bits, you must remap the cast
members to an existing color palette.
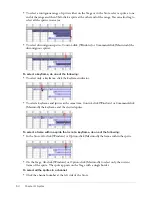
To select bitmap image options for importing:
1
Import a bitmap image by selecting File > Import. (For more information about this procedure,
see
“Importing cast members” on page 42
.)
2
If the Image Options dialog box appears while you are importing a bitmap image using
File > Import, select one of the following Color Depth options:
Image
specifies the color depth and palette of the image.
Stage
specifies the color depth of the current Stage.
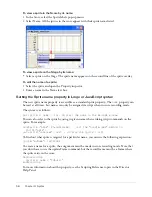
3
Select a Palette option to change palette settings for 2-, 4- or 8-bit images:
Import
imports the image with its color palette. The palette appears as a new cast member
immediately following the bitmap cast member.
Remap To
replaces the image’s colors with the most similar solid colors in the palette you
select from the pop-up menu.
4
Select Image options:
Trim White Space
removes any white pixels from the edges of the image. Deselect this option
to preserve the white canvas around an image.
Dither
blends the colors in the new palette in the Palette section to approximate the original
colors in the graphic.
5
To apply the current settings to all the remaining files that you selected for importing, select
Same Settings for Remaining Images.
Summary of Contents for DIRECTOR MX 2004-USING DIRECTOR
Page 1: ...DIRECTOR MX 2004 Using Director...
Page 16: ...16 Chapter 1 Introduction...
Page 82: ...82 Chapter 3 Sprites...
Page 98: ...98 Chapter 4 Animation...
Page 134: ...134 Chapter 5 Bitmaps...
Page 242: ...242 Chapter 10 Sound and Synchronization...
Page 274: ...274 Chapter 11 Using Digital Video...
Page 290: ...290 Chapter 12 Behaviors...
Page 302: ...302 Chapter 13 Navigation and User Interaction...
Page 334: ...334 Chapter 15 The 3D Cast Member 3D Text and 3D Behaviors...
Page 392: ...392 Chapter 16 Working with Models and Model Resources...
Page 418: ...418 Chapter 18 Movies in a Window...
Page 446: ...446 Chapter 22 Managing and Testing Director Projects...