


Setting linked Director movie properties
203
To place a Director movie cast member in the current movie:
1
Do one of the following:
■
For an internal movie, drag the film loop cast member to the Stage or Score.
■
For a linked external movie, drag the movie cast member to the Stage or Score.
2
Extend the sprite through all the frames in which you want it to appear.
3
To change any of the movie’s properties, use the Movie tab of the Property inspector.
See the next section.
Setting linked Director movie properties
To determine whether a linked Director movie is cropped or scaled to fit within a sprite’s
bounding rectangle, you use the Property inspector. You can also use the Property inspector to
enable the movie’s scripts, mute its sounds, and specify whether it loops.
To set linked movie properties:
1
Select a linked movie cast member.
2
To display the Property inspector, select Modify > Cast Member > Properties, or select Window
> Property Inspector.
3
If necessary, display the Member tab in Graphical mode.
The following noneditable settings are displayed:
■
The cast member size in kilobytes
■
The cast member creation and edit dates
■
The name of the last person who modified the cast member
4
To view or edit the cast member name, use the Name field.
5
To add comments about the cast member, use the Comments field.
6
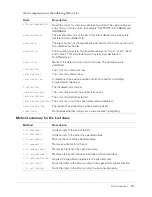
To specify how Director removes the cast member from memory if memory is low, select one
of the following options from the Unload pop-up menu:
3—Normal
sets the selected cast members to be removed from memory after any priority 2 cast
members have been removed.
2—Next
sets the selected cast members to be among the first removed from memory.
1—Last
sets the selected cast members to be the last removed from memory.
0—Never
sets the selected cast members to be retained in memory; these cast members are
never unloaded.
7
Click the Linked Movie tab in Graphical mode.
8
To determine how the linked movie appears within the sprite bounding rectangle, select a
Framing option:
Crop
displays the movie image at its default size. Any portions that extend beyond the sprite’s
rectangle are not visible.
Center
is available only if Crop is selected. It keeps the movie centered within the sprite’s
bounding rectangle if you resize the sprite.
Scale
resizes the movie to fit inside the bounding rectangle.
Summary of Contents for DIRECTOR MX 2004-USING DIRECTOR
Page 1: ...DIRECTOR MX 2004 Using Director...
Page 16: ...16 Chapter 1 Introduction...
Page 82: ...82 Chapter 3 Sprites...
Page 98: ...98 Chapter 4 Animation...
Page 134: ...134 Chapter 5 Bitmaps...
Page 242: ...242 Chapter 10 Sound and Synchronization...
Page 274: ...274 Chapter 11 Using Digital Video...
Page 290: ...290 Chapter 12 Behaviors...
Page 302: ...302 Chapter 13 Navigation and User Interaction...
Page 334: ...334 Chapter 15 The 3D Cast Member 3D Text and 3D Behaviors...
Page 392: ...392 Chapter 16 Working with Models and Model Resources...
Page 418: ...418 Chapter 18 Movies in a Window...
Page 446: ...446 Chapter 22 Managing and Testing Director Projects...