


60
Chapter 3: Sprites
Note:
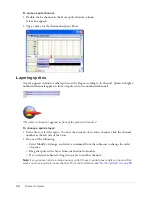
To open a window in which you can edit the sprite’s cast member, you can double-click the
thumbnail image.
3
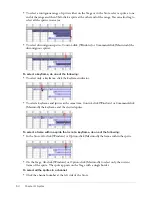
Edit any of the following sprite settings in the Property inspector:
Lock
changes the sprite to a locked sprite so you or other users can’t change it. For additional
information about locked sprites, see
“Locking and unlocking sprites” on page 63
.
Editable
applies only to text sprites and lets you edit the selected text sprite on the Stage
during playback. For more information, see
“Selecting and editing text on the Stage”
on page 166
.
Moveable
lets you position the selected sprite on the Stage during playback. For more
information, see
“Visually positioning sprites on the Stage” on page 65
.
Trails
makes the selected sprite remain on the Stage, leaving a trail of images along its path as
the movie plays. If Trails is not selected, the selected sprite is erased from previous frames as the
movie plays.
Flip Horizontal
and
Flip Vertical
reverse the sprite horizontally or vertically to form an
inverted image. See
“Flipping sprites” on page 75
.
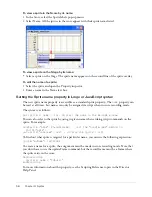
The Name text box
lets you enter a name for the sprite. For more information, see
“Naming
sprites” on page 55
.
Reg Point Horizontal (X)
and
Vertical (Y)
display the location of the registration point in
pixels from the upper left corner of the Stage. For more information, see
“Editing sprite
properties with Lingo or JavaScript syntax” on page 63
.
Left (L), Top (T), Right (R),
and
Bottom (B)
show the location of the edges of the sprite’s
bounding rectangle.
Width (W)
and
Height (H)
show the size of the sprite’s bounding rectangle in pixels.
The Ink pop-up menu
displays the ink of the current sprite and lets you select a new ink color.
For more information, see
“Using sprite inks” on page 77
.
Blend
determines the blend percentage of the selected sprites. For more information, see
“Setting blends” on page 76
.
Start Frame
and
End Frame
display the start and end frame numbers of the sprite. Enter new
values to adjust how long the sprite plays. For more information, see
“Changing the duration
of a sprite on the Stage” on page 70
.
Rotation
rotates the sprite by the number of degrees you enter. For more information, see
“Rotating and skewing sprites” on page 72
.
Skew
slants the sprite by the number of degrees you enter. For more information, see
“Rotating and skewing sprites” on page 72
.
Forecolor
and
Backcolor
color boxes
determine the colors of the selected sprite. For more
information, see
“Changing the color of a sprite” on page 75
.
Restore All
reverts the height and width to that of the cast member.
Scale
opens the Scale Sprite dialog box, where you can resize the selected sprite. For more
information, see
“Resizing and scaling sprites” on page 71
.
Displaying sprite properties in the Sprite toolbar
The Sprite toolbar displays a subset of the same information and text boxes found on the Sprite
tab in the Property inspector. You can use either the Sprite toolbar or the Property inspector,
depending on your preference, to perform many of the same procedures.
Summary of Contents for DIRECTOR MX 2004-USING DIRECTOR
Page 1: ...DIRECTOR MX 2004 Using Director...
Page 16: ...16 Chapter 1 Introduction...
Page 82: ...82 Chapter 3 Sprites...
Page 98: ...98 Chapter 4 Animation...
Page 134: ...134 Chapter 5 Bitmaps...
Page 242: ...242 Chapter 10 Sound and Synchronization...
Page 274: ...274 Chapter 11 Using Digital Video...
Page 290: ...290 Chapter 12 Behaviors...
Page 302: ...302 Chapter 13 Navigation and User Interaction...
Page 334: ...334 Chapter 15 The 3D Cast Member 3D Text and 3D Behaviors...
Page 392: ...392 Chapter 16 Working with Models and Model Resources...
Page 418: ...418 Chapter 18 Movies in a Window...
Page 446: ...446 Chapter 22 Managing and Testing Director Projects...