


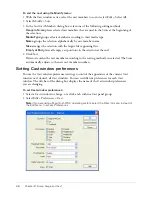


Setting Cast window preferences
37
3
To set the Cast window to display in either List or Thumbnail view, select the appropriate Cast
View option.
4
If you want your preferences to apply to all Cast windows, select Apply to All Casts.
5
To select the columns that appear in Cast List view, select the desired List Columns options.
See
“Using Cast List view” on page 31
.
6
To specify the maximum number of cast members to appear in the Cast window, select a value
from the Thumbnails Visible pop-up menu.
This option does not limit the number of cast members that can exist in the cast. If you have a
small number of cast members, you can hide the remaining unused cast positions to make
better use of the vertical scroll bar. The default is 1000.
7
To specify the number of thumbnails in each row of the Cast window, select an option from
the Row Width pop-up menu.
The options for 8 Thumbnails, 10 Thumbnails, and 20 Thumbnails specify fixed-row widths
that are independent of the window size; if the Cast window is smaller horizontally than the
width of the cast row, you must use the horizontal scroll bar to reveal the rest of the cast. The
Fit to Window option automatically adjusts the number of cast members per row to fit the
current width of the Cast window. In this mode, the horizontal scroll bar is disabled because
the entire width of the cast is always in view. The default is Fit to Window.
8
To set the size of each cast thumbnail image that appears in the Cast window, select one of the
following options from the Thumbnail Size pop-up menu:
Small
44 x 33 pixels
Medium
56 x 42 pixels (default)
Large
80 x 60 pixels
Thumbnails always maintain the standard 4:3 aspect ratio.
If the thumbnails appear fuzzy, they are probably displaying larger than their original size. To
correct this, change the Cast window preferences thumbnail setting to a smaller size. Click OK
when the alert message asks whether thumbnails should be regenerated.
9
To select the display format of the cast member ID that appears below each cast thumbnail
image in the Cast window, select one of the following options from the Label pop-up menu:
Number
displays the cast number.
Name
displays the cast name, if one exists; otherwise, this option displays the cast number in
decimal format.
Number:Name
displays the cast number in decimal format and the cast name, separated by a
colon (:) (for example, 340:Dancing Potato). If no name exists, this setting displays the cast
number in decimal format.
The selected format is also used in other windows, including the Score, whenever a cast
ID appears.
10
To specify whether Director displays an icon in the lower right corner of each cast member that
indicates the cast member’s type, select one of the following from the Media Type Icons pop-
up menu: All Types, All but Text and Bitmap, or None.
11
To display a script indicator icon in the lower left corner of each cast member that has a script
attached, select Script.
12
To make your preference settings the default settings, click Save as Default.
13
When you finish selecting your preferences, click OK.
Summary of Contents for DIRECTOR MX 2004-USING DIRECTOR
Page 1: ...DIRECTOR MX 2004 Using Director...
Page 16: ...16 Chapter 1 Introduction...
Page 82: ...82 Chapter 3 Sprites...
Page 98: ...98 Chapter 4 Animation...
Page 134: ...134 Chapter 5 Bitmaps...
Page 242: ...242 Chapter 10 Sound and Synchronization...
Page 274: ...274 Chapter 11 Using Digital Video...
Page 290: ...290 Chapter 12 Behaviors...
Page 302: ...302 Chapter 13 Navigation and User Interaction...
Page 334: ...334 Chapter 15 The 3D Cast Member 3D Text and 3D Behaviors...
Page 392: ...392 Chapter 16 Working with Models and Model Resources...
Page 418: ...418 Chapter 18 Movies in a Window...
Page 446: ...446 Chapter 22 Managing and Testing Director Projects...