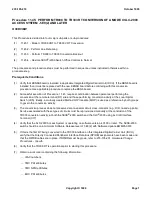
WARNING:
An antistatic wrist strap must be worn while handling circuit packs or system cables to prevent damage
to components.
1.
What is the equipped memory board configuration?
Reference:
Procedure
11.44.4
, Step 2.
If
Configuration 1
, unseat the 64 MB memory board equipped in the highest numbered slot, and place it in
the antistatic container. Go to Procedure
11.44.10
.
If
Configuration 2
, unseat the two 32 MB memory boards equipped in the two highest numbered slots, and
place these in the antistatic containers. Go to Procedure
11.44.10
.
If
Configuration 3
, unseat the 64 MB memory board equipped in the second highest numbered slot, and
place it in the antistatic container. Unseat the 32 MB memory board equipped in the highest numbered slot,
and seat it in the slot previously equipped with the 64 MB memory board. Go to Procedure
11.44.10
.
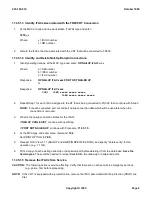
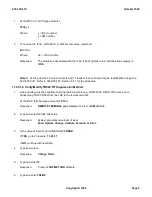
11.44.10 Replace Core Pack on MCTSI Side 0.
1.
Replace the UN540 processor core circuit pack with a UN560 processor core circuit pack on MCTSI Side 0.
11.44.11 Power Up MCTSI Side 0
1.
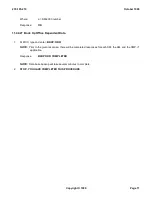
At MCTSI side 0 (SN516), depress the
ON
button.
Response:
REPT PWR ON MCTSI=
a
-0
Where:
a = SM-2000 number
11.44.12 Conditionally Restore MCTSI Side 0 to Service
1.
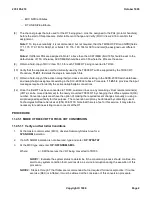
Conditionally restore MCTSI Side 0 by typing and entering:
RST:MCTSI=
a
-0
Where:
a = SM-2000 number
Response:
RST MCTSI
a
0 COMPLETED
11.44.13 Allow Soak Period
1.
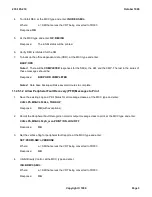
Allow MCTSI Side 0 to be active for 1 hour before continuing with this procedure. Monitor the ROP for any
messages that may implicate the new hardware.
11.44.14 Safe Stop Point
1.
Safe stop point.
11.44.15 Remove MCTSI Side 1 From Service
235-105-210
October 1999
Copyright © 1999
Page 6
Summary of Contents for 5ESS-2000
Page 96: ...235 105 210 October 1999 Copyright 1999 Page 2 ...
Page 184: ...235 105 210 October 1999 Copyright 1999 Page 3 ...
Page 300: ...13 STOP YOU HAVE COMPLETED THIS PROCEDURE 235 105 210 October 1999 Copyright 1999 Page 55 ...
Page 339: ...7 STOP YOU HAVE COMPLETED THIS PROCEDURE 235 105 210 October 1999 Copyright 1999 Page 13 ...
Page 342: ...235 105 210 October 1999 Copyright 1999 Page 2 ...
Page 359: ...235 105 210 October 1999 Copyright 1999 Page 5 ...
Page 609: ...2 STOP YOU HAVE COMPLETED THIS PROCEDURE 235 105 210 October 1999 Copyright 1999 Page 12 ...
Page 676: ...235 105 210 October 1999 Copyright 1999 Page 9 ...
Page 792: ...3 STOP YOU HAVE COMPLETED THIS PROCEDURE 235 105 210 October 1999 Copyright 1999 Page 9 ...
Page 799: ...Figure 11 36 3 1 Cleaning Points 235 105 210 October 1999 Copyright 1999 Page 7 ...
Page 801: ...235 105 210 October 1999 Copyright 1999 Page 9 ...
Page 839: ...2 STOP YOU HAVE COMPLETED THIS PROCEDURE 235 105 210 October 1999 Copyright 1999 Page 16 ...
Page 999: ...2 STOP YOU HAVE COMPLETED THIS PROCEDURE 235 105 210 October 1999 Copyright 1999 Page 13 ...
Page 1008: ...Figure 11 55 1 CTSNS DIP Switch Settings 235 105 210 October 1999 Copyright 1999 Page 2 ...
Page 1011: ...235 105 210 October 1999 Copyright 1999 Page 5 ...
Page 1053: ...235 105 210 October 1999 Copyright 1999 Page 15 ...
Page 1289: ...Figure 15 17 2 AMATPS Data Link 235 105 210 October 1999 Copyright 1999 Page 2 ...
Page 1292: ...235 105 210 October 1999 Copyright 1999 Page 5 ...
Page 1303: ...9 STOP YOU HAVE COMPLETED THIS PROCEDURE 235 105 210 October 1999 Copyright 1999 Page 2 ...
Page 1360: ...Figure 15 47 2 Typical SCANS III Link Diagram 235 105 210 October 1999 Copyright 1999 Page 2 ...
Page 1372: ...235 105 210 October 1999 Copyright 1999 Page 2 ...
Page 1374: ...235 105 210 October 1999 Copyright 1999 Page 4 ...
Page 1421: ...Table 1 1 O M Checklist 235 105 210 October 1999 Copyright 1999 Page 3 ...


