


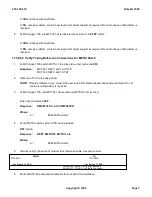


SCAN POINT = aaabcddee
Where:
aaa =
EXM-2000 number, 001-192
b =
Metallic service unit (MSU) number, 0,1
c =
MSU service group, 0,1
dd =
MSU board number, 00-31
ee =
MSU scan point number, 00-31
Response:
Enter Insert, Change, Validate, or Print:
7.
To insert, type and enter
i
Response:
inserting . . . FORM INSERTED.
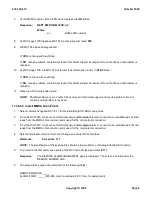
8.
Repeat from Step 6 to insert additional scan point.
9.
With all scan points assigned, exit RC/V.
10.
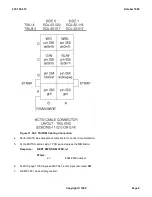
To backup ODD, at the MCC, type and enter
BKUP:ODD,NRODD=
a
,RODD,AM,CMP=0
;
Where:
a =
EXM-2000 number
NOTE:
Prior to the response, there will be completed responses for the EXM-2000, the AM, and the CMP.
Response:
BKUP NRODD COMPLETED
NOTE:
Data base back up will take several minutes to complete.
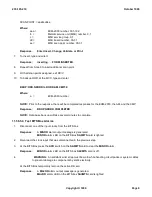
11.56.5.4 Test BITS Box Alarms
1.
Disconnect one of the input clocks from the BITS box.
Response:
A
MINOR
alarm output message is generated.
MINOR
alarm LED on the BITS Box
SAI/MTS
card is lighted.
2.
Reconnect the clock input that was disconnected in the previous step.
3.
At the BITS Box press the
ACO
switch on the
SAI/MTS
card to clear the
MINOR
alarm.
Response:
MINOR
alarm LED on the BITS box
SAI/MTS
card is off.
4.
WARNING:
An antistatic wrist strap must be worn while handling circuit packs or system cables
to prevent damage to components by static electricity.
At the BITS Box temporarily remove the active
CI
card.
Response:
A
MAJOR
alarm output message is generated.
MAJOR
alarm LED on the BITS box
SAI/MTS
card is lighted.
235-105-210
October 1999
Copyright © 1999
Page 9
Summary of Contents for 5ESS-2000
Page 96: ...235 105 210 October 1999 Copyright 1999 Page 2 ...
Page 184: ...235 105 210 October 1999 Copyright 1999 Page 3 ...
Page 300: ...13 STOP YOU HAVE COMPLETED THIS PROCEDURE 235 105 210 October 1999 Copyright 1999 Page 55 ...
Page 339: ...7 STOP YOU HAVE COMPLETED THIS PROCEDURE 235 105 210 October 1999 Copyright 1999 Page 13 ...
Page 342: ...235 105 210 October 1999 Copyright 1999 Page 2 ...
Page 359: ...235 105 210 October 1999 Copyright 1999 Page 5 ...
Page 609: ...2 STOP YOU HAVE COMPLETED THIS PROCEDURE 235 105 210 October 1999 Copyright 1999 Page 12 ...
Page 676: ...235 105 210 October 1999 Copyright 1999 Page 9 ...
Page 792: ...3 STOP YOU HAVE COMPLETED THIS PROCEDURE 235 105 210 October 1999 Copyright 1999 Page 9 ...
Page 799: ...Figure 11 36 3 1 Cleaning Points 235 105 210 October 1999 Copyright 1999 Page 7 ...
Page 801: ...235 105 210 October 1999 Copyright 1999 Page 9 ...
Page 839: ...2 STOP YOU HAVE COMPLETED THIS PROCEDURE 235 105 210 October 1999 Copyright 1999 Page 16 ...
Page 999: ...2 STOP YOU HAVE COMPLETED THIS PROCEDURE 235 105 210 October 1999 Copyright 1999 Page 13 ...
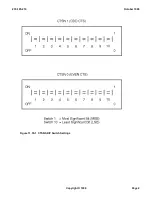
Page 1008: ...Figure 11 55 1 CTSNS DIP Switch Settings 235 105 210 October 1999 Copyright 1999 Page 2 ...
Page 1011: ...235 105 210 October 1999 Copyright 1999 Page 5 ...
Page 1053: ...235 105 210 October 1999 Copyright 1999 Page 15 ...
Page 1289: ...Figure 15 17 2 AMATPS Data Link 235 105 210 October 1999 Copyright 1999 Page 2 ...
Page 1292: ...235 105 210 October 1999 Copyright 1999 Page 5 ...
Page 1303: ...9 STOP YOU HAVE COMPLETED THIS PROCEDURE 235 105 210 October 1999 Copyright 1999 Page 2 ...
Page 1360: ...Figure 15 47 2 Typical SCANS III Link Diagram 235 105 210 October 1999 Copyright 1999 Page 2 ...
Page 1372: ...235 105 210 October 1999 Copyright 1999 Page 2 ...
Page 1374: ...235 105 210 October 1999 Copyright 1999 Page 4 ...
Page 1421: ...Table 1 1 O M Checklist 235 105 210 October 1999 Copyright 1999 Page 3 ...