If
YES
, (retrofit activity), then continue with next Step.
If
YES
, (normal office activity), seek technical assistance. Do not continue until problem is resolved.
If
NO
, continue with next Step.
4.
Allow the system to soak according to local practices before continuing to Section
6.33.5
. Lucent
Technologies recommends that the soak period not exceed 24 hours.
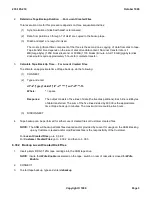
6.33.5 Update ECD Records
NOTE:
The memory growth that has been completed must now be updated in the ECD records on the
activate
form and incore ECD is copied to Root ECD on disk.
1.
To access the ECD form
rcvparams
; at RC/V or STLWS terminal, type and enter:
RCV:MENU:RCVECD;
Response:
rcvparams
form is displayed. Cursor at
database_name
filed.
2.
Type and enter values:
Field No.
Name
Value
1
database_name
=
incore
2
reviewonly
=
n
3
journaling
=
*
Response:
Forms selection page is displayed.
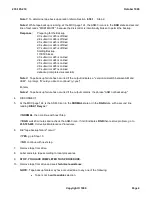
3.
Type and enter
activate
Response:
The
activate
form is displayed. Cursor at
copy_inc_to_disk
key field.
4.
Type and enter
Y
Response:
Copy incore to disk field indicates yes.
5.
Type and enter
e
Response:
At top right of screen,
updating . . . FORM EXECUTED.
display returns to data entry page.
6.
Type and enter
<
Response:
RCV MENU RCVECD COMPLETED
6.33.6 Update File Systems
NOTE:
The file systems are updated and may require several minutes for each update to be completed. If a
COMPLTED
output message response is not received in a reasonable time, then reenter the input
message command once more before looking elsewhere for trouble.
1.
At RC/V or STLWS terminal, type and enter:
IN:FILESYS:DIR,FN="/bdb";
Response:
COMPLETED
output message received.
2.
At RC/V or STLWS terminal, type and enter:
235-105-210
October 1999
Copyright © 1999
Page 8
Summary of Contents for 5ESS-2000
Page 96: ...235 105 210 October 1999 Copyright 1999 Page 2 ...
Page 184: ...235 105 210 October 1999 Copyright 1999 Page 3 ...
Page 300: ...13 STOP YOU HAVE COMPLETED THIS PROCEDURE 235 105 210 October 1999 Copyright 1999 Page 55 ...
Page 339: ...7 STOP YOU HAVE COMPLETED THIS PROCEDURE 235 105 210 October 1999 Copyright 1999 Page 13 ...
Page 342: ...235 105 210 October 1999 Copyright 1999 Page 2 ...
Page 359: ...235 105 210 October 1999 Copyright 1999 Page 5 ...
Page 609: ...2 STOP YOU HAVE COMPLETED THIS PROCEDURE 235 105 210 October 1999 Copyright 1999 Page 12 ...
Page 676: ...235 105 210 October 1999 Copyright 1999 Page 9 ...
Page 792: ...3 STOP YOU HAVE COMPLETED THIS PROCEDURE 235 105 210 October 1999 Copyright 1999 Page 9 ...
Page 799: ...Figure 11 36 3 1 Cleaning Points 235 105 210 October 1999 Copyright 1999 Page 7 ...
Page 801: ...235 105 210 October 1999 Copyright 1999 Page 9 ...
Page 839: ...2 STOP YOU HAVE COMPLETED THIS PROCEDURE 235 105 210 October 1999 Copyright 1999 Page 16 ...
Page 999: ...2 STOP YOU HAVE COMPLETED THIS PROCEDURE 235 105 210 October 1999 Copyright 1999 Page 13 ...
Page 1008: ...Figure 11 55 1 CTSNS DIP Switch Settings 235 105 210 October 1999 Copyright 1999 Page 2 ...
Page 1011: ...235 105 210 October 1999 Copyright 1999 Page 5 ...
Page 1053: ...235 105 210 October 1999 Copyright 1999 Page 15 ...
Page 1289: ...Figure 15 17 2 AMATPS Data Link 235 105 210 October 1999 Copyright 1999 Page 2 ...
Page 1292: ...235 105 210 October 1999 Copyright 1999 Page 5 ...
Page 1303: ...9 STOP YOU HAVE COMPLETED THIS PROCEDURE 235 105 210 October 1999 Copyright 1999 Page 2 ...
Page 1360: ...Figure 15 47 2 Typical SCANS III Link Diagram 235 105 210 October 1999 Copyright 1999 Page 2 ...
Page 1372: ...235 105 210 October 1999 Copyright 1999 Page 2 ...
Page 1374: ...235 105 210 October 1999 Copyright 1999 Page 4 ...
Page 1421: ...Table 1 1 O M Checklist 235 105 210 October 1999 Copyright 1999 Page 3 ...


