322
Number
Name
Functions
(5)
Delete button
Deletes the selected preset .
(6)
CSV button
Outputs the information from
the examination exposed in
the checkup mode in CSV
format .
(7)
Copy button
Copies the selected preset .
(8)
Create skipped
studies button
Turns the daily reset function
[ON] and [OFF].
Setting to [ON] automatically
generates the examination
that is skipped when the se-
rial number is changed .
(9)
Daily Reset but-
ton
Turns the auto examination
start function [ON] and [OFF].
If set to [ON], the serial
number set on the automatic
number issuing function
is reset when the date is
changed, and the value is
returned to the starting num-
ber .
Turning it [ON] also deletes
all the unexposed studies
from the previous day auto-
matically .
(10)
Auto Checkup
button
Turns the checkup mode
[ON] and [OFF].
If set to [ON], pressing the
Complete button does not
switch the exposure screen.
Thus, the automatic issue of
the numbers is maintained,
allowing you to proceed with
exposure of the next patient.
(11)
Serial number
field
Displays the current serial
number .
The serial number can be
changed using the [▲] and
[▼] buttons.
HINT
• The serial number is
held for each preset .
(12)
Setting button
Changes the contents of the
selected preset .
(13)
Cancel button
Closes the screen without
saving the modifications
made on this screen .
(14)
OK button
Closes the screen after sav-
ing the modifications con
-
ducted on this screen .
HINT
•••••••••••••••••••••••••••••••••••••
•
The examination automatically generated by the Cre
-
ate skipped studies function can be started from the
list screen .
•••••••••••••••••••••••••••••••••••••••••••••••••••••
7 .18 Checkup mode
The checkup mode allows the patient ID and acces-
sion number to be issued automatically, reducing the
time required for examination.
IMPORTANT
•••••••••••••••••••••••••••••••••••••
•
Exposure in Aero Sync mode is not possible in check
-
up mode .
•••••••••••••••••••••••••••••••••••••••••••••••••••••
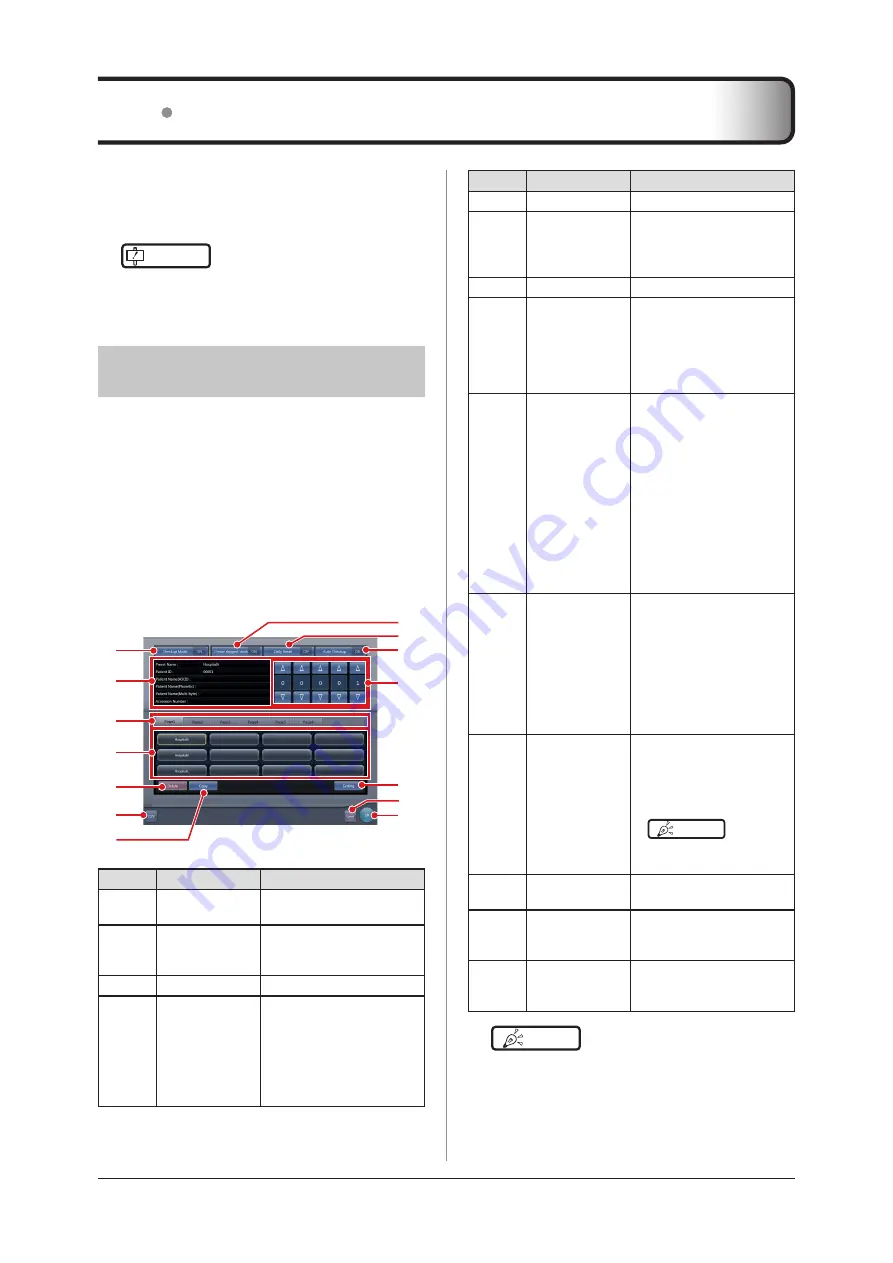
7 .18 .1 Screen structure
The following shows the setting screens of the check-
up mode .
z
Checkup setting screen
This screen is used for turning on or off the mode .
You can also start setting the checkup preset on this
screen .
Display this screen by pressing [Checkup] in the tool
bar of the system monitor screen, or by pressing [Pa
-
tient Info] on the exposure screen during checkup
mode .
(9)
(8)
(12)
(10)
(2)
(1)
(3)
(4)
(5)
(6)
(7)
(13)
(11)
(14)
Number
Name
Functions
(1)
Checkup Mode
button
Toggles the skip examination
generator [ON] and [OFF].
(2)
Selected preset
information dis-
play field
Displays the information in
the currently selected preset .
(3)
Switching tab
Switches the preset tab .
(4)
Preset button
Used to select the preset .
A preset name is indicated
on the button for which the
preset has already been
carried out . A button remains
unnamed until preset is car-
ried out .
Summary of Contents for CS-7
Page 1: ...0197 Operation Manual EN 15 DIRECT DIGITIZER Version 1 30 ...
Page 2: ......
Page 8: ...8 ...
Page 9: ...9 Introduction ...
Page 18: ...18 ...
Page 30: ...30 ...
Page 31: ...31 Chapter 2 Product Overview This chapter describes the overview of this device ...
Page 34: ...34 ...
Page 74: ...74 ...
Page 84: ...84 ...
Page 120: ...120 ...
Page 197: ...197 Chapter 7 Various Functions This chapter describes the functions of this device ...
Page 383: ...383 Chapter 10 Error Codes This chapter describes the error codes and countermeasures ...
Page 413: ...413 Chapter 11 Maintenance This chapter describes the items that require periodic maintenance ...
Page 416: ...416 ...
Page 417: ...417 Chapter 12 Specifications This chapter describes the specifications of this device ...
Page 422: ...422 ...
Page 423: ......
Page 424: ...A47FBA01EN15 2017 01 12 JD ...


