background image

210

7.2   Exposure with AeroDR Portable RF Unit2

7 .2 .3 

New registration of 

patient information

New registration of patient information is performed 

with the patient registration screen . Select the  

[PatientReg.] tab on the initial screen to display the pa

-

tient registration screen .

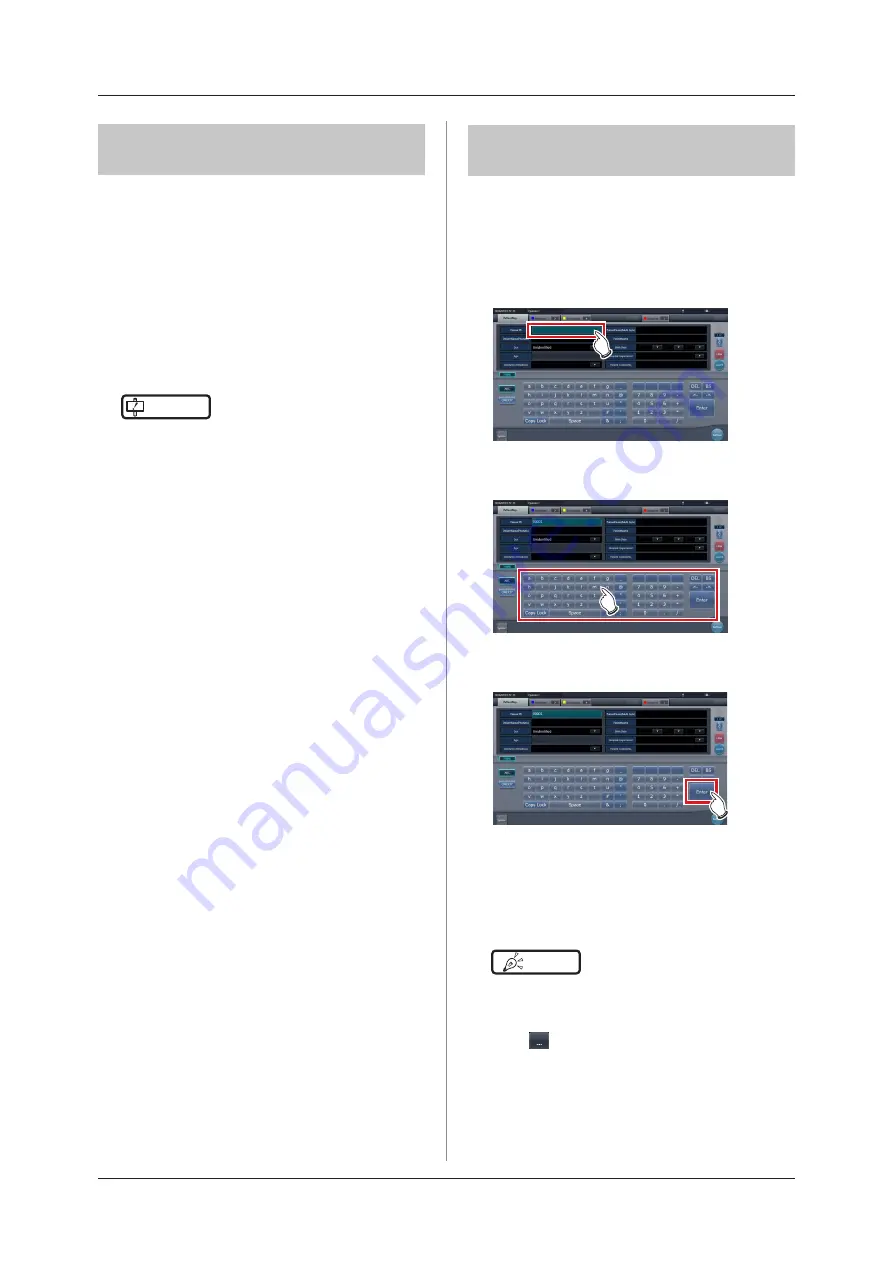
Press the column for the patient ID .

Press the input panel, and input the patient ID .

Press [Enter] .

Input patient name, sex and date of birth .

• 

After each inputting item, press [Enter]. 

• 

If you press [Enter], the cursor will move to the 

next item. 

HINT

 •••••••••••••••••••••••••••••••••••••

• 

If the length of an entry exceeds the dimensions of the 

display pane of the item or if the entry spreads across 
multiple lines, the long-sentence comment pop-up but-

ton [

] is displayed.

 •••••••••••••••••••••••••••••••••••••••••••••••••••••

7 .2 .2  Exposure preparations

The exposure preparation of the AeroDR Portable RF 

Unit2 is performed according to the following proce-

dure .

Prepare each device to perform exposure .

•  For information on how to prepare each device 

to perform exposure, refer to "AeroDR Portable 

RF Unit2 Operation Manual" .

Turn each device on .

IMPORTANT

 •••••••••••••••••••••••••••••••••••••

•  After the access point has started, it may take some 

time to establish a wireless connection .

•  To register the DR Detector, connect this device to the 

AeroDR Portable RF Unit2 in wired mode .

 •••••••••••••••••••••••••••••••••••••••••••••••••••••

Turn the mobile X-ray device on .

Summary of Contents for CS-7

Page 1: ...0197 Operation Manual EN 15 DIRECT DIGITIZER Version 1 30 ...

Page 2: ......

Page 3: ...s 32 2 1 2 System configuration example 32 Contents Chapter 3 Description of Each Screen 35 3 1 Screen connections 36 3 2 Patient registration screen 37 3 2 1 Structure of patient registration screen 37 3 2 2 Details of application bar 39 3 3 List screen 41 3 4 Body part selection screen 43 3 5 Exposure screen 45 3 5 1 Structure of the exposure screen 45 3 5 2 Examination display area 48 3 5 3 Wor...

Page 4: ...ns of each screen 121 6 1 Functions of the patient registration screen 122 6 1 1 Search registration 122 6 1 2 Emergency registration 123 6 2 Functions of the list screen 124 6 2 1 Display of details of examination 124 6 2 2 Display of examination history 124 6 2 3 Display of examinations with refined search 125 6 2 4 Modification of examination information 127 6 2 5 Deletion of examinations 128 6...

Page 5: ...l Scattered radiation correction 184 6 7 10 Positioning of annotation 186 6 7 11 Adjustment of annotation 187 6 7 12 Creating editing of annotation characters 188 6 8 Functions of the system monitor screen 190 6 8 1 System status 190 6 8 2 Device status 191 6 8 3 Status of the DR Detector 192 6 8 4 Host status 192 6 8 5 Printer status 193 6 8 6 Status of JM 194 6 8 7 Status of RIS IN 194 6 8 8 Sta...

Page 6: ...e multi study 299 7 12 5 Deletion of exposures in the multi study 300 7 12 6 Image output per examination in the multi study 301 7 13 Examination sharing 302 7 13 1 Screen structure 302 7 13 2 Reception of examination information 304 7 13 3 Transmission of examination information 305 7 13 4 Transmission of examination information during exposure 306 7 14 Merging and separation of studies 307 7 14 ...

Page 7: ...he DR Detector 378 9 1 4 Deletion of untransferred images in the DR Detector 380 9 1 5 Reacquisition of images from the REGIUS 381 9 1 6 Communications error during image reception 381 9 1 7 How to release the lock on the exposure screen 382 Chapter 10 Error Codes 383 10 1 Types of error codes and recognition methods 384 10 1 1 Types of error codes 384 10 1 2 Recognition method for error codes 385...

Page 8: ...8 ...

Page 9: ...9 Introduction ...

Page 10: ... collective term indicating CS 7 software and PC with the software installed Summary of usability specifications for IEC EN 62366 1 Medical purposes Provision of disease and injury diagnostic images 2 Patient groups No patient population exists who uses or is in contact with the device Patient population for the X ray images read is not specified 3 Parts of body or organizations to which the devic...

Page 11: ... 9 Konica Minolta Inc is not responsible for any claims for malfunction or damage caused by using this device for any purpose other than that specified for this device 10 Diagnostic and treatment action is performed under the responsibility of the physician s Konica Minolta Inc is not responsible for any diagnostic treatment conditions or diagnostic treatment results 11 Konica Minolta Inc is unabl...

Page 12: ...for the DR Detector AeroDR Battery Charger2 Charges the DR Detector It also has the registration function for the DR Detector Access point Collective term indicating AeroDR Access Point and a general purpose access point I F Cable Use with the DR detector wired connection It also includes the DR detector charging and registration functions AeroDR UF Cable In the case of capturing images with the w...

Page 13: ... a function that corrects scattered X ray radiation Exposure body part This is the exposure body part such as head neck and chest Exam Tag A button that has registered exposed body parts size direction etc It is positioned on the body part selection screen Exposure condition Indicates conditions relating to exposure in general such as exposure device exposure method exposure setting and positionin...

Page 14: ...up of this unit start the other units HINT The software version is displayed on the system startup screen Initialization will be completed a few minutes after turning on the power A progress bar is displayed on the system startup screen indicating the status of the system initialization process 3 Select the examination target The examination is selected 4 Press Perform The exposure screen is displ...

Page 15: ...re you want to suspend this study Notation of operation methods This manual describes main operation methods as follows Notation Description Press Operation to touch the screen or click with a mouse to operate operation targets such as buttons Select Operation to select from several options such as from a pull down menu or tabs Input Operation to enter any string using a keyboard or the input pane...

Page 16: ... institution and device For setting the display items of patient registration screen list screen etc and the layout For editing the patient information registered in the database For setting the marker to be overlaid on images For setting DR Detector For setting the stamp to be overlaid on images For registering and editing the selection of the operator names For registering and editing the select...

Page 17: ...a QA QC For evaluating and managing image quality Statistics Analysis For aggregating and taking the statistics of exposure history For outputting raw images to the host Quality Management area Raw Image Output For outputting raw images to media Other Manual area Other 2 Other 5 For displaying other manuals Setting AFSSAPS Tool Adjustment System area Date and Time Touch Panel Panel area Calibratio...

Page 18: ...18 ...

Page 19: ...19 Chapter 1 Safety Precautions Warnings This chapter describes precautions and warnings to ensure safe use of this device ...

Page 20: ... could result in death or serious injury CAUTION Indicates a potentially hazardous situation which if not avoided could result in minor or moderate injury It may also be used to indicate a hazardous situation where only physical damage is likely to occur 1 1 3 Description of graphic symbols Indicates the off position for the main power switch of this device Indicates the on position for the main p...

Page 21: ...is device confirm that this device is operating normally When a problem occurs with this device turn the power off attach an appropriate sign such as malfunction on this device and contact Konica Minolta technical representatives CAUTION This device is not explosion proof so do not use any flammable or explosive gas near this device For the basic operation of the personal computer display monitor ...

Page 22: ...ntatives Take the following precautions when using this de vice and software Konica Minolta or a contractor designated by Konica Minolta will install the software of this de vice Do not disassemble or modify this device Do not connect any devices that were not pur chased from Konica Minolta Do not install software purchased from other companies Do not uninstall software that has already been insta...

Page 23: ...or Be sure to check the image orientation of images received from medical imaging devices CR DR etc Shut down this device after confirming that the hard disk access lamp is out Also when turning on again do so after 10 seconds have elapsed 1 2 3 Precautions for installing moving and storing WARNING Take the following precautions when moving this device Do not subject to shock or vibration Do not s...

Page 24: ...wing precautions to prevent reading errors etc Do not subject to impact Do not touch disk surfaces Place in cases when storing Do not place in locations with a lot of dust Do not place in locations with high temperature and high humidity Do not place in direct sunlight Attach labels to CD DVD surfaces and cases so that the recorded content can be identified The types of media supported by this dev...

Page 25: ...m external storage media to be free of malware prior to use Use the device in a safe network environment incorporating adequate security measures for the prevention of malware infection Refrain from any hazardous activity leading to potential vulnerability against malware infection Take precautions not to allow others to see the de vice screen displaying sensitive patient information Privacy prote...

Page 26: ...subject It is also recommended that you arrange the measure in the combined image part during exposure to simplify the confirmation of the combined parts Precautions for One Shot stitching exposure One Shot stitching exposure outputs the combined picture by correcting the images overlapping part captured by DR panel Depending on the capturing conditions lateral stripes or decrease in contrast migh...

Page 27: ...king field When using a collimator set the edge of the X ray exposure field to be sufficient ly distant from the edge of the cassette In addition use preview on the Output tab or Overlay tab to check that the masking area is appropriately set before the image is output and modify the masking area on the viewer screen if needed CAUTION Notes on the chest wall blackening process Recognition of unexp...

Page 28: ...it CAUTION Precautions on a stitching cassette There are small differences in magnification of im ages made with REGIUS plates which are adjacent within a stitching cassette For this reason over lapping parts of images made with REGIUS plates which are adjacent do not completely match When the exposure distance is 1 5 m misalignment in the horizontal direction will be approximately 0 5 mm at maxim...

Page 29: ...are displayed in the im age display areas of this device Check that the S values indicate the appropriate dosage for exposed images Precautions when performing exposure in Aero Sync mode Confirm that the device is ready for exposure through its display before performing exposure Confirm that a confirmation is sounded from the de vice after the start of exposure Do not let the DR Detector vibrate o...

Page 30: ...30 ...

Page 31: ...31 Chapter 2 Product Overview This chapter describes the overview of this device ...

Page 32: ...patient images collected by the medical imaging device to provide image and patient information 2 1 2 System configuration example The system configuration example is as shown below X Ray device operation panel Printer PACS HOST Media Electronic Medical Records DICOM G W DICOM Image Data DICOM MPPS DICOM MWM FTP X Ray Exposure information DICOM Print DICOM Storage JPEG DICOM PDI HIS RIS REGIUS REG...

Page 33: ...device For details on how to use DR Detector and REGIUS REGIUS SIGMA SIGMA2 refer to their respective operation manuals 7 DR Detectors can be connected to this device 15 REGIUS series can be connected to this device Only a single REGIUS SIGMA SIGMA2 unit can be connected to this device A REGIUS series unit and a REGIUS SIGMA SIGMA2 unit cannot be connected to this device at the same time ...

Page 34: ...34 ...

Page 35: ...35 Chapter 3 Description of Each Screen This chapter describes the screen structure of this device and the function of each button on the screen etc ...

Page 36: ... is used to confirm the status of this device and de vices connected to this device as well as the time to replace the regular replacement parts Each screen is switched using tabs This is the screen for fine adjustment of the exposed image More detailed image adjustment can be performed than the exposure screen This is the screen to select an exposure body part This is the screen for exposing and ...

Page 37: ...ub tab can be added When all tabs cannot be displayed within the screen tab scroll buttons are displayed 3 Input item area This is the area to input patient information Some items require input with the input panel keyboard 4 Display hide button Input panel Displays or hides the input panel display 5 Tool bar area System The system monitor screen is displayed Web Remote Desktop Linkup The screen o...

Page 38: ... the automatic emergency number issuing function is turned on with the user tool IMPORTANT Creating too many tabs makes it difficult to find the target tab and lowers the operability Do not add more tabs than neces sary HINT Display of the System icon changes according to the device status and other conditions The meanings of the icons to be displayed are listed below The icon turns red when an er...

Page 39: ...ea press the date and time display area to hide it Date and time display area Operator name display area Device information display area The device information display area of the application bar displays the device icons as well as the states battery level and signal strength of the DR Detectors registered in this device Device icon Signal strength Battery level When an image display area has foc...

Page 40: ...ay device the network connection status etc are displayed on the application bar Device icon Network name Signal strength Battery level z zSignal status display of this device when using the portable X ray device Out of range Wireless condition Good Bad Icon Color of icon Red Yellow Green z zBattery level display of this device when using the portable X ray device Status Battery level High Low Not...

Page 41: ...displayed in the tab 5 Display item Item names of examination information Press displaying the item names and lists can be sorted with the item names means ascending order and means descending order Com binations of up to 3 items can be specified for sorting 6 Examination Examinations registered with the tab are displayed Focus is displayed in selected examinations 7 Filter button Refined display ...

Page 42: ...top is displayed Delete Deletes the selected examination Modify Displays the information modification screen for the selected examina tion Refer Displays the examination history of the selected examination Append Adds the Exam Tags to the completed examinations Refresh When connected to a higher system refreshes lists Guard Disables deletion of the selected examination Press again and protec tion ...

Page 43: ...extra care during X ray exposure 3 Favorite tab When the set tab is selected body part is displayed in the body part display area linked to the selected tab 4 Body part display area The exposure body part is displayed With a maximum of 2 pages each page can display up to 8 buttons at the same time 5 Switching button Body part display area Switches the pages of the body part display area Maximum is...

Page 44: ...g registration in the Exam Tags display area operation buttons are displayed for the focused examination System The system monitor screen is displayed Schedule Reserves the selected Exam Tags focused Exam Tags Pressing Schedule reserves the examination and displays the list screen Back Displays the list screen without reserving the examination Perform The exposure screen is displayed 15 Tool bar a...

Page 45: ...dis played when exposing with the multi study 3 Study display area The order list or body part selection is displayed The displayed details can be switched using tabs Pressing can move the display on an order by order basis Pressing moves the display to the starting order while pressing displays the last order 4 Currently selected order No Number of orders Displays the currently specified order of...

Page 46: ... mode used to adjust the S G value Pressing it again cancels the operation mode for adjustment You can adjust the S and G values by dragging the image while the operation mode for adjustment is turned on Invert Inverts the black and white colors of the image 11 Exam Tag button Changes or adds the Exam Tag The Exam Tag buttons can be switched by pressing and holding this button Changes the Exam Tag...

Page 47: ...layed at the bottom of the screen 14 Pause button Pauses the examination that has focus 15 Examination completion button Completes the examination and returns to the list screen 16 Tool bar System The system monitor screen is displayed Additional Supplemental information edit screen is displayed Log off Logs off Will appear only in login mode ...

Page 48: ...re method and flip rotate status are displayed 4 Condition copy button Copies the selected Exam Tags 5 Image copy button Copies the selected image 6 Image exchange button Replaces the selected image 7 Switching button Exam Tags Scrolls through the displayed Exam Tags HINT You can change the width of the examination display area by dragging it For more details contact Konica Minolta technical repre...

Page 49: ... exposure or exposure setting before exposure When the Queue Cont tab is selected previews at the time of output are displayed 3 Exam Tags display area Displays flip mark output format and Exam Tags etc The meaning of the icons are listed below Not flipped Flipped A format AB format 4 Full Screen button Displays captured images on the full screen 5 Screen display format switching button Changes sc...

Page 50: ...e Multiple image format is suitable for comparing multiple images 1 1 display screen 2 2 display screen 3 2 display screen The Reject button may also be displayed on the tool bar depending on the setting If the 23 inch multi touch monitor RadiForce MS235WT is used the image display area is expanded to display a large view The host output size and printer output size can be displayed in the image d...

Page 51: ...Device icon The exposure device icon and the size of the DR Detector is displayed 3 Exposure information The exposure information during the exposure is displayed 4 Exposure condition icon Exposure condition is displayed as an icon 5 Reading conditions Reading conditions such as reading size reading direction and resolu tion are displayed When set to automatic reading Automatic Reading is displaye...

Page 52: ... system is not im mediately available The device icon color can be changed for each DR Detector depending the settings The available color types are as follows Blue Orange Light Blue Pink Each DR Detector retains the color setting information If the same color is specified for multiple DR Detectors the following icon is displayed to indicate the duplication For information regarding details on the...

Page 53: ...l panels basically switch automatically accord ing to the operation objective and circumstances but sometimes you need to switch them manually The types of control panels are as follows Exp Info Expo sure conditions Image Proc Im age processing Acquisition AeroSync QUICK Exp Info Irra diation results Output For host Output For printer Overlay For host Overlay For printer ...

Page 54: ... is not displayed press displayed on the tab and scroll it until the desired one is displayed Hold down displayed on the tab for one second or longer to display the drop down list of tabs If you select a tab name from the list the selected tab is displayed You can fix the display of the desired tab ...

Page 55: ... button Switches the mode of automatic exposure 7 DENSITY button Adjust the dosage of radiation by pressing and buttons or moving the slider 8 Filter selection button Select from the menu The selection range varies according to the type 9 SID display Displays focal point detector distance cm 10 Collimator Height Width adjustment results Displays the results of adjusting the height and width of col...

Page 56: ...alue in multiples of the preset value The G value can also be adjusted by dragging the slider 3 ROI ROI Adjustment buttons Press ROI and ROI is displayed Press again and it is released Press ROI Adjustment and the viewer screen is displayed 4 ZOOM ZOOM FIT Detail buttons Changes the display method of the image that has focus ZOOM Switches to the zoom in mode Pressing it again cancels the zoom in m...

Page 57: ...y dragging the image while the operation mode for adjustment is turned on Rotate Flip Press this button to display the screen to rotate and flip an image 6 E process F process Hybrid Tool buttons Performs the process when pressed 7 Text button The viewer screen is displayed Place the annotation 8 Cropping button The viewer screen is displayed so set the effective image area manu ally 9 Masking but...

Page 58: ...rns the automatic reading settings off Select the reading size direc tion position using the Reading Size button Reading Direction button Reading Position button 2 Reading Size button Specify the reading size 3 Reading Direction button Specify the reading orientation portrait landscape 4 Reading Position button Specify the reading position 5 Resolution button Specify the reading resolution when us...

Page 59: ...7HQ AeroDR 1417S AeroDR 1717HQ AeroDR 1012HQ AeroDR 2 1417HQ or AeroDR 2 1417S the resolution is set to Standard 175μm It is not possible to select the resolution In some cases the maximum exposure time is fixed by the X ray device and is not displayed For more details contact Koni ca Minolta technical representatives The maximum exposure time of the One Shot stitching exposure using the maximum e...

Page 60: ...g for permission for exposure The screen changes to the ready to expose screen if you press AeroSync Ready to expose screen The screen is locked as it is ready to be captured To cancel exposure press Cancel then the screen returns to the exposure permission waiting screen When the AeroSync Button is set to OFF on the system monitor screen Ready to expose screen The screen is locked as it is ready ...

Page 61: ...value step by step Pressing increases or decreases the G value in multiples of the preset value The G value can also be adjusted by dragging the slider 3 Custom area Select a button from among ZOOM ZOOM Pan Fit ROI Text ROI Adjustment Rotate Flip E Process F Process H Process Tool Masking Cropping Contrast Invert Tube Gauze S G Value Preview Detection display and IG displayed depending on the sett...

Page 62: ...n irradiation results 2 1 Number Name Functions 1 Irradiation result value Displays irradiation result value 2 Numerical keypad Numerical keypad for inputting result values HINT If irradiation results could not be acquired from the X ray device the values are not displayed Use this control panel when resetting of irradiation results is necessary after exposure ...

Page 63: ...mmingSize button Select the trimming size 3 direction button Switches the orientation between portrait and landscape when trimming 4 Size adjustment button Adjusts size of trimming frame Each time you press each button for the width and height the size of the trimming frame changes 5 Reset button Returns to the state when image was displayed Only trimming size is reset 6 Preview button Displays a ...

Page 64: ...t Select from A format and AB format 4 Film Size button Select the film size 5 Direction button Switches the orientation between portrait and landscape when outputting 6 Number Set the number of output with and It can be set in the range from 1 to 9 7 Output Type button Select the output type 8 Reset button Returns to the state when image was displayed Film Size and number of sheets are reset 9 Pr...

Page 65: ... displayed when the printer is not registered as the output device 3 Marker 1 selection button Set the marker to display 4 Marker 1 position button Set the position of the marker to display 5 Marker 2 selection button Set the marker to display 6 Marker 2 position button Set the position of the marker to display 7 Stamp selection button Set the stamp to display 8 Stamp position button Set the posit...

Page 66: ... displayed when the host is not registered as the output device 3 Marker 1 selection button Set the marker to display 4 Marker 1 position button Set the position of the marker to display 5 Marker 2 selection button Set the marker to display 6 Marker 2 position button Set the position of the marker to display 7 Stamp selection button Set the stamp to display 8 Stamp position button Set the position...

Page 67: ...s the zoom in mode Pressing the image in the zoom in mode enlarges the image 1 step at a time ZOOM Switches to the zoom out mode Pressing it again cancels the zoom out mode Pressing the image in the zoom out mode reduces the image 1 step at a time Fit Displays the enlarged or reduced image to fit in the frame size size of the image display area Pan Moves the image Rotate Flip Rotates flips the ima...

Page 68: ...68 3 6 Viewer screen HINT The Return button may be displayed within the tool bar a depending on the setting For more details contact Konica Mi nolta technical representatives ...

Page 69: ...e etc connected to this device 3 System menu Starts a utility or shuts down the system This is displayed regardless of tabs being selected Shut down Shuts down this device Media The media output screen is displayed Utility Starts utilities This button is not displayed if the user authorization of the logged in operator is Technologist Update Refreshes information Checkup Displays the checkup setti...

Page 70: ... Aero Sync mode Sets whether or not the AeroSync button is to be operated when starting examination or exposure Turn this on when Large is selected 3 Detection Algorithm button Displayed only in Aero Sync mode Turn it on when enabling detection selection processing 4 Initial detection level Sets the X ray detection level at the time of starting examination or expo sure The buttons shown differ dep...

Page 71: ...Sync button after changing the button setting from OFF to ON If the setting for the initial detection level is changed while an examination is in progress the setting is not applied until the examination is complete The detection selection processing is a function that reduces malfunctions caused by impacts applied to the DR Detector When enabling detection selection processing an area 10 cm or lo...

Page 72: ...dby mode Error Normal Processing Power off or not connected Error When the AeroDR UF cable is connected to the DR Detector the DR Detector icons change to the icons for the device con figured with the AeroDR UF cable During manual display the following manual display dialog is displayed This dialog can be moved to any desired position The wireless button AeroSync button detection algorithm button ...

Page 73: ... usage status and replacement estimation of the replacement unit chosen from the list 6 Edit button Used by service engineers to edit the information about the replacement unit This button is not displayed in the log in mode 7 System menu Starts a utility or shuts down the system This is displayed regardless of tabs being selected Media The media output screen is displayed Utility Starts utilities...

Page 74: ...74 ...

Page 75: ...75 Chapter 4 General Operations This chapter describes general operation methods of this device ...

Page 76: ...r units HINT The software version is displayed on the system startup screen Initialization will be completed a few minutes after turning on the power A progress bar is displayed on the system startup screen indicating the status of the system initialization process During startup processing if startup could not be completed for any reason an error message will be displayed and the system will tran...

Page 77: ...2 AeroDR Portable RF Unit AeroDR Por table RF Unit2 AeroDR Portable UF Unit and small size access point are turned off before this device is turned off HINT In cases where a device like REGIUS is connected to this device and the power is linked when the power for this device is turned off the power for connected devices is also turned off or it shifts to sleep status If this device has been contin...

Page 78: ...nd processing details are as follows z zConnected devices and link details Connected devices Details to link DR Detector The DR Detector stops linked to the shutdown processing of this device REGIUS 110 REGIUS 110 HQ REGIUS 170 REGIUS 190 REGIUS 210 Each device recovers from sleep or transitions to sleep linked to the startup shutdown processing of this device ...

Page 79: ... screen saver Login screen HINT When the automatic login function is used you are automatically logged in when this device starts up and the initial screen can be displayed If LDAP login authentication has been enabled the domain input field is displayed on the login screen 4 2 2 Login When using login mode log in with the following pro cedure 1 Input user ID and password then press Login The init...

Page 80: ...off is pressed during an examination a message stating that the examination is paused is dis played Press OK on the confirmation screen to log off pausing the examination 4 2 4 Switch of operators When 2 or more operator names are registered their names can be switched Operator names can be switched only when the automatic login function is en abled 1 Press Operator in the application bar The oper...

Page 81: ...screen Enable user management function and user log management as user tools IMPORTANT When logged in with the automatic login function authorization becomes Administrator 4 2 6 Operation history Operation history of operators is recorded The following contents will be recorded Recorded contents Date when an event occurred Access right of the operator logged in when the event occurred Time when th...

Page 82: ...s z zDisplay the input panel Press the button for switching the input panel display Hide the input panel Display the input panel The display switches every time the button for switching the input panel display is pressed z zInput alphanumeric Press ABC or QWERTY ABC input panel QWERTY input panel Letters are displayed in alphabetical order or in the order on a keyboard ...

Page 83: ... 1 Insert the DR Detector into the AeroDR Battery Charger AeroDR Battery Charger2 Alternatively connect the DR Detector to an Wired cable The DR Detector is registered 2 Check registration of the DR Detector in the icon display of the application bar When registered normally the DR Detector icon is displayed in the application bar 4 4 Registration of the DR Detector ...

Page 84: ...84 ...

Page 85: ...85 Chapter 5 Sequence of Examination This chapter describes the operation steps for examination procedures performed with this device ...

Page 86: ...ion Exposure with DR Detector CR cassette Image adjustment Selection of examination Manual body part selec tion Changing deleting Exam Tags Change of S value G value E F HS parameter adjustments Adjustment of ROI area Positioning editing of annotation Press Perform Press Perform Press Back Press Press Return Press Tool etc Press or Pressing will produce an output to the host or printer depending o...

Page 87: ...1 5 2 6 Image adjustment on the exposure screen 5 5 2 7 Examination completion and output 6 Number Task 1 Perform a new patient registration in the patient registration screen 2 Select the examination target in the list screen 3 Set the exposure body part and exposure condition 4 Press the exposure switch 5 Adjust the exposed images after exposure Change the S value G value move the ROI area etc 6...

Page 88: ...d of the input panel press the selection buttons When entering Institution Residence Hospital Department and Requesting Physician select the names from the pull down menu or selection button or input them directly with the keyboard With the input item as a search key search the patient database for this device or a higher system When there is a patient ID that matches name sex and age are displaye...

Page 89: ... examination The exposure screen or the body part selection screen can be displayed by double clicking the examination target If Patient ID is read by a barcode reader examination target can be selected You can also transition to the exposure screen at the same time the barcode is read depending on the setting 5 2 4 Manual body part selection When making advanced settings of exposure body part and...

Page 90: ...er may affect the image quality Be careful when handling the DR Detector during and just after radiog raphy If an image is displayed when an exposure is not per formed this may be a detection error due to noises etc Perform rejected image deletion of images and repeat exposure If you have performed an exposure when Ready was not displayed repeat an exposure after approximately one minute The selec...

Page 91: ...d is displayed until the DR Detector is inserted into the wall stand 2 Insert the DR Detector into the wall stand 1 3 2 Until the DR Detector is inserted into the wall stand and exposure becomes ready Preparing is displayed in image display area 1 1 3 2 When the DR Detector inserted into the wall stand is ready to start exposure Ready is dis played IMPORTANT When using the AeroDR 3 1417HD click th...

Page 92: ...e Press the exposure switch after Ready is dis played in image display area 3 Configure the X ray device settings and check the exposure setting before making an exposure Press the exposure switch 1 3 2 1 3 2 The exposed image is displayed in image display area 3 The focus remains on image display area 3 IMPORTANT When linked with the X ray device because the se lected exposure conditions at the t...

Page 93: ...view of jawbone Side view of jawbone Front view of the child chest Side view of the child chest Progress observation of child chest Front view of infant chest Side view of infant chest and abdomen Progress observation of infant chest and ab domen Newborn chest Newborn skeleton Front view of cervix Side view of cervix Radial position of cervix Cervix opening Ribs Side view of sternum Radial posi ti...

Page 94: ... drag operation to in crease or decrease the S G values and specify the degree of change that can be obtained from You can also select the setting so that the S G values can be adjusted by simply dragging the image or drag ging it using both mouse buttons without pressing the S G button z zChange of parameters Change of the parameters is performed with the following procedure 1 Select an image who...

Page 95: ...a movement HINT Perform detailed position change of ROI area on the viewer screen z zZooming in and out Zoom in out of exposed images is performed with the following procedure 1 Select an image to zoom in out The control panel automatically switches to the Image Proc tab If it does not switch select the Image Proc tab manually z zChange of ROI area position Change of ROI area position is performed...

Page 96: ...hen a multi touch monitor is used zoom in out can be performed with the following operations In this case ZOOM or ZOOM do not need to be pressed Zoom in Simultaneously press 2 points with the thumb and in dex finger and spread the 2 points spread the finger tips to zoom in on the image Zoom out Simultaneously press 2 points with the thumb and index finger and move to close the 2 points close the f...

Page 97: ...gs In such cases press the Pause button or Termination button Either of the two buttons is displayed depending on the settings HINT If there is an unexposed image a confirmation screen is displayed Press OK to complete the examination by delet ing data for the unexposed portion and display the initial screen Press Cancel to return to the previous screen When outputting to a host the output destina...

Page 98: ...eroDR 1012HQ AeroDR 2 1417HQ AeroDR 2 1417S AeroDR 3 1417HD If there are any radioactive substances remaining in the patient s body after nuclear medicine testing or some other reason the AeroDR 2 1417HQ and the AeroDR 2 1417S may recognize that X rays were emitted and start image transfer When the im age is transferred change the X ray sensitive setting of the image processing controller to Large...

Page 99: ...ation 1 5 3 6 Image adjustment on the exposure screen 5 5 3 7 Examination completion and output 6 Number Task 1 Perform a new patient registration in the patient registration screen 2 Select the examination target in the list screen 3 Set the exposure body part and exposure condition 4 Perform exposure 5 Adjust the exposed images after exposure Change the S value G value move the ROI area etc 6 Wh...

Page 100: ...e entry spreads across multiple lines the long sentence comment pop up but ton is displayed 5 Press Perform Registration is performed in the patient data base of this device and the exposure screen or the body part selection screen is displayed HINT Because input of Sex Pregnancy are displayed with selection buttons instead of the input panel press the selection buttons When entering Institution R...

Page 101: ...ion The exposure screen or the body part selection screen can be displayed by double clicking the examination target If Patient ID is read by a barcode reader examination target can be selected You can also transition to the exposure screen at the same time the barcode is read depending on the setting 5 3 4 Manual body part selection When making advanced settings of exposure body part and exposure...

Page 102: ...procedure The procedure varies depending on the setting of the AeroSync Button on the system monitor screen IMPORTANT Always check the patient information and exposure conditions before exposure Available X ray detection level varies depending on the DR Detector model In the event of a communication error and depending on the timing at which the error has occurred images may not be displayed and t...

Page 103: ...ction may be caused by a shock to the DR Detector In such cases set AeroSync Button to ON on the system monitor screen To prevent incorrect operations always check that Ready is displayed Conditions for changing the detection level vary de pending on the X ray device being used If a survey has been carried out when the system was installed follow the survey results When using the AeroDR 3 1417HD c...

Page 104: ...ection level can be set when making an exposure Refer to 5 3 Exposure with DR Detector Aero Sync mode for information on the X ray detec tion levels that can be set 3 Perform exposure Configure the X ray device settings and check the exposure setting before making an expo sure Press the exposure switch As soon as the exposed image is transferred the image is displayed in the image display area IMP...

Page 105: ...press the image once more to switch to the viewer screen When more advanced image adjustment is required perform image adjust ment on the viewer screen where larger images are displayed Dragging the control panel slider or pressing increases or decreases the S value G value in multiples of the preset value In addition when you press the S G button on the control panel the S value G value can be ad...

Page 106: ...sition Change of ROI area position is performed with the fol lowing procedure 1 Select an image whose ROI area you want to change The control panel automatically switches to the Image Proc tab If it does not switch select the Image Proc tab manually 2 Press ROI The ROI area is displayed 3 Move the ROI area When any part of the image is clicked the ROI area moves to the center of the clicked part T...

Page 107: ...r image or perform any other operations the image will return to its original size IMPORTANT Effects of resizing are not reflected at the time of out put HINT When a multi touch monitor is used zoom in out can be performed with the following operations In this case ZOOM or ZOOM do not need to be pressed Zoom in Simultaneously press 2 points with the thumb and in dex finger and spread the 2 points ...

Page 108: ...cases press the Pause button or Termination button Either of the two buttons is displayed depending on the settings HINT If there is an unexposed image a confirmation screen is displayed Press OK to complete the examination by delet ing data for the unexposed portion and display the initial screen Press Cancel to return to the previous screen When outputting to a host the output destination can be...

Page 109: ...istration screen 2 Select the examination target in the list screen 3 Perform exposure with the CR cassette 4 Set the exposure body part and exposure condition 5 Perform exposure with bar code registration Perform bar code registration on the exposure screen 6 Perform exposure with a specified reading sequence Specify the reading sequence on the exposure screen 7 After exposure and reading the CR ...

Page 110: ...spreads across multiple lines the long sentence comment pop up but ton is displayed 5 Press Perform Registration is performed in the patient data base of this device and the exposure screen or the body part selection screen is displayed HINT Because input of Sex Pregnancy are displayed with selection buttons instead of the input panel press the selection buttons When entering Institution Residence...

Page 111: ... exposure screen or the body part selection screen can be displayed by double clicking the examination target If Patient ID is read by a barcode reader examination target can be selected You can also transition to the exposure screen at the same time the barcode is read depending on the setting 5 4 4 Manual body part selection When making advanced settings of exposure body part and exposure method...

Page 112: ...hods when install ing If you have set to register the Exam Tags automati cally the body part selection screen is not displayed The display transitions to the exposure screen 5 4 5 Exposure For exposure when CR cassettes are used there are 2 types bar code registration and specified reading sequence IMPORTANT Always check the patient information and exposure conditions before exposure HINT Registra...

Page 113: ...tte is for general exposure Check the Exam Tag Press OK and register the correct CR cassette CR cassettes with the same bar code cannot be reg istered consecutively When there are several expo sures with CR cassettes with the same bar code re register after reading the image with the REGIUS for each exposure By continually carrying out steps 1 and 2 the CR cas settes can be continually registered ...

Page 114: ... 2 Perform exposure for the first image Configure the X ray device settings and check the exposure setting before making an expo sure Press the exposure switch 3 Read CR cassette When the first image is displayed the First marker disappears what was Second up to that point changes its marker to First and what was Third up to that point changes its marker to Second The numbers will move up in turn ...

Page 115: ...ified reading sequence is suitable when this device is connected with 1 REGIUS When REGIUS SIGMA SIGMA2 is connected the fol lowing dialog window appears during the image read ing process 5 4 6 Image adjustment on the exposure screen Performs adjustment of exposed images Basic image adjustments such as S value G value position of ROI area etc can be made on the exposure screen z zChange of S value...

Page 116: ...on to in crease or decrease the S G values and specify the degree of change that can be obtained from You can also select the setting so that the S G values can be adjusted by simply dragging the image or drag ging it using both mouse buttons without pressing the S G button z zChange of parameters Change of the parameters is performed with the following procedure 1 Select an image whose parameters...

Page 117: ...a moves to the center of the clicked part The following operations will cancel the ROI mode Pressing ROI again Pressing another button IMPORTANT When ROI area movement is performed after chang ing S value G value the changed S value G value is reset and the S G value becomes optimized after ROI area movement HINT Perform detailed position change of ROI area on the viewer screen z zZooming in and o...

Page 118: ...the 2 points close the fingertips to zoom out on the image You can also zoom in or out from to an image by rotat ing the mouse wheel up and down on the focused im age Use the user tool to set the amount of change associ ated with rotating the mouse wheel 2 Press ZOOM or ZOOM 3 Press any part of the image Zooming in out is displayed centering on the clicked part Every time you press a part of the i...

Page 119: ... are captured Cannot com plete study may be displayed depending on the settings In such cases press the Pause button or Termination button Either of the two buttons is displayed depending on the settings HINT If there is an unexposed image a confirmation screen is displayed Press OK to complete the examination by delet ing data for the unexposed portion and display the initial screen Press Cancel ...

Page 120: ...120 ...

Page 121: ...121 Chapter 6 Functions of each screen This chapter describes the functions of each screen of this device ...

Page 122: ... be searched or Search is pressed A search is performed once for each patient data input When running the search again do so after clearing the patient data being input by pressing Clear HINT Reading patient information by barcode reader after focusing on the patient ID enables you to display the information for that patient You can also transition to the exposure screen at the same time the barco...

Page 123: ...ation 1 Press the field for the patient ID 2 Input an arbitrary ID 3 Press Enter Registration as an emergency patient is per formed in the patient database of this device and the exposure screen or the body part selec tion screen is displayed IMPORTANT When a patient is registered as an emergency patient a mark indicating emergency patient is displayed in the patient information display area HINT ...

Page 124: ...s 2 Press The details of the examination are displayed on the examination information display area 6 2 2 Display of examination history The history of finished examinations can be displayed 1 Select the Completed tab A list of finished examinations is displayed 2 Select an examination to display its his tory 3 Press Refer 6 2 Functions of the list screen ...

Page 125: ...ion 6 3 5 4 2 1 Number Name Functions 1 Filter conditions input column Inputs displays filter condi tions Use the input panel selection buttons keyboard to input the conditions 2 Input panel Se lection buttons Selects filter conditions You can select multiple condi tions 3 Clear button Clears the input filter condi tions 4 Filter button Performs filtering with the input filter conditions 5 Blank b...

Page 126: ... filtering condition Ex posure Date as Study Date z zProcedure for refined display 1 Select the tab to display the refined search 2 Input a keyword under refinement Press Clear if you have input the wrong key word or to search with another keyword 3 Press Filter Only narrowed down examinations are dis played as the search result HINT When an accession number or patient ID is read from a bar code t...

Page 127: ...Modify The patient information is displayed 3 Select the item to be modified and input the necessary information After selecting the item to be modified input the necessary information If you press Enter the cursor will move to the next item 4 Press OK A confirmation screen is displayed 5 Press OK Press Cancel to return to the previous screen The modified content is reflected and display returns t...

Page 128: ...te A confirmation screen is displayed 3 Press OK Press Cancel to return to the previous screen The examination is deleted HINT Deletion of examination is possible only when there is no exposure 6 2 6 Addition of Exam Tags to completed examinations Exam Tags can be added to completed examinations 1 Select the Completed tab 2 Select the examination to which to add Exam Tags 3 Press Append A confirma...

Page 129: ... list screen 4 Press OK Press Cancel to return to the previous screen The Body Part Selection screen is displayed 5 Set the Exam Tags The Exam Tag is added is displayed for the added Exam Tag 6 Press OK The exposure screen is displayed ...

Page 130: ... deleted beginning with the oldest one Examinations can be protected so that they are not automatically deleted 1 Select an examination to protect 2 Press Guard For protected examinations G is displayed for the Guard items on the list screen HINT Pressing Guard again while selecting a protected ex amination will cancel protection ...

Page 131: ... 1 Select the Exam Tag to change 2 Press the Exam Tag to be changed The Exam Tag is changed HINT is indicated to the changed Exam Tags 6 3 2 Deletion of Exam Tags When the body part is selected manually Exam Tags can be deleted 1 Select the Exam Tag to delete 2 Press Delete The Exam Tag is deleted HINT The Exam Tags of exposed images cannot be de leted ...

Page 132: ... 3 3 Change of order of Exam Tags When body part selection is performed manually the order of Exam Tags can be changed 1 Drag and drop the Exam Tags A white line is displayed at the position where the order can be changed The order of Exam Tags is changed ...

Page 133: ...ns 1 Hold down or for one second or longer Both Exam Tag buttons are displayed in the pop up window 2 Press or HINT The selected Exam Tag button will be displayed again in your next operation z zModifying the Exam Tag 1 Select the Exam Tag to change the target body part and press The body part selection screen is displayed and the selected Exam Tag is focused 2 Change the Exam Tag ...

Page 134: ... changed is displayed for the changed Exam Tag 3 Press OK The Exam Tag on the exposure screen is changed z zAdding the Exam Tag 1 Press The Body Part Selection screen is displayed 2 Set the Exam Tags The Exam Tag is added is displayed for the added Exam Tag ...

Page 135: ...es During exposure the order of exposures can be changed Numbers 1 2 displayed on the screen are shown for ease of explanation and not displayed on the actual screen 1 Drag the Exam Tags display area whose order of exposure you want to change and drop it into the image display area at a desired location 1 2 1 2 Order of exposure is changed ...

Page 136: ...Exam Tag copy allows copying of each group 1 Select the Exam Tags you want to copy from the order list 2 Press A confirmation screen is displayed HINT A confirmation message is displayed depending on your settings The button is displayed if it has been set with the service tool If the button is not displayed con tact Konica Minolta technical representatives 3 Press OK The Exam Tags are copied ...

Page 137: ...are shown for ease of explanation and not displayed on the actual screen 1 Select the image to delete 1 2 2 Press 1 2 Expose again is displayed 3 Press OK or Cancel A 1 2 Pressing OK copies Exam Tags 1 to frame A enabling you to perform reject and repeat exposure Further frame 2 moves to the bot tom left Pressing Cancel only performs reject In each case image 1 is the target of reject and display ...

Page 138: ...t at installation When the Reject Image button is displayed on the tool bar the reject image mark is indicated and replace each other depending on the focused image 6 4 5 Cancellation of reject deletion of images Even when reject is performed until the examination is ended reject can be cancelled 1 Press for the rejected image A confirmation screen is displayed 2 Press OK Press Cancel to return to...

Page 139: ...nformation transmitted to a higher system will not include the information of a copied image Images cannot be copied when they are being re ferred to by the examination history Copied images cannot be registered in the statistics summary database 1 Select the image you want to copy from the order list 2 Press The confirmation screen is displayed HINT You can display by setting it using the ser vic...

Page 140: ...king place Exposure Acquisition of an image from the reading device Replacement with the following images is not available The image of an order that was not successfully acquired from the reading device An image of the order that is waiting for image re transmission Images created by stitching exposure A rejected image A copied image An image exposed as a mammogram and an image exposed as anythin...

Page 141: ...to the one used to move the image to a desti nation 6 4 8 Change of exposure devices During exposure the exposure device can be changed 1 Press the device icon of the frame where you want to change the exposure device The wall stand is registered in this example Device icons registered in this device are dis played 2 Select a device icon to change In this example the DR Detector is selected The ex...

Page 142: ...ead bar code of the CR cassette The bar code number is displayed in the Exam Tags display area 3 Perform exposure using the registered CR cassette Configure the X ray device settings and check the exposure setting before making an expo sure Press the exposure switch 4 The image is read with the REGIUS or REGIUS SIGMA SIGMA2 The exposed image is displayed HINT The device can also be switched to CR ...

Page 143: ...ctor 1 Move focus to the unexposed image dis play area to be exposed by the CR cas sette 2 Press the device icon Device icons registered in this device are dis played 3 Select the device in which the DR Detec tor is inserted 4 Perform exposure Configure the X ray device settings and check the exposure setting before making an expo sure Press the exposure switch The exposed image is displayed ...

Page 144: ...or ease of explana tion and are not displayed on the actual screen Circumstances Performing exposure with DR Detector C that had been planned to be performed with DR Detector A 1 Set focus on any of the image areas 1 2 or 4 registered with DR Detector A 1 3 2 4 Exposure with DR Detector A Exposure with DR Detector B Exposure with DR Detector A Exposure with DR Detector A 2 Press the selection swit...

Page 145: ...th the DR Detector Charging This is displayed when the DR Detector is being charged due to a low battery level Please Charge This is displayed when the DR Detector s battery level is low but the DR Detector is not being charged Reading Images are being read HINT This is displayed when performing exposure in Aero Sync mode Waiting for permission Waiting for exposure permission Pressing AeroSync shi...

Page 146: ...ntal information 2 Press Additional The image supplemental information editing screen is displayed 3 Edit the image supplemental information 4 Press OK The supplemental information is added and the exposure screen is displayed IMPORTANT Input the patient orientation in the form of Row orien tation Line orientation For the values available for the Row orientation and Line orientation refer to the o...

Page 147: ...fied on the list screen and press Perform or Modify When Modify is pressed Go to step 3 The exposure screen is displayed 2 Press The patient information editing screen is dis played 3 Edit the patient information 4 Press OK A confirmation screen is displayed 5 Press OK Press Cancel to return to the previous screen The edited content is reflected and the expo sure screen is displayed ...

Page 148: ...pressed the examination display area is hidden and the work area is enlarged You can press the tab again to display the examination display area When the 2 work area zoom tab is pressed the tool bar is hidden and the work area is en larged You can press the tab again to display the tool bar When the 3 work area zoom tab is pressed the control panel is hidden and the work area is enlarged You can p...

Page 149: ... sary for the examination 1 Press or Pressing switches the display format to 2 2 Pressing switches the display format to 3 2 Press to return the display format to 1 1 6 4 17 Full screen image display Captured images can be displayed on the full screen z zFull screen display 1 Select the image to be displayed on the full screen 2 Press the icon The image is displayed on the full screen ...

Page 150: ... to be rotated if its height and width are the same You can enable Full Screen Display or return to the original display by double clicking the image display area using the mouse You can double click only by using a mouse in the im age display area Double click can be substituted with double touch in the Exam Tags display area 6 4 18 Rotation and flip of display Exposed images can be rotated and f...

Page 151: ...on of the selection screen select the rotating image after pressing Flip ON when flipping and rotating 1 image Set to hide unhide Flip OFF and Flip ON during in stallation 6 4 19 Panning of an image When an image that is larger than the size of the image display area is displayed the image can be panned 1 Select an image to pan 2 Press Pan 3 Drag the image to pan ...

Page 152: ...h buttons without press ing Pan 6 4 20 Deletion of registration of CR cassette regis tered with bar code When exposing with CR cassette the registration of a CR cassette registered with bar code can be can celled 1 Press the Exam Tag display area of the CR cassette registration to be deleted A confirmation screen is displayed 2 Press OK Press Cancel to return to the previous screen The bar code re...

Page 153: ...s displayed For the examinations on hold Suspend is displayed in the status field of the list screen The Exam Tags for the examination on hold cannot be deleted in order to prevent incorrect operations 6 4 22 Overlay Marker 1 Marker 2 Stamp and Grid Scale can be overlaid on the exposed image 1 Select the Overlay tab The screen switches to the control panel of overlay 2 Input the overlay by operati...

Page 154: ...displayed 4 Press an item to display The overlay is displayed 5 Select the display position for marker or stamp For both marker and stamp select 1 of the 4 corners Go to step 8 6 Press Scale The selection screen is displayed 7 Press either Measure1 Measure2 or Grid Press OFF to quit the display A grid or scale is displayed 8 Press Preview ...

Page 155: ...highlight function for the tube gauze is available for the images of the following body parts Front view of the chest Front view of the abdomen Front and side views of the head Front view of the child chest Infant chest and abdomen Auditory organ Side view of the lumbar spine Maniphalanx bones Over all view Toe Side view of the chest Side view of the abdo men Towne view of the head Side view of th...

Page 156: ... tube gauze is turned on and off every time you press the Tube Gauze button Tube Gauze OFF Tube Gauze Level 2 z zChanging the highlight level 1 Press the Tube Gauze button for 1 sec ond or more The highlight level change dialog box is dis played 2 Press OFF or the button of the level to be changed on the highlight level change dialog box The highlight level is changed ...

Page 157: ...lighted image output can be changed For more details contact Konica Minolta technical representatives 6 4 24 Automatic 1 1 display function When examining with a 2 2 display screen or a 3 2 display screen they can be changed to a 1 1 display screen automatically when the exposed image is re ceived The following procedure describes an example of what happens when while having the screen display set...

Page 158: ...d the button displays a countdown in seconds Before the countdown reaches 0 if any operation is performed on the image the countdown is stopped and the button changes to display NEXT 2 Press NEXT 1 2 Returns to the 2 2 display screen and the focus moves to the next unexposed frame HINT When the button countdown reaches 0 the previous screen will be displayed and the focus will move to the next Exa...

Page 159: ...atically when an exposed image is received IMPORTANT This function can be used only when Scattered Radia tion Correction is set to ON in the Exam Tag The S value after scattered radiation correction is cal culated for the image whose scattered radiation was corrected Therefore it is larger than the S value of the image before scattered radiation correction Use scattered radiation correction with a...

Page 160: ...NT Turning off the IG button will turn off image scattered radiation correction S G and other values will return to the values calculated for the image before scattered radiation correction z zAdjustment of the scattered radiation cor rection parameter 1 Press and hold the IG button The scattered radiation correction parameter dialog is displayed 2 Select the correction level The scattered radiati...

Page 161: ...on the image being output the results of image adjustment during output are not reflected The device icon of the host is displayed also when the electronic medical record is specified as the output destination This section describes the procedure for outputting im ages from the exposure screen and the operation per formed when the Output tab is selected on the control panel of the exposure screen ...

Page 162: ...n screen is dis played with the previously transmitted destina tion selected 2 Select the output destination It is possible to select multiple transmission des tinations 3 Press OK When not outputting press Cancel Images are re output 6 5 3 Change of host elec tronic medical record output conditions The conditions of images output to a host electronic medical record can be changed 1 Select the Out...

Page 163: ... is pressed Adjust the cropping height The height changes every time the button is pressed Returns to the state when im age was displayed HINT You can long press and drag the trimming frame The trimming frame is highlighted when selected and the original position is shown by dotted lines 5 Press The image is output to the host electronic medi cal record and is displayed in the image display area c...

Page 164: ...ormat The A image is displayed on top and the B image is on the bottom Direction The A image is displayed on the left and the B image is on the right Vertical output A format Only 1 image can be output AB format The A image is displayed on top and the B image is on the bottom The A image is displayed on the left and the B image is on the right Number 1 9 Output type Overall size Print an image aft...

Page 165: ...Screen Output Tab Functions 6 5 5 Printer output in A format 1 image can be output in 1 sheet of film 1 Select the Output tab 2 Press Printer 3 Select an image to output 4 Select in Format 5 Change Film Size Direction etc 6 Press ...

Page 166: ...lay area changes to indicating that output is done 6 5 6 Printer output in AB format 2 different images can be output in 1 sheet of film 1 Select the Output tab 2 Press Printer 3 Select an image first one to output 4 Select from Format 5 Change Film Size Direction Output Type etc 6 Select an image 2nd one to output ...

Page 167: ...ge to which denotes pair waiting status 8 Press of the 2nd image to be out put A confirmation screen is displayed 9 Press OK The images are output to the printer and is displayed in each image display area changes to indicating that output is done IMPORTANT When outputting in AB format be careful of the follow ing Images are outputting as a pair only when the for mat film size and film orientation...

Page 168: ...ing frame is displayed on the image The size of cropping frame changes automatically according to the film size length and width and height of the film output area The cropping frame can be moved by pressing the cropping frame move button or by selecting the destination of the cropping frame Cropping frame move button Cropping frame 6 5 7 Sort of preview images each image for host output Each prev...

Page 169: ...each series for host output Exposed images can be arranged in 1 series by expo sure body part Preview images for host output can be sorted by series 1 Select the Queue Cont tab Previews are displayed in the sequence of transmission to the host A preview is displayed as 1 series per body part 2 Drag the series to be changed and drop it into a desired position to rearrange the series A white line is...

Page 170: ... the Queue Cont tab Previews are displayed in the sequence of transmission to the host Transmitted series are displayed in gray A preview is displayed as 1 series per body part 2 Select a series already sent to the host 3 Press Reset A confirmation screen is displayed 4 Press OK Press Cancel to return to the previous screen The order of images can be changed in this state IMPORTANT Series that inc...

Page 171: ...ut by pressing Preview on the Image Proc Output or other tabs z zScreen structure This screen is used for checking preview images 1 4 2 3 8 7 6 5 Number Name Functions 1 Title bar Displays Preview Host Out put when a preview image for the host is shown Displays Preview Printer Output when a preview im age for the printer is shown 2 Output preview image Displays a preview of the im age to be output...

Page 172: ...cedure for displaying previews 1 Press Preview The image is displayed on the preview screen 2 Press Close The preview screen is closed HINT When a rejected image is displayed a reject icon ap pears in the image display area A life size stitched image with two or more combined output pages cannot be displayed on the preview screen ...

Page 173: ...en linked to the X ray device editing can only be made when X ray irradiation results cannot be ac quired from the X ray device Risk of misidentification of patients may occur if modi fications to patient information are made Be sure to read Chapter 1 Safety Precautions Warnings HINT When there are no X ray irradiation results associated with an exposed image result values are not displayed Editin...

Page 174: ...adiation information results after mammography exposure irradiation in formation results can be changed with the following procedure IMPORTANT For United States of America this device is not intend ed to use for Mammography 1 Select an image to edit 2 Press the Exp Info tab 3 Select anode and filter 4 Press the number part of the item you want to edit 5 Input numerical values with the number pad T...

Page 175: ...acement press of the same frame again or press any position other than 6 6 3 Replacement of X ray irra diation information results X ray irradiation information results of the image ex posed with the CR cassette can be replaced 1 Press of the image to be replaced The image display area is surrounded by a white frame 2 Press of the image to be replaced A confirmation screen is displayed ...

Page 176: ...orrection Positioning of annotation Adjusting an annotation Creating editing annotation characters 6 7 1 Change of E F HS parameters The parameters can be changed 1 Press Tool There are 3 types of processing E process F process and HS process The viewer screen is displayed 2 Select the process and change the param eter Icon Functions Switches the E process ON and OFF Switches the F process ON and ...

Page 177: ...erformed in the tab 3 Press Return after change Returns to the exposure screen IMPORTANT When the ROI area is changed the auto gradient pro cess is performed again and the optimized image is displayed HINT E F HS parameters can be changed individually The results of the changed parameter such as E F HS are automatically stored and can also be reflect ed in following exposures 6 7 2 Change of the R...

Page 178: ...t changes every time you press these buttons Icon Functions To use a fixed size effective image area set this option to ON Resets operations performed in the tab 3 Press Return after change Returns to the exposure screen IMPORTANT If image recognition fails and an inappropriate effec tive image area is set during automatic reading the image may become white or black all over When this happens temp...

Page 179: ...the size of the effective image area Select 8x10 10x12 11x14 14x14 14x17 or 17x17 2 Direction Switches the orientation of the effective image area between portrait and landscape HINT The fixed size effective image area can be moved by changing the position of the center point If any part of the effective image area is moved outside the image display area the position of the center point is ad just...

Page 180: ...asking area to change the shape of the masking area The results of masking recognition outside the expo sure field can be confirmed on the viewer screen or the image display area of the exposure screen Depending on the image information status automatic recognition of the exposure field area may not be car ried out properly In this case please change the ef fective image area manually The accuracy...

Page 181: ... the control panel the S value G value can be adjusted by dragging the image Use the user tool to set the drag operation to in crease or decrease the S G values and specify the degree of change that can be obtained from You can also select the setting so that the S G values can be adjusted by simply dragging the image or drag ging it using both mouse buttons without pressing the S G button 6 7 6 Z...

Page 182: ...index finger and move to close the 2 points close the fingertips to zoom out on the image You can also zoom in or out from to an image by rotat ing the mouse wheel up and down on the image Use the user tool to set the amount of change associ ated with rotating the mouse wheel 6 7 7 Moving images Move an image according to the following procedure 1 Press Pan 2 Drag the image The image moves followi...

Page 183: ...The rotation flip is reflected in the image HINT To simultaneously rotate and flip an image when Flip OFF and Flip ON are displayed on the selection screen at the top right press Flip ON and then select an image to be rotated You can select whether to display Flip OFF and Flip ON when installing the device Only the options Original 180 deg Flip and 180 deg Flip can be selected for images composed ...

Page 184: ...ion may fail during the grid removal process z zGrid removal 1 Select the image to remove the grid again 2 Press one of ROI Adjustment Masking Cropping or Viewer The viewer screen is displayed 3 Press Grid Suppress Control panel to adjust the parameters is displayed 4 Remove the grid again Select the grid direction and grid density HINT You can also remove the grid when correcting scat tered radia...

Page 185: ...ighted tube gauze function off to apply scattered radiation correction then turn the highlighted tube gauze function on 1 Select an image whose scattered radiation you want to correct 2 Press one of ROI Adjustment Masking Cropping or Viewer The viewer screen is displayed 3 Press Grid Suppress Control panel to adjust the parameters is displayed 4 Perform scattered radiation correction Select ON or ...

Page 186: ...po sition an annotation The control panel automatically switches to the Image Proc tab If it does not switch select the Image Proc tab manually 2 Press Text The viewer screen is displayed 3 Select the annotation to be positioned 4 Select the place to position the annota tion Annotation is added 5 Press Return after the placement of an notation is completed Returns to the exposure screen ...

Page 187: ...re on the image When you select an annotation in Step 3 click where characters are not registered You can move the annotation you placed using the mouse 6 7 11 Adjustment of annotation Annotations placed can be adjusted 1 Select an annotation to adjust 2 Adjust the annotation Icon Functions Text size adjustment Adjust the size of characters by moving the slider Character color switches be tween bl...

Page 188: ...l by making the character size of the annotation larger Also even with the film with the same character size and output method the character size will differ slight ly depending on the setting of resolution Character color and background color are linked When setting character color to White background color can be selected from either Black or None When setting character color to Black background...

Page 189: ...iewer screen Content is reflected in the row selected in step 1 HINT Up to 10 annotations can be created per tab Annotations registered in each tab can have up to 14 characters To delete the selected characters press Delete dur ing step 2 ...

Page 190: ...the icon on the screen 6 8 1 System status The status of this device can be confirmed 1 4 5 2 3 7 8 6 Number Name Functions 1 System Informa tion Displays the name serial number version and hospi tal ID of this device 2 HDD Displays maximum capacity of the hard disk and space in use 3 Guarded Image Displays the total number of guarded images 4 CPU Memory Displays utilization for the CPU and memory...

Page 191: ...vice status The status of REGIUS REGIUS SIGMA SIGMA2 X ray device AeroDR Generator Interface Unit AeroDR Generator Interface Unit2 AeroDR Portable RF Unit AeroDR Portable RF Unit2 sub monitor and other de vices connected to this device can be confirmed 5 1 2 4 3 Number Name Functions 1 Device name Information The device name device type error description are displayed 2 Status The IP address of a ...

Page 192: ...e displayed 3 Ping button Press to confirm the ping status 4 Route button Press to confirm Route infor mation 5 Number of reserved images The number of images not sent to the host is displayed 6 Output switch button Switches between ON and OFF of host output Outputs when set to ON and does not output to the host when set to OFF and the output reservation queue re mains in this device Switches betw...

Page 193: ... number of images not sent to the printer is displayed 6 Output switch button Switches between ON and OFF of printer output Outputs when set to ON and does not output to printer when set to OFF and the output reservation queue will remain in this device Switches between ON and OFF every time the button is pressed 7 Output reserva tion list Output reservations queues remaining in this device are di...

Page 194: ...ble to switch to the backup JM 8 Back button Closes the screen IMPORTANT Normally Delete Reading is not used Use this when although an image is not being read the message This image is being prepared for reading and cannot be viewed View after reading is completed or can celled is displayed and you cannot move to another screen 6 8 7 Status of RIS IN The status of higher systems connected to this ...

Page 195: ...s the screen IMPORTANT Because examination status is not output to a higher system when the switch of output is OFF the higher system cannot manage examination status and com pleted examinations may remain in a list Do not set the switch of output to OFF except at the time of a higher system problem 6 8 9 EMR Image The information image of electronic medical records connected to this device can be...

Page 196: ...t All and then press Delete Pressing Clear All cancels the selection 9 Back button Closes the screen 6 8 11 Status of examination sharing transmission The status of examination sharing transmission can be confirmed 7 9 8 3 2 4 5 6 1 Number Name Functions 1 Study Sharing Request Examination signal transmis sion and error contents are displayed 2 Terminal list This device and terminals conducting ex...

Page 197: ...197 Chapter 7 Various Functions This chapter describes the functions of this device ...

Page 198: ... adapter can be reset using the radio wave status icon on the application bar 1 Number Name Functions 1 Radio wave status Resets the wireless LAN adapter Press the radio wave status icon to display the dialog Press OK to reset the wireless LAN adapter IMPORTANT Do not turn off the wireless LAN adapter while it is resetting If you are using an external wireless LAN adapter do not remove it while it...

Page 199: ...n and is not displayed when the output is OFF Red A network connection error or data transmission error occurs in a connected device such as RIS HOST in a state connected to the network but without data waiting to be sent Exposure can be continued but there will be a data transmission error The network can be disconnected and the IP ad dress can be switched Sometimes a maximum 10 seconds elapses b...

Page 200: ...atically selects the optimum channel 5 Inactive AP List AP information list registered in this device Select an icon to switch to an AP infor mation If there are more than 7 AP information registered press to scroll sideways 6 System menu Starts a utility or shuts down the system This is displayed regardless of tabs being se lected Utility Starts utilities This button is not displayed if the user ...

Page 201: ...S OUT or printer confirm the output is set to ON using the same procedure 2 Import the examination information to be used for the exposure using the portable X ray device Confirm that an Ethernet cable is connected to this device Press Refresh on the list screen on this device The latest examination information is imported from the higher system by pressing the Refresh button HINT To input examina...

Page 202: ... AeroDR Portable RF Unit Opera tion Manual Confirm that the icon of the DR Detector to be used in exposure is displayed on the application bar IMPORTANT When the AP information channel is set to Auto CH press Auto CH on the system monitor screen por table and check the channel Wireless connection may take several minutes after the AeroDR Portable RF Unit is turned on 2 Select the examination 3 Pre...

Page 203: ...age After exposure adjust the image as required 6 Press The exposure is completed and the display re turns to the initial screen IMPORTANT When consolidating image adjustment press to pause the examination and return to the initial screen 7 When exposure is finished turn the Aero DR Portable RF Unit off Turn off the power switch of the AeroDR Por table RF Unit and check that the power LED green or...

Page 204: ...ormation The AeroDR Portable RF Unit is turned on The AeroDR Portable RF Unit has been turned on for 1 minute or more 1 Press System to display the system monitor screen System is displayed in the toolbar display area of the patient registration screen list screen body part selection screen and exposure screen The system monitor screen is displayed 2 Press the Portable tab The portable screen is d...

Page 205: ...e and send the image data etc saved in this device to the higher system The following proce dure is for an example in which a wired connection is in operation between this device and a higher system 1 Connect the Ethernet cable that is con nected to the DR Detector registration hub to the portable X ray device hub On connection the icon of System will change IMPORTANT Do not disconnect the Etherne...

Page 206: ...tion screen is displayed 3 Press the button corresponding to the de sired area name Press Cancel to return to the previous screen The area is switched and the display returns to the list screen IMPORTANT When there is data which has not yet been transmit ted a confirmation screen appears Press OK to execute the change in IP address Press Cancel to close the area selection screen and return to the ...

Page 207: ... RIS details can be checked by starting Internet Explorer The procedure is ex plained using the list screen as an example 1 Press Web Remote Desktop Linkup on the patient registration screen or the list screen Internet Explorer starts HINT URLs that can be displayed in Internet Explorer are only those beginning with http or https ...

Page 208: ...ter can be reset using the radio wave status icon on the application bar 1 Number Name Functions 1 Radio wave status Resets the wireless LAN adapter Press the radio wave status icon to display the dialog Press OK to reset the wireless LAN adapter IMPORTANT Do not turn off the wireless LAN adapter while it is resetting If you are using an external wireless LAN adapter do not remove it while it is r...

Page 209: ...n and is not displayed when the output is OFF Red A network connection error or data transmission error occurs in a connected device such as RIS HOST in a state connected to the network but without data waiting to be sent Exposure can be continued but there will be a data transmission error The network can be disconnected and the IP ad dress can be switched Sometimes a maximum 10 seconds elapses b...

Page 210: ...the length of an entry exceeds the dimensions of the display pane of the item or if the entry spreads across multiple lines the long sentence comment pop up but ton is displayed 7 2 2 Exposure preparations The exposure preparation of the AeroDR Portable RF Unit2 is performed according to the following proce dure 1 Prepare each device to perform exposure For information on how to prepare each devic...

Page 211: ...ith the keyboard With the input item as a search key search the patient database for this device or a higher system When there is a patient ID that matches name sex and age are displayed When there is no patient ID that matches the cursor moves to the following input field 7 2 4 Manual body part selec tion When making advanced settings of exposure body part and exposure method for each exposure se...

Page 212: ...ed this may be a detection error due to noises etc Perform rejected image deletion of images and repeat exposure If you have performed an exposure when Ready was not displayed repeat an exposure after approximately one minute When using the AeroDR 3 1417HD click the modal ity icon before making an exposure and select the AeroDR 3 1417HD Selecting the AeroDR 3 1417HD icon allows the exposure time t...

Page 213: ...on is in op eration between this device and a higher system 1 Turn all the devices off For information on how to shut down each de vice refer to AeroDR Portable RF Unit2 Opera tion Manual 2 Place each device in the carrying case For information on how to store each device refer to AeroDR Portable RF Unit2 Operation Manual 3 Return to the institution 4 Connect this device to the institution net wor...

Page 214: ...ase change the IP address When selecting areas using an external wired LAN adapter make sure the external wired LAN adapter is attached before pressing the area selection button 7 2 7 Change of the IP ad dress of the connected institution network Follow the steps below to obtain information from RIS in advance or to switch the IP address when connect ing to the institution network and outputting d...

Page 215: ...an check details of RIS by starting Internet Explorer depending on set tings The procedure is explained using the list screen as an example 1 Press Web Remote Desktop Linkup on the patient registration screen or the list screen Internet Explorer starts HINT URLs that can be displayed in Internet Explorer are only those beginning with http or https ...

Page 216: ... the direct X ray region does not enter the DR Detector due to the narrowed exposure field Be careful not to subject the DR Detector to strong shocks during exposure Extra Large is displayed when using either the AeroDR 2 1417HQ or AeroDR 2 1417S The control panel display AeroSync and items that can be selected differ depending on the type of DR Detector AeroDR 1417HQ AeroDR 1717HQ AeroDR 1012HQ A...

Page 217: ...io wave status icon on the application bar 1 Number Name Functions 1 Radio wave status Resets the wireless LAN adapter Press the radio wave status icon to display the dialog Press OK to reset the wireless LAN adapter IMPORTANT Do not turn off the wireless LAN adapter while it is resetting If you are using an external wireless LAN adapter do not remove it while it is resetting ...

Page 218: ...ce is waiting for permission for exposure The screen changes to the ready to expose screen if you press AeroSync Ready to expose screen The screen is locked as it is ready to be captured To cancel exposure press Cancel then the screen re turns to the exposure permission waiting screen When the AeroSync Button is set to OFF on the system monitor screen Ready to expose screen The screen is locked as...

Page 219: ...n and is not displayed when the output is OFF Red A network connection error or data transmission error occurs in a connected device such as RIS HOST in a state connected to the network but without data waiting to be sent Exposure can be continued but there will be a data transmission error The network can be disconnected and the IP ad dress can be switched Sometimes a maximum 10 seconds elapses b...

Page 220: ...utomatically selects the optimum channel 5 Inactive AP List AP information list registered in this device Select an icon to switch to an AP information If there are more than 7 AP information registered press to scroll sideways 6 System menu Starts a utility or shuts down the system This is displayed regardless of tabs being selected Utility Starts utilities This button is not displayed if the use...

Page 221: ...the host The device switches between ON and OFF every time Output is pressed When using a RIS OUT or printer confirm the output is set to ON using the same procedure 2 Import the examination information to be used for the exposure using the portable X ray device Confirm that an Ethernet cable is connected to this device Press Refresh on the list screen on this device The latest examination informa...

Page 222: ... Portable UF Unit Opera tion Manual Confirm that the icon of the DR Detector to be used in exposure is displayed on the application bar IMPORTANT When the AP information channel is set to Auto CH press Auto CH on the system monitor screen por table and check the channel It may take several minutes for wireless connection to start after turning on the AeroDR Portable UF Unit 2 Select the examinatio...

Page 223: ...m on the body part selection screen the exposure screen is displayed When you move the focus in the image display area on the exposure resumption waiting screen to capture an im age of another body part not the ready to expose screen but the exposure resumption waiting screen is displayed Refer to 7 3 Exposure with AeroDR Portable UF Unit for information on the X ray detection levels that can be s...

Page 224: ...ion 3 Press Perform The exposure screen is displayed A message Waiting for permission is displayed in the image display area HINT If the information about the body part is not imported while importing examination information from the high er system select the body part to be imaged Then press Perform on the body part selection screen to display the exposure screen When the AeroDR power management ...

Page 225: ...isition started without performing exposure this may result in incorrect detection due to noise etc Perform reject image deletion and repeat exposure If image acquisition does not start after exposure the voltage may not be enough Check the exposure con ditions and repeat exposure When exposure is done while Ready is not dis played have an interval of 1 minute or more before repeating exposure 6 A...

Page 226: ...ormation The AeroDR Portable UF Unit is turned on The AeroDR Portable UF Unit has been turned on for 1 minute or more 1 Press System to display the system monitor screen System is displayed in the toolbar display area of the patient registration screen list screen body part selection screen and exposure screen The system monitor screen is displayed 2 Press the Portable tab The portable screen is d...

Page 227: ...a etc saved in this device to the higher system The following proce dure is for an example in which a wired connection is in operation between this device and a higher system 1 Connect the Ethernet cable connected to the DR Detector registration side hub to this device On connection the icon of System will change IMPORTANT Do not disconnect the Ethernet cable while the data is being transmitted Th...

Page 228: ...tion screen is displayed 3 Press the button corresponding to the de sired area name Press Cancel to return to the previous screen The area is switched and the display returns to the list screen IMPORTANT When there is data which has not yet been transmit ted a confirmation screen appears Press OK to execute the change in IP address Press Cancel to close the area selection screen and return to the ...

Page 229: ... RIS details can be checked by starting Internet Explorer The procedure is ex plained using the list screen as an example 1 Press Web Remote Desktop Linkup on the patient registration screen or the list screen Internet Explorer starts HINT URLs that can be displayed in Internet Explorer are only those beginning with http or https ...

Page 230: ...12HQ AeroDR 2 1417HQ AeroDR 2 1417S AeroDR 3 1417HD If there are any radioactive substances remaining in the patient s body after nuclear medicine testing or some other reason the AeroDR 2 1417HQ and the AeroDR 2 1417S may recognize that X rays were emitted and start image transfer When the im age is transferred change the X ray sensitive setting of the image processing controller to Large before ...

Page 231: ... status icon on the application bar 1 Number Name Functions 1 Radio wave status Resets the wireless LAN adapter Press the radio wave status icon to display the dialog Press OK to reset the wireless LAN adapter IMPORTANT Do not turn off the wireless LAN adapter while it is resetting If you are using an external wireless LAN adapter do not remove it while it is resetting ...

Page 232: ...c Ready to expose screen The screen is locked as it is ready to be captured To cancel exposure press Cancel then the screen re turns to the exposure permission waiting screen When the AeroSync Button is set to OFF on the system monitor screen Ready to expose screen The screen is locked as it is ready to be captured To suspend exposure press Pause then the screen returns to the exposure permission ...

Page 233: ... not displayed when the output is OFF Red A network connection error or data transmission error occurs in a connected device such as RIS HOST in a state connected to the network but without data waiting to be sent Exposure can be continued but there will be a data transmission error The network can be disconnected and the IP ad dress can be switched Sometimes a maximum 10 seconds elapses before th...

Page 234: ...ly selects the optimum channel 5 Inactive AP List AP information list registered in this device Select an icon to switch to an AP information If there are more than 7 AP information registered press to scroll sideways 6 System menu Starts a utility or shuts down the system This is displayed regardless of tabs being selected Utility Starts utilities This button is not displayed if the user authoriz...

Page 235: ...mages are transmitted simultaneously with host output If the communication speed is reduced make sure there are no output reservations on the system moni tor screen system monitor tab and then turn off host output After all examinations are complete turn host output back on The device switches between ON and OFF every time Output is pressed 2 Import the examination information to be used for the e...

Page 236: ... is locked To change the X ray detection level press Pause to enable modification After changing the detection level press Restart then the message Ready is displayed IMPORTANT A malfunction may be caused by a shock to the DR Detector In such cases set AeroSync Button to ON on the system monitor screen To prevent incorrect operations always check that Ready is displayed Conditions for changing the...

Page 237: ... When exposure is done while Ready is not dis played have an interval of 1 minute or more before repeating exposure 5 Adjust the image After exposure adjust the image as required 6 Press The exposure is completed and the display re turns to the initial screen IMPORTANT When consolidating image adjustment press to pause the examination and return to the initial screen HINT Image adjustment can be d...

Page 238: ...ow the survey results When the AeroDR power management level is set to 3 4 or 5 it may take some time until the exposure becomes ready after you have pressed Aero Sync In this case Standby button instead of Cancel button is displayed in the message button area When using the AeroDR 3 1417HD click the modal ity icon before making an exposure and select the AeroDR 3 1417HD HINT Refer to 7 4 Exposure...

Page 239: ...s after exposure When the exposure is completed move the portable X ray device and send the image data etc saved in this device to the higher system The following proce dure is for an example in which a wired connection is in operation between this device and a higher system 1 Connect the Ethernet cable connected to the DR Detector registration side hub to this device On connection the icon of Sys...

Page 240: ...e area selection button The area selection screen is displayed 3 Press the button corresponding to the de sired area name Press Cancel to return to the previous screen The area is switched and the display returns to the list screen IMPORTANT When there is data which has not yet been transmit ted a confirmation screen appears Press OK to execute the change in IP address Press Cancel to close the ar...

Page 241: ...ation The AeroDR Access Point 2 is turned on The AeroDR Access Point 2 Unit has been turned on for 1 minute or more 1 Press System to display the system monitor screen System is displayed in the toolbar display area of the patient registration screen list screen body part selection screen and exposure screen The system monitor screen is displayed 2 Press the Portable tab The portable screen is dis...

Page 242: ...TANT Do not turn off the AeroDR Access Point 2 during the channel change process HINT Set the icon type and name of the information icon during installation 7 4 7 Other functions of unitless After returning to the institution you can check details of RIS by starting Internet Explorer depending on set tings The procedure is explained using the list screen as an example 1 Press Web Remote Desktop Li...

Page 243: ...e top and middle When two plates are used only is displayed 3 Adjust button Displays and hides the stitch ing adjustment panel 7 5 1 Screen structure z zExposure screen This is the screen for manual stitching exposure 3 1 2 8 7 9 5 4 6 Number Name Functions 1 Order list List of exposures 2 Combined image display area The images for combination are displayed Focus is dis played on selected images 3...

Page 244: ... button Applies the adjusted image combination position IMPORTANT For details on the overlap button when carrying out ex posure using the CR Stitching cassette refer to 7 8 1 Screen structure HINT z zMoving rotating an image during image combination For image movement rotation the lower image be comes the work image The movement rotation action is as follows Moving Moves the image to direction pre...

Page 245: ... Output for host This is the control panel to perform setting of host out put conditions for combined stitching images 2 1 Number Name Functions 1 Trimming size button This button is used to select the trimming size Set to hide unhide trimming size button during installation 2 Split button This button is used to split combined images and output these images to hosts The device switches between ON ...

Page 246: ...is as follows IMPORTANT For the stitching exposure images make sure that the combined parts are combined in the correct positions If there is gap between combined images manually adjust the image position of the combined parts using the viewer screen for stitching combination position adjustment It is also recommended that you arrange a measure in the combined image part during expo sure to confir...

Page 247: ...n because of a minute difference in magnifica tion After taking this into account confirm the combi nation position through the marker 1 Select the images to be combined Select the images to be combined from the or der list and press or The selected images are displayed in the com bined image display area If you pressed continuously select the associated images second and third HINT and can be pre...

Page 248: ...e upper image to that of the lower image If the upper image is used as the density standard adjust the density of the lower image based on the upper image HINT For the frame display format 1 1 2 1 and 2 2 display options can be selected A 2 2 frame display can only be selected when combining 3 images 4 Adjust the image combination position For details on how to operate the viewer screen for stitch...

Page 249: ... be displayed The combination position can then be readjusted The combined image is output and the display returns to the initial screen IMPORTANT The stitching image is output first then non stitching images are output If images are output before stitching the stitching image is output last Press the Adjust button after rotating combined im ages on the exposure screen to reset the image rota tion...

Page 250: ...rate the viewer screen refer to 3 6 Viewer screen IMPORTANT Note the following when adjusting images created by stitching exposure ROI adjustment is not possible Automatic recognition of the exposure field is not possible manual adjustment is possible If the effective image area is changed only the im age size will change Automatic calculation of masking is not possible 2 Press Return when image a...

Page 251: ...ton batch selection Gathers multiple exposure images associated with the images selected in the order list and displays them in the combined image display area Number Name Functions 5 Selection button individual selec tion Displays the selected images in the order list in the com bined image display area 6 Delete button Deletes the images selected in the combined image dis play area 7 Combination ...

Page 252: ...ressing or dragging the bar 8 Move rotate but ton Moves the position of select ed images and adjusts their angles image position is moved toward each direction image angles are adjusted 9 Magnification Ra tio button Magnifi cation Ratio bar Display images are magnified shrunk by pressing or dragging the bar 10 Apply button Applies the adjusted image combination position HINT z zMoving rotating an ...

Page 253: ...rol panel Output for host This is the control panel to perform setting of host out put conditions for combined stitching images 2 1 Number Name Functions 1 Trimming size button This button is used to select the trimming size Set to hide unhide trimming size button during installation 2 Split button This button is used to split combined images and output these images to hosts The device switches be...

Page 254: ... is smaller than the trimming region the entire combined image may not completely fit within the selected region If the configuration of the split images results in one image the split processing is not applied and the split output frame does not appear 7 6 2 Exposure The auto stitching exposure method using DR Detec tor is as follows 1 Perform exposure preparations for Aero DR Stitching System Fo...

Page 255: ...following action is performed If exposure field confirmation results are less than the Exam Tag the confirmation screen is displayed The Exam Tag is maintained as is and exposure is enabled If exposure field confirmation results exceed the Exam Tag an error is displayed Either reset the exposure field or add an Exam Tag on the body part selection screen 5 The exposure ready LED blue of the AeroDR ...

Page 256: ... of reject is the image before and after combination Rejecting any image within a single examination makes other images also the target for rejecting 7 6 3 Image combination Images exposed by auto stitching using the DR Detec tor are combined automatically The following proce dure describes an example of combining 3 images IMPORTANT Automatic combination may fail depending on the con dition of the...

Page 257: ...after rotating combined im ages on the exposure screen to reset the image rota tion HINT A merged image can also be displayed after the pre merged images in the order list For more details con tact Konica Minolta technical representatives 4 Press The combined image is output and the display returns to the initial screen IMPORTANT The stitching image is output first then non stitching images are ou...

Page 258: ...nts For details on how to operate the viewer screen refer to 3 6 Viewer screen IMPORTANT Note the following when adjusting images created by stitching exposure ROI adjustment is not possible The exposure field automatic recognition function cannot be performed manual adjustment is pos sible If the effective image area is changed only the im age size will change 2 Press Return when image adjustment...

Page 259: ...rea The images for combination are displayed Focus is displayed on selected images Number Name Functions 4 Reference grada tion button This button is for selecting the image which will be the image shade standard among the images displayed in the combined image display area You can only select 1 image Not selected Selected 5 Adjust button Performs re adjustment of the combination image z zDetails ...

Page 260: ...detector is ready for exposure An error has occurred in the DR detector An unsent image remains in the DR detec tor The combination display will display in an icon whether or not the connection status and type of DR detector loaded into the upper section or lower section based on the DR detector that is loaded into the middle sec tion of a stitching holder The display meaning is as follows The DR ...

Page 261: ...Magnification Ratio bar Display images are magnified shrunk by pressing or dragging the bar 8 Apply button Applies the adjusted image combination position 9 Adjust image guide The adjusted target image is displayed HINT z zMoving rotating an image during image combination For image movement rotation the lower image becomes the work image The movement rotation action is as follows Moving Moves the ...

Page 262: ...ontrol panel to perform setting of host output conditions for combined stitching images 2 1 Number Name Functions 1 Trimming size button This button is used to select the trimming size Set to hide unhide trimming size button during installation 2 Split button This button is used to split combined images and output these images to hosts The device switches between ON and OFF every time the button i...

Page 263: ...image the split processing is not applied and the split output frame does not appear 7 7 2 Exposure The One shot stitching exposure method using DR Detector is as follows IMPORTANT If One Shot stitching exposure is carried out please be careful of the following items Image copying is not possible Image replacing is not possible Exposure condition copying is not possible Automatic sorting of the or...

Page 264: ...ing out table position exposure in 2 DR de tectors the dummy detector is loaded in the upper slot In addition please make sure to always load this in the upper slot since reflection of the dummy detector will occur One Shot stitching exposure outputs the merged im ages by correcting the overlapping portions of the cap tured image in the DR detector Through the exposure conditions since lowering of...

Page 265: ...en IMPORTANT Adjust the combination position by using the markers as supplementary standards in addition to body parts of the subject It is also recommended that you arrange the measure in the combined image part during exposure to sim plify the confirmation of the combined parts 6 Press The combined image is output and the display returns to the initial screen IMPORTANT Please be sure to confirm ...

Page 266: ...tments For details on how to operate the viewer screen refer to 3 6 Viewer screen IMPORTANT Note the following when adjusting images created by stitching exposure ROI adjustment is not possible The exposure field automatic recognition function cannot be performed manual adjustment is possible If the effective image area is changed only the image size will change 2 Press Return when image adjustmen...

Page 267: ...bined image display area Number Name Functions 8 Stitching button Combines the images dis played in the combined im age display area Press this button to display the stitching combination position adjust ment screen 9 Adjust button Performs re adjustment of the combination posi tion This button cannot be pressed when combined images are not displayed HINT Adjustments to the combination position of...

Page 268: ...y images are magni fied shrunk by pressing or dragging the bar 10 Apply button Applies the adjusted image combination position HINT z zMoving rotating an image during image combination For image movement rotation the lower image is the operational object The movement rotation action is as follows Moving Moves the image to direction pressed The image can also be moved by dragging the center of the ...

Page 269: ...el Output for host This is the control panel to perform setting of host out put conditions for combined stitching images 2 1 Number Name Functions 1 Trimming size button This button is used to select the trimming size Set to hide unhide trimming size button during installation 2 Split button This button is used to split combined images and output these images to hosts The device switches between O...

Page 270: ...ame does not appear 7 8 2 Exposure The exposure method for CR stitching cassette is as follows IMPORTANT For the stitching exposure images make sure that the combined parts are combined in the correct positions If there is gap between the combined images manu ally adjust the image position of the combined parts using the viewer screen for stitching combination position adjustment It is also recomm...

Page 271: ...ns an example of combining 3 images IMPORTANT Adjust the combination position by using the markers as supplementary standards in addition to body parts of the subject It is also recommended that you arrange the measure in the combined image part during exposure to sim plify the confirmation of the combined parts In stitching exposure when plates overlap and are ar ranged so that there is no image ...

Page 272: ...ANT Press the Adjust button after rotating combined im ages on the exposure screen to reset the image rota tion HINT A merged image can also be displayed after the pre merged images in the order list For more details con tact Konica Minolta technical representatives 4 Press The combined image is output and the display returns to the initial screen IMPORTANT The stitching image is output first then...

Page 273: ...s For details on how to operate the viewer screen refer to 3 6 Viewer screen IMPORTANT Note the following when adjusting images created by stitching exposure ROI adjustment is not possible The exposure field automatic recognition function cannot be performed manual adjustment is pos sible If the effective image area is changed only the im age size will change 2 Press Return when image adjustment i...

Page 274: ...s this button to display the stitching combination position adjust ment screen Number Name Functions 9 Adjust button Performs re adjustment of the combination posi tion This button cannot be pressed when combined images are not displayed 10 SID setting Select the SID value HINT Adjustments to the combination position of the stitch ing exposure images are performed on the viewer screen for stitchin...

Page 275: ...image combination position HINT z zMoving rotating an image during image combination For image movement rotation the lower image is the operational object The movement rotation action is as follows Moving Moves the image to direction pressed The image can also be moved by dragging the center of the image horizontal stripe portion Rotating Lowers the upper left edge of the image Raises the upper le...

Page 276: ...t for host This is the control panel to perform setting of host out put conditions for combined stitching images 2 1 Number Name Functions 1 Trimming size button This button is used to select the trimming size Set to hide unhide trimming size button during installation 2 Split button This button is used to split combined images and output these images to hosts The device switches between ON and OF...

Page 277: ...ssing is not applied and the split output frame does not appear 7 9 2 Exposure The Reina bucky based exposure method is as fol lows This is an example using three images IMPORTANT For the stitching exposure images make sure that the combined parts are combined in the correct positions If there is gap between combined images manually adjust the image position of the combined parts using the viewer ...

Page 278: ...re is registered 2 Perform exposure using Reina buckies Configure the X ray device and check the expo sure conditions before making an exposure Press the exposure switch 3 Read CR cassette After the first image is displayed the indication First disappears First is indicated for the thus far Second image and Second for the thus far Third image the numbering changes in order Repeat Step 3 to read th...

Page 279: ...ry to adjust the combination positions manually Adjust the combination position by using the markers as supplementary standards in addition to body parts of the subject It is also recommended that you arrange the measure in the combined image part during exposure to sim plify the confirmation of the combined parts In stitching exposure when plates overlap and are ar ranged so that there is no imag...

Page 280: ...just and display the viewer screen for stitching combination position adjustment For information concerning the method of manually adjusting the combination position refer to 7 9 1 Screen structure Press Cancel to return to the previous screen The combined image is displayed The combined image is added to the order list IMPORTANT Press the Adjust button after rotating combined im ages on the expos...

Page 281: ... For more details contact Konica Minolta technical rep resentatives 7 9 4 Image adjustment The adjustment method for the combined image is as follows 1 Display the combined image and press Viewer The viewer screen is displayed Perform various image adjustments For details on how to operate the viewer screen refer to 3 6 Viewer screen IMPORTANT Note the following when adjusting images created by st...

Page 282: ...282 7 9 SIGMA stitching exposure 2 Press Return when image adjustment is completed The exposure screen is displayed ...

Page 283: ...ctions 3 Segment flip but ton Replaces the right and left images with each other The images are replaced every time you press the button 4 Cancel button Cancels outputting image in AB format 5 OK button Outputs mammogram im ages in AB format 7 10 2 Exposure The procedure for mammogram exposure is as follows The procedure is explained using barcode registration as an example IMPORTANT Using EF proc...

Page 284: ...d 4 Focus on the image display area to regis ter the Mammography cassette 5 Read the barcode of the Mammography cassette with a barcode reader The barcode number read is displayed in the Exam Tag display area This completes the read preparation for REGIUS 6 Select image resolution High on the Ac quisition tab IMPORTANT In the case of mammogram exposure Standard is 87 5μm and High is 43 75μm ...

Page 285: ...east area HINT Overlay settings LR CC MLO etc are made on the Overlay tab host or printer For information on the overlay setting method refer to 6 4 22 Overlay If the image needs revision chest wall blackening process etc when checking the image by pressing Preview of overlay adjust the image on the viewer screen 9 Perform the second exposure or more Repeat from step 4 to perform the second expo s...

Page 286: ...ay returns to the initial screen 7 10 3 Chest wall blackening process adjustment Chest wall blackening process for the mammogram image is conducted on the viewer screen HINT Chest wall blackening process is ON under ordinary circumstances 1 Focus on the image to be adjusted and press Viewer The viewer screen is displayed 2 Select the Masking tab ...

Page 287: ...m exposure Chapter 7 3 Press Chest wall Pressing Chest wall toggles blackening pro cess between ON and OFF 4 Click Return Return to the exposure screen When outputting make sure chest wall blacken ing process is applied ...

Page 288: ...vice must be equipped with a writable media drive Since writing to CD R and DVD R media uses the disc at once method additional data cannot be added on the media once data is written The patient ID is used in the image file name when outputting to JPEG When the patient ID file name has restricted characters they are replaced with _ Be careful not to misidentify patients 7 11 1 Screen structure Str...

Page 289: ...Media The capacity of the output destination is displayed in Capacity 5 Select the image format Press JPEG or PDI When JPEG is pressed select image size and image quality Select one image size from 25 50 75 or 100 Select one image qual ity from Low Standard or High HINT When image size becomes larger and image quality becomes higher data volume during output becomes larger The JPEG image size is t...

Page 290: ... this device is restarted 7 Press Run When outputting to JPEG specify the output destination folder for the image Specify the folder name then press OK You can enter up to 15 characters Press Cancel to stop media output The screen that shows the progress status is displayed and creation of the write data starts Press Cancel to stop media output The screen that shows the progress status is displaye...

Page 291: ...t together with a PDI viewer Depending on the settings at installation it may also be possible to en able automatic launching of the PDI viewer Do not specify the drive in which the software for this device is installed as the output destination drive In the examination that was output to media examina tion that has one or more images that was normally output an icon is displayed in the Output fin...

Page 292: ...gram from your media on the Software and games screen on the control panel of Windows 2 Press PDI Viewer A security warning message is displayed HINT For Windows 10 cannot start the PDI viewer from the INDEX HTM screen of the Microsoft Edge Display the INDEX HTM screen on the Internet Ex plorer 3 Press Run The PDI viewer is displayed HINT The following message may be displayed when you press Run T...

Page 293: ...ssing to the image 12 Zoom Zooms in out on the image 13 Pan Move the image 14 Magnifier Enlarges the area pointed with the mouse pointer 15 Contrast invert Reverses black and white on the image 16 Overlay Displays or hides the overlay HINT Not used in this device 17 Horizontal flip Reverses the image in the horizontal direction 18 Vertical flip Reverses the image in the vertical direction 19 Right...

Page 294: ...the exposure item list and displays the last page In this way you can switch the target examination to be exposed This section describes the screen structure of the ex posure screen and procedure of examination when performing examination with the multi study In multi study individual order items displayed in the Study List are referred to as examinations In addition a single exposure taken for ea...

Page 295: ...isplayed 2 Issue button Issues the accession num ber 3 Delete button Deletes exposures individu ally after selecting the expo sure to be deleted IMPORTANT Aside from the screen structures explained here each screen is the same as usual However cannot be pressed on the exposure screen when performing an examination with multi study 7 12 2 Multi study examination from the list screen The following d...

Page 296: ...the second exposure to be ex posed When there are two or more exposure items repeat the same procedure to proceed with the second and later exposures 7 After performing the exposure press or Press to save the exposed image Press to output the exposed image After the image is saved or output the exposure screen Study List tab screen is displayed 8 Press the second examination When there are two or ...

Page 297: ...ayed by pressing NEXT displayed in the Exam Tags display area after completing the exposure of 1 examination 7 12 3 Multi study examination from patient registration screen When conducting examination by multi study from the patient registration screen use the following proce dure 1 Enter the search conditions from the Pa tient registration screen 2 Press Search A list of examinations correspondin...

Page 298: ...sure Exposure and other functions can be operated same as normal examination For detail refer to 5 2 Exposure procedure with DR Detector Ba sic connection and later 8 Select the second exposure to expose the examination When there are two or more exposure items repeat the same procedure to proceed with the second and later exposures 9 After carrying out the exposure press or Press to save the expo...

Page 299: ...dure refer to 5 2 4 Manual body part selection HINT You can issue the accession number by pressing Is sue 10 Press the second examination When there are two or more exposure items press the intended examination and proceed with the exposure using the same procedure Exposure screen Exam Tag tab screen is dis played Continue with your exposure using the proce dures described in Steps 5 to 8 11 Once ...

Page 300: ...the exposure screen Study List tab screen For the selection press the icon on the left side of the exposure item After the selection the button portion on the left end is focused on 2 Press Del Study The icon turns to indicating the exposure item is in the deleted state 3 Press OK Added exposures are displayed in the exposure item list on the exposure screen Study List tab screen ...

Page 301: ...i nation in the multi study The following describes how to output every image that has been exposed but not yet output on an exami nation item basis HINT If you want to output exposed images on a piece by piece basis press on Exam Tag tab screen 1 Select the exposure item to be output from the exposure screen Study List tab screen For the selection press the icon on the left side of the exposure i...

Page 302: ...lays the examination information of this device 5 6 3 4 2 1 Number Name Functions 1 OrderList tab This tab displays the exami nation information registered in this device 7 13 Examination sharing Multiple these devices can share examination informa tion and perform exposure check adjustment of im ages Examination information can be sent or received from one unit of this device to another unit of t...

Page 303: ...on A tab to automatically filter by specifying a pending reason can be added Whether to display this tab name of the tab and pending reason to be displayed are set at installation z zExposure screen transmission When an examination is paused during exposure the screen below is displayed 4 3 1 2 Number Name Functions 1 Details confirma tion screen This is displayed when is pressed depending on the ...

Page 304: ...waiting for image retransfer or image reading has not been completed after job registration an error message is displayed and reception is not reserved Pressing Perform displays the exposure screen as soon as the examination is received 7 13 2 Reception of examination information Receive shared examination information following the procedure below 1 Press the Study Sharing tab on the list screen 2...

Page 305: ...is not updated after examination infor mation is transmitted Press Refresh to display the latest information When examination information is transmitted the ex amination information is deleted from this device HINT If the examination to be transmitted is reserved for reception from another unit of this device or reserved for transmission to another unit of this device then an error message is disp...

Page 306: ... confirmation screen is displayed 2 Press OK Press Cancel to return to the previous screen The details confirmation screen is displayed HINT The details confirmation screen may not be displayed depending on the setting In this case pressing OK transmits the data with the preset pending reason to the preset destination 3 Select Reason and Destination IMPORTANT Select None for transmission destinati...

Page 307: ... same as those that are available on the normal list screen z zStudy Search screen 2 3 4 1 Number Name Functions 1 Search conditions input columns These columns are used to display and enter the search conditions 2 Clear button Clears the entered search con ditions 3 Search button Searches for the study based on the entered search condi tions 4 Return button Press this button before entering any s...

Page 308: ... left and right image lists 6 Close button Cancels operation of moving images and returns to the list screen 7 Save button Saves the result of moving images 7 14 2 Merging of studies The following describes the procedure for merging re assigning studies from the list screen 1 Select a study with a Suspended or Ex posed status that you want to merge on the list screen 2 Press Merge The Study Search...

Page 309: ...he search Press Cancel to return to the search screen When there is a mistake in the search terms return to the search screen enter the correct search terms and redo the search 5 Press OK Press Cancel to return to the search screen The studies are combined and the display re turns to the list screen IMPORTANT The study to be merged is suspended and the merging examination is deleted Depending on t...

Page 310: ...1 On the list screen select the study from which to move images 2 Press Merge The Study Search screen is displayed 3 Enter the patient name ID and other items of the study to move images to HINT When an accession number is used for the search you can search for all studies related to the patient IDs of the target study When using this function contact Konica Minolta technical representatives 4 Pre...

Page 311: ...ncel on the confirmation screen to return to the search screen If the search conditions are not correct when checked press Cancel to return to the search screen and reenter the correct search terms Studies other than completed suspended or unex posed studies cannot be combined If an attempt is made to combine such studies the following dialog box appears Press OK to display the Image Move screen 6...

Page 312: ...e is moved the study status is sus pended and the output completed checkmark is cleared To output data again press button or complete the study that is being performed 8 Press Save Press Close to return to the list screen The Image Move screen is closed 7 14 4 Checking an image The procedure for checking an image is as follows 1 Double click the image to check its de tails The image display dialog...

Page 313: ... 1 2 3 Number Name Functions 1 Information type selection button Select the type of information to be referenced 2 Period specifica tion operator name modality reader selection Select the period when information is collected or the operator name etc The options filter conditions will change according to the type of information to be referenced 3 Information dis play area Displays information in a ...

Page 314: ... Information Options filter conditions Remarks Re Exposure Info Period opera tor modality Displays the operator who performed retake or modal ity Exposure Info Period opera tor modality Displays exposure informa tion Console Info Period modality Displays information of another unit within the net work Only started devices are display targets Plate Info Modality Displays the usage of the DR Detecto...

Page 315: ...oSync QUICK Exp info Output Stitching 7 16 Print composer Using the print composer multiple exposed images can be laid out as you like on a film and output 7 16 1 Screen structure z zExposure screen 8 6 5 7 1 3 4 2 Number Name Functions 1 Filming tab Selecting this tab can display the film editing area 2 Film editing area Displays the output layout The display area of each exposed image is called ...

Page 316: ...mage into the film editing area the assignment completed checkmark is dis played on the image in the examination display area If you output an exposed image the output completed checkmark is displayed on the image in the study dis play area In the viewer screen the image in the selected box is displayed You can also zoom in or out by rotating the mouse wheel up or down on the image z zControl pane...

Page 317: ...u drop a new image into the image box to which another image has already been assigned the image that is currently in the image box will be replaced with the new one Dragging the split line changes the shape of the image box Dragging the intersection of split lines can move two split lines at the same time If a new box number is reassigned to the image boxes by moving the split line the position o...

Page 318: ...ab manually 2 Set the output conditions in the Filming tab of the control panel 3 Press Automatic acquisition button The image acquired to the image box is dis played IMPORTANT Each exposed image is assigned to an image box in numerical order of the boxes An exposed image with the output completed checkmark and the rejected exposed image are not acquired If the Exam Tag before reading is acquired ...

Page 319: ... The image is displayed in the destination image box HINT If you move a new image to the image box to which another image has already been assigned the image that is currently in the image box will be replaced with the new one 7 16 5 Deletion of images The following describes the procedure for deleting im ages from the film editing area 1 Drag the triangular mark in the upper left corner of the im...

Page 320: ...n the DR Detector is used It is recommended that this function be used during examinations carried out on rounds 7 17 1 Screen structure z zExposure screen 5 4 1 3 2 Number Name Functions 1 Order List If a deficiency in the lung image or body motion blur is detected an icon indicating such is displayed for the Exam Tag Number Name Functions 2 Lung lack detec tion spot The spot where a deficiency i...

Page 321: ... blur is detected HINT Press any position in the entire display area to display the pressed position in the image display area 7 17 2 Confirming the detected spot Confirm the spot where a deficiency in the lung image or body motion blur is detected in the following proce dure z zLung lack 1 Check the spot in the image display area where a deficiency in the lung image is detected HINT Use Detection...

Page 322: ...selected preset 13 Cancel button Closes the screen without saving the modifications made on this screen 14 OK button Closes the screen after sav ing the modifications con ducted on this screen HINT The examination automatically generated by the Cre ate skipped studies function can be started from the list screen 7 18 Checkup mode The checkup mode allows the patient ID and acces sion number to be i...

Page 323: ...ss Exam Tag to display the Exam Tag setting screen to set the Exam Tags 7 Cancel button Closes the screen without saving the modifications made on this screen 8 OK button Closes the screen after sav ing the modifications con ducted on this screen z zExam Tag setting screen Set the conditions of the automatic exposure You can display this screen by pressing Exam Tag on the checkup preset setting sc...

Page 324: ...og Press OK to perform the deletion 7 18 2 Preset setting proce dure The following describes how to set the preset z zWhen setting up new presets As there are no presets in the initial state it is neces sary to set new presets 1 Press System on the initial screen The system monitor screen is displayed 2 Press Checkup The checkup setting screen is displayed 3 Select the preset button to be set from...

Page 325: ...ASCII Accession Number HINT Patient ID is a mandatory setting item 7 Select the components of the number from the menu An example of the automatically issued number is displayed in Issue image Using the corre sponding tabs set the components for each of the items you require IMPORTANT Serial numbers can be set at between 3 and 5 digits long but when setting multiple serial numbers such as for Pati...

Page 326: ...ween the menus is included when it is kept pressed 8 Set the starting and ending values using Occurrence Number Enter the beginning value for the serial number in Start and enter the ending value for the se rial number in Stop HINT After the ending value is issued the next number is returned to the starting value The number to be issued next time is displayed in Next Value If you want to return to...

Page 327: ...ettings screen Make sure that the specified preset name is dis played 13 Press OK The display returns to the system monitor screen 14 Press Close The display returns to the initial screen z zWhen copying and setting an existing pre set It is possible to copy an existing preset make changes to it and then save it as a new preset 1 Press System on the initial screen The system monitor screen is disp...

Page 328: ...eckup The checkup setting screen is displayed 3 Select the preset to be copied 4 Press Copy The preset is copied 5 Select the copied preset 6 Press Setting Checkup preset settings screen is displayed 7 Change the settings as necessary ...

Page 329: ...ess Close The display returns to the initial screen 7 18 3 Starting checkup mode Start checkup mode and perform preparations for tak ing exposure 1 Press System on the initial screen The system monitor screen is displayed 2 Press Checkup The checkup setting screen is displayed 3 Press Checkup Mode to turn it ON Press Checkup Mode to switch between ON and OFF ...

Page 330: ...ibes the procedure for performing exposures in the checkup mode Before starting the exposure refer to 7 18 3 Starting checkup mode to make necessary preparations for the checkup mode The following procedures vary depending on whether the auto examination start function is to be used and also whether the Exam Tags are already set for the preset used z zWhen the Auto Checkup is turned ON and the Exa...

Page 331: ...h 4 Press The automatic number issuing function displays the next number Continue the exposure process repeating Steps 3 and 4 z zWhen the Auto Checkup is turned OFF and the Exam Tags are not set The following describes the procedure when Auto Checkup is turned OFF and the Exam Tags are not set for the preset used 1 Display the Patient registration screen or List screen Check that the automatic is...

Page 332: ...d 4 Press Perform The exposure screen is displayed The selected body part targeted for exposure is displayed 5 Perform exposure Configure the X ray device settings and check the exposure setting before making an expo sure Press the exposure switch 6 Press The display returns to the initial screen with the next numbers displayed on it Repeat Steps 1 to 6 to continue your exposure HINT When Auto Che...

Page 333: ... screen Delete Copy and Setting operations z zChange of serial numbers 1 Press Patient Info on the exposure screen The checkup setting screen is displayed 2 Change the serial number using the and buttons in the serial number dis play field 3 Press OK The patient information is updated HINT When the examination of the changed serial number is completed the process continues and starts the examinati...

Page 334: ...ination from the preset before a change select the preset The examina tion restarts from the accession number before the change 7 18 6 Auto Checkup using bar code scan If bar code scanning is carried out on the patient reg istration screen by the settings an examination can be started automatically using the scanned patient ID or accession number This section describes how to set Auto Checkup to O...

Page 335: ... Press the exposure switch 3 Press The patient registration screen is displayed HINT The serial number displayed before bar code scan ning was carried out is input to the patient registration screen 7 18 7 Ending the checkup mode End the checkup mode Here the procedure when automatic checkup is on is described When automatic checkup is off refer to step 3 1 Press on the exposure screen Press while...

Page 336: ...INT Press instead of to save the number at the time it was paused and return to the initial screen with the next number issued 3 Press System on the initial screen The system monitor screen is displayed 4 Press Checkup The checkup setting screen is displayed 5 Press Checkup Mode and switch to OFF 6 Press OK The display returns to the system monitor screen ...

Page 337: ... exposure of the in formation you want to output Select the exposure date from Study Start Date or Study End Date The exposure date is set 3 Press Browse Browse For Folder is displayed 4 Select the folder you want to output the file to 5 Press OK The CSV file is output HINT The file name is ImageList Study Date csv The specified examination date is entered in Study Date If for example from January...

Page 338: ...mer gency number is automatically issued from the initial screen Press Perform to start examination If you have set to register the Exam Tags automati cally the body part selection screen is not displayed The display transitions to the exposure screen 7 19 Automatic emergency number issuing 2 Select the body part and press Perform The exposure screen is displayed HINT Press Back on the Body part s...

Page 339: ...e backup Chapter 7 4 Press The display returns to the initial screen HINT When examining emergency patients in sequence press trauma and repeat the procedure from Step 1 In this case make sure the next number is issued ...

Page 340: ...7HQ AeroDR 2 1417HQ AeroDR 2 1417S Approximately 42MB Approximately 10MB more for every additional image AeroDR 1717HQ Approximately 44MB Approximately 12MB more for every additional image The capacity varies depending on the image trimmed Using the real time backup function you can output the exposed images to media at the same time as the study ends HINT For details on editing the tag of image d...

Page 341: ...next study even before output to media has finished If there is no free space remaining on the media an error message is displayed Replace it with a new me dia and press Retry after this device has recognized it If you stop operation of this device while output to medium is continuing the following dialog box is displayed If you press OK operation of this device ends and the studies that are not o...

Page 342: ...e list screen The Completed tab is displayed 2 Select the study to be re output 3 Press Append The confirmation dialog box is displayed 4 Press OK The Body Part Selection screen is displayed 5 Add or change the Exam Tags if neces sary and then press OK The exposure screen is displayed 6 Add exposure or change the patient infor mation if necessary and then press The image is output to media again H...

Page 343: ...n start the Remote Desktop function using the Remote Desktop Linkup and operate the RIS client etc on the same terminal IMPORTANT The Web Remote Desktop Linkup allows to connect up to two personal computers simultaneously HINT The name you have registered during installation is displayed as the name of the Web Linkup or Remote Desktop Linkup button If multiple connection destinations are registere...

Page 344: ...xplorer or the Remote Desktop 2 Once operation of the connected device is finished minimize or close the Re mote Desktop and return to this device s screen HINT If Auto Checkup is enabled by RIS IN setting and automatic remote connection is set when the study is complete the screen can be switched automatically between the screen of this device and the relational RIS client etc Complete Study regi...

Page 345: ...at did not have one when the wireless communications func tion was switched from off to on before use 1 Press System on the initial screen The system monitor screen is displayed If the network status is not displayed select the System Monitor tab on the function switching tabs 2 Press Wireless to switch the wireless communication function shows that wireless communica tion function is on shows tha...

Page 346: ...ion status and power status of the AeroDR S SRM KIT and then ex ecute the link setting again z zCanceling link to X ray device The link to the X ray device can be canceled as fol lows 1 Press Free A confirmation screen is displayed IMPORTANT The link to the X ray device is released to enable exposure only while the confirmation screen is displayed Press Use XG Sync to restore the link to the X ray...

Page 347: ...sentence pop up screen closes 7 22 4 Screen hide function When the icon is displayed in the leftmost posi tion of the application bar you can hide the screen us ing a one touch operation 1 Press the date and time display on the ap plication bar The screen display is hidden 2 To return to the screen display perform an operation with the touch panel mouse or keyboard IMPORTANT Before using a bar cod...

Page 348: ...tion where it will enter the eyes of people The bar code can be read in either up or down orientation of the CR cassette After pressing the trigger button if the bar code is not read in a certain time the laser goes out When reading again release the trigger button press it again and discharge the laser z zBluetooth bar code reader The battery lasts for about 2 days when connect ed to a PC via Blu...

Page 349: ...ader unit and slide horizontally to the opposite edge While the magnetic data is being read do not perform input Sometimes magnetic data gets mixed with data input by input operation 7 22 7 Addition of high preci sion monitor An optional high precision monitor can be connected to this device The following are precautionary items when a high precision monitor is used The image that has focus on the...

Page 350: ...display adapter or restart this device after turning the power on off 7 22 9 Addition of monitor for checking image An optional monitor for checking image can be con nected to this device The following are precautionary items when a monitor for checking image is used Used as a monitor for checking images when oper ating this device with the portable X ray device IMPORTANT This device s monitor wil...

Page 351: ...the manual press on the operation manual screen or in the manual display dialog box The operation manual is closed z zDisplaying a manual from the user tool For information regarding the procedure to display the manual from the user tool refer to the User Tool Operation Manual HINT Up to eight manuals can be called from the user tool if it is used 7 22 11 TeamViewer startup TeamViewer is a remote ...

Page 352: ...o display the remote operation permission screen on the front layer Give the ID 9 digits and password 4 digits informa tion displayed on the remote operation permission screen to a customer service representative This in formation is used to start remote access 4 To close the remote operation permission screen press on the remote opera tion permission screen or on the TeamViewer startup button The...

Page 353: ...353 Chapter 8 Displayed Messages This chapter describes the displayed messages and the countermeasures ...

Page 354: ...between a dialog box and a balloon Dialog box Together with a message OK and Cancel are displayed Read the message and perform the ap propriate operation Pressing Cancel will basically return you to the pre vious screen Balloon is displayed together with the message The screen can be closed by pressing The screen will also close after a certain amount of time elapses ...

Page 355: ... corresponding panel is unavailable until im age re acquisition is complete DR Detector name A communication error occurred during image reception Check the connection status of the communication cable Displayed when a communication error occurs while the device is receiving an image from the DR Detector Check the cable status Also tap the Exam Tags in the yellow frame to re acquire the image DR D...

Page 356: ...ge reading Check the network Restart the reader Displayed when a communications error occurs while reading an image with a CR Cassette exposure Check the network and restart REGIUS An unexpected error has occurred Please restart CS 7 Displayed when an error with an unknown cause occurs Restart the device If the error persists contact Konica Minolta technical represen tatives Are you sure want to d...

Page 357: ...you sure you want to re Assign image to film This is displayed when clearing the images that have been as signed to the print composer Press OK to clear them Are you sure you want to suspend these examinations Displayed when pausing multiple studies at once Press OK to run the suspension process Are you sure you want to suspend these examinations If this examination is suspended it is necessary to...

Page 358: ...ame patient exceeds the maximum value Further reservations cannot be added Cannot add exposures beyond MaxSize This is displayed when the maximum number of Exam Tags that can be registered has been exceeded Cannot capture images due to low battery power Charge the battery Displayed when the battery level for the DR Detector in use is low Charge the DR Detector Cannot edit the stitching position be...

Page 359: ...ssfully saved Displayed when CSV output is complete Data Already Present Please Change Media This is displayed when appending to written media is not pos sible DB data got udapted Updated Study will be displayed Displayed when updating a study while it is in operation Check the content details DB Error Create order failed This is displayed when a new study cannot be created Deleting of the job is ...

Page 360: ... to end Do you want to exchange the image Displayed when is pressed Press OK to exchange images Do you want to exit without saving Displayed when closing the screen without saving changes Press OK to close the screen without saving Do you want to overwrite collimator size May be displayed when updating the reading conditions while linked with an X ray device Press OK to update the collimator size ...

Page 361: ... status An error of unknown cause occurred during the moving process Move the target study again If the problem persists restart the device and try to move the target study again If this does not solve the problem contact Konica Minolta tech nical representatives Error occurred while receiving the files in Other device name Check the network status Communication between consoles failed Confirm tha...

Page 362: ... t match Please confirm the number of exposure Displayed when the number of images detected by the AeroDR Stitching System is less than the number of Exam Tag Confirm the image count and performed the exposure Exposure results applied for more than one order This is displayed when an exposure result is applied to multiple images that were exposed Exposure sync setting error Check the network conne...

Page 363: ...chnical representatives Image inversion will be canceled Displayed when trying to merge flipped images Confirm the contents of the images and press OK to clear the flip Image is being resent Do not turn off the power to the AeroDR Displayed during image re acquisition Wait until image re acquisition is complete Image not assigned because it exceeded the maximum film size MaxAssignSize MB This is d...

Page 364: ...n field aperture This is displayed when irradiation was not uniform Check for foreign objects and problems with the irradiation field aperture then perform exposure again Less than Minimum Space Required Please Check Media This is displayed when the amount of available space on the media for storing backup data is low Prepare new media Log Backup Failed due to an error Displayed when an internal p...

Page 365: ...nolta technical representatives Not able to retrieve studies from below consoles Please check the connectivity of these consoles Displayed when unable to acquire parts of a study after per forming multiple terminal study acquisition through study shar ing Check the connection and reacquire the study Not Enough Space For Output Please insert new media and click Retry button This is displayed when t...

Page 366: ...e If this does not solve the problem contact Konica Minolta technical representatives PDA backprocess startup error Check settings Restart the device If this does not solve the problem contact Konica Minolta technical representatives Perform Not Possible This is displayed when starting of selected study has failed Please check all reader and console is running and press OK Displayed after pressing...

Page 367: ...ed while various processes are running Wait for a while until the processes end Queue cannot be deleted because this study is moving to other console Studies in the process of moving cannot be cancelled Radiation field detection Failed Displayed when exposure field detection of the AeroDR Stitch ing Unit fails Check the exposure range and perform exposure field detection again Re exposure is requi...

Page 368: ...study which does not exist Confirm that the target study has not been moved to another device Send Error occured Please refresh the study list and try again Displayed when attempting to transmit a study which does not exist or which has already been reserved for transmission to another device Confirm that the target study has not been moved to another device Separately if you want to use the panel...

Page 369: ...h communications again If this does not solve the problem con tact Konica Minolta technical representatives Study reserve to the console Other device name got failed for the study PATIENT_ID PATIENT_NAME Other device name file access failed File access failed due to unforeseen circumstances Move the target study again If the problem persists restart the device and try to move the study again If th...

Page 370: ... nical representatives Study retreival from console Other device name got failed for the study PATIENT_ID PATIENT_NAME Failed to access Im age information of Other device name Failed to move the image file due to unforeseen circumstances Move the target study again If the problem persists restart the device and try to the target study again If this does not solve the problem contact Konica Minolta...

Page 371: ...n could not be found in the patient information search The wireless use will be set OFF Is it OK Displayed when changing wireless from enabled to disabled Press OK to continue The wireless use will be set ON Is it OK Displayed when changing wireless from disabled to enabled Press OK to continue There are images unreceived to the AeroDR Do not turn off the power of AeroDR Return AeroDR detector to ...

Page 372: ... the im age Unable to clear log Displayed when deleting the log using the Log management tool or Reject log tool fails Restart this device and try to delete the log again Unable to prepare to read CR cassette as CR Mammography license is not installed Please register the license Displayed when mammogram exposure conditions are read with the barcode and the CR Mammography license is not reg istered...

Page 373: ...nter a value of 1800 or higher This is displayed when a year before 1800 is entered Enter a year 1800 A D or later Future date not possible This is displayed when a future date from current date is en tered Enter the correct date Future month not possible This is displayed when a future month from current date is en tered Enter the correct month Future year not possible This is displayed when a fu...

Page 374: ...e remaining battery power is low Charge the battery This is displayed when the battery level of the DR Detector is getting low Charge the DR Detector The remaining PC battery power is low This is displayed when the battery level of this device being used is getting low Charge this device The remaining PC battery power is low Charge the battery This is displayed when the battery level of this devic...

Page 375: ...375 Chapter 9 Troubleshooting This chapter describes the countermeasures when the problems occur ...

Page 376: ...played If the network status is not displayed press the System Monitor tab on the function switching tabs 2 Press JM The JM status confirmation screen is displayed 3 Select Backup The confirmation screen is displayed 4 Press OK Press Cancel and the switchover of JM is can celled returning to the JM status confirmation screen however exposure cannot be performed because a fault has occurred in the ...

Page 377: ...tector cancel the image reacquisition and do not perform any changes to the exposure device In the event of a communication error and depending on the timing at which the error has occurred images may not be displayed and the DR Detector may not contain any images that have not been transferred the same status as that observed when no exposures have been carried out In such a case a message may be...

Page 378: ...is enclosed in a yellow frame The dialog window regarding the reconnection between this device and the DR Detector is dis played When the connection is restored images are automatically transferred Images are reacquired and displayed 9 1 3 Stopping and resuming reacquisition of images from the DR Detector If recovery of the connection with the DR Detector is taking a long time you can stop reacqui...

Page 379: ...n of images 1 Press the image display area to resume reacquisition of images from the DR De tector The confirmation dialog is displayed IMPORTANT The confirmation dialog displayed varies depending on the connection with the DR Detector When the connection with the DR Detector is re stored Press OK and reacquisition of images from the DR Detector is resumed When the connection with the DR Detector ...

Page 380: ...or next study is displayed press Refresh Press Cancel to return to the previous screen The confirmation screen is displayed again 2 Press OK Press Cancel to return to the previous screen The confirmation dialog box disappears and untransferred images in the DR Detector are de leted then exposure can be performed HINT You can also delete untransferred images by pressing the device icon that is encl...

Page 381: ...s are received suc cessfully Images are reacquired and displayed HINT If you cancel via the Receiving the retransmitted imag es screen a confirmation screen which says Are you sure you want to cancel image reception Restart the reader in case of reception canceled will be displayed Press OK to cancel retransmission The REGIUS needs to be restarted Press Cancel to return to the Receiving the retran...

Page 382: ...n this condition occurs perform the following op eration 1 Again press only the first stage of the ex posure switch and release it The screen lock is released and the screen op eration and operation of the exposure switch are enabled Make sure Ready is displayed in the work area of the exposure target and expose again IMPORTANT In the above operation when the screen lock is re leased X rays are no...

Page 383: ...383 Chapter 10 Error Codes This chapter describes the error codes and countermeasures ...

Page 384: ...rface Unit2 errors An error has been caused in the AeroDR Interface Unit2 AeroDR Generator Interface Unit errors An error has been caused in the AeroDR Generator Interface Unit AeroDR Generator Interface Unit2 errors An error has been caused in the AeroDR Generator Interface Unit2 AeroDR Portable RF Unit errors An error has been caused in the AeroDR Portable RF Unit AeroDR Portable RF Unit2 errors...

Page 385: ...ial letters of the error code C2 is displayed as the initial letters of the error code C3 through C7 are displayed as the initial letters of the error code F is displayed as the initial letter of the error code Check 10 2 1 Communication errors and perform the coun termeasures Check 10 2 2 Software errors and perform the countermea sures Check 10 2 3 DR Detector er rors and perform the counter mea...

Page 386: ...tting to the X ray system error Check the exposure settings set on this device C21527 The X ray system interlock failed Check the X ray device status C21528 The X ray system inter unlock failed C21529 Failed to send the X ray system buzzer sound success C21530 Failed to send the X ray system buzzer sound failure C21531 Failed to retrieve DAP value Contact Konica Minolta technical representatives C...

Page 387: ...and connection settings 2 Restart the device C35504 Channel mismatch occurred Contact Konica Minolta technical representatives C35520 Failed to initialize Restart this device C35521 There was an error with reading the setting file Check the setting file and update it C35522 A time out occurred PPS result notification time out occurred Check the connection destination C35540 Failed to initialize Re...

Page 388: ... OK and wait until image re acquisition is complete C37010 DR Detector name Correction processing error Correction processing error Restart the CS 7 and retake Restart this device and perform the exposure again C37012 DR Detector name Additional registration error Check the network equipment and communication cable connection status C37013 DR Detector name Registration cancelation error C37014 DR ...

Page 389: ...without exceeding the num ber of licenses C37119 Non activated AeroDR detector is found Contact Konica Minolta technical representatives C37121 There s no selectable channel It will take maximum 30 minutes to recover the wire less LAN This appears when there are no accessible chan nels available when attempting to switch access point channels while detecting radar waves Please wait until wireless ...

Page 390: ...stination 2 Restart the device 3 Please check the setting again C37400 C37402 Conversion error 1 Please check the connection status 2 Restart the device C37403 C37409 C3741 C37420 C37421 Health check error C37422 C37430 Scheduled check error C37431 C37438 C3744 Termination error C37454 C37456 Study performing error C37457 C37459 C3746 C37470 C37472 Error in study completed notification to RIS C374...

Page 391: ...in Body part selection screen Registration of Exam Tag failed Register the Exam Tag from the body part selection screen again C40008 Study is busy Reopen study after few seconds The study is currently being processed so the study cannot be performed Wait for a while before performing a study C50001 The Channel is inactive Service No 0 Channel No 1 1 If the settings are off after checking the syste...

Page 392: ...tector name radio error The radio condition has transiently worsened 1 Restart the DR Detector 2 Contact Konica Minolta technical representatives Wireless connection cannot be used but continued operation is possible with the wired connection F0H00 F0H01 DR Detector name internal error If the panel after rebooting does not recover contact a service representative 1 Restart the DR Detector 2 Contac...

Page 393: ...ver contact a service representative 1 Restart the DR Detector 2 Contact Konica Minolta technical representatives F0I20 DR Detector name power source error Remove cable or cradle from the panel If the panel does not recover after a while contact a service representative 1 Remove the DR Detector from the AeroDR Battery Charger AeroDR Battery Charger2 or the wired connection cable 2 Contact Konica M...

Page 394: ...sentatives F0I47 Please reconnect the cable or the cradle 1 Please reconnect the I F Cable or the AeroDR Bat tery Charger 2 If the problem persists contact Konica Minolta tech nical representatives F0J11 DR Detector name internal error If the panel after rebooting does not recover contact a service representative 1 Restart the DR Detector 2 Contact Konica Minolta technical representatives F0P01 DR...

Page 395: ...became worse 1 Restart the DR Detector 2 Contact Konica Minolta technical representatives Wireless connection cannot be used but continued operation is possible with the wired connection F3K24 DR Detector name network error IP address is already in use for another device Contact a service representative Contact Konica Minolta technical representatives F3L27 DR Detector name internal error If the p...

Page 396: ...nding device oc curred Release the exposure switch G2012S Device name There is a startup error Contact a service representative Contact Konica Minolta technical representatives G2020S G2021S Device name There is a startup error Release the exposure switch Initial status error of the corresponding device oc curred Release the exposure switch G2022S Device name There is a startup error Contact a ser...

Page 397: ... Please confirm the auto barrier unit movement area before switch the power to ON 1 Turn off the AeroDR Stitching System 2 Check that there are no obstacles in the operat ing range of the Stitching Mask of the AeroDR Stitching X Ray Auto barrier Unit and turn on the AeroDR Stitching System S00200 AeroDR Stitching Unit name Motor Error Please power OFF ON of AeroDR Stitching unit Restart the AeroDR...

Page 398: ...R Stitching Unit and close the internal lid 2 Close the side cover and restart the AeroDR Stitch ing System S200 AeroDR Stitching Unit name Internal connection error Please power OFF of AeroDR Stitching unit Please confirm the connectivity of Power box and auto barrier unit before switching the power to ON 1 Turn off the AeroDR Stitching System 2 Check the power unit and the AeroDR Stitching X Ray...

Page 399: ...nit name Height detection failed other reason Please press the AeroDR Stitching unit RESET switch Repeat the height detection 1 Press the Reset switch on the AeroDR Stitching X Ray Auto barrier Unit to cancel the error 2 Check the collimator installation position in the X ray device is correct 3 Execute height detection 4 If the problem is not solved by the above method there is a possibility that...

Page 400: ... slot s blue indicator to light up before re inserting them CASIN7 Cassette Jam feeds 2 case contiguously Contact Konica Minolta technical representatives CASINB Unsupported Cassette is inserted A cassette that is not supported by the device is in serted The device does not support cleaning cassettes opti cal cleaners insertion rollers CASINE Failed to take the plate out of the cassette Open up pe...

Page 401: ... restarting restart the device and the REGIUS series 07000 Initialization failed Cassette is set in the reader Please open the door and remove the Cassette and Plate 1 Remove the cassette and plate from the device 2 Delete the image on the removed plate using the Erase mode 07001 07002 Initialization failed Plate still might be inside the reader Please open the door and check inside 07003 07005 In...

Page 402: ...e on the removed plate using the Erase mode 07125 Critical error has occurred while processing the cas sette Please contact service Please open the top door and remove the Cassette And open the back door and remove the Plate 1 After opening the top door remove the plate and cassette 2 After this error occurs even if the power is turned OFF and ON the device error will not be cleared Contact Konica...

Page 403: ...s detected during initialization Open and close the top door Perform initialization of the device again Check if the error reoccurs 07416 07419 Reader error was detected 1 Remove the cassette and plate from the device 2 Contact Konica Minolta technical representatives 07420 Initialization failed Reader error was detected during initialization Open and close the top door Perform initialization of t...

Page 404: ...on Re try main tenance command Contact Konica Minolta technical representatives 27002 Maintenance operation failed as USB was disconnect ed during its operation Re try maintenance command 27010 Service call Version of program doesn t correspond Need to update program 27100 This reader is in process Connect to the former PC To terminate process turn off the reader The image will be deleted This mes...

Page 405: ... Write Error Contact Konica Minolta technical representatives 35942 35943 Media Write Error Writing to the media failed 1 Check the media status and output again 2 Contact Konica Minolta technical representatives 35944 Media Write Error JPEG creation failed 1 Output again 2 Contact Konica Minolta technical representatives 35945 Time Out Error Contact Konica Minolta technical representatives 36200 ...

Page 406: ...m Set the film 36226 EMPTY 11X14 CLR There is no more 11 14 clear film Set the film 36227 EMPTY 11X14 PAPR There is no more 11 14 paper Set the paper 36228 EMPTY 14X14 There is no more 14 14 film Set the film 36229 EMPTY 14X14 BLUE There is no more 14 14 blue film Set the film 36230 EMPTY 14X14 CLR There is no more 14 14 clear film Set the film 36231 EMPTY 14X14 PAPR There is no more 14 14 paper S...

Page 407: ...OW 8X10 Low supply on 8 10 film Set the film 36253 LOW 8X10 BLUE Low supply on 8 10 blue film Set the film 36254 LOW 8X10 CLR Low supply on 8 10 clear film Set the film 36255 LOW 8X10 PAPR Low supply on 8 10 paper Set the paper 36256 LOW 10X12 Low supply on 10 12 film Set the film 36257 LOW 10X12 BLUE Low supply on 10 12 blue film Set the film 36258 LOW 10X12 CLR Low supply on 10 12 clear film Set...

Page 408: ...clear film Set the film 36283 LOW 24X30 PAPR Low supply on 24 30 paper Set the paper 36284 LOW A4 PAPR Low supply on A4 paper Set the paper 36285 LOW A4 TRANS Low supply on A4 transparencies Set the transparencies 36286 NO RECEIVE MGZ The printer s discharge magazine cannot be used Check the printer 36287 NO RIBBON The printer does not have a ribbon cartridge Check the printer 36288 NO SUPPLY MGZ ...

Page 409: ...UPPLY LOW Low supply in the supply magazine Check the printer 36307 UNKNOWN An undefined error occurred 1 Output again 2 Contact Konica Minolta technical representatives 36308 EMPTY 8X10 DR There is no more 8 10 DR film Set the film 36309 EMPTY 8X10 DR B There is no more 8 10 DR blue film Set the film 36310 EMPTY 8X10 DR C There is no more 8 10 DR clear film Set the film 36311 EMPTY 10X12 DR There...

Page 410: ...12 DR blue film Set the film 36334 LOW 10X12 DR C Low supply on 10 12 DR clear film Set the film 36335 LOW 11X14 DR Low supply on 11 14 DR film Set the film 36336 LOW 11X14 DR B Low supply on 11 14 DR blue film Set the film 36337 LOW 11X14 DR C Low supply on 11 14 DR clear film Set the film 36338 LOW 14X14 DR Low supply on 14 14 DR film Set the film 36339 LOW 14X14 DR B Low supply on 14 14 DR blue...

Page 411: ...sentative Failed to acquire imager information 1 Restart the imager and check it again 2 Contact Konica Minolta technical representatives 37623 37624 Internal error occurred in PRINTER communication Contact a service representative Contact Konica Minolta technical representatives 37625 Internal error occurred in PRINTER communication Contact a service representative Communication with the imager f...

Page 412: ... for communication with the host was denied Check the communication settings 37680 PRINT A ASSOCIATE is rejected Please check com munication setting Connection request for communication with the imager was denied Check the communication settings 37681 HOST A ASSOCIATE is rejected transient Connection request for communication with the host was temporarily denied Check the host 37681 PRINT A ASSOCI...

Page 413: ...413 Chapter 11 Maintenance This chapter describes the items that require periodic maintenance ...

Page 414: ...or from getting dirty use in a low dust environment and clean periodically with a dry cloth This chapter describes inspections and cleaning re quired in order to maintain the use of this device in an optimum condition z zQuality Tool HINT Simple Check QC for CS 7 is available for checking of imaging quality Please contact our customer ser vice for the detail For more details contact Konica Minolta...

Page 415: ... the status of the regular replacement parts with the replacement unit list and unit us age status For details on regular replacement parts contact Konica Minolta technical representative HINT The yellow System icon will return to the original color when the regular replacement parts have been replaced 11 1 4 Consumables IMPORTANT For information on consumables or periodic replace ment parts for h...

Page 416: ...416 ...

Page 417: ...417 Chapter 12 Specifications This chapter describes the specifications of this device ...

Page 418: ...for AeroDR 3 1417HD 175μm 100μm Only for AeroDR 3 1417HD 87 5μm Only for REGIUS series Image output Host max 4ch Printer max 2ch Software components 1 Application CS 7 application software 2 OS Windows 7 Professional 32bit Windows 10 Enterprise 2015 LTSB 64bit SOUP 3 Middleware NET framework 4 6 1 SOUP Microsoft SQL Server Compact Edition SOUP Postgre SQL SOUP 4 Driver CD R DVD R writing library S...

Page 419: ...for MDD Conforms to the standards that the CE marking requires Major accessories Control unit power cable Operation unit monitor power cable Connector cable between control unit and operation unit monitor Keyboard Mouse Recommended storage and usage environment conditions During operation Temperature Humidity 10 to 35 C 0 m to 3 048 m in maximum altitude 35 10 to 90 RH ensure no water con densatio...

Page 420: ...rd Monitor 1280 800 or above Sound Audio function available Power requirements AC 100 V 240 V Single phase 50 60 Hz Power consumption Max about 60 W Standard for MDD Conforms to the standards that the CE marking requires Major accessories Power cable Recommended storage and usage environment conditions During operation Temperature Humidity 5 to 35 C 5 35 30 to 80 RH ensure no water con densation 3...

Page 421: ...on cable Bar code Reader CS multi bar code reader CS bar code reader Bluetooth bar code reader when using the portable X ray device Magnetic card reader CD magnetic card reader Add in LAN Add in Ethernet board Wireless LAN adapter when using the portable X ray device Expansion memory Memory module for expansion HINT For the specifications of the monitor and options refer to the operation manual of...

Page 422: ...422 ...

Page 423: ......

Page 424: ...A47FBA01EN15 2017 01 12 JD ...

Reviews: