


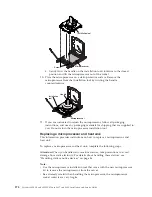


6.
After removal, place the heat sink on its side on a clean, flat surface.
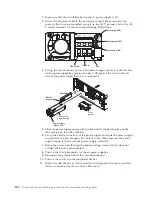
7.
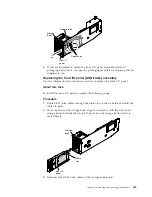
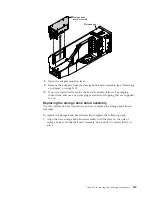
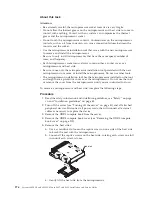
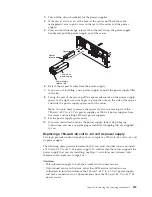
Open the microprocessor socket release levers and microprocessor retainer.
Attention:
Do not use any tools or sharp objects to lift the release levers on
the microprocessor socket. Doing so might result in permanent damage to the
board.
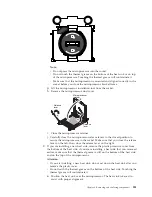
a.
Locate the two release levers on the microprocessor socket.
b.
Press the release lever on the right down and inward toward the socket
and lift it up to the fully open position; then, press the release lever on the
left down and inward toward the socket and it opens up to the fully open
position.
c.
Open the microprocessor retainer by lifting up on the retainer tab.
Attention:
Do not touch the contacts on the microprocessor and the
microprocessor socket.
Release
lever
Release
lever
Microprocessor
retainer
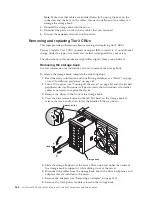
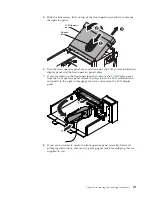
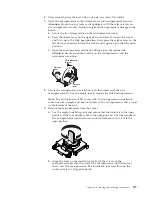
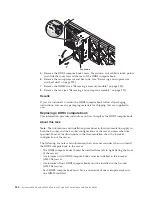
8.
Locate the microprocessor installation tools that comes with the new
microprocessor kit. Use the empty tool to remove the failed microprocessor.
Note:
The microprocessor FRU comes with two microprocessor installation
tools: one tool is empty and one tool comes with a microprocessor and a cover
on the bottom of the tool.
9.
Remove the microprocessor from the socket:
a.
Use the empty installation tool and ensure that the handle is in the open
position. If the tool handle is not in the open position, twist the handle on
the microprocessor installation tool counterclockwise so that it is in the
open position.
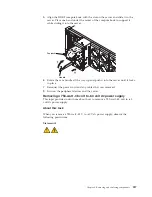
b.
Align the holes on the installation tool with the screws on the
microprocessor bracket, then lower the microprocessor installation tool
down over the microprocessor. The installation tool rests flush on the
socket only if it is aligned correctly.
Chapter 6. Removing and replacing components
277
Summary of Contents for X3850 X6
Page 1: ...System x3850 X6 and x3950 X6 Types 3837 and 3839 Installation and Service Guide...
Page 2: ......
Page 3: ...System x3850 X6 and x3950 X6 Types 3837 and 3839 Installation and Service Guide...
Page 138: ...120 System x3850 X6 and x3950 X6 Types 3837 and 3839 Installation and Service Guide...
Page 225: ...25 26 27 Chapter 5 Parts listing System x3850 X6 and x3950 X6 Types 3837 and 3839 207...
Page 1682: ...1664 System x3850 X6 and x3950 X6 Types 3837 and 3839 Installation and Service Guide...
Page 1706: ...1688 System x3850 X6 and x3950 X6 Types 3837 and 3839 Installation and Service Guide...
Page 1710: ...1692 System x3850 X6 and x3950 X6 Types 3837 and 3839 Installation and Service Guide...
Page 1728: ...1710 System x3850 X6 and x3950 X6 Types 3837 and 3839 Installation and Service Guide...
Page 1729: ......
Page 1730: ...Part Number 00FH434 Printed in USA 1P P N 00FH434...


