3.
Remove the storage book (see “Removing the storage book” on page 266).
4.
Disconnect the cables from the bottom drive backplane, if needed.
5.
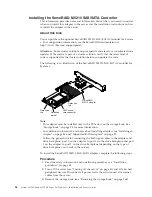
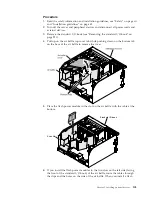
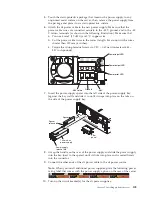
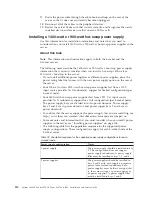
Open the retention clip on the flash power module slot. Press the blue tab
outward to open the retention clip (see the following illustration for the
location of the flash power slots).
Storage book
Flash power
module slots
6.
Rotate the retention clip all the way up.
7.
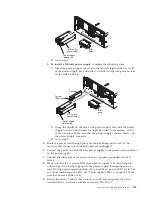
Place the flash power module in the flash power module slot with the cable at
the bottom and facing the rear of the storage book.
8.
Connect one end of the cable extender, that comes with the power module, to
the flash power module cable and the other end of the cable extender to the
adapter.
9.
Rotate the retention clip down and press it until it clicks in place.
10.
Reconnect the cables to the drive backplane.
Results
If you have other devices to install or remove, do so now. Otherwise, go to
“Completing the installation” on page 119.
Installing a RAID adapter flash power module in the standard I/O book
Use this information for instructions on how to install a RAID adapter flash power
module in the standard I/O book.
About this task
Note:
v
You can install up to three RAID flash power modules in the standard I/O book.
When you install RAID adapters that come with flash power modules in the
standard I/O book , install the flash power modules in the slots inside the
standard I/O book air baffle to prevent them from overheating. To install a RAID
adapter flash power module in the air baffle, complete the following steps:
102
System x3850 X6 and x3950 X6 Types 3837 and 3839: Installation and Service Guide
Summary of Contents for X3850 X6
Page 1: ...System x3850 X6 and x3950 X6 Types 3837 and 3839 Installation and Service Guide...
Page 2: ......
Page 3: ...System x3850 X6 and x3950 X6 Types 3837 and 3839 Installation and Service Guide...
Page 138: ...120 System x3850 X6 and x3950 X6 Types 3837 and 3839 Installation and Service Guide...
Page 225: ...25 26 27 Chapter 5 Parts listing System x3850 X6 and x3950 X6 Types 3837 and 3839 207...
Page 1682: ...1664 System x3850 X6 and x3950 X6 Types 3837 and 3839 Installation and Service Guide...
Page 1706: ...1688 System x3850 X6 and x3950 X6 Types 3837 and 3839 Installation and Service Guide...
Page 1710: ...1692 System x3850 X6 and x3950 X6 Types 3837 and 3839 Installation and Service Guide...
Page 1728: ...1710 System x3850 X6 and x3950 X6 Types 3837 and 3839 Installation and Service Guide...
Page 1729: ......
Page 1730: ...Part Number 00FH434 Printed in USA 1P P N 00FH434...

