
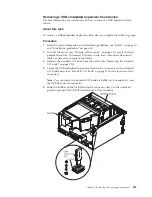


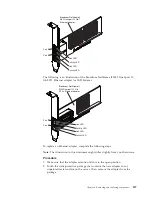

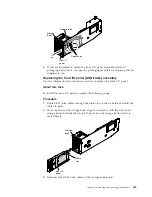

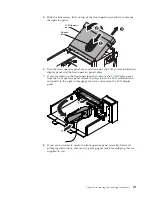

3.
Align the edge connector on the adapter with the connector on the standard
I/O book board. Press the edge of the connector
firmly
into the standard I/O
book board connector and make sure that the adapter snaps into the connector
securely.
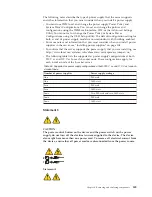
Attention:
When you install an adapter, make sure that the adapter is
correctly seated in the connector before you turn on the server. An incorrectly
seated adapter might cause damage to the standard I/O book board or the
adapter.
4.
Close the adapter retention lever.
5.
Reinstall the standard I/O book in the server (see “Replacing the standard I/O
book” on page 222.
6.
Perform any configuration tasks that are required for the adapter.
7.
Reconnect the power cord and any cables that you removed.
8.
Turn on the peripheral devices and the server.
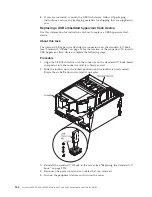
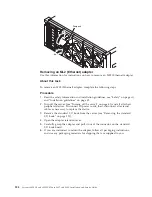
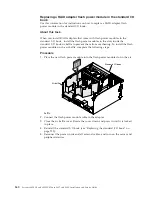
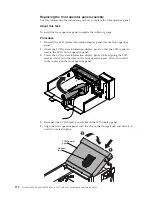
Removing a RAID adapter flash power module from the standard
I/O book
Use this information for instructions on how to remove a RAID adapter flash
power module from the standard I/O book.
About this task
If a RAID adapter flash power module is installed in the standard I/O bookand
you need to replace the flash power module, complete the following steps:
Procedure
1.
Read the safety information and installation guidelines, see “Safety” on page vii
and “Installation guidelines” on page 45.
2.
Turn off the server (see “Turning off the server” on page 41) and all attached
peripheral devices. Disconnect all power cords; then, disconnect all external
cables as necessary to replace the device.
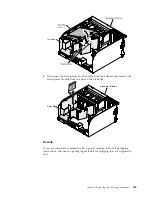
3.
Remove the standard I/O book from the server (see “Removing the standard
I/O book” on page 221).
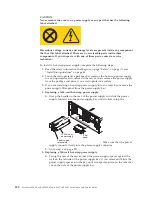
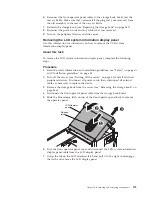
4.
Remove the air baffle cover. Pull up on the air baffle top cover tab while
pushing down on the bottom tab on the base of the air baffle to remove the
cover.
258
System x3850 X6 and x3950 X6 Types 3837 and 3839: Installation and Service Guide
Summary of Contents for X3850 X6
Page 1: ...System x3850 X6 and x3950 X6 Types 3837 and 3839 Installation and Service Guide...
Page 2: ......
Page 3: ...System x3850 X6 and x3950 X6 Types 3837 and 3839 Installation and Service Guide...
Page 138: ...120 System x3850 X6 and x3950 X6 Types 3837 and 3839 Installation and Service Guide...
Page 225: ...25 26 27 Chapter 5 Parts listing System x3850 X6 and x3950 X6 Types 3837 and 3839 207...
Page 1682: ...1664 System x3850 X6 and x3950 X6 Types 3837 and 3839 Installation and Service Guide...
Page 1706: ...1688 System x3850 X6 and x3950 X6 Types 3837 and 3839 Installation and Service Guide...
Page 1710: ...1692 System x3850 X6 and x3950 X6 Types 3837 and 3839 Installation and Service Guide...
Page 1728: ...1710 System x3850 X6 and x3950 X6 Types 3837 and 3839 Installation and Service Guide...
Page 1729: ......
Page 1730: ...Part Number 00FH434 Printed in USA 1P P N 00FH434...