


Table 21. Installation sequence for the eight compute books configuration for an 8-socket server
Compute
book
Top node
(bay 1)
Top node
(bay 2)
Top node
(bay 3)
Top node
(bay 4)
Bottom
node (bay 1)
Bottom
node (bay 2)
Bottom
node (bay 3)
Bottom
node (bay 4)
1
compute
book 1
2
compute
book 2
3
compute
book 3
4
compute
book 4
5
compute
book 5
6
compute
book 6
7
compute
book 7
8
compute
book 8
v
For more information about the DDR3 compute book, see “DDR3 compute
book” on page 30. For more information about installing DIMMs, see “Installing
a memory module” on page 47.
v
For a list of supported devices, see http://www.ibm.com/systems/info/
x86servers/serverproven/compat/us/.
To install the DDR3 compute book, complete the following steps:
Procedure
1.
Read the safety information that begins on page “Safety” on page vii and
“Installation guidelines” on page 45.
2.
Turn off the server (see “Turning off the server” on page 41) and all attached
peripheral devices. Disconnect all power cords; then, disconnect all external
cables as necessary to replace the device.
3.
4.
Remove the compute book cover(s) to install your DIMMs (see “Removing the
DDR3 compute book cover” on page 218).
5.
Install your DIMMs (see “Installing a memory module” on page 47).
6.
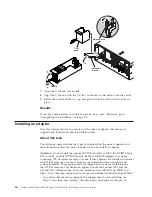
Open the cam handle on the compute book. Pull the top fan-pack handle down
and slide the blue release latch (behind the fan handle) to the right to release
the DDR3 compute book cam handle.
7.
Align the DDR3 compute book with the bay on the server and slide it in the
server. Place one hand under the center of the compute book to support it
while sliding it into the server.
Chapter 2. Installing optional devices
69
Summary of Contents for X3850 X6
Page 1: ...System x3850 X6 and x3950 X6 Types 3837 and 3839 Installation and Service Guide...
Page 2: ......
Page 3: ...System x3850 X6 and x3950 X6 Types 3837 and 3839 Installation and Service Guide...
Page 138: ...120 System x3850 X6 and x3950 X6 Types 3837 and 3839 Installation and Service Guide...
Page 225: ...25 26 27 Chapter 5 Parts listing System x3850 X6 and x3950 X6 Types 3837 and 3839 207...
Page 1682: ...1664 System x3850 X6 and x3950 X6 Types 3837 and 3839 Installation and Service Guide...
Page 1706: ...1688 System x3850 X6 and x3950 X6 Types 3837 and 3839 Installation and Service Guide...
Page 1710: ...1692 System x3850 X6 and x3950 X6 Types 3837 and 3839 Installation and Service Guide...
Page 1728: ...1710 System x3850 X6 and x3950 X6 Types 3837 and 3839 Installation and Service Guide...
Page 1729: ......
Page 1730: ...Part Number 00FH434 Printed in USA 1P P N 00FH434...