230
Mai
l
INFORMATION
●
The mail address entered in the
field and
field can be seen at the receiver side. However, it may
not be displayed depending on the terminal, device, or
mailing software.
●
When sending of mail to some addresses fails, an error
message is displayed. Pressing
o
may display a list of
mail addresses for which transmission failed.
」
Composing and sending Deco-mail
Deco-mail
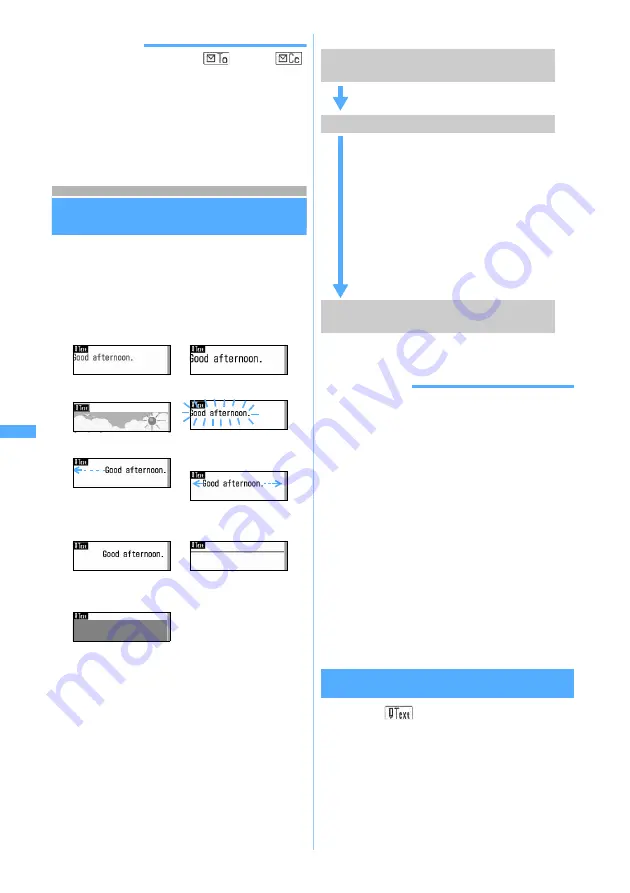
You can decorate the i-mode Mail message by
changing the font size, font color, or background
color and inserting still images including the ones
shot with the camera to compose Deco-mail.
■
Examples of decoration
■
Flow of Deco-mail composition
INFORMATION
●
Even if you delete decorated characters, the decoration
data may remain and the number of characters to be
entered may be fewer. Cancel the decoration first and
then delete characters. Holding down
c
for over a
second deletes all the characters and decoration (except
the background color).
●
When sent and received to/from other than the Deco-
mail compatible FOMA terminal such as a PC, the
decoration in Deco-mail may not be correctly displayed.
●
The actions of decoration such as blink, ticker, swing,
and animation stop automatically after a certain period of
time on the mail composition screen or the preview
screen.
●
When a Deco-mail is sent to a non-compatible terminal, it
will be received as a mail containing a URL for viewing
the Deco-mail. The Deco-mail cannot be viewed from the
mail containing the URL that has been transferred or by
entering the URL directly (it can be viewed only on the
terminal of the original receiver).
Entering characters after specifying the
decoration method
1
Select
on the mail composition
screen
z
a
a
Changing font color
b
Changing font size
c
Inserting images
d
Blinking characters
e
Setting tickers
f
Swinging characters
left and right
g
Changing word
alignment
h
Inserting lines (ruled
lines)
i
Changing
background color
Step 1
Display the message text entry screen
from the mail composition screen
Start composing i-mode Mail and display
the message text entry screen.
Step 2
Enter characters and decorate them
・
Enter decorated characters and
images: For the operation procedure
(
☛
P230), refer to “Entering
characters after specifying the
decoration method”.
・
Decorate entered characters: For the
operation procedure (
☛
P233), refer
to “Specifying decoration method
after entering characters”.
・
Press
m0
during editing to
check the decoration on the preview
screen.
Step 3
Confirm the decoration before
sending
Check the decoration on the mail
composition screen.
De
c
o
-m
a
il
Note: The miniSD memory card is not included in the bundle and needs to be purchased.
☛
P331
Summary of Contents for D902iS
Page 1: ......
Page 467: ...465 MEMO ...
Page 468: ...466 MEMO ...
Page 469: ...467 MEMO ...
Page 470: ...468 MEMO ...
Page 471: ...469 INDEX Quick Reference Manual INDEX 470 Quick Reference Manual 476 ...
Page 484: ......


