Chapter 2
2-16
machine to the 2-level cassette pedestal Y2 or more.)
F-2-71
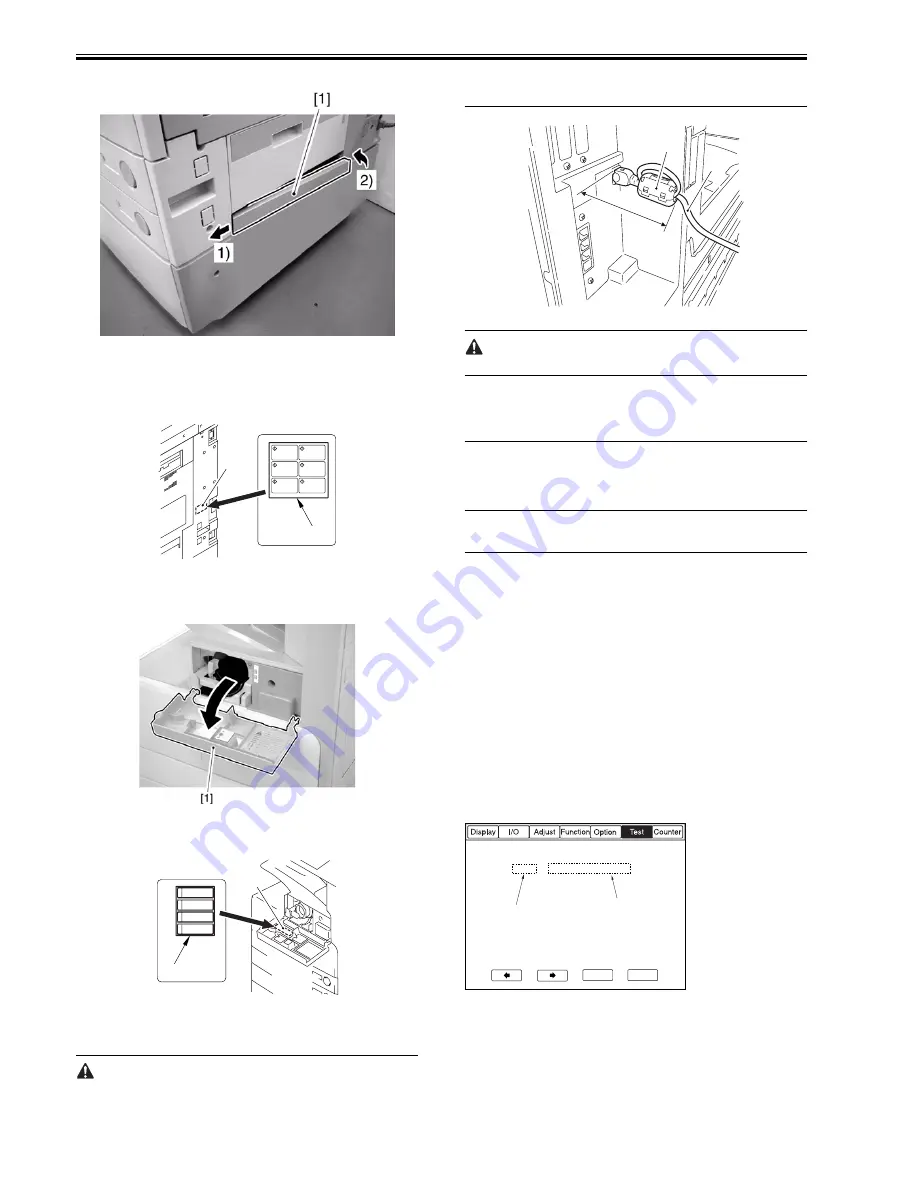
- Shut-Down Warning Label
1) Attach the Shut-Down warning label [1] of the appropriate language to the
right cover (rear) of the machine (i.e.,. on the left inside [2] of the main
power supply.).
F-2-72
- Toner Bottle Warning Label
1) Open the front cover [1].
F-2-73
2) Attach the Toner Bottle warning label [1] of the appropriate language
behind [2] the front cover.
F-2-74
- Ferrite Core (230V model only)
1) Fit the ferrite core [1] to the network cable [2].
Be sure to fit the ferrite core as follows to protect against noise:
- Be sure to fit it as close to the joint between the machine and the network
cable as possible.
- The harness must be wound around the ferrite core once before the core is
fixed in place.
- The harness is not trapped by the ferrite core.
F-2-75
When installing the machine newly or when replacing the harness, be
sure not to leave behind the ferrite core.
2.2.13 If Not Connected to a Network
0007-6496
iR2270 / iR2870 / iR3570 / iR4570 / / / / / iR2230 / / iR3530 /
Reference
If the machine is not connected to a network, its control panel will indicate
the message "Check the Connection to the Network." To disable the mes-
sage, turn off the following user mode item:
system setup>network>Ethernet driver setup>auto detect
2.3 Checking the Connection to the Network
2.3.1 Overview
0007-5605
iR2270 / iR2870 / iR3570 / iR4570 / / / / / iR2230 / / iR3530 /
The instructions that follow apply only when the machine is connected to a
network.
If the user's network environment is based on TCP/IP, use the PING function
to make sure that the network settings are correct.
If the user's network environment is based on IPX/SPX or AppleTalk, on the
other hand, such a check need not be made.
2.3.2 Using the PING Function
0007-5600
iR2270 / iR2870 / iR3570 / iR4570 / / / / / iR2230 / / iR3530 /
1) Make the following selections in service mode:
COPIER>TEST>NETWORK>PING.
2) Enter the correct IP address using the control panel keypad, and press the
OK key.
3) Press the Start key.
- If successful, the indication will be 'OK'. If the attempt fails, however, 'NG'
will be indicated.
F-2-76
[1] Result (OK/NG)
[2] IP address input
2.3.3 Making a Check Using a Remote Host Address
0007-5603
iR2270 / iR2870 / iR3570 / iR4570 / / / / / iR2230 / / iR3530 /
You can use a remote host address in combination with the PING function to
check the connection to the network.
[2]
[1]
[2]
[1]
[2]
[1]
0. 0. 0. 0
+/-
OK
<NETWORK>
< 1/1 >
<READY >
PING
[2]
[1]
Summary of Contents for iR3570 Series
Page 1: ...Jan 17 2007 Service Manual iR4570 3570 2870 2270 Series...
Page 2: ......
Page 6: ......
Page 27: ...Chapter 1 Introduction...
Page 28: ......
Page 70: ......
Page 71: ...Chapter 2 Installation...
Page 72: ......
Page 146: ......
Page 147: ...Chapter 3 Basic Operation...
Page 148: ......
Page 150: ......
Page 154: ......
Page 155: ...Chapter 4 Main Controller...
Page 156: ......
Page 187: ...Chapter 5 Original Exposure System...
Page 188: ......
Page 217: ...Chapter 5 5 27 F 5 91...
Page 218: ......
Page 219: ...Chapter 6 Laser Exposure...
Page 220: ......
Page 222: ......
Page 230: ......
Page 231: ...Chapter 7 Image Formation...
Page 232: ......
Page 236: ......
Page 280: ......
Page 281: ...Chapter 8 Pickup Feeding System...
Page 282: ......
Page 388: ......
Page 389: ...Chapter 9 Fixing System...
Page 390: ......
Page 419: ...Chapter 9 9 27 F 9 148...
Page 420: ......
Page 421: ...Chapter 10 External and Controls...
Page 422: ......
Page 426: ......
Page 437: ...Chapter 10 10 11 F 10 12 2 Remove the check mark from SNMP Status Enabled...
Page 438: ...Chapter 10 10 12 F 10 13...
Page 440: ...Chapter 10 10 14 F 10 15...
Page 475: ...Chapter 11 MEAP...
Page 476: ......
Page 478: ......
Page 481: ...Chapter 12 Maintenance and Inspection...
Page 482: ......
Page 484: ......
Page 509: ...Chapter 13 Standards and Adjustments...
Page 510: ......
Page 512: ......
Page 521: ...Chapter 14 Correcting Faulty Images...
Page 522: ......
Page 528: ......
Page 537: ...Chapter 14 14 9 43mm s b Z x i j B iR4570_395 s u A B FM2 0287...
Page 538: ...Chapter 14 14 10...
Page 539: ...Chapter 14 14 11...
Page 585: ...Chapter 15 Self Diagnosis...
Page 586: ......
Page 588: ......
Page 623: ...Chapter 16 Service Mode...
Page 624: ......
Page 626: ......
Page 679: ...Chapter 17 Upgrading...
Page 680: ......
Page 682: ......
Page 693: ...Chapter 17 17 11 F 17 18 2 Click Start F 17 19 3 When the session has ended click OK...
Page 698: ...Chapter 17 17 16 F 17 28 2 Click Start F 17 29 3 When the session has ended click OK...
Page 710: ...Chapter 17 17 28 F 17 51 3 Click Start F 17 52 4 Click Save...
Page 712: ...Chapter 17 17 30 F 17 55 2 Select the data to download F 17 56 3 Click Start...
Page 714: ......
Page 715: ...Chapter 18 Service Tools...
Page 716: ......
Page 718: ......
Page 720: ......
Page 721: ...Jan 17 2007...
Page 722: ......


