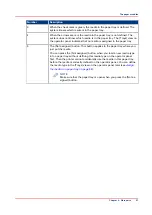
Number
Description
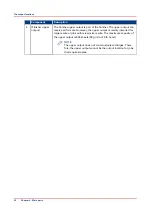
3
When the check mark is green, the media in the paper tray is defined. The
system knows which media is in the paper tray.
4
When the arrows are red, the media in the paper tray is not defined. The
system does not know which media is in the paper tray. The [Trays] view on
the operator panel indicates that no media is assigned to the paper tray.
5
The [Not assigned] button. This button applies to the paper tray where you
just put the media.
You can press the [Not assigned] button when you load a new media type
into a paper tray without defining this media type on the operator panel
first. Then the printer cannot accidentally use the media in this paper tray
before the media is correctly defined on the operator panel. You can define
the media type in the [Trays] view on the operator panel later (see
the media to a paper tray on page 59
).
NOTE
Make sure that the paper tray is open when you press the [Not as-
signed] button.
The paper modules
Chapter 4 - Main parts
27
Summary of Contents for 6160
Page 1: ...Operation guide Océ VarioPrint 6000 Line ...
Page 7: ...Chapter 1 Preface ...
Page 11: ...Chapter 2 Introduction ...
Page 13: ...Chapter 3 Power information ...
Page 19: ...Chapter 4 Main parts ...
Page 31: ...Chapter 5 Adapt printer settings to your needs ...
Page 49: ...Chapter 6 Media handling ...
Page 85: ...Chapter 7 Carry out print jobs ...
Page 162: ...Exchange all setups between printers 162 Chapter 7 Carry out print jobs ...
Page 163: ...Chapter 8 Remote Service ORS optional ...
Page 166: ...Remote Service 166 Chapter 8 Remote Service ORS optional ...
Page 167: ...Chapter 9 Remote Monitor optional ...
Page 169: ...Chapter 10 Optional finishers and other devices ...
Page 189: ...Chapter 11 Counters ...
Page 194: ...Find the meter readings 194 Chapter 11 Counters ...
Page 195: ...Chapter 12 Keeping the printer running ...
Page 209: ...Appendix A Miscellaneous ...
Page 212: ...Product specifications 212 Appendix A Miscellaneous ...
Page 220: ...Index 220 ...
Page 221: ......


