Load the media
Introduction
This section describes how to load the media into a paper tray.
When you load the media via the [Load] button in the [Schedule], the paper tray is automatically
assigned to the correct media.
When you load and assign the media via the [Assign] button in the [Trays] view, you must assign
the paper tray to the loaded media manually.
When no external finisher is connected to the machine, you must put all the media types face up
and header up into the paper trays. The tabs of tab sheets must be at the right-hand side. When
an external finisher is connected to the machine, it is possible that you must put the media into
the paper trays in a different way. Refer to the documentation of the external finisher for more
information about how to place the media.
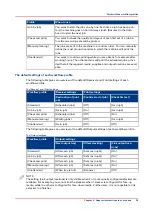
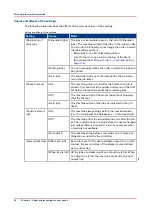
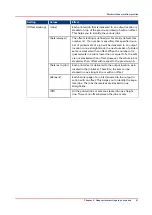
When to do
• The [Schedule] displays a red bar next to a required media. The red bar indicates that a
scheduled job now requires a media that is not available in the paper trays.
• The [Schedule] displays an orange bar next to a required media. The orange bar indicates that
a scheduled job requires media which is either not available in the paper trays or which is
available, but not in sufficient quantity to finish the job.
• The current job requires more of the same media than is currently loaded in the paper trays.
You can add more of the required media into another paper tray.
• You already want to load and assign media that are required for the next job (work ahead).
IMPORTANT
Always put the stack of media at the left-hand side of the paper guides inside the paper trays, as
indicated on the sticker inside the paper trays.
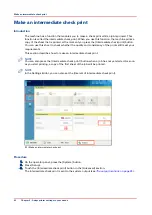
Procedure
1.
Put a small stack of the media into the paper tray.
2.
Pinch the green handle of the right-hand guide and push the guide against the edge of the media.
3.
Turn the green knob to adjust the front guide and the rear guide.
4.
Put the rest of the media on top of the small stack.
NOTE
When you want to assign the media later you must press the [Not assigned] button.
Load the media
Chapter 6 - Media handling
53
Summary of Contents for 6160
Page 1: ...Operation guide Océ VarioPrint 6000 Line ...
Page 7: ...Chapter 1 Preface ...
Page 11: ...Chapter 2 Introduction ...
Page 13: ...Chapter 3 Power information ...
Page 19: ...Chapter 4 Main parts ...
Page 31: ...Chapter 5 Adapt printer settings to your needs ...
Page 49: ...Chapter 6 Media handling ...
Page 85: ...Chapter 7 Carry out print jobs ...
Page 162: ...Exchange all setups between printers 162 Chapter 7 Carry out print jobs ...
Page 163: ...Chapter 8 Remote Service ORS optional ...
Page 166: ...Remote Service 166 Chapter 8 Remote Service ORS optional ...
Page 167: ...Chapter 9 Remote Monitor optional ...
Page 169: ...Chapter 10 Optional finishers and other devices ...
Page 189: ...Chapter 11 Counters ...
Page 194: ...Find the meter readings 194 Chapter 11 Counters ...
Page 195: ...Chapter 12 Keeping the printer running ...
Page 209: ...Appendix A Miscellaneous ...
Page 212: ...Product specifications 212 Appendix A Miscellaneous ...
Page 220: ...Index 220 ...
Page 221: ......

