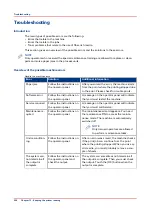
Toner pollution problem
Solution
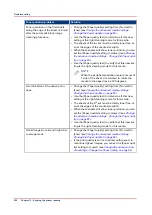
Toner pollution on the first sheets
along the edge of the sheet (2-3 mm)
after the automatic black image
cleaning procedure.
• Change the [Paper quality] setting from [Normal] to
Change the advanced media settings -
Change the Paper quality on page 83
).
• Use the [Paper quality test] to determine if this new
setting is the right cleaning mode for this media.
• The sheets of the 5
th
set must be totally toner free, al-
so at the edges of the media size width.
• When these sheets still show toner pollution, you can
set the [Paper quality] setting to [Lower] (see
the advanced media settings - Change the Paper qual-
ity on page 83
• Use the [Paper quality test] to verify that this new set-
ting is the right cleaning mode for this media.
NOTE
When the peripheral pollution mainly occurs at
1 side of the sheet, it is advised to rotate the
media in the paper tray by 180 degrees.
A combination of the above pollu-
tions.
• Change the [Paper quality] setting from [Normal] to
Change the advanced media settings -
Change the Paper quality on page 83
).
• Use the [Paper quality test] to determine if this new
setting is the right cleaning mode for this media.
• The sheets of the 5
th
set must be totally toner free, al-
so at the edges of the media size width.
• When these sheets still show toner pollution, you can
set the [Paper quality] setting to [Lower] (see
the advanced media settings - Change the Paper qual-
ity on page 83
• Use the [Paper quality test] to verify that this new set-
ting is the right cleaning mode for this media.
Ghost images in mid and high toner
coverage areas.
• Change the [Paper quality] setting from [Normal] to
Change the advanced media settings -
Change the Paper quality on page 83
).
• If the print quality is still not optimal with respect to
mentioned ghost images, you can set the [Paper qual-
ity] setting to [Lower] (see
dia settings - Change the Paper quality on page 83
Troubleshooting
208
Chapter 12 - Keeping the printer running
Summary of Contents for 6160
Page 1: ...Operation guide Océ VarioPrint 6000 Line ...
Page 7: ...Chapter 1 Preface ...
Page 11: ...Chapter 2 Introduction ...
Page 13: ...Chapter 3 Power information ...
Page 19: ...Chapter 4 Main parts ...
Page 31: ...Chapter 5 Adapt printer settings to your needs ...
Page 49: ...Chapter 6 Media handling ...
Page 85: ...Chapter 7 Carry out print jobs ...
Page 162: ...Exchange all setups between printers 162 Chapter 7 Carry out print jobs ...
Page 163: ...Chapter 8 Remote Service ORS optional ...
Page 166: ...Remote Service 166 Chapter 8 Remote Service ORS optional ...
Page 167: ...Chapter 9 Remote Monitor optional ...
Page 169: ...Chapter 10 Optional finishers and other devices ...
Page 189: ...Chapter 11 Counters ...
Page 194: ...Find the meter readings 194 Chapter 11 Counters ...
Page 195: ...Chapter 12 Keeping the printer running ...
Page 209: ...Appendix A Miscellaneous ...
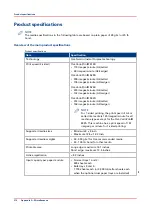
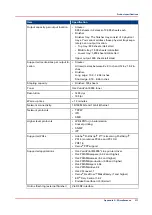
Page 212: ...Product specifications 212 Appendix A Miscellaneous ...
Page 220: ...Index 220 ...
Page 221: ......


