


Page 248
STAT
IM 2000/2000S
Service Guide
96-106775 Rev 5.0
12. Printer and Data Logger
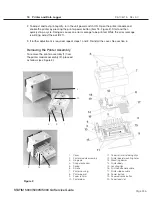
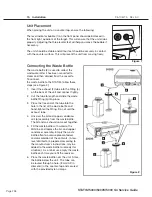
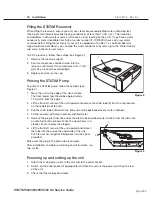
To replace the paper roll (3), proceed as follows (see Figure 3.2):
1. With scissors, cut the paper between the roll (3) and the paper feed
slot (5)
2. Remove the roll from the arm and discard the unused portion.
3. Press the paper advance button (6) to feed the paper that remains in
the printer out of the slot at the front of the printer.
4. Install the new thermal paper roll by following the instructions
described above.
Removing Paper Jams
NOTE: If paper jams in the printer and cannot be removed by pressing the paper advance button,
the printer must be disassembled. Do not pull the paper backwards through the printer. Never put
utensils or tools into the paper exit slot.
When paper is jammed in the printer, proceed as follows:
1. Turn the host unit power OFF.
2. Make sure the printer power button (18) is in the OFF position and disconnect the printer cable
(2) (Figure 1) from the STAT
im
printer connector port and the printer.
3. Using scissors cut the paper between the roll and the paper feed slot (20).
4. Remove the three screws (6) from the printer housing (7) and set them aside for use in
reassembling the printer. Remove the housing.
5. Note the orientation of the exposed printed wiring board and the paper roll arm assembled on
the printer door (10). Remove the paper roll arm (9) from the clips (11).
6. Gently lift the printed wiring board (8) upwards and away from the printer door (10).
Be careful when handling the board. The printer is integral to the wiring board. Do not place
strain on the connections of the ribbon cable soldered to the board. Do not remove the
connector of the flexible cable (16) from the connector header on the board.
The paper drive mechanism on the underside of the wiring board is now exposed.
7. Using a pair of tweezers or fine needle-nosed pliers, carefully remove the paper from the
mechanism.
8. When the paper is removed, proceed as described in “Replacing the Printer.”
STAT
IM
5000/5000S/5000 G4 Service Guide
Figure 3.2
6
2
5


