172
6 Troubleshooting
6
Troubleshooting
If you encounter a problem while using this printer and have trouble solving it, see if any of
the symptoms in the following pages match your problem.
If your problem is described in the following pages, apply the suggested solution provided
for the problem.
If your problem is not described, or could not be solved with the suggested solution, contact
our Customer Support Center or your dealer.
6.1
Clearing Paper Jams
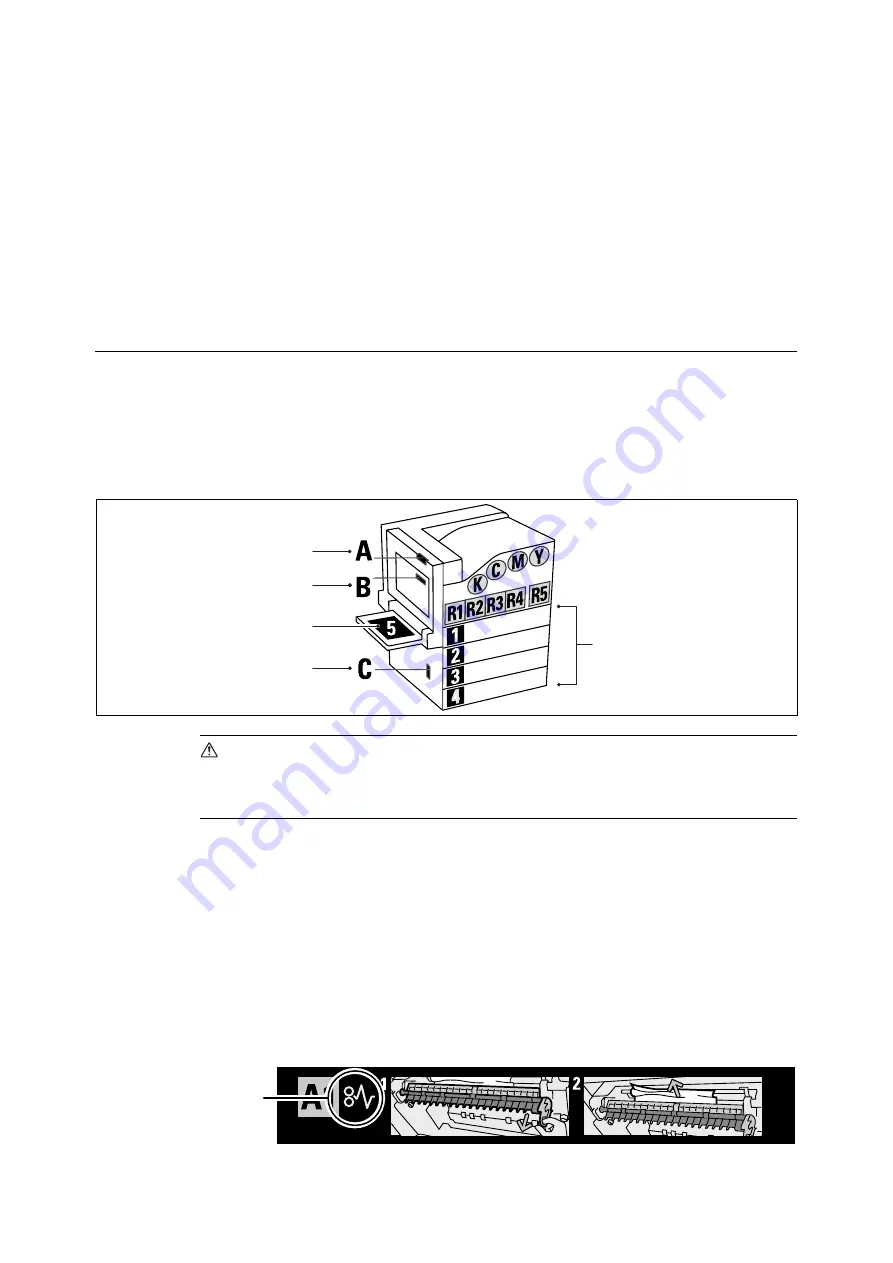
A paper jam will disable the machine and cause an alarm to sound. An <Error> lamp will
light on the control panel and an error message will appear on the display. Use the left side
of the control panel to check the location of the paper jam described in the message, and
remove the jammed paper.
After the paper jam is cleared, printing restarts automatically from the point where printing
stopped due to the paper jam.
CAUTION
• Do not attempt to remove a paper jammed deeply inside the product, particularly a paper
wrapped around a fuser or a heat roller. Otherwise, it may cause injuries or burns.
Switch off the product promptly and contact your local Fuji Xerox representative.
Important
• Pulling out a paper tray without confirming the location of the paper jam may tear paper and cause
pieces of paper to be left in the machine. This can cause a malfunction. Be sure to confirm the location of
the paper jam before attempting to clear it.
• The paper jam indicator remains lit on the control panel if there are pieces of paper remaining inside the
printer.
• Make sure that the power is on when clearing a paper jam. Switching the power off erases the print data
remaining in the printer and the information stored in the printer's memory.
• Do not touch interior components of the printer. Doing so can cause defective printing.
Note
• Labels with the symbol shown below provide jam clearance procedures. Also use the labels as guides
when clearing paper jams.
“Paper Jam Inside Cover B (Optional
Duplex Unit Installed)” (P. 175)
“Paper Jam in the Bypass Tray”
“Paper Jam in Trays 1 - 4” (P. 173)
Paper clearance
instruction symbol
Summary of Contents for DocuPrint C2255
Page 1: ...DocuPrint C2255 User Guide ...
Page 176: ...176 6 Troubleshooting 2 Remove the jammed paper 3 Gently close cover C ...
Page 210: ...210 7 Maintenance 12 Close the front cover ...
Page 266: ...266 7 Maintenance 7 Rotate the lever to the right to lock it 8 Close the front cover ...
Page 313: ...Index 313 WSD 26 129 X XeroxStdAccounting 147 XPS 113 XPS file 309 ...


