104
4 Paper
11. To configure settings for other types of
paper, press the < > button or <Return>
button until the screen in step 8 is
displayed. Then repeat the steps that
follow.
To exit the setting operation, press the
<Menu> button to return to the [Ready to
print] screen.
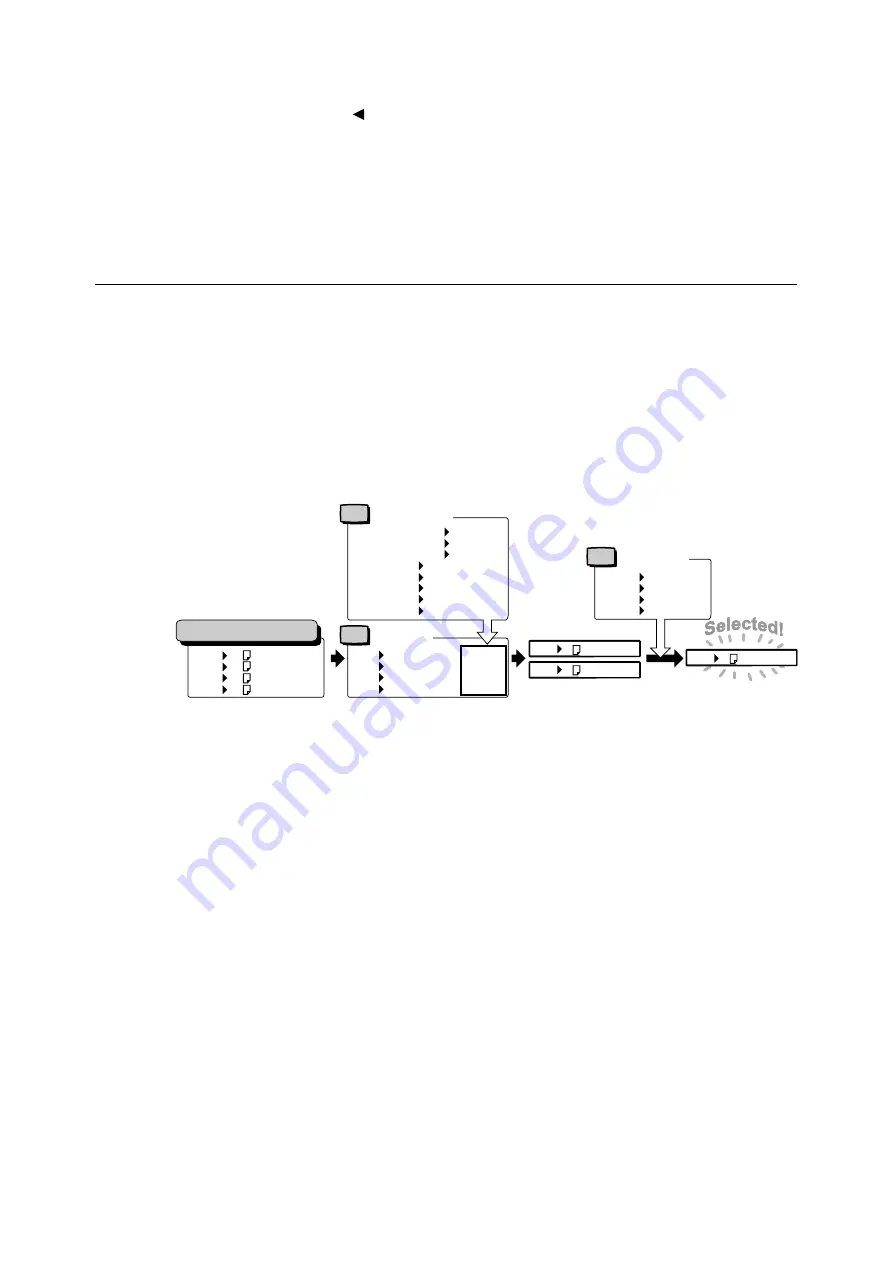
Auto Tray Selection Feature
Printing while [Auto Paper Select] is selected for the [Paper Tray] setting on the [Paper/
Output] tab of the print driver, the printer automatically selects a paper tray based on the
size and orientation of the document to be printed. This feature is called “Auto Tray
Selection”.
If there is more than one tray that is appropriate for the document, the printer checks the
[Paper Type Priority] setting and selects a paper tray that contains the paper of the highest
priority. If the [Paper Type Priority] setting is set to [Not Selected], the printer does not
perform auto tray selection. If the [Paper Type Priority] setting is the same for all of the paper
types, the printer selects paper based on the setting.
Note
• The bypass tray is not available with the auto tray selection feature.
• If there is no tray that corresponds to the automatically selected tray, the printer will display a message
prompting you to load paper. You can program your printer not to display this message and have the
printer print the job on paper that is nearly the same size or larger than the document size (Substitute
Tray feature).
• If a tray runs out of paper during printing, the printer automatically switches to another tray that contains
paper of the same size and orientation (Auto Tray Switch feature). The printer will not switch trays if the
[Paper Type Priority] is set to [Not Selected] for the type of paper in the tray.
• You can assign names to paper of the same type and configure them as custom paper. For example, if
blue plain paper is loaded in one tray, you can name it “Plain blue” to differentiate it from other plain
paper.
Refer to
• “[Printer Settings]” (P. 154)
Tray 1 Recycled Paper••
Tray 2 Plain S2 Paper••
Tray 3 Plain Paper•••••
Tray 4 3.Custom 3••••••
Tray 1 A4 Recycled Paper
Tray 2 A4 Plain S2 Paper
Tray 3 A4 Plain Paper
Tray 4 A4 Plain Paper
For example
Set
Set
Tray Priority
Paper Priority
Plain Paper 1st
Recycled Paper 1st
Plain S2 Paper Not Selected
1.Custom 1 Not Selected
2.Custom 2 Not Selected
3.Custom 3 2nd
4.Custom 4 Not Selected
5.Custom 5 Not Selected
Paper in the paper trays
Paper Type
1st
Not Selected
1st
2nd
Tray 1 A4 Recycled Paper
Tray 3 A4 Plain Paper
Tray 1 1st
Tray 2 2nd
Tray 3 3rd
Tray 4 4th
Tray 1 A4 Recycled Paper
Set
Summary of Contents for DocuPrint C2255
Page 1: ...DocuPrint C2255 User Guide ...
Page 176: ...176 6 Troubleshooting 2 Remove the jammed paper 3 Gently close cover C ...
Page 210: ...210 7 Maintenance 12 Close the front cover ...
Page 266: ...266 7 Maintenance 7 Rotate the lever to the right to lock it 8 Close the front cover ...
Page 313: ...Index 313 WSD 26 129 X XeroxStdAccounting 147 XPS 113 XPS file 309 ...


