background image

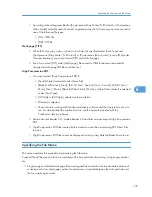
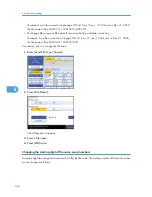
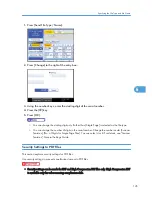
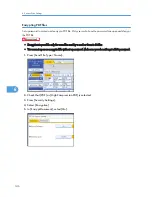
• Default settings for the initial screen can be registered for normal screens and simplified displays

respectively.

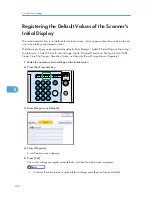
Registering the Default Values of the Scanner's Initial Display

155

6

Summary of Contents for Aficio MP 4000

Page 1: ...ppendix 1 2 3 4 Read this manual carefully before you use this machine and keep it handy for future reference For safe and correct use be sure to read the Safety Information in this manual before using the machine About This Machine Operating Instructions ...

Page 2: ... equipment does not emit hazardous light since the beam is totally enclosed during all customer modes of operation and maintenance Caution Use of controls or adjustments or performance of procedures other than those specified in this manual might result in hazardous radiation exposure Notes The model names of the machines do not appear in the following pages Check the type of your machine before r...

Page 3: ...s and other consumables Copy Document Server Reference Explains Copier and Document Server functions and operations Also refer to this manual for explanations on how to place originals Facsimile Reference Explains Facsimile functions and operations Printer Reference Explains Printer functions and operations Scanner Reference Explains Scanner functions and operations Network Guide Explains how to c...

Page 4: ... dealer This manual includes descriptions of functions and settings that might not be available on this machine Information Contains general notes on the machine and information about the trademarks of product names used in the manuals Other manuals Manuals for DeskTopBinder Lite DeskTopBinder Lite Setup Guide DeskTopBinder Introduction Guide Auto Document Link Guide Manuals provided are specific ...

Page 5: ...ubleshooting Yes Yes Yes Copy Document Server Reference No Yes Yes Facsimile Reference No Yes Yes Printer Reference No Yes Yes Scanner Reference No Yes Yes Network Guide No Yes Yes General Settings Guide No Yes Yes Security Reference No Yes Yes PostScript 3 Supplement No Yes Yes UNIX Supplement No No Yes Information No Yes No 3 ...

Page 6: ...the original size and then selects an appropriate reproduction ratio based on the paper size you select If the orientation in which your original is placed is different from that of the paper you are copying onto the machine rotates the original image by 90 degrees and fits it on the copy paper Copier functions such as Duplex Combine Booklet and Magazine allow you to save on paper by copying multi...

Page 7: ...ng types of print jobs can be selected Sample Print Locked Print Hold Print and Stored Print The optional finisher allows you to collate staple and punch holes in your prints See Printer Reference Utilizing Stored Documents You can store files scanned in copier printer or scanner mode on the machine s hard disk With DeskTopBinder optional or Web Image Monitor you can use your computer to search fo...

Page 8: ...cument Server see Document Server Copy Document Server Reference For details about DeskTopBinder see DeskTopBinder manuals Paperless Fax Transmission and Reception You can store received fax messages on the machine s hard disk instead of printing them onto paper Reception You can store received fax documents in electrical format without printing it onto paper BCX005S You can use DeskTopBinder opti...

Page 9: ...ence Fax Transmission and Reception Over the Internet This machine supports Internet Fax and IP Fax BCX007S Internet Fax This machine converts scanned document images to e mail format and transmits and receives this data over the Internet To send a document specify an e mail address instead of dialing the destination telephone number Internet Fax Transmission This machine can receive e mail messag...

Page 10: ... network BCX008S You can scan originals in full color using the scanner function You can send scan files to a specified destination using e mail Sending scan files by e mail See Sending to E mail Folder Destinations Facsimile Reference and Sending Scan Files by E mail Scanner Reference You can send scan files directly to folders Sending scan files by Scan to Folder See Sending to E mail Folder Des...

Page 11: ...authorization By setting passwords you can prevent unauthorized access via the network You can erase the data on the hard disk to prevent the information from leaking out See the manual for the DataOverWriteSecurity Unit optional and Security Reference Monitoring the Machine Via Computer You can change the machine s settings and monitor its status from a connected computer BCX010S WebImageMonitorl...

Page 12: ...n a machine with the Copy Data Security Unit optional protected pages are grayed out in the copy preventing confidential information from being copied Protected fax messages are grayed out before being transmitted or stored If a document protected by unauthorized copy guard is copied on a machine that is equipped with the Copy Data Security Unit the machine beeps to notify users that unauthorized ...

Page 13: ... Machine Protecting Documents Security Functions 9 Monitoring the Machine Via Computer 9 Preventing an Unauthorized Copy 10 Notice 14 Important 14 Note to Users 14 Regulatory Information 15 How to Read This Manual 16 Symbols 16 Names of Major Options 16 Safety Information 17 Safety During Operation 17 Safety Precautions to be Followed 17 Positions of WARNING and CAUTION labels 21 ENERGY STAR Progr...

Page 14: ...wer 42 Turning On the Main Power 42 Turning On the Power 43 Turning Off the Power 43 Turning Off the Main Power 44 Saving Energy 45 2 Entering Text Entering Text 47 Available Characters 47 Keys 47 How to Enter Text 48 3 Operating Instructions Installing Operating Instructions 51 PDF Manuals 52 How to Use the Operating Instructions 53 Opening from the Icon 53 Opening from the Start Menu 53 Opening ...

Page 15: ...ray 74 Finisher Shift Tray 74 Finisher Booklet Tray 75 Specifications for Punch Kit 2 Tray Finisher Booklet Finisher Optional 77 Specifications for Bridge Unit Optional 79 Specifications for Internal Tray 2 1 bin tray Optional 80 Specifications for Lower Paper Trays Optional 81 Specifications for Tray 3 LCT Optional 82 Specifications for Large Capacity Tray LCT Optional 83 Specifications for IEEE ...

Page 16: ...rty Ricoh Americas Corporation Address 5 Dedrick Place West Caldwell NJ 07006 Telephone number 973 882 2000 This device complies with Part 15 of the FCC Rules Operation is subject to the following two conditions 1 This device may not cause harmful interference and 2 this device must accept any interference received including interference that may cause undesired operation Note This equipment has b...

Page 17: ...rienced radio TV technician for help Caution Changes or modifications not expressly approved by the party responsible for compliance could void the user s authority to operate the equipment Note to users in Canada Note This Class B digital apparatus complies with Canadian ICES 003 Remarque concernant les utilisateurs au Canada Avertissement Cet appareil numérique de la classe B est conforme à la n...

Page 18: ...is manual Indicates points to pay attention to when using the machine and explanations of likely causes of paper misfeeds damage to originals or loss of data Be sure to read these explanations Indicates supplementary explanations of the machine s functions and instructions on resolving user errors This symbol is located at the end of sections It indicates where you can find further relevant inform...

Page 19: ...lways be followed when using this machine Environments where the machine can be used This section explains safety precautions about environments where the machine can be used Keep the machine away from flammable liquids gases and aerosols A fire or an electric shock might occur Keep the machine away from humidity and dust Otherwise a fire or an electric shock might occur Do not place the machine o...

Page 20: ...rag the cord itself Doing so may result in damage to the cord leading to fire or electric shock For safety reason unplug the power cord from the wall outlet if the machine will not be used for an extended period of time such as holidays Handling the main machine This section explains safety precautions about handling the main machine Turn off the power and disconnect the power plug by pulling the ...

Page 21: ... might occur During operation rollers for transporting the paper and originals revolve A safety device is being installed so that the machine can be operated safely But take care not to touch the machine during operation An injury might occur Fire and breakdown can result from heavy accumulation of dust inside this machine Consult your service representative for details about and charges for clean...

Page 22: ...tting toner on your clothes or skin when removing a paper jam or replacing toner If your skin comes into contact with toner wash the affected area thoroughly with soap and water If toner gets on your clothing wash with cold water Hot water will set the toner into the fabric and may make removing the stain impossible When loading paper take care not to trap or injure your fingers Keep your hands cl...

Page 23: ... This machine has labels for WARNING and CAUTION at the positions shown below For safety please follow the instructions and handle the machine as indicated BCX012S BCX014D High temperature Be careful of hot parts when clearing paper jams 21 ...

Page 24: ... This machine comes in two models which vary in copy print speed To ascertain which model you have see the inside front cover Type 1 Type 2 Copy print speed 40 sheets minute A4 81 2 11 50 sheets minute A4 81 2 11 24 ...

Page 25: ...1 Auto document feeder ADF Lowertheautodocumentfeeder ADF overoriginalsplacedontheexposureglass Ifyouloadastackoforiginals in the auto document feeder ADF the ADF will automatically feed the originals one by one This document feeder can be used for two sided originals 2 Exposure glass Place originals here face down 3 Operation switch Press to turn the power on the operation switch indicator lights...

Page 26: ...e machine does not operate after turning on the operation switch check if the main power switch is turned on If it is off turn it on See Turning On Off the Power 10 Ventilation holes Prevent overheating 11 Internal tray Copied printed paper and fax messages are delivered here BCX016S 1 Bypass tray Use to copy or print onto OHP transparencies adhesive labels translucent paper envelopes and custom s...

Page 27: ...ting p 27 Options p 31 Control Panel p 42 Turning On Off the Power Options This section introduces the names and functions of main optional parts External options This section provides explanations about external options Guide to Components 27 1 ...

Page 28: ...sts of two paper trays Holds up to 1 100 sheets of paper Each paper tray holds 550 sheets 6 Bridge unit Relays paper to the finisher 7 3000 sheet finisher Sorts stacks staples and punches multiple sheets of paper Consists of the following paper trays Finisher upper tray Finisher shift tray 8 Booklet finisher Sorts stacks staples and punches multiple sheets of paper The saddle stitch function can s...

Page 29: ...it Allows you to print by RPCS or PCL printer driver and use the scanner function The HDD is included Printer Enhance Option Allows you to print by PCL printer driver The HDD is included Scanner Enhance Option Allows you to use the scanner function Does not include the HDD PostScript 3 Unit Allows you to print by Adobe PostScript printer driver and send PDF files directly to the machine Does not i...

Page 30: ...ages are grayed out in the copy DataOverWriteSecurity Unit Allows you to erase data that is stored on the hard disk Gigabit Ethernet 1000BASE T Allows you to communicate over 1000BASE T Onlyoneofthefollowingoptionscanbeinstalledonthemachineatanyonetime IEEE1284interface board Wireless LAN board Bluetooth interface unit File Format Converter Gigabit Ethernet 1000BASE T If the Copy Data Security Uni...

Page 31: ...ls General Settings Guide Counter Press to check or print the counter value See Counter General Settings Guide Inquiry Press to find out where to order expendable supplies and where to call when a malfunction occurs You can also print these details See Inquiry General Settings Guide 2 Function keys Press to display the operation screen of one of the following functions copy document box facsimile ...

Page 32: ... To turn the power off press again the operation switch indicator goes off See Turning On the Power 10 Communicating indicator Receiving File indicator Confidential File indicator Communicating indicator Lights continuously during data transmission and reception Receiving File indicator Lights continuously while data other than personal box or Memory Lock file is being received and stored in the f...

Page 33: ...ample Copy key Press to make a single set of copies or prints to check print quality before making multiple sets See Sample Copy Copy Document Server Reference 18 Simplified Display key Press this to switch to the Simplified Display 19 Login Logout key Press this to log in or log out p 34 Display Panel p 34 Simplified Display p 40 Changing Modes p 42 Turning On Off the Power p 45 Saving Energy Con...

Page 34: ...or specify an item on the display panel it is highlighted like Keys appearing as cannot be used The copy display is set as the default screen when the machine is turned on The display panels shown in this manual s illustrations are taken from a machine on which all options are installed Simplified Display This section explains how to switch to the simplified display When you press the Simplified D...

Page 35: ...fied display BCX029S 1 Key Color Press to increase screen contrast by changing the color of the keys This is available only for the simplified display To return to the initial display press the Simplified Display key again Certain keys do not appear on the simplified display Display Panel 35 1 ...

Page 36: ...ation is active you cannot use the machine until you enter the user code If you can use the machine you can say that you are logged in When you go out of the operable state you can say that you are logged out After logging in the machine be sure to log out of it to prevent unauthorized usage If authentication fails the Authentication has failed message appears Check that the login user name and lo...

Page 37: ...r code in the printer properties of the printer driver For details see the printer driver Help When logged in through User Code Authentication you do not have to log out Login Using the Control Panel This section explains the procedure for logging in to the machine when Basic Authentication Windows Authentication LDAP Authentication or Integration Server Authentication is set 1 Press Login 2 Enter...

Page 38: ...ser name and login password are correct Logout Using the Control Panel This section explains the procedure for logging out the machine when Basic Authentication Windows Authentication LDAP Authentication or Integration Server Authentication is set To prevent use of the machine by unauthorized persons always log out when you have finished using the machine 1 Press the Login Logout key BCT032S 1 Get...

Page 39: ...river Help When logged in using a printer driver you do not have to log out Login Using Web Image Monitor This section explains the procedure for logging in to the machine via Web Image Monitor 1 Click Login 2 Enter a login user name and password and then click Login For user code authentication enter a user code in User Name and then click OK Logout Using Web Image Monitor This section explains t...

Page 40: ...tch modes in any of the following situations When scanning a fax message for transmission During immediate transmission When accessing User Tools Counter Inquiry During interrupt copying During On hook dialling for fax transmission While scanning an original 1 Getting Started 40 1 ...

Page 41: ...pecified length of time and then restores its settings to the default values specified under Function Priority This function is called System Reset For the procedure for specifying default settings under Function Priority see System Settings General Settings Guide To change the length of time that the machine waits before restoring its settings to their default values use the System Auto Reset Tim...

Page 42: ... memory may be lost if you turn this switch off Use this switch only when necessary This machine automatically enters Energy Saver mode or turns itself off if you do not use it for a while To specify the time that the machine waits before it turns itself off configure the Auto Off Timer setting See System Settings General Settings Guide Turning On the Main Power This section explains how to turn o...

Page 43: ...s pressed check the main power switch is on If it is off turn it on When the message Functional problem within the machine Press Restart after the current process Make the settings again after the machine has restarted is displayed follow the instructions and press Restart at the bottom right hand corner of the screen after the process is completed Turning Off the Power This section explains how t...

Page 44: ...e to turn off the main power switch before pulling out the power plug Not doing so may result in damage to the hard disk or memory 1 Make sure the operation switch indicator is not lit 2 Open the switch cover and then turn off the main power switch The main power indicator goes out When the main power switch is turned off while using the fax function waiting fax and print jobs may be cancelled and...

Page 45: ...hange the Auto Off time under Auto Off Timer See System Settings General Settings Guide The Energy Saver and Auto Off functions will not operate in the following cases When a warning message appears When the service call message appears When paper is jammed When the cover is open When the Add Toner message appears When toner is being replenished When the User Tools Counter Inquiry screen is displa...

Page 46: ...1 Getting Started 46 1 ...

Page 47: ... there is a character already at the cursor position the entered character appears before that Available Characters This section explains which characters are available You can enter the following characters Alphabetic characters Symbols Numerals 0123456789 Keys This section explains the entry screen and the keys displayed on it You can change the entry screen using the keys below 47 2 ...

Page 48: ...de How to Enter Text This section explains text entry more specifically Entering letters This section explains how to enter letters 1 Press Shift to switch between uppercase and lowercase 2 Press the letters you want to enter Deleting characters This section explains how to delete characters 1 Press Backspace or Delete All to delete characters 2 Entering Text 48 2 ...

Page 49: ...User Text that is registered in Program Change Delete User Text FortheregistrationprocedureunderProgram Change DeleteUserText see SystemSettings General Settings Guide 1 Press User Text 2 Select the User Text you want to use Entering Text 49 2 ...

Page 50: ...2 Entering Text 50 2 ...

Page 51: ...d browsers Microsoft Internet Explorer 4 01 SP2 or later Netscape 6 2 or later Non recommended browsers can display the simplified manual only HTML manuals can also be viewed on a Macintosh 1 Select a language and a product and then click OK 2 Click Install manuals If you want to read manuals from the CD ROM click Read HTML manuals or Read PDF manuals 3 Install the manual you require according to ...

Page 52: ... contains PDF manuals File path The PDF manuals are in the following folder on the CD ROM MANUAL_PDF ENGLISH To view the PDF manuals you need to have Adobe Acrobat Reader Adobe Reader installed on your computer 3 Operating Instructions 52 3 ...

Page 53: ...wser opens and the manual appears Opening from the Start Menu This section explains how to open a manual from the Start menu 1 On the Start menu point to Programs Windows XP All Programs then Product Name and then click the manual you want to view The browser opens and then the manual appears Depending on the settings made during installation menu folder names may differ How to Use the Operating I...

Page 54: ...nexplainshowtoopenamanualfromthesupplied Manuals and ManualsforAdministrators CD ROMs 1 Click Read HTML manuals 2 Click the title of the manual you want to view The browser opens and then the manual appears 3 Operating Instructions 54 3 ...

Page 55: ...rm this is not a malfunction The area around the ventilation holes might feel warm This is caused by exhaust air and is not a malfunction When the machine is not in use and in stand by mode you may hear a small noise inside This is caused by the image stabilization process and is not a malfunction If the ambient temperature is high the internal cooling fan will make noise when the machine is in st...

Page 56: ...midity steam may come from the exhaust vent behind the control panel during printing This is water vapour from the paper not a sign of malfunction If condensation forms inside the machine as a result of temperature change the machine may not print properly To minimize this problem use the optional anti condensation heaters Be sure to make a note of the registered machine settings in case they are ...

Page 57: ...as well as manage printers For details about this utility see PostScript 3 Supplement Some documentation about using the machine is included on the CD ROM in PDF format For details about using Adobe Acrobat Reader Adobe Reader see Adobe Acrobat Reader Adobe Reader online Help Viewing the Contents of the CD ROM This section explains how to view the contents of the CD ROMs 1 Insert the CD ROM into t...

Page 58: ...ows Server 2003 Enterprise Edition Microsoft Windows Server 2003 Web Edition Microsoft Windows Server 2003 Datacenter Edition Microsoft Windows Server 2003 R2 Standard Edition Microsoft Windows Server 2003 R2 Enterprise Edition Microsoft Windows Server 2003 R2 Datacenter Edition 5 Versions 8 6 to 9 2 of the Mac OS Mac OS X Classic mode is supported 6 Mac OS X 10 1 or later Native mode PCL printer ...

Page 59: ... on the CD ROM labeled Scanner Driver and Utilities provided with this machine DRIVERS TWAIN System requirements Hardware PC AT compatible machines that support the following operating system properly Operating system Windows 95 98 Me 2000 XP Vista Windows Server 2003 2003 R2 Windows NT 4 0 Display resolution 800 600 pixels 256 colors or higher Under Windows NT with RISC based processors MIPS R se...

Page 60: ...te DeskTopBinder is to be installed on the client computers for integration and management of various kinds of files such as scan files files created with applications and existing scan files This software allows you to use various functions for stored scan files such as viewing stored files Also with the ScanRouter delivery software you can view the files stored in in trays of the delivery server...

Page 61: ...d that network administrators use this application File path SmartDeviceMonitorforAdminisstoredinthefollowingfolderintheCD ROMlabeled PrinterDrivers and Utilities NETWORK DEVMON ADMIN DISK1 Operating system Protocol stack Windows 95 98 Me TCP IP provided with Windows 95 98 Me IPX SPX provided with Windows 95 98 Me NetWare Client provided with Windows 95 98 Novell Client provided with Windows 95 98...

Page 62: ...etwork Guide and SmartDeviceMonitor for Admin Help DeskTopBinder SmartDeviceMonitor for Client This section describes the file path and system requirements of DeskTopBinder SmartDeviceMonitor for Client DeskTopBinder SmartDeviceMonitor for Client allows you to manage and print various data such as files created with an application images scanned with a scanner and existing images as one document F...

Page 63: ...nner Reference or Help of DeskTopBinder SmartDeviceMonitor for Client DeskTopBinder includes SmartDeviceMonitor for Client See Help of DeskTopBinder SmartDeviceMonitor for Client Software and Utilities Included on the CD ROM 63 4 ...

Page 64: ...mponent magnetic brush development system Fusing Heating roll pressure system Resolution Scanning originals 600 dpi Printing 600 dpi Exposure glass Stationary original exposure type Original reference position Rear left corner Warm up time 23 C rated voltage Main power switch 18 seconds or less Operation switch Type 1 10 seconds or less Type 2 15 seconds or less Originals Sheet book objects Maximu...

Page 65: ...ches Trailing edge 0 0 4 0 mm 0 00 0 2 inches Left edge 0 5 3 5 mm 0 02 0 14 inches Right edge 0 5 4 5 mm 0 02 0 18 inches First copy print time Type 1 4 1 seconds or less Type 2 3 5 seconds or less A4 81 2 11 100 reproduction feeding from Tray 1 on the exposure glass Copying speed Type 1 40 copies minute A4 81 2 11 Type 2 50 copies minute A4 81 2 11 Reproduction ratio Preset reproduction ratios E...

Page 66: ...opy run 999 sheets Paper capacity 80 g m2 20 lb Trays 1 2 550 sheets Bypass tray 100 sheets Power consumption Main unit only Type 1 Type 2 Warm up About 1 39 kW About 1 39 kW Stand by About 155 W About 165 W During printing About 0 78 kW About 0 88 kW Maximum Less than 1 39 kW Less than 1 39 kW Complete system Type 1 Type 2 Warm up About 1 41 kW About 1 41 kW 4 Appendix 66 4 ...

Page 67: ...ns W D H up to exposure glass with paper tray unit Types 1 2 670 677 1020 mm 26 4 26 7 40 2 inches Space for main unit W D Types 1 2 670 677 mm 26 4 26 7 inches Noise emission Sound power level Main unit only Type 1 Type 2 Stand by 35 9 dB A 35 6 dB A Copying 65 6 dB A 68 2 dB A Complete system Type 1 Type 2 Stand by 36 2 dB A 36 2 dB A Copying 71 8 dB A 72 3 dB A Sound pressure level Main unit on...

Page 68: ...prox 85 kg 187 4 lb Document Server This section describes specifications for the Document Server HDD 40 GB HDD Document Server Approx 9 GB Capacity Copy Approx 200 pages ITUT No 4 chart Printer Approx 100 pages 600 dpi Scanner Approx 200 pages Scanning Conditions ITUT No 4 chart 200 dpi Text A4 MMR Maximum number of stored documents 3 000 documents Maximum pages of stored documents 9 000 pages Ma...

Page 69: ...inals A3 A5 Inch version 1 sided originals 11 17 51 2 81 2 2 sided originals 11 17 51 2 81 2 Original weight 1 sided originals 40 128 g m2 10 34 lb 2 sided originals 52 128 g m2 14 34 lb Number of originals to be set 100 sheets 80 g m2 20 lb Maximum power consumption Less than 60 W Power is supplied from the main unit Dimensions W D H 570 520 135 mm 22 5 20 5 5 4 inches Weight Approx 12 kg 26 5 lb...

Page 70: ...capacity 80 g m2 20 lb 250 sheets A4 81 2 11 or smaller 50 sheets B4 JIS 81 2 14 or larger Finisher Shift Tray This section describes specifications for the finisher shift tray of the 1000 sheet finisher Paper size A3 B4 JIS A4 B5 JIS A5 12 18 11 17 11 15 11 14 10 15 10 14 81 2 14 81 2 13 81 2 11 81 4 14 81 4 13 8 13 8 101 2 8 10 51 2 81 2 71 4 101 2 8K 16K Paper weight 52 163 g m2 14 43 lb Stack ...

Page 71: ... 11 10 50 sheets 100 20 sets A4 81 2 11 10 50 sheets 50 10 sets A4 B5 JIS 81 2 11 2 9 sheets 50 sets A3 B4 JIS 11 17 81 2 14 10 30 sheets 50 10 sets A3 B4 JIS 11 17 81 2 14 Staple position 3 positions Top Bottom 2 Staples Power consumption 50 W Power is supplied from the main unit Dimensions W D H 270 520 790 mm 10 7 20 5 31 2 inches Weight Approx 25 kg 55 2 lb Specifications for 1000 Sheet Finish...

Page 72: ...63 g m2 14 43 lb Stack capacity 80 g m2 20 lb 250 sheets A4 81 2 11 or smaller 50 sheets B4 JIS 81 2 14 or larger Finisher Shift Tray This section describes specifications for the finisher shift tray of the 2 tray finisher Paper size A3 B4 JIS A4 B5 JIS A5 B6 JIS A6 12 18 11 17 11 15 11 14 10 15 10 14 81 2 14 81 2 13 81 2 11 81 4 14 81 4 13 8 13 8 101 2 8 10 51 2 81 2 71 4 101 2 8K 16K custom size...

Page 73: ...ixed Size 2 19 sheets 150 sets A4 81 2 11 20 50 sheets 150 60 sets A4 81 2 11 2 14 sheets 100 sets A4 B5 JIS 81 2 11 15 50 sheets 100 30 sets A4 B5 JIS 81 2 11 2 14 sheets 100 sets other size paper 15 30 sheets 100 33 sets other size paper With Mixed Size 2 30 sheets 50 sets A3 A4 B4 JIS B5 JIS 11 17 81 2 11 Staple position 4 positions Top Top Slant Bottom 2 Staples Power consumption Approx 96 W P...

Page 74: ...3 g m2 14 43 lb Stack capacity 80 g m2 20 lb 250 sheets A4 81 2 11 or smaller 50 sheets B4 JIS 81 2 14 or larger Finisher Shift Tray This section describes specifications for the finisher shift tray of booklet finisher Paper size A3 B4 JIS A4 B5 JIS A5 B6 JIS A6 12 18 11 17 11 15 11 14 10 15 10 14 81 2 14 81 2 13 81 2 11 81 4 14 81 4 13 8 13 8 101 2 8 10 51 2 81 2 71 4 101 2 8K 16K custom size Pap...

Page 75: ...11 13 50 sheets 150 40 sets A4 81 2 11 2 9 sheets 100 sets A4 B5 JIS 81 2 11 10 50 sheets 100 20 sets A4 B5 JIS 81 2 11 2 9 sheets 100 sets other size paper 10 30 sheets 100 33 sets other size paper With Mixed Size 2 30 sheets 50 sets A3 A4 B4 JIS B5 JIS 11 17 81 2 11 Staple position 4 positions Top Top Slant Bottom 2 Staples Finisher Booklet Tray This section describes specifications for the fini...

Page 76: ...sets 11 15 sheets 10 sets Saddle stitch position Center 2 positions Power consumption Approx 96 W Power is supplied from the main unit Dimensions W D H 657 613 960 mm 25 8 24 2 37 8 inches Weight Approx 63 kg 138 9 lb without punch kit Approx 65 kg 143 3 lb with punch kit 4 Appendix 76 4 ...

Page 77: ...1 4 101 2 8K 2 4 holes type 4 holes A4 B5 JIS 81 2 11 8 101 2 71 4 101 2 16K 4 holes type 4 holes A3 B4 JIS A4 B5 JIS A5 11 17 81 2 14 81 2 11 51 2 81 2 71 4 101 2 8 13 81 2 13 81 4 13 81 4 14 8 101 2 8 10 11 15 11 14 10 15 10 14 8K 16K 4 holes type 4 holes A4 B5 JIS A5 81 2 11 71 4 101 2 8 101 2 8 10 2 3 holes type 2 holes A3 B4 JIS B5 JIS A5 11 17 81 2 14 81 2 11 51 2 81 2 71 4 101 2 8 13 81 2 1...

Page 78: ... holes A4 B5 JIS 81 2 11 8 101 2 8 10 71 4 101 2 16K Paper weight 52 163 g m2 14 43 lb Power consumption 20 W Power is supplied from the main unit Dimensions W D H 110 484 117 mm 4 4 190 6 46 1 inches Weight Approx 2 9 kg 6 4 lb 4 Appendix 78 4 ...

Page 79: ...ibes specifications for the bridge unit Stack capacity 80 g m2 20 lb 250 sheets A4 81 2 11 or smaller 125 sheets B4 JIS 81 2 14 or larger Dimensions W D H 415 412 111 mm 16 4 16 3 4 4 inches Weight Approx 5 kg 11 lb Specifications for Bridge Unit Optional 79 4 ...

Page 80: ...11 17 81 2 14 81 2 11 51 2 81 2 71 4 101 2 81 2 13 81 4 14 81 4 13 8 13 8 10 11 14 11 15 10 14 10 15 8K 16K custom size Paper weight 60 105 g m2 16 28 lb Paper capacity 80 g m2 20 lb 125 sheets A4 81 2 11 or smaller Power consumption Approx 10 W Power is supplied from the main unit Dimensions W D H 565 410 115 mm 22 2 16 1 4 5 inches Weight Approx 2 5 kg 1 13 lb 4 Appendix 80 4 ...

Page 81: ...1 2 13 81 4 13 8 13 51 2 81 2 71 4 101 2 81 4 14 8 101 2 8 10 11 15 10 14 custom size Paper weight 60 169 g m2 16 45 lb Paper capacity 80 g m2 20 lb 550 sheets 2 trays Power consumption Maximum 50 W Power is supplied from the main unit Dimensions W D H 580 620 260 mm 22 9 24 5 10 3 inches Weight Approx 26 kg 57 3 lb Specifications for Lower Paper Trays Optional 81 4 ...

Page 82: ...e tray 3 LCT Paper size A4 81 2 11 Paper weight 60 169 g m2 16 45 lb Paper capacity 80 g m2 20 lb 1 000 sheets 2 trays Power consumption Maximum 50 W Power is supplied from the main unit Dimensions W D H 580 650 260 mm 22 9 24 5 10 3 inches Weight Approx 26 kg 57 3 lb 4 Appendix 82 4 ...

Page 83: ...y LCT Paper size A4 B5 JIS 81 2 11 Paper weight 60 169 g m2 16 45 lb Paper capacity 80 g m2 20 lb 1 200 sheets Power consumption Maximum 55 W Power is supplied from the main unit Dimensions W D H 530 540 290 mm 20 9 21 3 11 4 inches Weight Approx 14 kg 30 9 lb Specifications for Large Capacity Tray LCT Optional 83 4 ...

Page 84: ...EE 1284 Interface Board Optional This section describes specifications for the IEEE 1284 interface board Transmission spec IEEE 1284 Required cable Standard IEEE 1284 compliant Micro Centronics 36 pin cable 4 Appendix 84 4 ...

Page 85: ...k Data transfer speed Auto select from the following speed 1 Mbps 2 Mbps 5 5 Mbps 6 Mbps 9 Mbps 11 Mbps 12 Mbps 18 Mbps 24 Mbps 36 Mbps 48 Mbps 54 Mbps Frequency range 2412 2462 MHz 1 11 channels 5180 5320 MHz 36 40 44 48 52 56 60 and 64 channels Transmission mode Ad hoc mode Infrastructure mode SmartDeviceMonitor and Web Image Monitor are supported Specifications for Wireless LAN Board Optional 8...

Page 86: ...PP Serial Port Profile HCRP Hardcopy Cable Replacement Profile BIP Basic Imaging Profile Frequency Range 2 45 GHz ISM band Data Transmission Speed 723 kbps Maximum Range 10 m The transmission speed is adjusted according to factors such as the distance and obstacles between the devices radio signal condition and Bluetooth adaptor 4 Appendix 86 4 ...

Page 87: ...ase T 100Base TX 1000Base T USB 2 0 It requires a USB computer port and cable that support USB 2 0 Data Transmission Speed Ethernet 1000 Mbps 100 Mbps 10 Mbps USB 480 Mbps High speed USB 2 0 12 Mbps Full speed Protocol TCP IP IPX SPX AppleTalk Distance Between Devices Ethernet 100 m USB 5 m Specifications for Gigabit Ethernet Optional 87 4 ...

Page 88: ...B5 JIS A5 550 sheets 60 169 g m2 16 45 lb 2 11 17 11 14 81 2 14 81 2 13 81 2 11 81 4 14 81 4 13 8 13 8 10 71 4 101 2 11 15 10 14 2 81 2 13 81 4 14 81 4 13 8 13 8 10 71 4 101 2 11 15 10 14 A3 B4 JIS A4 B5 JIS 550 sheets 60 169 g m2 16 45 lb 3 Custom size Vertical 182 305 mm Horizontal 210 432 mm 3 Custom size Vertical 7 17 12 00 inches Horizontal 8 27 17 00 inches 550 sheets Bypass tray optional Pa...

Page 89: ...100 sheets 60 105 g m2 16 28 lb Thin paper 52 60 g m2 14 16 lb 5 Custom size Vertical 90 305 mm Horizontal 148 600 mm 5 Custom size Vertical 3 55 12 inches Horizontal 5 83 23 62 inches 100 sheets Thick paper 6 105 220 g m2 28 58 lb 1 A3 A4 A5 A6 1 11 17 81 2 11 51 2 81 2 7 Thick paper 6 105 220 g m2 28 58 lb 4 B4 JIS B5 JIS B6 JIS 12 18 11 17 81 2 14 81 2 13 81 2 11 81 4 14 81 4 13 8 13 8 101 2 8 ...

Page 90: ...per capacity 60 169 g m2 16 45 lb A4 10 81 2 11 10 1 000 sheets 2 Large capacity tray LCT optional Paper type and weight Metric version Inch version Paper capacity 60 169 g m2 16 45 lb A4 B5 JIS 10 81 2 11 10 1 200 sheets 1 The paper size is detected automatically 2 Select the paper size in System Settings For details about Tray Paper Size Tray 1 4 see System Settings General Settings Guide 3 Ente...

Page 91: ...nd the key and then select the paper size When you load OHP transparencies check the front and back of the sheets and place them correctly or a misfeed might occur Use A4 or 81 2 11 size transparencies and specify their size For details see Copy Document Server Reference and Printer Reference When you use OHP transparencies fan them for each use We recommend that you use a 4000ANSI lumen or bright...

Page 92: ...t speed is slower than usual The paper types you can select in System Settings are only general classifications Copy quality for every kind of paper in a classification is not guaranteed See Unusable Paper for more information p 93 Unusable Paper 4 Appendix 92 4 ...

Page 93: ... Hemmed edge paper Color OHP transparencies with easily melted coatings Faults can occur if you copy or print onto sides that are already printed Take care to copy or print onto unprinted sides only To prevent misfeeds do not use the following kinds of paper Bent folded or creased paper Perforated paper Slippery paper Torn paper Rough paper Thin paper with little stiffness Paper with a dusty surfa...

Page 94: ...be followed Do not store paper where it will be exposed to direct sunlight Avoid storing paper in humid areas humidity 70 or less Store on a flat surface Do not store paper vertically Under high temperature and humidity conditions or low temperature and humidity conditions store paper in plastic bags 4 Appendix 94 4 ...

Page 95: ...ator 32 Contents of the CD ROM 57 Control panel 26 31 36 37 38 Copier 4 40 Copy Data Security Unit 10 30 Copy speed 24 Counter key 31 D Data In indicator 32 DataOverWriteSecurity Unit 9 30 Delete All 48 Deleting characters 48 DeskTopBinder 5 6 DeskTopBinder Lite 60 DeskTopBinder SmartDeviceMonitor for Client 57 62 Display panel 31 34 Document Server 5 40 68 Dos and Don ts 55 Duplex 4 22 26 Duplex ...

Page 96: ...dhesive labels 88 LAN Fax 6 59 LAN Fax driver 59 Large capacity tray 16 Large capacity tray LCT 28 83 90 LCT 16 28 82 83 90 Legal prohibition 14 Local connection 5 Locked Print 5 Login 37 39 Login Logout key 33 Logout 38 39 Low Power mode 22 Lower paper trays 26 28 81 88 Lower right cover 26 M Machine types 24 Magazine 4 Main power 42 44 Main power indicator 32 Main power switch 26 42 Main unit 64...

Page 97: ...7 Safety precautions to be followed 17 Sample Copy key 33 Sample Print 5 Saving paper 4 Scan originals in full color 8 Scanner 8 40 Scanner Driver and Utilities 57 59 60 Scanner Enhance Option 29 ScanRouter 8 Security functions 9 Sending scan files by e mail 8 Sending scan files by Scan to Folder 8 Shift 48 Shift Lock 47 Simplified Display 34 Simplified Display key 33 34 Sleep mode 22 SmartDeviceM...

Page 98: ...g off the power 42 43 Turning on the main power 42 Turning on the power 42 43 TWAIN driver 59 U Unauthorized copy prevention 10 Unusable paper 93 User Code Authentication 36 37 User Text 49 User Tools key 31 User Tools Counter key 31 Using the Print Job function 5 Utilities included on the CD ROM 57 V Ventilation holes 26 27 Viewing the contents of the CD ROM 57 W WARNING 17 21 Web Image Monitor 5...

Page 99: ...MEMO 99 ...

Page 100: ...MEMO 100 EN USA D012 7754 ...

Page 101: ...emarks of their respective companies We disclaim any and all rights to those marks The proper names of the Windows operating systems are as follows The product name of Windows 95 is Microsoft Windows 95 The product name of Windows 98 is Microsoft Windows 98 The product name of Windows Me is Microsoft Windows Millennium Edition Windows Me The product names of Windows 2000 are as follows Microsoft W...

Page 102: ...9040 9040b MP 4000 MP 4000B LD040 LD040B Aficio MP 4000 Aficio MP 4000B Type for 9050 9050b MP 5000 MP 5000B LD050 LD050B Aficio MP 5000 Aficio MP 5000B Operating Instructions About This Machine D012 7754 EN USA ...

Page 103: ...he Printer Function Troubleshooting When Using the Scanner Function Adding Paper Toner and Staples Clearing Misfeeds Remarks 1 2 3 4 Read this manual carefully before you use this machine and keep it handy for future reference For safe and correct use be sure to read the Safety Information in About This Machine before using the machine 8 5 6 7 Troubleshooting Operating Instructions ...

Page 104: ...dures other than those specified in this manual might result in hazardous radiation exposure Notes The model names of the machines do not appear in the following pages Check the type of your machine before reading this manual For details see Machine Types About This Machine Type 1 9040 9040b MP 4000 MP 4000B LD040 LD040B Aficio MP 4000 Aficio MP 4000B Type 2 9050 9050b MP 5000 MP 5000B LD050 LD050...

Page 105: ...s and other consumables Copy Document Server Reference Explains Copier and Document Server functions and operations Also refer to this manual for explanations on how to place originals Facsimile Reference Explains Facsimile functions and operations Printer Reference Explains Printer functions and operations Scanner Reference Explains Scanner functions and operations Network Guide Explains how to c...

Page 106: ...se visit our Web site or consult an authorized dealer This manual includes descriptions of functions and settings that might not be available on this machine Information Contains general notes on the machine and information about the trademarks of product names used in the manuals Other manuals Manuals for DeskTopBinder Lite DeskTopBinder Lite Setup Guide DeskTopBinder Introduction Guide Auto Docu...

Page 107: ... When You Cannot Make Copies As Wanted 27 When Memory Is Full 32 3 Troubleshooting When Using the Facsimile Function Adjusting the Volume 35 Messages Displayed When Using the Facsimile Function 37 When You Cannot Send or Receive Fax Messages As Wanted 46 When Memory Is Full 51 If an Error Report Is Printed 52 Turning Off the Main Power In the Event of Power Failure 53 When an Error Occurs Using In...

Page 108: ...Cannot Be Started 83 When Stored Files Cannot Be Edited 84 When the Network Delivery Function Cannot Be Used 84 When S MIME Cannot Be Used 84 Operations Are Not Possible When Messages Are Displayed 85 Messages Displayed When Using the Scanner Function 86 Messages Displayed on the Control Panel When Using the Scanner Function 86 Messages Displayed on the Client Computer 92 6 Adding Paper Toner and ...

Page 109: ...ammed Paper 117 Locating Jammed Paper 117 Removing Jammed Paper 119 Removing Jammed Staples 127 1000 sheet Finisher 127 3000 sheet Finisher 128 Booklet Finisher 128 Booklet Finisher Saddle Stitch 129 Removing Punch Waste 131 3000 sheet Finisher and Booklet Finisher 131 8 Remarks Where to Put Your Machine 133 Machine Environment 133 Power Connection 135 Maintaining Your Machine 137 Cleaning the Exp...

Page 110: ...out This Machine Indicates points to pay attention to when using the machine and explanations of likely causes of paper misfeeds damage to originals or loss of data Be sure to read these explanations Indicates supplementary explanations of the machine s functions and instructions on resolving user errors This symbol is located at the end of sections It indicates where you can find further relevant...

Page 111: ...aper Load Paper indicator Appears when paper runs out See p 97 Loading Paper Add Toner indicator Appears when toner runs out See p 106 Adding Toner Add Staple indicator Appears when staples run out See p 110 Adding Staples Waste Toner Full indicator Appears when the waste toner bottle is full Contact your sales or service representative Empty Hole Punch Receptacle indicator Appears when the hole p...

Page 112: ...ve long beeps Soft alert The initial screen returns when the machine goes into energy saving mode and when simplified display is canceled Five long beeps repeated four times Soft alert Anoriginalhasbeenleftontheexposure glass or paper is empty Five short beeps repeated five times Strong alert The machine requires user attention because paper has jammed the toner needs replenishing or other problem...

Page 113: ...state of and solutions for original misfeeds Paper Misfeed Displays state of and solutions for paper jams Cover Open Indicates whether front cover duplex unit etc is open Data Storage You can check the following items under Data Storage HDD Remaining Memory Displays the amount of available hard disk drive memory HDD File s Displays the total number of jobs stored in the hard disk drive Print Job s...

Page 114: ...ount Machine IPv4 Address Displays the machine s IPv4 address Machine IPv6 Address Displays the machine s IPv6 address Inquiry You can check the following items under Inquiry Machine Repairs Displays the machine number and contact number that are required for service Sales Representative Displays the sales representative s telephone number Supply Order Displays the contact number for placing suppl...

Page 115: ... previous screen returns No Staples Punch Receptacle Full Output Tray Full Original Misfeed Paper Misfeed and Cover Open appear on the Maintenance Info tab only when these errors occur For details about how to locate and remove misfeeds see Removing Jammed Paper p 117 Removing Jammed Paper Checking Machine Status and Settings 11 1 ...

Page 116: ... is full Remove the prints from the tray Documents and reports do not print out There is no paper left Load paper See p 97 Loading Paper An error has occurred The function whose indicator is lit is defective Record the code number shown on the display and contact your service representative See Messages Displayed of each chapter You can use other functions normally The machine is unable to connect...

Page 117: ...e Machine General Settings Guide Contact the network administrator If the indicator is still lit even after trying to solve the problem as described here contact your service representative When an Indicator to the Right of a Function Key Is Lit 13 1 ...

Page 118: ...e required varies by function Functions appear in the User Tools menu when they become ready for use Wait a little longer The operation switch indicator continues blinking and does not turn off when pressed This occurs in the following cases The ADF is open The machine is communicating with external equipment The hard disk is active The machine is cooling down Close the ADF and check if the machin...

Page 119: ...ts pages that can be stored in the hard disk Press StoreFile tostorepagesthat have been scanned Delete unnecessary files with Delete File Press No if you are not storing pages that have been scanned Delete unnecessary files with Delete File The user code entry screen is displayed Users are restricted by User Code Authentication Enter the user code up to eight digits and then press OK The Authentic...

Page 120: ... is not installed Press the Start key Original images are printed on the reverse side of the paper You may have loaded the paper incorrectly Load paper correctly Place paper in the paper tray or tray 3 LCT with the print side up Load paper into the large capacity tray LCT or bypass tray with the print side down See p 97 Loading Paper Misfeeds occur frequently The tray s side or end fences may not ...

Page 121: ...print in duplex mode Apply Duplex is set to No for Paper Type In Tray Paper Settings under Paper Type set Apply Duplex to Yes Cannot print in duplex mode You cannot select duplex printing if the paper type is set to Thick Paper 2 In Tray Paper Settings under Paper Type select a paper type other than Thick Paper 2 If you cannot make copies as you want because of paper type paper size or paper capac...

Page 122: ...chart shows Function Compatibility when print priority is set to Interleave For details about Print Priority see System Settings General Settings Guide Simultaneous operations are possible Operation is enabled when the relevant function key is pressed and remote switching of the scanner external extension is done Operation is enabled when the Interrupt key is pressed to interrupt the preceding ope...

Page 123: ...Operation is possible when extra lines are added 4 During stapling printing automatically starts after the current job 5 Stapling is not available 6 Simultaneous operation becomes possible after you press New Job 7 During parallel reception any subsequent job is suspended until the reception is completed Stapling cannot be used at the same time for multiple functions When a Job Is Not Performed 19...

Page 124: ...ettings General Settings Guide When the 1000 sheet finisher the 3000 sheet finisher or the booklet finisher is installed on the machine you can specify the output tray where documents are delivered For details about Output Tray Settings see System Settings General Settings Guide While printing is in progress scanning a document using another function may take longer than usual 1 When the Machine D...

Page 125: ...ng the Machine p 14 When You Have Problems Operating the Machine Message Cause Solution Authentication has failed The entered login user name or login password is not correct Inquire the user administrator for the correct login user name and login password Authentication has failed The machine cannot perform authentication Contact the administrator Cannot detect original size The original placed o...

Page 126: ...s a file in the Document Server If you do not want to store scanned pages press No Scanned data is deleted File being stored exceeded max number of pages per file Copying will be stopped The scanned originals have too many pages to store as one document Press Exit and then store again with an appropriate number of pages Magazine or Booklet mode is not available due to mixed image mode You selected...

Page 127: ...h this paper size A size of paper for which Rotate Sort is not available is selected Select a proper paper size See Supplementary Information Copy Document Server Reference The selected file s contained file s without access privileges Only file s with access privileges will be deleted You have tried to delete files without the authority to do so Files can be deleted by the person who created the ...

Page 128: ...cted On the control panel select Auto Density A shadow appears on copies if you use pasted originals Image density is too high Adjust the image density settings See Adjusting Copy Image Density Copy Document Server Reference Change the orientation of the original Put mending tape on the pasted part The same copy area is dirty whenever making copies The exposure glass scanning glass or ADF is dirty...

Page 129: ... of images are not copied The correct paper size is not selected Select the proper paper size Imagesappearonlypartially The paper is damp Use paper that has been stored in the recommended temperature and humidity condition For details about the proper way to store it see Paper Storage About This Machine Black lines appear The exposure glass or scanning glass is dirty Clean them See p 137 Maintaini...

Page 130: ...Place the print on the exposure glass in either of the following ways Place an OHP transparency on the exposure glass and then place the print on the OHP transparency Place the print on the exposure glass and then place two or three sheets of white paper on it Leave the ADF open when copying 2 Troubleshooting When Using the Copy Document Server Function 26 2 ...

Page 131: ...frequently The paper is too thick or too thin Use recommended paper See Recommended Paper Sizes and Types About This Machine Misfeeds occur frequently The copy paper is wrinkled or has been folded creased Use recommended paper only and be sure its storage environment meets the recommended temperature and humidity conditions For details about recommended paper and the proper way to store it see Rec...

Page 132: ...es of paper are resistant to folding and open out after being folded and stitched Use recommended paper See Recommended Paper Sizes and Types About This Machine You cannot combine several functions Selected functions cannot be used together Check the combination of functions and make the settings again See Function Compatibility Copy Document Server Reference When sorting the pages are divided int...

Page 133: ...Erase Center Border mode parts of the original image are not copied Originals are not scanned correctly Place the originals correctly In Margin Adjustment mode parts of the original image are not copied You set a wide erased margin There is a lack of margin space on the opposite side of the binding position Set a narrower margin with User Tools You can set the width between 0 30 mm 0 1 2 inches In...

Page 134: ... sizes of your originals and copy paper When you specify a reproduction ratio using Manual Paper Select mode make sure the ratio matches your originals and the copy paper Select the correct reproduction ratio before using Combine mode See One Sided Combine Two Sided Combine or Auto Reduce Enlarge Copy Document Server Reference Copies are not in correct order You placed the originals in the incorre...

Page 135: ...You cannot access a protectedfilewithoutentering the password Contact the administrator To delete the files stored in the document server select Delete All Files in Document Server under Administrator Tools in System Settings As this will permanently delete every single file make sure the document server does not contain any files you want to keep For details about Delete All Files in Document Ser...

Page 136: ...out specifying the setting again Check print quality by printing out only the first set using the Sample Copy key See Finishing Copy Document Server Reference Cannot display preview of this page appears and you can not check the thumbnail image The image data may have been corrupted Press Exit to display the preview screen without a thumbnail If the selected document contains several pages press S...

Page 137: ...ry overflow message will not be displayed The machine will make copies of the scanned originals first and then automatically proceed to scan and to copy the remaining originals In this case the resulting sorted pages will not be sequential For details about Memory Full Auto Scan Restart see Copier Document Server Features General Settings Guide When You Cannot Make Copies As Wanted 33 2 ...

Page 138: ...2 Troubleshooting When Using the Copy Document Server Function 34 2 ...

Page 139: ...ng sounds that the machine makes On Hook Mode Heard when On Hook is pressed At Transmission Heard when Immediate Transmission is performed At Reception Heard when the machine receives a document At Dialing Heard after pressing the Start key until the line connects to the destination At Printing Heard when a received document is printed 1 Press the User Tools Counter key BBT052S 2 Press Facsimile F...

Page 140: ...ou press Cancel the volume setting is canceled The display returns to that of step 4 You can set the volume level to between 0 and 7 6 Press the User Tools Counter key The standby display appears You can adjust the On Hook volume when you press On Hook See On Hook Dial Facsimile Reference 3 Troubleshooting When Using the Facsimile Function 36 3 ...

Page 141: ...mputer or folder entered as the destination is wrong Check whether the computer name and the folder name for the destination are correct Check whether there are any network problems 13 10 The alias telephone number you entered is already registered on the gatekeeper by another device In Facsimile Features under Initial Settings select H 323 Settings and then check the alias telephone number is cor...

Page 142: ...Web Image Monitor s Help Contact the network administrator Check whether there are any network problems 13 24 The password registered for the SIP server is not the same as the password registered for this machine Contact the administrator Check whether there are any network problems 13 25 In Effective Protocol the IP address is not enabled or an incorrect IP address has been registered In System S...

Page 143: ... programmed You can also use the Web Image Monitor for confirmation See the Web Image Monitor s Help In System Settings under File Transfer select SMTP Server and then check Server Name or Port No is correctly programmed You can also use the Web Image Monitor for confirmation See the Web Image Monitor s Help Check that the folder for forwarding is correctly specified Check that the computer in whi...

Page 144: ...ministrator s e mail address is registered In System Settings under File Transfer select Fax E mail Account and then check that E mail Address is correctly programmed You can also use the Web Image Monitor for confirmation See the Web Image Monitor s Help Contact the network administrator Check whether there are any network problems 15 01 No POP3 IMAP4 server address is programmed In System Settin...

Page 145: ...5 11 Cannot find the DNS server or POP3 IMAP4 server In System Settings under Interface Settings check the IP address of the DNS Server is correctly programmed You can also use the Web Image Monitor for confirmation See the Web Image Monitor s Help In System Settings under File Transfer select POP3 IMAP4 Settings and then check Server Name is correctly programmed You can also use the Web Image Mon...

Page 146: ...an also use the Web Image Monitor for confirmation See the Web Image Monitor s Help In System Settings under File Transfer check that the user name and password for POP before SMTP authentication are correctly programmed You can also use the Web Image Monitor for confirmation See the Web Image Monitor s Help Contact the network administrator Connection with LDAP server has failed Check the server ...

Page 147: ...here is a problem with the fax Record the code number shown on the display and contact your service representative Other functions can be used LDAP server authentication has failed Check the settings A network error has occurred and connection has failed Make settings correctly for the user name and the password for LDAP server authentication Original is being scanned by another function Switch to...

Page 148: ...martDeviceMonitor for Admin or Web Image Monitor Wait until the message disappears Do not switch off the power while this messageisdisplayed Dependingonthe number of destinations to be updated there may be some delay before you can resume operation Operation is not possiblewhilethismessageisdisplayed You do not have the privileges to use this function The logged in user name does not have permissi...

Page 149: ...pears on the display You can turn this function on or off with Parameter Settings For details about how to do this see Parameter Settings General Settings Guide Messages Displayed When Using the Facsimile Function 45 3 ...

Page 150: ...ed via the ADF the side to be scanned must face up Printed or sent images are spotty The ADF exposure glass or scanning glass is dirty Clean them See p 137 Maintaining Your Machine Make sure ink or correction fluid is dry before placing originals Reception is possible but transmission is impossible Theterminaladaptorsettingis incorrect Check the setting Reception is possible but transmission is im...

Page 151: ...nd enter them correctly Contact the administrator LAN Fax Driver does not work A high security level is set by the extended security function Contact the administrator Although a group specification was set for the following reception was not possible Receiving Station of Information Box Forwarding Forwarding of Special Sender Reception Report e mail Email TX Results routing e mail received via SM...

Page 152: ... Cannot receive E mails currently appears and e mail cannot be received The machine is receiving an ondemand e mail message e mail inquiry from the administrator After the e mail is received press Manual E mail RX and then try again Printing Problem Cause Solution Print is slanted The tray s side fences might not be locked Check the side fences are locked See p 102 Changing the Paper Size Print is...

Page 153: ... Storage About This Machine Copy paper becomes creased The paper is too thin Use recommended paper See Recommended Paper Sizes and Types About This Machine Images are only partially printed The paper is damp Use paper that has been stored in the recommended temperature and humidity condition See Paper Storage About This Machine Black lines appear on the print produced at the destination The ADF ex...

Page 154: ... a Power Failure Report is automatically printed when the machine is turned on If fax documents stored for Memory Transmission have been lost check the destinations and resend the documents If fax documents received through Memory Memory Lock or Substitute Reception have been lost ask the senders to resend the documents See p 53 Turning Off the Main Power In the Event of Power Failure When a corre...

Page 155: ...tination settings Cannot print JPEG format files with the Mail to Print function Only JFIF files are printable JFIF is a JPEG subformat Make sure the files you are trying to print are in JFIF subformat When Memory Is Full This section describes likely causes of and possible solutions for problems related to full memory Message Cause Solution Memory is full Cannot scan more Transmission will be sto...

Page 156: ...y contact your service representative The Page column gives the total number of pages The Page not sent or Page not received column gives the number of pages not sent or received successfully You can display destinations by configuring the appropriate User Parameter For details about how to do this see Parameter Settings General Settings Guide You can display sender names by configuring the approp...

Page 157: ...en if the main power switch is turned off the contents of the machine memory for example programmed numbers will not be lost However if power is lost for about one hour because the main power switch is turned off there is a power cut or the power cable is removed contents of the Fax memory are lost Lost items will include any fax documents stored in memory using Memory Transmission Reception or Me...

Page 158: ...ter Settings General Settings Guide If Error Mail Notification cannot be sent the Error Report E mail is printed by the machine If an error occurs when an e mail is received via SMTP the SMTP server sends an error e mail to the originator of the document Error Report E mail The Error Report E mail is printed by the machine when it is unable to send an Error Mail Notification Server Generated Error...

Page 159: ... This section describes the procedure under Windows 2000 1 On the Start menu point to Settings and then click Printers 2 Double click the Add Printer icon 3 Follow the instructions in Add Printer Wizard If the printer driver is on a CD ROM the location of the driver is DRIVERS RPCS PCL6 or PCL5E XP_VISTA language DISK1 If the installer starts click Cancel to quit 4 Specify a port Available ports v...

Page 160: ...ions in Add Printer Wizard If the printer driver is on a CD ROM the location of the driver is DRIVERS RPCS PCL6 or PCL5E XP_VISTA language DISK1 If the installer starts click Cancel to quit 6 Specify a port Available ports vary according to your Windows operating system or the type of interface For details see Preparing the Machine Printer Reference Windows Vista This section describes the procedu...

Page 161: ...Available ports vary according to your Windows operating system or the type of interface For details see Preparing the Machine Printer Reference Messages Displayed When Installing the Printer Driver 57 4 ...

Page 162: ...t the USB cable and then turn it on again Windows has already configured the USB settings Check whether the computer has identified the machine as an unsupported device Open Windows Device Manager and then under Universal Serial Bus controllers remove any conflicting devices Conflicting deviceshave a or icon by them Take care not to accidentally remove required devices For details see Windows Help...

Page 163: ...r a second or two while the machine is preparing performing initial adjustments or adding toner Wait a while Ready This is the default ready message The machine is ready for use No action is required Resetting job The machine is resetting the print job Wait until Ready appears on the display panel Setting change The machine is setting changing You cannot use the control panel while this message is...

Page 164: ...cess privileges will be deleted You have tried to delete files without the authority to do so Files can be deleted by the person who created the file To delete a file which youarenotauthorizedtodelete contact the person who created the file The tray selected for other pages is the same as the one for Slip Sheets Designate Cannot print Check the setting The tray selected for other pages is the same...

Page 165: ...s unavailable Check that the data is valid 86 Error Parameters of the control code are invalid Set the parameters correctly 91 Error Printing was canceled by the auto job cancel function due to a command error Check that the data is valid 92 Error Printing was canceled because Job Reset or the Clear Stop key was selected on the machine s control panel Perform the print operation again if necessary...

Page 166: ...ation between the computer and the machine is working correctly Check if the correct printer driver is being used Checkifthemachine smemorysize is set correctly in the printer driver Check that the printer driver is the most up to date version available Data storage error You tried to print a Sample Print Locked Print Hold Print or Stored Print file or to store a file in the document server when t...

Page 167: ...er was exceeded Delete some of the files stored in the document server or reduce the number of pages that you want to send Exceeded max number of pages to print for temporary stored jobs WhileprintingaSamplePrint Locked Print Hold Print or Stored Print file the maximum page capacity was exceeded Delete unneeded files stored in the machine Reduce the number of pages to print Exceeded max pages Coll...

Page 168: ...back on again If the message appears again contact your service representative Hardware Problem USB An error has occurred in the USB interface Turn off the main power switch and back on again If the message appears again contact your service representative Hardware Problem Wireless Board Access to the wireless board in which the wireless LAN interface unit is inserted is possible but an error was ...

Page 169: ...ttings dialog box and then on the Image Adjustments tab specify a lower value for Resolution Memory Overflow The memory is full On the RPCS printer driver s Print Quality tab open the Change User Settings dialog box and then on the Image Adjustments tab specify a lower value for Resolution In Printer Features under System set Memory Usage to Font Priority If this message continues to appear after ...

Page 170: ...can produce print results that might not be as expected Receiving data failed Data reception was aborted Resend the data Sending data failed The machine received a command to stop transmission from the printer driver Check if the computer is working correctly Staple has been cancelled Stapling printing was canceled Check the paper orientation paper quantity print orientation and staple position Ce...

Page 171: ...name and password are correct You do not have a privilege to use this function This job has been cancelled The logged in user is not allowed to use the selected function Contact the administrator If the printing does not start contact your service representative The contents of errors may be printed on the Configuration Page Check the Configuration Page in conjunction with the error log For detail...

Page 172: ...isplay 1 Press the Printer key to display the printer screen BBT053S 2 Press Error Log An error log list appears 3 Press the desired job list and then press Details A detailed error log appears 4 Troubleshooting When Using the Printer Function 68 4 ...

Page 173: ...l Settings Guide Printing does not start The correct interface cable is not being used The type of interface cable you should use depends on the computer Be sure to use the correct one If the cable is damaged or worn replace it See Connecting to the Interfaces General Settings Guide Printing does not start The interface cable was connected after the machine was switched on Connect the interface ca...

Page 174: ...rd or driver encryption key is invalid Check the login user name login password or driver encryption key Printing does not start Advanced encryption has been set using the Extended Security function Check the settings of the Extended Security function with the administrator Data In indicator does not light up or flash If the Data In indicator does not light up or flash even after the print job sta...

Page 175: ...light up or blink Check if the print port setting is correct When it is connected using a parallel interface connect it to LPT1 or LPT2 For Windows 2000 1 Click the Start button point to Settings and then click Printers 2 Click the icon of the machine On the File menu click Properties 3 Click the Ports tab 4 In the Print to the following port s list confirm the correct port is selected For Windows...

Page 176: ... For Windows Vista 1 Click the Start button and then click Control Panel 2 Click Printers 3 Click the icon of the machine On the Organize menu click Properties 4 Click the Ports tab 5 In the Print to the following port s list confirm the correct port is selected Network connection Contact the network administrator 4 Troubleshooting When Using the Printer Function 72 4 ...

Page 177: ...r the entire page The paper is damp Use paper that has been stored in the recommended temperature and humidity condition See Paper Storage About This Machine The printed image is faded over the entire page The paper is unsuitable Use recommended paper Printing on coarse or treated paper might result in faint print image See Recommended Paper Sizes and Types About This Machine The printed image is ...

Page 178: ...dding Toner When printing graphics the output and the screen are different If the printer driver is configured to use the graphics command the graphics command from the machine is used to print If you want to print accurately set the printer driver to print without using the graphics command See the printer driver Help Lines of garbled or unwanted alphanumeric characters appear An incorrect printe...

Page 179: ...ngs dialog box and then on the Image Adjustments tab change the Dithering setting See the printer driver Help If the problem continues after you change the dithering settings use the settings of the application in which the image was created to change the thickness of the lines When paper is not fed properly Problem Cause Solution Paper is not fed from the selected tray When you are using a Window...

Page 180: ...Paper Sizes and Types and Paper Storage About This Machine Misfeeds occur frequently Printed paper is being used Do not use paper that has been already copied or printed onto Misfeeds occur frequently The paper tray s side fences are set too tightly Push the side fences lightly and then reset it Also we recommend you set at least 20 sheets of thick paper Copy paper becomes creased The paper is dam...

Page 181: ...t when printing such data If the Data In indicator is blinking data has been received by the printer Wait for a moment Changing the following settings with the printer driver may help speed up printing On the Print Quality tab select Speed in the Document type area On the Print Quality tab open the Change User Settings dialog box and then on the Image Adjustments tab specify a lower value for Reso...

Page 182: ...erface Settings in the System Settings menu Change the setting of Signal Control to Printer priority See Interface Settings General Settings Guide PDF files do not print out cannot perform PDF direct print PDF files are password protected To print password protected PDF files enter the password in the PDF Menu or on Web Image Monitor For details see Printing a PDF File Directly Printer Reference o...

Page 183: ... Reduce the number of jobs Printing by Bluetooth is slow A communication error might have occurred Interference from the wireless LAN devices can reduce communication speed Bluetooth transmission speeds are not high Remove the machine from close proximity with the wireless LAN devices If there are active wireless LAN devices or other Bluetooth devices nearby relocate the machine or disable those d...

Page 184: ...4 Troubleshooting When Using the Printer Function 80 4 ...

Page 185: ...own The original was placed upside down Place the original in the correct orientation See Setting of Original Feed Type Scanner Reference No image results from scanning The original was placed with the front and back reversed When the original is placed directly on the exposure glass the side to be scanned must face down When the original is fed via the ADF the side to be scanned must face up Imag...

Page 186: ... from unauthorized copying Check the document For details about how to prevent unauthorized copying of the document see Using Data security for copying Printer Reference After an original is scanned the following settings are canceled Destination Sender E mail text Subject and File name To prevent the scanned data being sent to the wrong destination this machine has a function that cancels the set...

Page 187: ...describes likely causes of and possible solutions for the network browsing failing to operate when files are sent Problem Cause Solution The network cannot be browsed when specifying the destination folder The following machine settings may not be correct IP address Subnet Mask Check the settings See Connecting the Machine General Settings Guide When the TWAIN Driver Cannot Be Started This section...

Page 188: ...pecified Contact the administrator Cannot use the network delivery function The network delivery function setting is not correct Specify it correctly See Network Settings Required to Use the Network Delivery Scanner General Settings Guide When S MIME Cannot Be Used This section describes likely causes of and possible solutions for S MIME related problems Problem Cause Solution If several destinati...

Page 189: ...le solutions for messages that appear and when the machine fails to operate Message Cause Solution Destination list machine settings are updated Selected destinations or function settings have been cleared Please re select the settings The destination list is being updated from the network using SmartDeviceMonitor for Admin Depending on the number of destinations to be updated there may be some de...

Page 190: ...inistrator for the correct login user name and login password Authentication has failed The machine cannot perform authentication Contact the administrator Authentication with the destination has failed Check settings To check the current status press Scanned Files Status The entered user name or password was invalid Check that the user name and password are correct Check that the ID and password ...

Page 191: ...ral Settings Guide Destinations to which encrypted files will be sent contain users without certificates or with invalid certificates Check the destinations The destination s S MIME certificates are invalid or cannot be found Contact the administrator Destinations to which encrypted files will be sent contain users that could not be verified by the certificates Check the destinations S MIME certif...

Page 192: ...m number of specifiable alphanumeric characters in a path has been exceeded The maximum number of characters whichcanbeenteredforthepathis256 Check the number of character you entered and then enter the path again Exceeded max number of alphanumeric characters The maximum enterable number of alphanumeric characters has been exceeded Make sure the maximum number of characters which can be entered a...

Page 193: ...he number of scanned pages exceeded maximum page capacity Select whether to send the data so far Exceeded maximum number of file to store Delete all unnecessary files Too many files are waiting to be delivered Please try again after they have been delivered Exceeded time limit for LDAP server search Check the server status A network error has occurred and connection has failed Try the operation on...

Page 194: ...ring or sending by e mail while storing in the Document Server only some of the pages could be scanned Specify whether to use the data or not No paper Load paper of one of the following sizes No paper is set in the specified paper tray Load paper of the sizes listed in the message See p 97 Loading Paper Originalisbeingscannedby another function Switch to the following function then press the Stop ...

Page 195: ...ting status cleared or the DeskTopBinder setting and then change the user name Sending the data has failed The data will be resent later A network error has occurred and a file was not sent correctly Wait until sending is retried automatically after the preset interval If sending fails again contact the network administrator Some invalid destination s contained Do you want to select only valid des...

Page 196: ...urred and the file could not be sent correctly Try the operation once more If the message is still shown the network may be crowded Contact the network administrator If multiple files were sent use the Scanned Files Status screen to check for which file the problem occurred Updating the destination list has failed Try again Anetworkerrorhasoccurred Check whether the server is connected Updating th...

Page 197: ...es has been exceeded The maximum number of modes that can be stored is 100 Delete unneeded modes Cannot connect to the scanner Check the network Access Mask settings in User Tools An access mask is set Contact the network or scanner administrator Cannot detect the paper size of the original Specify the scanning size The set original was misaligned Place the original correctly Specify the scan size...

Page 198: ... is 100 Delete unneeded scanning area Clear Misfeed s in ADF A paper misfeed has occurred inside the ADF Remove jammed originals and place them again For details see p 117 Removing Jammed Paper Check whether the originals are suitable to be scanned by the machine Communication error has occurred on the network A communication error has occurred on the network Check whether the client computer can ...

Page 199: ...Reset the scan size Lower the resolution Set with no compression See TWAIN Driver help Theproblemmaybeduetothefollowing cause Scanning cannot be performed if large values are set for brightness when using halftone or high resolution See Relationship between Resolution and Scan Size Scanner Reference Invalid Winsock version Please use version 1 1 or higher You are using an invalid version of Winsoc...

Page 200: ... is not available Check the scanner connection status The machine s main power switch is off Set the main power switch to On Scanner is not available Check the scanner connection status The machine is not connected to the network correctly Check whether the machine is connected tothe networkcorrectly Deselect the personal firewall function of the client computer For details see Windows Help Use an...

Page 201: ...aper sizes and types see Recommended Paper Sizes and Types About This Machine To load paper in the bypass tray see Copying from the Bypass Tray Copy Document Server Reference Loading Paper into the Paper Trays This section describes how to load paper into the paper trays Various sizes of paper can be loaded in the paper trays by adjusting the positions of side fences and end fence Check the paper ...

Page 202: ...T uses 81 2 11 paper exclusively Only load 81 2 11 paper If you want to load A4 contact your service representative Align the paper stacks and load them against the left and right walls or a paper misfeed might occur Each tray hold up to 1 000 sheets of paper Do not stack paper over the limit mark 1 Carefully pull out tray 3 LCT until it stops BBR023S 6 Adding Paper Toner and Staples 98 6 ...

Page 203: ...capacity tray LCT uses 81 2 11 paper exclusively If you want to load A4 or B5 JIS Japanese Industrial Standard contact your service representative Align the paper stacks and load them against the left and right walls or a paper misfeed might occur The tray can hold up to 1 200 sheets of paper Do not stack paper over the limit mark 1 Open the top cover of the large capacity tray LCT BBR004S 2 Load ...

Page 204: ... fixed top to bottom or two sided paper for example letterhead paper punched paper or copied paper might not print correctly depending on how the originals and paper are placed Set Letterhead Setting to Yes in Input Output under Copier Document Server Features and then place the original and paper as shown below For details about Letterhead Setting see Copier Document Server Features General Setti...

Page 205: ...Original Orientation Exposure glass ADF copy scanner Paper Orientation BBR036S Loading Paper 101 6 ...

Page 206: ...s see Recommended Paper Sizes and Types About This Machine Changing the Paper Size in the Paper Trays This section describes how to change the paper size in the paper trays If a paper tray is pushed vigorously when putting it back into place the position of the tray s side fences may slip out of place Do not stack paper over the limit mark Check the paper edges are aligned with the right side Slid...

Page 207: ...slide the side fences until they are aligned with the paper size you want to load BBR009S 5 Slide the end fence until it is aligned with the size of paper to you want to load BBR010S 6 Square the paper and load it print side up Re lock the side fences again Changing the Paper Size 103 6 ...

Page 208: ...atically Detected If you load a paper size that is not selected automatically you need to specify the paper size with the control panel This section describes how to load such paper 1 Press the User Tools Counter key BBT052S 2 Press System Settings 3 Press Tray Paper Settings tab 6 Adding Paper Toner and Staples 104 6 ...

Page 209: ... initial display is shown For details about paper sizes selected automatically see Recommended Paper Sizes and Types About This Machine If you want to print on paper that is selected automatically after printing on a paper size that is not selected automatically you must return the setting to Auto Detect Reload the paper and select Auto Detect in step 5 The setting is returned to Auto Detect Chang...

Page 210: ...sary Avoid getting toner on your clothes or skin when removing a paper jam or replacing toner If your skin comes into contact with toner wash the affected area thoroughly with soap and water If toner gets on your clothing wash with cold water Hot water will set the toner into the fabric and may make removing the stain impossible Do not open toner containers forcefully Toner can spill dirtying your...

Page 211: ...an check name of the required toner name and the replacement procedure using the Add Toner screen Press System Status to check contact number where you can order supplies See Checking Machine Status and Settings p 9 Checking Machine Status and Settings Removing Toner This section describes how to remove toner BBR026S Inserting Toner This section describes how to insert toner Adding Toner 107 6 ...

Page 212: ...munications executed after the toner has run out and not listed in the automatically output Journal exceeds 200 communication is not possible 1 Make sure the machine is in facsimile or scanner mode 2 Press Exit and then perform transmission operation The error message disappears Any reports are not printed If the fax or scanner screen does not appear in step 1 press the Facsimile key or the Scanne...

Page 213: ...re used Bring the stored used container to your sales representative or service representative for recycling through our recycling system If you discard it on your own treat it as general plastic waste material Adding Toner 109 6 ...

Page 214: ...you use a staple cartridge other than that recommended If you cannot pull out the upper unit there are staples remaining inside the cartridge Use all the staples and do not add more Refill the stapler according to the finisher type Check the type if you are unsure For details about type of finisher see Appendix About This Machine 1000 sheet Finisher This section describes how to add staples to the...

Page 215: ...3000 sheet Finisher This section describes how to add staples to the 3000 sheet finisher BAZ033S Booklet Finisher This section describes how to add staples to the booklet finisher Adding Staples 111 6 ...

Page 216: ...BAZ034S Booklet Finisher Saddle Stitch This section describes how to add staples to the booklet finisher Saddle Stitch 6 Adding Paper Toner and Staples 112 6 ...

Page 217: ...BAZ035S Adding Staples 113 6 ...

Page 218: ...le and scanner functions Do not add ink to the cartridge by yourself Neglecting this can cause ink leakage Be sure not to dirty your fingers with ink from the cartridge Use the cartridge specified for this machine 1 Open the ADF cover BBR012S 2 Raise lever P2 and then pull open cover P2 BBR013S 6 Adding Paper Toner and Staples 114 6 ...

Page 219: ...n open the cover P3 BBR014S 4 Pull out the old stamp cartridge BBR015S 5 Insert the new stamp cartridge Push in the cartridge until the metal parts are no longer visible BBR016S 6 Close cover P3 P2 and the ADF cover Replacing the Stamp Cartridge 115 6 ...

Page 220: ...6 Adding Paper Toner and Staples 116 6 ...

Page 221: ...fed paper Keep your hands clear of the booklet finisher tray when pulling out or pushing in the finisher s staple unit You can trap your fingers if you do not When clearing misfeeds do not turn off the operation switch If you do your copy settings will be lost To prevent misfeeds do not leave any torn scraps of paper inside the machine Contact your service representative if misfeeds occur frequent...

Page 222: ...aper 2 After each step is complete press Next To go back to the previous step press Previous 3 When all jammed paper is removed restore the machine to the original state More than one misfeed may be indicated When this happens check all the areas indicated 7 Clearing Misfeeds 118 7 ...

Page 223: ...s explicitly indicated in the manual Do not remove the fusing unit Doing so will result in loss of print quality Inside the finisher or inside the front cover there is a sticker explaining how to remove misfed paper If a detailed removal instruction appears on the right of the screen follow it You can also use the procedure indicated in System Status to remove jammed paper When A is displayed BBR0...

Page 224: ...When C is displayed BBR030S When D is displayed BBR031S 7 Clearing Misfeeds 120 7 ...

Page 225: ...When P is displayed BBR040S Removing Jammed Paper 121 7 ...

Page 226: ...When R1 R5 is displayed in the case of 1000 sheet finisher BBT034S When R1 R4 is displayed in the case of 3000 sheet finisher BBR043S 7 Clearing Misfeeds 122 7 ...

Page 227: ...When R5 R8 is displayed in the case of 3000 sheet finisher BAZ052S Removing Jammed Paper 123 7 ...

Page 228: ...When R1 R4 is displayed in the case of booklet finisher BBR046S When R5 R7 is displayed in the case of booklet finisher BAZ054S 7 Clearing Misfeeds 124 7 ...

Page 229: ...When R8 R12 is displayed in the case of booklet finisher BAZ055S When U is displayed BBR047S Removing Jammed Paper 125 7 ...

Page 230: ...When Y is displayed BBR032S When Y is displayed in the case of Large Capacity Tray LCT BBR033S When Z is displayed BBR034S 7 Clearing Misfeeds 126 7 ...

Page 231: ...void this turn paper over in the tray When the finisher is installed after removing jammed staples staples will not be ejected the first few times you try to use the stapler Remove the jammed staples according to the finisher type Check the type if you are unsure For details about type of finisher see Appendix About This Machine 1000 sheet Finisher This section describes how to remove jammed stapl...

Page 232: ...isher This section describes how to remove jammed staples from the 3000 sheet finisher BAZ060S Booklet Finisher This section describes how to remove jammed staples from the booklet finisher 7 Clearing Misfeeds 128 7 ...

Page 233: ...BAZ061S Booklet Finisher Saddle Stitch This section describes how to remove jammed staples from the booklet finisher Removing Jammed Staples 129 7 ...

Page 234: ...BAZ062S 7 Clearing Misfeeds 130 7 ...

Page 235: ...yed until the punch waste box is reinstalled If the message is still displayed reinstall the punch waste box 3000 sheet Finisher and Booklet Finisher This section describes how to remove punch wastes from the 3000 sheet finisher and booklet finisher 1 Open the finisher front cover BBR017S 2 Pull out the punch waste box carefully and then remove punch waste BAY035S Removing Punch Waste 131 7 ...

Page 236: ...3 Reinstall the punch waste box BAY036S 4 Close the finisher front cover Hole Punch Receptacle is full disappears 7 Clearing Misfeeds 132 7 ...

Page 237: ...Before moving the machine be sure to disconnect all external connections especially the power cord from the wall outlet Damaged power cords are a fire and electric shock hazard Unplug the power cord from the wall outlet before you move the machine While moving the machine you should take care that the power cord will not be damaged under the machine Be careful when moving the machine Take the foll...

Page 238: ...machineiswellventilatedandspacious Goodventilation is especially important when the machine is used heavily Temperature 10 32 C 50 89 6 F humidity to be 54 at 32 C 89 6 F Humidity 15 80 temperature to be 27 C 80 6 F at 80 A strong and level base The machine must be level within 5 mm 0 2 inch both front to rear and left to right To avoid possible buildup of ozone make sure to locate this machine in...

Page 239: ...ront cover of this manual Connect the power cord directly into a wall outlet and do not use an extension cord Do not damage break or make any modifications to the power cord Do not place heavy objects on it Do not pull it hard nor bend it more than necessary These actions could cause an electric shock or fire If the power cord is damaged exposure of the core disconnection etc contact your service ...

Page 240: ...n the stand by position the optional anti condensation heaters are on In an emergency unplug the machine s power cord When you unplug the power cord the anti condensation heaters turn off Make sure the plug is inserted firmly in the wall outlet Voltage must not fluctuate by more than 10 The wall outlet shall be installed near the machine and shall be easily accessible 8 Remarks 136 8 ...

Page 241: ...occur Do not clean parts other than those explicitly specified in this manual Other parts should only be cleaned by your service representative How to maintain Wipe the machine with a soft damp cloth and then wipe it with a dry cloth to remove the water Cleaning the Exposure Glass This section describes how to clean the exposure glass and the scanning glass BBR020S Clean 1 and 2 Cleaning the Auto ...

Page 242: ...BBR022S Clean 1 and 2 8 Remarks 138 8 ...

Page 243: ...rver 27 Duplex 27 E Edit 27 Enquiry 9 Environments to avoid 134 Error log 61 67 Error Mail Notification 54 Error occurs using Internet Fax 54 Error Report E mail 54 F Facsimile function 37 H How to read this manual 6 I If an error report is printed 52 If USB connection fails 58 Indicators 7 Inserting toner 107 J Job is not performed 18 L Large capacity tray LCT 99 Loading paper 97 Loading paper in...

Page 244: ...n 46 Transmission Reception 46 Tray 3 LCT 98 Turning off the main power In the event of power failure 53 TWAIN 92 TWAIN driver cannot be started 83 U Used toner 109 W When A is displayed 119 When an indicator to the right of a function key is lit 12 When B is displayed 119 When C is displayed 120 When D is displayed 120 When memory is full 51 When P is displayed 121 When paper is not fed properly ...

Page 245: ...When Z is displayed 126 Where to put your machine 133 Windows 2000 55 Windows Server 2003 2003 R2 55 Windows Vista 56 Windows XP Home Edition 56 Windows XP Professional 55 141 ...

Page 246: ...MEMO 142 ...

Page 247: ...MEMO 143 ...

Page 248: ...MEMO 144 EN USA D012 7804 ...

Page 249: ...ight be trademarks of their respective companies We disclaim any and all rights to those marks The proper names of the Windows operating systems are as follows The product names of Windows 2000 are as follows Microsoft Windows 2000 Professional Microsoft Windows 2000 Server Microsoft Windows 2000 Advanced Server The product names of Windows XP are as follows Microsoft Windows XP Professional Micro...

Page 250: ... 9040 9040b MP 4000 MP 4000B LD040 LD040B Aficio MP 4000 Aficio MP 4000B Type for 9050 9050b MP 5000 MP 5000B LD050 LD050B Aficio MP 5000 Aficio MP 5000B Operating Instructions Troubleshooting D012 7804 EN USA ...

Page 251: ...dix 1 2 3 4 Read this manual carefully before you use this machine and keep it handy for future reference For safe and correct use be sure to read the Safety Information in About This Machine before using the machine 5 Operating Instructions Copy Document Server Reference ...

Page 252: ...ality of copying or printing certain items consult with your legal advisor Notes Some illustrations in this manual might be slightly different from the machine Certain options might not be available in some countries For details please contact your local dealer Depending on which country you are in your machine may include certain options as standard For details please contact your local dealer Ca...

Page 253: ...s and other consumables Copy Document Server Reference Explains Copier and Document Server functions and operations Also refer to this manual for explanations on how to place originals Facsimile Reference Explains Facsimile functions and operations Printer Reference Explains Printer functions and operations Scanner Reference Explains Scanner functions and operations Network Guide Explains how to c...

Page 254: ...t Explains how to set up and use PostScript 3 UNIX Supplement For UNIX Supplement please visit our Web site or consult an authorized dealer This manual includes descriptions of functions and settings that might not be available on this machine Information Contains general notes on the machine and information about the trademarks of product names used in the manuals Other manuals Manuals for DeskTo...

Page 255: ...rations Reducing Enlarging Originals by Specifying the Paper Size The machine automatically detects the original size and then selects an appropriate reproduction ratio based on the paper size you select Auto Reduce Enlarge See p 46 Auto Reduce Enlarge BAS033S Saving Paper The Duplex and Combine functions allow you to save paper Duplex Copies two 1 sided pages or one 2 sided page onto a 2 sided pa...

Page 256: ...ine Combines up to eight pages of originals onto one side of a sheet See p 52 One Sided Combine BAS038S BAS041S Two Sided Combine Combines up to 16 pages of originals onto two sides of one sheet See p 56 Two Sided Combine 4 ...

Page 257: ...an copy onto various types of paper such as thick paper See p 42 Copying onto Special Paper Creating a Booklet or Magazine Copies two or more originals in page order Booklet Make copies in page order for a folded booklet See p 132 Booklet Magazine 5 ...

Page 258: ... 2 Open to right BAT106S 1 Open to left 2 Open to right Magazine Copies two or more originals to make copies in page order when they are folded and stacked See p 132 Booklet Magazine BAT107S 1 Open to left 2 Open to right 6 ...

Page 259: ...als Such as Books Copies bound originals onto one side or both sides of a sheet Series Copies Separately copies the front and back of a 2 sided original or the two facing pages of a bound original onto two sheets See p 130 Series Copies BAS103S BAS104S 7 ...

Page 260: ...t display contain the functions you use most often For example if the default selection is the Duplex function but the function you use most frequently is 1 sided copying you can change the default selection to 1 sided copying instead For details see Registering the Initial Display s Default Functions You can also store frequently used copy job settings in the machine memory and recall them for fu...

Page 261: ...ng Optional Configurations 14 Display 15 Simplified Display 16 1 Placing Originals Originals 17 Sizes and Weights of Recommended Originals 17 Sizes Detectable with Auto Paper Select 18 Missing Image Area 21 Placing Originals 22 Original Orientation 22 Left Original Beeper 24 Placing Originals on the Exposure Glass 24 Placing Originals in the ADF 25 Batch Mode 26 SADF Mode 27 Mixed Sizes Mode 28 Sp...

Page 262: ...e Document Server 73 Managing Jobs 75 Job List Screen 75 Checking Jobs in the Job List 76 Changing the Order of Jobs 77 Holding Jobs 77 Deleting Jobs 78 Checking the Job History 79 Registering Frequently Used Functions 80 Registering Functions in a Program 80 Changing a Stored Program 81 Recalling a Stored Program 82 Deleting a Stored Program 82 Registering the Initial Display s Default Functions ...

Page 263: ...nch 98 Create Margin 100 Stamps 101 Background Numbering 101 Preset Stamp 102 User Stamp 105 Date Stamp 109 Page Numbering 112 Advanced Copier Functions 118 Margin Adjustment 118 Erase Center Border 119 Image Repeat 125 Double Copies 127 Centering 128 Positive Negative 130 Series Copies 130 Booklet Magazine 132 Covers 137 Designate 139 Chapters 140 Slip Sheets 142 4 Document Server Relationship be...

Page 264: ...of a Stored Document 156 Checking the Details of a Stored Document 156 Searching for Stored Documents 157 Printing Stored Documents 159 Deleting a Stored Document 165 Displaying Stored Documents with Web Image Monitor 166 Downloading Stored Documents with Web Image Monitor 166 5 Appendix Function Compatibility 169 Supplementary Information 171 User Tools Menu Copier Document Server Features 182 IN...

Page 265: ...es could result in moderate or minor injury or damage to the machine or to property Be sure to read these notes They can be found in the Safety Information section of About This Machine Indicates points to pay attention to when using the machine and explanations of likely causes of paper misfeeds damage to originals or loss of data Be sure to read these explanations Indicates supplementary explana...

Page 266: ...000 sheet finisher 3000 sheet finisher booklet finisher Staple Center Booklet finisher Punch 3000 sheet finisher or booklet finisher and punch unit Series Copies HDD Background Numbering HDD Preset Stamp HDD User Stamp HDD Store File Document Server HDD Depending on the model you are using some options may be provided as standard For more information see Options About This Machine The bridge unit ...

Page 267: ...in User Tools For details see Copier Document Server Features General Settings Guide 4 Displays the numbers of originals scanned copies set and copies made 5 Press the key to confirm the current settings 6 Displays the Shortcut keys You can register frequently used functions under General Features in User Tools For details see Copier Document Server Features General Settings Guide 7 Displays Sort ...

Page 268: ...display Letters and keys are displayed at a larger size making operations easier BCU031S Example of a simplified display BCU032S 1 Key Color Press to increase screen contrast by changing the color of the keys This is available only for the simplified display To return to the initial display press the Simplified Display key again Certain keys do not appear on the simplified display 16 ...

Page 269: ...etric version Original location Original size Original weight Exposure glass Up to A3 ADF One sided originals A3 B6 JIS Japanese Industrial Standard 40 128 g m2 35 110 kg Two sided originals A3 A5 52 128 g m2 45 110 kg Inch version Original location Original size Original weight Exposure glass Up to 11 17 ADF One sided originals 11 17 51 2 81 2 10 34 lb Two sided originals 11 17 51 2 81 2 14 34 lb...

Page 270: ...as translucent paper Thin or highly flexible originals Thick originals such as postcards Originals of inappropriate weight Bound originals such as books Transparent originals such as OHP transparencies or translucent paper Originals that are still wet with ink or correction fluid The original might become dirty if it is written with a pencil or a similar tool Sizes Detectable with Auto Paper Selec...

Page 271: ...1 2 13 If you want to switch the detectable size from 81 2 13 to 8 13 or 81 4 13 contact your service representative Inch version Size A3 A4 11 17 81 2 14 81 2 11 51 2 81 2 10 14 71 4 101 2 Original location Exposure glass 1 1 6 ADF 2 3 4 5 Detectable size Undetectable size 1 Default is 81 2 11 If you want to switch the detectable size from 81 2 11 to A4 contact your service representative 2 Defau...

Page 272: ...zes Sizes difficult to detect It is difficult for the machine to detect the sizes of the following originals so select the paper size manually Originals with indexes tags or other projecting parts Transparent originals such as OHP transparencies or translucent paper Dark originals with a lot of text and drawings Originals which partially contain a solid image Originals which have solid images at t...

Page 273: ...DF or on the exposure glass correctly margin of a few millimeters on all four sides of the original might not be copied BAT019S 1 0 5 4 5 mm 0 02 0 18 inch 2 0 0 mm 4 0 mm 0 02 0 16 inch 3 0 5 3 5 mm 0 02 0 14 inch 4 1 0 5 0 mm 0 04 0 20 inch Originals 21 1 ...

Page 274: ...When using the ADF place it face up BAT020S 1 ADF 2 Exposure glass When you cannot place the original as the above you may not make copies as you want with particular functions If this happens change the orientation by selecting the unreadable orientation Readable orientation Select this mode when the original orientation is the same as the copy paper orientation Unreadable orientation Select this...

Page 275: ...BAT021S 1 Press Special Original 2 Select the original orientation and then press OK Placing Originals 23 1 ...

Page 276: ...cing Originals on the Exposure Glass Place originals on the exposure glass Do not lift the exposure glass cover or the ADF forcefully Otherwise the cover of the ADF might open or be damaged 1 Lift the exposure glass cover or the ADF Be sure to lift the exposure glass cover or the ADF by more than 30 degrees Otherwise the size of the original might not be detected correctly 2 Place the original fac...

Page 277: ...e a malfunction BCY002S 1 Sensors Settings should be made in the following situations When placing originals consisting of more than 100 pages See Batch Mode When placing originals one by one See SADF Mode When copying originals of various sizes See Mixed Sizes Mode When placing custom size originals See Custom sizes 1 Adjust the document guide to the original size 2 Set the aligned originals face...

Page 278: ...he original before placing it on the ADF Set the original squarely p 26 Batch Mode p 27 SADF Mode p 28 Mixed Sizes Mode p 30 Custom sizes Batch Mode In Batch mode the machine copies an original of more than 100 pages as one document even if it is placed on the ADF in parts Place special originals such as translucent paper one by one 1 Placing Originals 26 1 ...

Page 279: ...Switch to Batch in User Tools For details about Switch to Batch see Copier Document Server Features General Settings Guide To copy subsequent originals in this mode repeat step 4 When the Sort Combine or 1 Sided 2 Sided function has been set press the key after all originals have been scanned SADF Mode In SADF mode even when an original is placed page by page in the ADF each page is automatically ...

Page 280: ...thin a specified time after the previous original has been fed You can adjust this time under SADF Auto Reset in User Tools For details see Copier Document Server Features General Settings Guide Mixed Sizes Mode When placing different size originals in the ADF together the machine automatically checks the size of the originals and makes copies When placing originals of different sizes in the ADF a...

Page 281: ... the original size 5 Place originals in the ADF 6 Press the Start key For details about weights of paper that can be used with this mode and other relevant information see Supplementary Information p 171 Supplementary Information Specifying Original Sizes Specify the size of the originals Regular sizes Select the size of the originals from the regular sizes 1 Press Special Original Placing Origina...

Page 282: ...originals in the ADF specify the size of the originals Paper that has a vertical length of 105 297 mm 4 2 11 6 inches and a horizontal length of 128 1260 mm 5 1 49 6 inches can be placed with this function If the ADF is not installed the maximum length in horizontal direction is 432 mm 17 inches 1 Press Special Original 2 Press Original Size 3 Press Custom Size 1 Placing Originals 30 1 ...

Page 283: ...hen press 5 Enter the vertical size with the number keys and then press 6 Press OK twice 7 Place the originals and then press the Start key To change the value you entered press the item you want to change and then enter a new value Placing Originals 31 1 ...

Page 284: ...1 Placing Originals 32 1 ...

Page 285: ...s see When the Authentication Screen is Displayed About This Machine To copy onto paper other than plain paper specify the paper type under Tray Paper Settings in User Tools For details about Tray Paper Settings see System Settings General Settings Guide 1 Make sure Ready appears on the screen If any other function is displayed press the Copy key on the left side of the control panel Initial copy ...

Page 286: ...d values press the Clear Stop key or Cancel on the screen To confirm settings press Check Modes You can change the maximum copy quantity under Max Copy Quantity in User Tools For details about Max Copy Quantity see Copier Document Server Features General Settings Guide Interrupt Copy Use this function if you want to interrupt a long copy job to make urgently needed copies You cannot use the Interr...

Page 287: ... press the Start key Following the instructions on the display The previous copy job settings are restored Simply press the Start key to continue copying from where it left off Job Preset You can make settings for the next copy job during copying If a long copy job is in progress and you do not want to wait for it to finish you can use this function to set up the next copy job in advance When the ...

Page 288: ...initial copy display appears After the current copy job the next copy job starts automatically You can switch the display to the current copy job by pressing To Copying Screen You can switch the display to the preset job by pressing To Reserv Screen Preset copy jobs are registered under job numbers in the Reserv Screen You can confirm and delete preset jobs For details about the procedures see Man...

Page 289: ...es as regular size copy paper Metric version A3 A4 A5 A6 Inch version 11 17 81 2 11 51 2 81 2 If you want to use the size of paper other than the above be sure to specify the size When copying onto OHP transparencies paper lighter than 60 g m2 about 16 lb or heavier than 82 g m2 about 22 lb you need to specify the type and size of paper under Tray Paper Settings in User Tools For details about Tra...

Page 290: ...e paper 5 Press OK 6 Place the originals and then press the Start key 7 When the copy job is finished press the Clear Modes key to clear the settings Load only as much paper as can be held between the guides on the bypass tray Overloading the bypass tray can result in misfeeds and skewed images To support A4 81 2 11 or larger paper sizes pull out the extender To prevent multiple sheets from being ...

Page 291: ...oving through the machine This noise does not indicate a malfunction For standard paper sizes that can be used with the bypass tray see Supplementary Information p 84 Registering the Initial Display s Default Functions p 171 Supplementary Information Copying onto Regular Size Paper Makes copies onto regular size paper from the bypass tray 1 Open the bypass tray and then insert the paper face down ...

Page 292: ...the beep 2 Align the paper guides to the paper size by pinching the clip 3 Press Bypass and then press the key 4 Press Custom Size 5 Enter the horizontal size with the number keys and then press 6 Enter the vertical size with the number keys and then press 7 Press OK 8 Place the originals and then press the Start key To change the value you entered press the item you want to change and then enter ...

Page 293: ...s and then press 4 Enter the vertical size with the number keys and then press 5 Press Program The confirmation screen appears 6 Press Exit 7 Press OK Recalling the registered custom size Recalls the registered paper size 1 Press Bypass and then press the key 2 Press Custom Size 3 Press Recall The registered size is displayed Copying from the Bypass Tray 41 2 ...

Page 294: ...en the bypass tray and then insert the paper face down until you hear the beep 2 Align the paper guides to the paper size by pinching the clip 3 Press Bypass and then press the key 4 Select the paper type in Special Paper 5 Specify the paper size and then press OK 6 Place the originals and then press the Start key When copying onto OHP transparencies use A4 or 81 2 11 size sheets and specify its s...

Page 295: ...set Reduce Enlarge This function allows you to reduce or enlarge images by selecting a preset ratio You can register up to three frequently used reproduction ratios other than the preset Reduce Enlarge ratios BAS030S Base Point The base point of Reduce Enlarge differs depending on how the original is scanned When the original is placed on the exposure glass the upper left corner will be the base p...

Page 296: ...ratio and then press OK 3 Place the originals and then press the Start key You can change reproduction ratios shown on the initial display under Reproduction Ratio in User Tools For details about Reproduction Ratio see Copier Document Server Features General Settings Guide Zoom You can specify the reproduction ratio in increments of 1 2 Basic Copying 44 2 ...

Page 297: ...ge 2 Select a preset ratio which is close to the desired ratio 3 Adjust the ratio with and Press or changestheratioinincrementsof1 Pressingandholdingdown or changes it in increments of 10 4 Press OK 5 Place the originals and then press the Start key Reducing or Enlarging Originals 45 2 ...

Page 298: ... Enter the desired ratio with the number keys and then press 4 Press OK twice 5 Place the originals and then press the Start key To change the value you entered press Clear and then enter a new value Auto Reduce Enlarge The machine automatically detects the original size and then selects an appropriate reproduction ratio based on the paper size you select 2 Basic Copying 46 2 ...

Page 299: ...s placed is different from that of the paper you are copying onto the machine rotates the original image by 90 degrees and fits it on the copy paper Rotate Copy For example to reduce A3 11 17 originals to fit onto A4 81 2 11 paper select a paper tray containing A4 81 2 11 paper and then press Auto Reduce Enlarge The image is automatically rotated BAT179S For details about Rotate Copy see Rotate Co...

Page 300: ...S A5 B6 JIS 11 17 81 2 11 81 2 13 Inch version Original location Original size and orientation Exposure glass 11 17 81 2 14 81 2 11 ADF A3 A4 11 17 81 2 14 81 2 11 51 2 81 2 10 14 71 4 101 2 1 Press Auto Reduce Enlarge 2 Select the paper size 3 Place the originals and then press the Start key p 93 Rotate Copy 2 Basic Copying 48 2 ...

Page 301: ... function is 60 169 g m2 16 45 5 lb 1 Sided 2 Sided Copies two 1 sided pages on one 2 sided page BAS034S 2 Sided 2 Sided Copies one 2 sided page on one 2 sided page BAS035S Original orientation and completed copies The resulting copy image will differ according to the orientation in which you place your originals or The table shows the orientation of images on the front and back of copies not the ...

Page 302: ...BAT036S 1 Press Dup Combine Series 2 Make sure that Duplex is selected If Duplex is not selected press Duplex 2 Basic Copying 50 2 ...

Page 303: ...posure glass or in the ADF using Batch mode press the key after all the originals have been scanned You can specify the margins under Edit in User Tools For details about Edit see Copier Document Server Features General Settings Guide For standard paper sizes that can be used with the Duplex function see Supplementary Information p 22 Original Orientation p 118 Margin Adjustment p 171 Supplementar...

Page 304: ...n Duplex Mode and Copy Orientation in Duplex Mode in User Tools For details see Copier Document Server Features General Settings Guide One Sided Combine Combine several pages onto one side of a sheet You cannot use the bypass tray with this function There are six types of One Sided Combine 1 Sided 2 Pages Combine 1 Side Copies two 1 sided originals to one side of a sheet 2 Basic Copying 52 2 ...

Page 305: ... 1 sided originals to one side of a sheet BAS039S 1 Sided 8 Pages Combine 1 Side Copies eight 1 sided originals to one side of a sheet BAS040S 2 Sided 1 Page Combine 1 Side Copies one 2 sided original to one side of a sheet Duplex Combined Copying 53 2 ...

Page 306: ...wo 2 sided originals to one side of a sheet BAS042S 2 Sided 4 Pages Combine 1 Side Copies four 2 sided originals to one side of a sheet BAS043S Orientation of the original and image position of combine Portrait originals BAS044S 2 Basic Copying 54 2 ...

Page 307: ...inals BAS045S Placing originals originals placed in the ADF Originals read from left to right BAT046S Originals read from top to bottom BAT047S 1 Press Dup Combine Series 2 Press Combine Duplex Combined Copying 55 2 ...

Page 308: ...press the key after all the originals have been scanned If you selected 2 Sided for Original you can change the orientation See Originals and copy orientation You can change the initial settings for 1 Sided Combine under Edit in User Tools For details see Copier Document Server Features General Settings Guide p 51 Originals and copy orientation Two Sided Combine Combines various pages of originals...

Page 309: ...our pages per side BAT048S 1 Front 2 Back 1 Sided 16 Pages Combine 2 Sides Copies 16 1 sided originals to one sheet with eight pages per side BAT049S 1 Front 2 Back 2 Sided 2 Pages Combine 2 Sides Copies two 2 sided originals to one sheet with two pages per side Duplex Combined Copying 57 2 ...

Page 310: ...es Copies four 2 sided originals to one sheet with four pages per side BAT051S 1 Front 2 Back 2 Sided 8 Pages Combine 2 Sides Copies eight 2 sided originals to one sheet with eight pages per side BAT052S 1 Front 2 Back 2 Basic Copying 58 2 ...

Page 311: ...riginals and then press the Start key When placing originals on the exposure glass start with the first page to be copied When placing originals in the ADF set the first page on top When placing originals on the exposure glass or in the ADF using the Batch function press the key after all the originals have been scanned You can change the initial settings for 2 Sided Combine under Edit in User Too...

Page 312: ...der To use the Rotate Sort function two paper trays loaded with paper of the same size and type but in different orientation are required You cannot use the bypass tray with Rotate Sort Sort Shift Sort Copies are assembled as sets in sequential order To use Shift Sort an optional finisher is required Each time the copies of one set or a job are delivered the next copy is shifted to separate each s...

Page 313: ...1 Press Finishing 2 Select Sort or Rotate Sort When a finisher is not installed When the booklet finisher is installed When the 1000 sheet finisher is installed Finishing 61 2 ...

Page 314: ... ADF set so the first page is on the top When placing originals on the exposure glass or in the ADF using Batch mode press the key after all the originals have been scanned You can change the settings for Sort under Input Output in User Tools For details see Copier Document Server Features General Settings Guide For details about standard paper sizes that can be used with Rotate Sort and the numbe...

Page 315: ...table press Continue The number of copies made is the number specified minus one for the proof copy If you press Suspend after checking the results return to step 1 to adjust the copy settings as necessary You can change the settings However depending on the combination of functions you may not be able to change some settings Changing the number of sets You can change the number of copy sets durin...

Page 316: ...ding on when the Clear Stop key is pressed Stack Groups together copies of each page in a multi page original BAS055S If an optional finisher or the shift sort tray is installed each time the copies of one page are delivered the next copy is shifted when delivered so you can separate each job by page You cannot use the bypass tray with this function 2 Basic Copying 64 2 ...

Page 317: ...1 Press Finishing 2 Press Stack When the booklet finisher is installed When the 1000 sheet finisher is installed When the 3000 sheet finisher is installed Finishing 65 2 ...

Page 318: ...ll the originals have been scanned Staple Each copy set can be stapled together BAS056S You cannot use the bypass tray with this function If you select staple without having the stapler cartridge for saddle stitch set in the booklet finisher a paper misfeed might occur Be sure to set the stapler cartridge Original orientation and stapling position Place all the originals in the ADF in the orientat...

Page 319: ...The relationship between the orientation in which you place the original and the staple positions is as follows 1000 sheet finisher BCU017S Booklet finisher 3000 sheet finisher Finishing 67 2 ...

Page 320: ... The orientation of the paper does not indicate the direction of delivery Left 2 and Top 2 are not available for paper larger than A4 1 Press Finishing 2 Select one of the stapling positions When the booklet finisher is installed 2 Basic Copying 68 2 ...

Page 321: ...py sets using the number keys 5 Place the originals and then press the Start key When placing an original on the exposure glass start with the first page to be copied When placing originals in the ADF set so that the first page is on the top When placing originals on the exposure glass or in the ADF using Batch mode press the key after all the originals have been scanned Finishing 69 2 ...

Page 322: ...ils see Copier Document Server Features General Settings Guide For details about the number of sheets that can be stapled together and the number of stapled copies that can be stacked on each tray see Supplementary Information p 132 Booklet Magazine p 171 Supplementary Information Punch You can make punch holes in copies You cannot use the bypass tray with this function 2 holes BAS059S 3 holes BAS...

Page 323: ...lacing the original on the exposure glass keep the same orientation but set the original facing downwards The relationship between the orientation in which you place the original and the punch hole positions is as follows BCU035S 1 Press Finishing 2 Select one of the punch hole positions When the booklet finisher is installed Finishing 71 2 ...

Page 324: ... on the exposure glass start with the first page to be copied When placing originals in the ADF set so that the first page is on the top You can change the punch hole positions shown on the initial display under Input Output in User Tools For details see Copier Document Server Features General Settings Guide 2 Basic Copying 72 2 ...

Page 325: ... for any damage that might result from the loss of data 1 Press Store File 2 Enter a file name user name or password if necessary 3 Press OK 4 Place the originals 5 Make the scanning settings for the original 6 Press the Start key Stores scanned originals in memory and makes one set of copies To stop scanning press the Clear Stop key To resume a paused scanning job press Continue in the confirmati...

Page 326: ...cument has been stored press the Document Server key If you want to store another document do so after copying is complete For details about the Document Server see Using the Document Server For details about printing stored documents see Printing Stored Documents For details about setting user name file name and password see Storing Data Depending on the security setting Access Privileges may app...

Page 327: ...simile function and scanner function are not displayed in the job list Job List Screen This section explains displays and icons that appear in the Job List screen The Job List screen varies depending on whether Job Order is selected with Print Priority for the System Settings For details about the setting procedure see System Settings General Settings Guide When Job Order is not selected The job l...

Page 328: ...inted using copy function Job printed using printer function Job printed using Document Server function Job printed using DeskTopBinder Job printed using Web Image Monitor Checking Jobs in the Job List You can check the contents of jobs in the job list 1 Press Job List 2 Select the job whose contents you want to check 3 Press Details and then check the contents 4 Press Exit 2 Basic Copying 76 2 ...

Page 329: ...Press Job List 2 Select the job whose order you want to change 3 Press Change Order 4 Change the order using Top Previous or Next 5 Press OK Holding Jobs You can hold jobs that are queued or currently printing 1 Press Job List 2 Select the job you want to hold Managing Jobs 77 2 ...

Page 330: ... are suspended To resume the suspended jobs press Resume Printing This function is available only if Job Order is specified Deleting Jobs You can delete a job that is queued or currently printing 1 Press Job List 2 Select the job you want to delete To delete two or more print jobs select them 3 Press Delete Reservation 4 Press OK 2 Basic Copying 78 2 ...

Page 331: ...history and contents of completed print jobs 1 Press Job List 2 Press Job History A list of completed print jobs appears 3 Select a job whose contents you want to check 4 Press Details and then check the contents 5 Press Exit Managing Jobs 79 2 ...

Page 332: ...ay s Default Functions Paper settings are stored based on paper size So if you place more than one paper tray of the same size the paper tray prioritized under Tray Paper Settings in User Tools will be selected first For details see System Settings General Settings Guide Programs are not deleted by turning the power off or by pressing the Clear Modes key p 84 Registering the Initial Display s Defa...

Page 333: ...e program number followed by the program name The screen returns to the initial copy display after a short time Program numbers with against them already have settings made for them Changing a Stored Program Changes program settings 1 Check the program settings 2 Specify the contents of a program 3 Press the Program key 4 Press Program 5 Press the program number you want to change Registering Freq...

Page 334: ...ontents of a program recall the program When it is overwritten the previous program is deleted Recalling a Stored Program Recalls a stored program to make copies using the stored settings 1 Press the Program key 2 Press Recall 3 Press the program number you want to recall The stored settings are displayed Only programs with against them contain a program Deleting a Stored Program Erases the conten...

Page 335: ...2 Press Delete 3 Press the program number you want to delete 4 Press Yes The program is deleted and the display returns to the initial copy display Registering Frequently Used Functions 83 2 ...

Page 336: ... frequently is 1 sided copying you can change the default selection to 1 sided copying instead ThesettingsyoucanprogramasdefaultsarePaperTray OriginalType Density SpecialOriginal Original Orientation Cover Slip Sheet Edit Stamp Dup Combine Series Reduce Enlarge Finishing and the number of copies 1 Specify scan settings and any other settings you require on the initial display 2 Press the Program k...

Page 337: ...defaults The screen returns to the initial display To restore the factory default settings on the initial display press Restore Factory Defaults The default settings can be programmed separately for the normal screen and simplified display screens Registering the Initial Display s Default Functions 85 2 ...

Page 338: ...2 Basic Copying 86 2 ...

Page 339: ...nual image density You can adjust the density of the overall original in nine steps Combined auto and manual image density Adjusts the density of an image only for dark texture originals Auto Image Density The machine automatically adjusts the image density by scanning the densities of originals Dark texture originals such as newspaper or recycled paper will be copied so that background will not b...

Page 340: ...n image only for dark texture originals 1 Make sure Auto Density is selected If Auto Density is not selected press Auto Density 2 Press or to adjust the density The density indicator moves Copy Quality Adjusts image qualities The following three types of image adjustments are available Sharp Soft Adjusts the outline of an image Contrast Adjusts the shades of an image 3 Advanced Copying 88 3 ...

Page 341: ...however their adjustments can affect the level of other adjustment functions The adjusted settings will be deleted and the initial values will be reset when Auto Clear has been performed when the Clear Modes key has been pressed or when the power has been turned off Sharp Soft Adjusts the outline of an image 1 Adjust the image quality by pressing Soft or Sharp 2 Press OK Adjusting Copy Image Densi...

Page 342: ...y pressing Lighter or Darker 2 Press OK Adjustments should be made lighter when copying dark textured originals such as newspaper or recycled paper Adjustments should be made darker when darkening the area marked with markers or highlighters However as the color of highlighters is difficult to copy the copy might not come out depending on the color of the highlighters 3 Advanced Copying 90 3 ...

Page 343: ...s that are printed on paper e g magazines Copied Photo Use when copying copies or originals generated by color copiers Pale For originals that have lighter lines written in pencil or faintly copied slips Generation Copy For originals that are copied The copy image can be reproduced sharply and clearly 1 Select the original type and then press OK You can select whether or not to display the keys fo...

Page 344: ... Paper Select when copying at a ratio of 100 Metric version Original location Original size and orientation Exposure glass A3 B4 JIS A4 B5 JIS 81 2 13 ADF A3 B4 JIS A4 B5 JIS A5 B6 JIS 11 17 81 2 11 81 2 13 Inch version Original location Original size and orientation Exposure glass 11 17 81 2 14 81 2 11 ADF A3 A4 11 17 81 2 14 81 2 11 51 2 81 2 10 14 71 4 101 2 Only the paper trays set to No Displ...

Page 345: ...ation in which your original is placed is different from that of the paper you are copying onto the machine rotates the original image by 90 to fit it on the paper BAT065S You cannot use Rotate Copy when enlarging onto A3 B4 JIS or 11 17 81 2 14 size paper In this case place your original in the orientation Original size and orientation Copy paper size and orientation You cannot rotate 81 2 11 or ...

Page 346: ...y if this setting is changed to Without Image Rotation or Off For details about Auto Tray Switching see Copier Document Server Features General Settings Guide Depending on the settings for Punch or Staple you may not be able to use the Rotated Copy function p 46 Auto Reduce Enlarge p 66 Staple p 70 Punch p 93 Auto Paper Select Manual Paper Select Select the tray containing the paper you want to co...

Page 347: ...nctions see Reducing or Enlarging Images p 43 Reducing or Enlarging Originals Size Magnification This function calculates a reproduction ratio based on the lengths of the original and copy BAT067S Measure and specify the lengths of the original and copy by comparing A with a 1 Press Reduce Enlarge 2 Press Size Magnification Advanced Reduce Enlarge Copying 95 3 ...

Page 348: ...ess 5 Press OK twice To change the value you entered press the key you want to change and then enter a new value Directional Magnification Specify the horizontal and vertical reproduction ratios individually Copies can be reduced or enlarged at different reproduction ratios horizontally and vertically BAT068S a Horizontal ratio b Vertical ratio Specifying the ratio with and Specify a ratio using a...

Page 349: ...ges the ratio in increments of 1 Pressing and holding down or changes it in increments of 10 6 Press Vertical 7 Adjust the ratio with and 8 Press OK twice To change the value you entered readjust it with and Entering the ratio with the number keys Enter a ratio using the number keys Advanced Reduce Enlarge Copying 97 3 ...

Page 350: ... press 7 Press OK twice 8 Place the originals and then press the Start key To change the value you entered press the key you want to change and then enter a new value Directional Size Magnification inch Specify the horizontal and vertical lengths of the original and copy image Copies can be reduced or enlarged at different reproduction ratios horizontally and vertically 3 Advanced Copying 98 3 ...

Page 351: ...original and copy by comparing A with a and B with b 1 Press Reduce Enlarge 2 Press Dir Size Mag inch 3 Enter the horizontal size of the original with the number keys and then press You can enter sizes between 1 to 999 mm 0 1 to 99 9 inches in increments of 1 mm 0 1 inch 4 Enter the horizontal size of the copy with the number keys and then press Advanced Reduce Enlarge Copying 99 3 ...

Page 352: ...lue Create Margin Reduces the image to 93 of its original size and places the reduced image at the center By combining it with the Reduce Enlarge functions you can further increase a margin 1 Press Create Margin 2 Select the reproduction ratio if necessary You can change the ratio for Create Margin under Reproduction Ratio in User Tools For details about Reproduction Ratio see Copier Document Serv...

Page 353: ... to have numbers printed on the background of copies If this function is used in conjunction with Sort the same numbers are printed on each set of copies helping you keep track of confidential documents BAS070S 1 Press Edit Stamp 2 Press Stamp 3 Press Background Numbering Stamps 101 3 ...

Page 354: ...ckground Numbering under Stamp in User Tools For details about Stamp see Copier Document Server Features General Settings Guide Preset Stamp Messages are stamped on copies BAT071S You cannot use the bypass tray with this function Only one message can be stamped at a time The following eight messages are available for Preset Stamp COPY URGENT PRIORITY For Your Info PRELIMINARY For Internal Use Only...

Page 355: ...tamp position and original orientation The stamp positions differ according to the orientation in which you place the originals BAT072S 1 Press Edit Stamp 2 Press Stamp 3 Press Preset Stamp Stamps 103 3 ...

Page 356: ...ings for Preset Stamp under Stamp in User Tools Depending on the setting density may change For details about Stamp see Copier Document Server Features General Settings Guide p 22 Original Orientation Changing the stamp position size and density Changes the stamp position size and density 1 Press Change under Position Size Density 2 Select the stamp position size and density and then press OK 3 Ad...

Page 357: ... You have to register a user stamp before using this function You cannot use the bypass tray with this function Only one message can be stamped each time Stamp position and original orientation The user stamp positions differ according to the orientation in which you place the originals BAT074S Stamps 105 3 ...

Page 358: ...ct the print page 6 After making all settings press OK 7 Press OK You can change the settings for User Stamp under Stamp in User Tools For details about Stamp see Copier Document Server Features General Settings Guide p 22 Original Orientation p 107 Registering the user stamp Changing the user stamp position Changes the stamp position 3 Advanced Copying 106 3 ...

Page 359: ... of stamp images is 10 297 mm 0 4 11 7 inches high and 10 432 mm 0 4 17 0 inches wide However ifthevalueexceedsthemaximumvalueofthearea 5 000mm2 7 75inch2 itiscorrected within the range of the area automatically Up to four frequently used images can be stored in memory BAT075S 1 Base point 2 Exposure glass 1 Press the User Tools Counter key BAT183S Stamps 107 3 ...

Page 360: ...inal will be scanned and the stamp will be registered 11 Press Exit 12 Press Exit The display returns to the User Tools Counter Inquiry screen 13 Press Exit Exits settings and gets ready to copy Stamp numbers with already have settings in them Stamp numbers that are not registered yet are marked with Not Programmed If the stamp number is already being used the machine will ask you if you want to o...

Page 361: ...ss User Stamp 5 Press Program Delete Stamp 6 Press Delete and then press the stamp number you want to delete 7 Select Yes and then press Exit 8 Press Exit The display returns to the User Tools Counter Inquiry screen 9 Press Exit Exits settings and gets ready to copy Date Stamp Use this function to print dates on your copies Stamps 109 3 ...

Page 362: ...ou can select from the following styles MM DD YYYY MM DD YYYY DD MM YYYY DD MM YYYY YYYY MM DD Stamp position and original orientation The date stamp positions differ according to the orientation in which you place the originals BAT077S 3 Advanced Copying 110 3 ...

Page 363: ...ly to select the print page 6 After making all settings press OK 7 Press OK You can change the settings for Date Stamp under Stamp in User Tools For details about Stamp see Copier Document Server Features General Settings Guide p 22 Original Orientation Changing the format of date Changes the format of date 1 Press Change Format under Current Date Stamps 111 3 ...

Page 364: ...Changing the date stamp position Changes the stamp position 1 Press Change under Stamp Position 2 Select the stamp position and then press OK Page Numbering Use this function to print page numbers on your copies BAS078S 3 Advanced Copying 112 3 ...

Page 365: ...s function There are six types of page numbering P1 P2 1 5 2 5 1 2 P 1 P 2 1 2 1 1 1 2 Stamp position and original orientation The page stamp positions differ according to the orientation in which you place the originals BAT079S Stamps 113 3 ...

Page 366: ...Tools For details about Stamp see Copier Document Server Features General Settings Guide You can change the stamp position if Combine or Duplex is specified for use with this function under Duplex Back Page Stamping Position or Page Numbering in Combine in User Tools For details about these settings see Copier Document Server Features General Settings Guide Changing the stamp position Changes the ...

Page 367: ...s 2 and the start number is 3 BAS080S In the following procedure P1 P2 is selected but the procedure is the same regardless of the format you select 1 Press Change under Change Numbering 2 Press First Printing Page enter the original sheet number from which to start printing and then press 3 Press First Printing Number enter the number of page from which to start numbering with the number keys and...

Page 368: ...nd LastNumber Specifying the first printing page and start number 1 5 2 5 Specify the first printing page and start number 1 Press Change under Change Numbering 2 Press First Printing Page enter the original sheet number from which to start printing and then press 3 Press First Printing Number enter the number of page from which to start numbering with the number keys and then press 4 Press Last N...

Page 369: ...d start number 1 Press Change under Change Numbering 2 Press First Printing Page enter the original sheet number from which to start printing and then press 3 Press First Chapter No enter the chapter number from which to start numbering with the number keys and then press 4 Press First Printing Number enter the page number from which to start printing with the number keys and then press 5 When pag...

Page 370: ...ced copy functions Margin Adjustment Copies originals leaving a binding margin BAS086S 1 Press Edit Stamp 2 Make sure that Margin Adj is selected If Margin Adj is not selected press Margin Adj 3 Specify a binding margin for the front side pages 3 Advanced Copying 118 3 ...

Page 371: ...mm 0 1 inch increments Margin on the back side of the page is valid when 1 Sided 2 Sided or Combine 2 Sides is selected You can change the settings for Margin Adjustment under Edit in User Tools For details about Edit see Copier Document Server Features General Settings Guide Erase Center Border This function erases the center and or all four sides of the original image This function has the follo...

Page 372: ... 1 Erased part 2 2 99 mm 0 1 3 9 inches To erase the image on the back side of the original press 2 Sided Setting and then Back Erasing the image on the back side is valid when you copy 2 Sided originals The erase width is set to 10 mm 0 4 inch as a default You can change this setting under Edit in User Tools For details about Edit see Copier Document Server Features General Settings Guide 3 Advan...

Page 373: ...y an erase border width with and Pressing or changes the width in increments of 1 mm 0 1 inch Pressing and holding down the relevant key changes the width in increments of 10 mm 1 inch 7 Press OK twice To change the value you entered press and and then specify a new value Erase Border different width Erases the edge margins of the original image Advanced Copier Functions 121 3 ...

Page 374: ... Border 5 Press Different Width 6 Press the key you want to change and specify an erase width with and 7 Press OK twice To change the value you entered press and and then specify a new value Erase Center Erases the center margin of the original image 3 Advanced Copying 122 3 ...

Page 375: ...ress Erase Center 5 Specify the erase width with and 6 Press OK twice To change the value you entered press and and then specify a new value Erase Center Border same width Erases both the center and edge margins of the original image Advanced Copier Functions 123 3 ...

Page 376: ... Center and then specify the erase width with and 7 Press Border and then specify the erase width with and 8 Press OK twice To change the value you entered press and and then specify a new value Erase Center Border different width Erases both the center and edge margins of the original image 3 Advanced Copying 124 3 ...

Page 377: ...nter Border 5 Press Different Width 6 Press the key you want to change and specify an erase width with and 7 Press OK twice To change the value you entered press and and then specify a new value Image Repeat The original image is copied repeatedly Advanced Copier Functions 125 3 ...

Page 378: ...nal 51 2 81 2 Copy paper 81 2 11 or Original 51 2 81 2 Copy paper 81 2 11 4 repeats 71 16 repeats 35 BAT096S BAT095S Original A5 Copy paper A4 Original A5 Copy paper A4 Original 51 2 81 2 Copy paper 81 2 11 or Original 51 2 81 2 Copy paper 81 2 11 2 repeats 100 8 repeats 50 32 repeats 25 BAT086S BAT087S BAT088S 1 Select the size of copy paper and the reproduction ratio 3 Advanced Copying 126 3 ...

Page 379: ...s Guide Double Copies One original image is copied twice on one sheet BAS098S You cannot use the bypass tray with this function Originals with a size of A5 B6 JIS and 51 2 81 2 cannot be detected properly on the exposure glass Be sure to select the copy paper manually or place the originals in the ADF See the following table for original and copy paper sizes when using a 100 ratio Advanced Copier ...

Page 380: ...pies 4 Press OK 5 Select the paper size You can change the settings for Double Copies under Edit in User Tools For details about Edit see Copier Document Server Features General Settings Guide Centering You can make copies with the image moved to the center of the copy paper 3 Advanced Copying 128 3 ...

Page 381: ...cation Original size and orientation Exposure glass A3 B4 JIS A4 B5 JIS 81 2 13 ADF A3 B4 JIS A4 B5 JIS A5 B6 JIS 11 17 81 2 11 81 2 13 Inch version Original location Original size and orientation Exposure glass 11 17 81 2 14 81 2 11 ADF A3 A4 11 17 81 2 14 81 2 11 51 2 81 2 10 14 71 4 101 2 1 Select the paper size 2 Press Edit Stamp Advanced Copier Functions 129 3 ...

Page 382: ...Press Positive Negative 4 Press OK Series Copies Separately copies the front and back of a 2 sided original or the two facing pages of a bound original onto two sheets You cannot use the Book 1 Sided function from the ADF The following table shows the paper sizes for Book 1 Sided when the reproduction ratio is 100 3 Advanced Copying 130 3 ...

Page 383: ...2S There are two types of Series Copies Book 1 Sided You can make 1 sided copies from two facing pages of a bound original book BAS103S 2 Sided 1 Sided You can make 1 sided copies from 2 sided originals BAS104S Advanced Copier Functions 131 3 ...

Page 384: ...n specify the orientation Press the key after all originals have been scanned p 51 Originals and copy orientation Booklet Magazine Copies two or more originals in page order You cannot use the bypass tray with this function The following table shows the paper sizes for Book 2 Sided when the reproduction ratio is 100 3 Advanced Copying 132 3 ...

Page 385: ...azine 1 Sided Booklet Make copies in page order for a folded booklet as shown BAT105S 1 Open to left 2 Open to right 2 Sided Booklet Make 2 sided originals to copies in page order for a folded booklet as shown BAT106S 1 Open to left 2 Open to right Advanced Copier Functions 133 3 ...

Page 386: ...T107S 1 Open to left 2 Open to right 2 Sided Magazine Copies two or more originals of 2 sided to make copies in page order when they are folded and stacked BAT108S 1 Open to left 2 Open to right Book 2 Sided Copies a two page spread original onto one sheet with one page per side BAS109S 3 Advanced Copying 134 3 ...

Page 387: ...S How to fold and unfold copies to make a booklet Fold a copy along the centerline and open BAT111S 1 Open to left 2 Open to right How to fold and unfold copies to make a magazine Fold and stack copies to make a magazine and open BAT112S 1 Open to left 2 Open to right Advanced Copier Functions 135 3 ...

Page 388: ... 4 Select the paper size 5 Press OK When placing originals on the exposure glass or in the ADF using Batch mode press the key after all the originals have been scanned The machine sets the reproduction ratio automatically to meet the paper size The default setting for the orientation of Booklet and Magazine is Open to Left You can change the default under Orientation Booklet Magazine in User Tools...

Page 389: ... loaded in the bypass tray When selecting Copy select whether the front and back covers are copied 1 sided or 2 sided The Covers function includes Front Cover and Front Back Covers Front Cover This function copies the first page of an original onto paper that has been specified for covers or places a cover sheet before the first copy page Copy BAS114S Blank BAS115S Front Back Covers Thisfunction c...

Page 390: ... main sheet tray that contains the paper to copy the originals The cover sheet should be the same size and orientation as the main sheets You can make a combined copy on the front cover sheet For details about Front Cover Copy in Combine see Copier Document Server Features General Settings Guide 3 Advanced Copying 138 3 ...

Page 391: ...heet for each page specified Copy BAS118S Blank BAS119S Before using this function select the tray for designation sheets under Slip Sheet Tray in User Tools For details see System Settings General Settings Guide You cannot specify the bypass tray as the Main Sheet Tray 1 Press Cover Slip Sheet Advanced Copier Functions 139 3 ...

Page 392: ...d then press the key 6 To specify another page location repeat steps 4 to 5 Up to 20 locations can be specified 7 Select the main sheet tray that contains the paper to copy the originals 8 After making all settings press OK twice The designation sheets should be the same size and orientation as the main sheets Chapters The page locations you specify with this function will appear on the front of c...

Page 393: ...chapter number To select chapters 11 to 20 press 11 20 5 Enter the page location of the first page of the chapter with the number keys and then press the key Up to 20 locations can be specified 6 To specify another page location repeat steps 4 to 5 7 Select the main sheet tray that contains the paper to copy the originals 8 After making all settings press OK twice To change the value you entered p...

Page 394: ...ct printed surfaces This function is useful in copying OHP transparencies BAS122S If 1 Sided 2 Sided is set cancel the setting Before using this function select the tray for slip sheets under Slip Sheet Tray in User Tools For details see System Settings General Settings Guide When placing OHP transparencies in the bypass tray Copy BAS123S Blank BAS124S 3 Advanced Copying 142 3 ...

Page 395: ...py the originals When copying onto OHP transparencies use the bypass tray When setting OHP transparencies on the bypass tray press the key and select OHP Transparency in Special Paper The slip sheets should be the same size and orientation as the copy paper or the OHP transparency p 42 Copying onto Special Paper Advanced Copier Functions 143 3 ...

Page 396: ...3 Advanced Copying 144 3 ...

Page 397: ...vailable Printing Available Transmission Unavailable Facsimile functions Storing method Facsimile List display Available Printing Available Transmission Available The data can be transferred by the facsimile feature For details see Sending Stored Documents Facsimile Reference Scanner functions Storing method Scanner List display Unavailable When documents are stored with the scanner feature you ca...

Page 398: ...ies made 4 Displays keys for the operation 5 Displays an icon that indicates the function used to stored the document 6 Displays keys for switching the display between list and thumbnails The following icons appear in the list of the Document Server to indicate the function used to store a document Function Copier Facsimile Printer Icons Thumbnail screen In thumbnail view miniature images of the s...

Page 399: ...ified Display This section explains how to switch to the simplified display When you press the Simplified Display key the screen changes from the initial display to the simplified display Letters and keys are displayed at a larger size making operations easier BCU031S Document Server Display 147 4 ...

Page 400: ...y key again Certain keys do not appear on the simplified display Preview Display This section explains the items that appear on the preview display and how to preview stored documents To preview stored documents select the documents you want to preview on the Document Server initial display and then press Preview The preview display denotes the screen that allows confirming contents of the scanned...

Page 401: ... switch between them 5 Display Page Displays the number of the currently displayed page total number of pages and page size 6 Switch Flips the page of the selected file 7 Display Position Indicates the location of the displayed preview image when the image is enlarged When the preview is already selected from another function the preview screen function may become unusable The preview display is a...

Page 402: ...cessed by other users After the operation be sure to press the Clear Modes key to cancel the document selection The user name registered to a stored document in the Document Server is to identify the document creator and type It is not to protect confidential documents from others When turning on the fax transmission or scanning by the scanner make sure that all other operations are ended File Nam...

Page 403: ...canning job press Continue in the confirmation display To delete saved images and cancel the job press Stop The original placed in the ADF will be ejected If a password is set the key icon appears on the left side of the file name After scanning a list of stored documents will be displayed If the list does not appear press Scanning Complete Data stored in the Document Server is set to be deleted a...

Page 404: ...ead of User Name For details about specifying Access Privileges consult the administrator For details about how to enter text see Entering Text About This Machine Specifying a User Name You can specify a user name for the stored file 1 Press Scan Original 2 Press User Name A list of user names appears 3 Select a user name and then press OK The user names shown are names that were registered in the...

Page 405: ...cument name and then press OK You can enter up to 20 characters for a document name In the list however up to 16 characters are displayed as the document name If above limits are exceeded the list will display up to 15 characters for the document name Specifying a Password You can specify a password for the stored document 1 Press Scan Original 2 Press Password Using the Document Server 153 4 ...

Page 406: ...4 For double check enter the password again and then press OK Changing the User Name of a Stored Document You can change the user name for a stored document 1 Select the document whose user name you want to change If a password is set enter it and then press OK 2 Press File Management 4 Document Server 154 4 ...

Page 407: ...ing Access Privileges consult the administrator For details about how to enter text see Entering Text About This Machine Changing the File Name of a Stored Document You can change the file name of a stored document 1 Select the document whose name you want to change If a password is set enter it and then press OK 2 Press File Management 3 Press Change File Name 4 Enter a new file name and then pre...

Page 408: ...nt to change If a password is set enter it and then press OK 2 Press File Management 3 Press Change Password 4 Enter a new password and then press OK 5 For double check enter the password again and then press OK 6 Press OK To cancel the selection press the selected highlighted key Depending on the security setting Access Privileges may appear instead of User Name For details about specifying Acces...

Page 409: ...hancel the selection press the selected highlighted key Pressing Exit restores the document selection screen Searching for Stored Documents Searches for stored documents by user name or file name You can rearrange the currently chronologically ordered documents in any desired order Searching by file name Searches for stored documents by file name Searching by user name Searches for stored document...

Page 410: ...ing by file name Searches for stored documents by file name 1 Press File Name 2 Enter the document name to be searched and then press OK Document names that match completely from the starting character will be searched and displayed on the screen Pressing Display All displays all stored documents Searching by user name Searches for stored documents by user name 4 Document Server 158 4 ...

Page 411: ...haracter will be searched and displayed on the screen Pressing Display All displays all stored documents Printing Stored Documents Prints stored documents Web Image Monitor allows you to print documents stored in the Document Server from your computer 1 Select a document to be printed If a password is set enter it and then press OK 2 When printing two or more documents at a time repeat step 1 Up t...

Page 412: ...documents by user name file name or creation date Press the item to be used for the sorting on the top of the list Some of the selected documents may not be printed due to the difference in the size or resolution When changing the printing order cancel the highlight and then specify the order correctly Pressing the Clear Modes key cancels every selection Pressing Order displays the selected docume...

Page 413: ...conditions set for the first document are applied to all the remaining documents When two or more documents are selected press to confirm the user name document name and printing order of the document Pressing Select File restores the document selection screen The Stamp function is not specifiable to the documents being stored from the facsimile feature You can change the maximum print quantity un...

Page 414: ...ng will be resumed The number of sets you can enter in step 3 differs depending on when the Clear Stop key is pressed Sample Print When the number of sets is massive you can print a single set in advance to check the printing order and the printing conditions of the selected documents This function can be used only when the Sort function is selected in the printing conditions 1 Select the document...

Page 415: ...cted on the Select File screen When two or more documents are selected the first page of the respective documents is printed 1 Select the document to be printed If a password is set enter it and then press OK 2 Press Print Specified Page 3 Press 1st Page 4 Press the Start key Printing a specified page You can print the specified page alone of the document selected on the Select File screen 1 Selec...

Page 416: ...e of the document selected on the Select File screen 1 Select the document to be printed If a password is set enter it and then press OK 2 Press Print Specified Page 3 Press Specify Range 4 Specify the printing start page with the number keys and then press 5 Specify the printing end page with the number keys and then press 6 Press the Start key To change the value you entered press the key you wa...

Page 417: ... Settings Guide Web Image Monitor allows you to print a document stored in the Document Server from your computer It is also possible to select two or more documents and delete them You can search the target document using File Name or User Name situated in the left side of the screen You can sort the documents by user name file name or creation date Press the item to be used for the sorting on th...

Page 418: ...confirm Information of the document will be displayed 5 Confirm contents of the document You can change the format of the list Click the Thumbnails Icons or Details When you want to enlarge the preview display click Enlarge Image Downloading Stored Documents with Web Image Monitor You can download stored documents to the computer with Web Image Monitor When downloading a document stored with the c...

Page 419: ...page TIFF for the file format The data will be downloaded 6 Click OK You can change the format of the list Click the Thumbnails Icons or Details You cannot select Multi page TIFF for a document being stored with the copy or printer When downloading a document with Multi page TIFF you must prepare the file format converter Using the Document Server 167 4 ...

Page 420: ...4 Document Server 168 4 ...

Page 421: ...modes can be used together These modes cannot be used together The first mode selected will be the mode you are working in These modes cannot be used together The second mode selected will be the mode you are working in The following shows the combinations of functions BCY013S The following combinations are not possible 1 1 Sided 2 Sided 2 Sided 2 Sided with Copying from the Bypass Tray or Slip Sh...

Page 422: ...with Magazine 4 Covers with Date Stamp If a HDD is not installed 5 Front Back 2 Sided with Store File 6 Rotate Sort with Covers Designate Staple Punch or Copying from the Bypass Tray 7 Staple Top 2 with Punch Left Staple Top 1 with Punch Top 5 Appendix 170 5 ...

Page 423: ... size are in even numbers If you have an odd number of originals insert blank sheets to adjust the total BAT146S Copying from the Bypass Tray The following paper sizes can be selected as the standard sizes A3 B4 JIS A4 B5 JIS A5 B6 JIS A6 11 17 81 2 14 81 2 13 81 2 11 81 4 14 81 4 13 8 13 8 101 2 8 10 71 4 101 2 51 2 81 2 12 18 11 15 11 14 10 15 10 14 Preset Reduce Enlarge You can select one of 12...

Page 424: ...riginal or copy paper With some ratios parts of the image might not be copied or margins will appear on copies Zoom The reproduction ratios you can specify are 25 400 You can select a ratio regardless of the size of an original or copy paper With some ratios parts of the image might not be copied or margins will appear on copies Auto Reduce Enlarge You can place originals of different sizes in the...

Page 425: ...ulated ratio is under the minimum ratio it is automatically adjusted to within available range However with some ratios parts of the image might not be copied You cannot use custom size paper If the orientation of originals is different from that of the copy paper the machine will automatically rotate the image by 90 to make copies properly If the number of originals placed is less than the number...

Page 426: ... Shift tray A4 81 2 11 3000 sheets A3 A4 B4 JIS B5 JIS 11 17 81 4 14 81 2 11 12 18 1500 sheets A5 500 sheets A5 B6 JIS A6 51 2 81 2 100 sheets Booklet finisher Upper tray A4 81 2 11 or smaller 250 sheets B4 JIS 81 2 14 or larger 50 sheets Booklet finisher Shift tray A4 81 2 11 2000 sheets A3 A4 B4 JIS B5 JIS 11 17 81 4 14 81 2 11 12 18 1000 sheets A5 500 sheets A5 B6 JIS A6 51 2 81 2 100 sheets Wh...

Page 427: ...ceeds the capacity of the stapler Divides the copies into the number of sheets that can be stapled Cancels the stapling job To specify Left 2 Top 2 or Slant together with 2 Originals or 8 Originals of Combine 1 Side or 4 Originals or 16 Originals of Combine 2 Sides specify paper for orientation originals and specify paper for orientation originals To specify Left 2 Top 2 or Slant together with Dou...

Page 428: ...port plate of the finisher tray When the number of copies exceeds tray capacity copying stops If this happens remove the copies from the shift tray and then resume copying The tray capacity for the stapled sheets is as follows paper weight 80 g m2 20 lb 1000 sheet finisher A4 81 2 11 2 to 9 leaf binding 100 copies 10 to 50 leaf binding 100 to 20 copies A4 B5 JIS 81 2 11 2 to 9 leaf binding 100 cop...

Page 429: ... Check orientation message may appear depending on the orientation of originals and paper you placed In this case change the paper orientation When Top or Bottom is selected and the paper with the same orientation as the original is not loaded the image is rotated and the paper with the same size and the different orientation is selected When Left 2 or Top 2 is selected the following settings are ...

Page 430: ...are 25 400 When entering a percentage ratio you can specify any value in the permitted range regardless of original or copy paper size However depending on settings and other conditions part of the image may not be copied or margins will appear on copies When entering a size in mm inch if the calculated ratio is over the maximum or under the minimum ratio it is automatically adjusted to within ava...

Page 431: ...unction pagenumbers are printed as follows Per Original is selected in Page Numbering in Combine With 1 Sided 2 Sided using the Combine function BAT152S With the Magazine or Booklet function BAT122S Per Copy is selected in Page Numbering in Combine With 1 Sided 2 Sided using the Combine function Supplementary Information 179 5 ...

Page 432: ...the erased margin varies depending on the reproduction ratio Image Repeat Depending on the paper size ratio and orientation parts of repeated images may not be copied Centering Though the original is set to a different orientation from the paper loaded the machine will not rotate the image by 90 Rotate copy Booklet Magazine The machine sets the reproduction ratio automatically to meet the paper si...

Page 433: ... and folds the paper in the center then delivers the paper folded Front Cover Front Back Covers If Blank mode is selected the cover will not be counted as a copy The settings made under Cover Sheet Tray in User Tools determine whether or not the front and back covers are duplex printed At Mode Selected Settings made in Cover Sheet Tray will take priority Full Time Settings made in Paper Type will ...

Page 434: ...he available paper trays and sizes shown on the initial display Original Orientation in Duplex Mode You can set the original orientation when making two sided copies Copy Orientation in Duplex Mode You can set the copy orientation when making two sided copies Max Copy Quantity The maximum copy quantity can be set between 1 and 999 Auto Tray Switching If you load paper of the same size in two or mo...

Page 435: ...ce Enlarge ratio when registering Create Margin in a shortcut key Edit Item Description Front Margin Left Right Specify left and right margins on the front side of copies in Margin Adjustment mode Back Margin Left Right Specify left and right margins on the back side of copies in Margin Adjustment mode Front Margin Top Bottom Specify top and bottom margins on the front side of copies in Margin Adj...

Page 436: ...opy on the inserted slip sheets in Desig Chapter mode Image Repeat Separation Line You can select a separation line using the Image Repeat function from None Solid Broken A Broken B or Crop Marks Double Copies Separation Line YoucanselectaseparationlineusingtheDoubleCopiesfunctionfrom None Solid Broken A Broken B or Crop Marks Separation Line in Combine You can select a separation line using the C...

Page 437: ...ge Numbering mode Size You can set the size of the stamp printed in Page Numbering mode Duplex Back Page Stamping Position You can set the position of the duplex back page number printed in Duplex mode Page Numbering in Combine You can set page numbering when using the Combine function and the Page Numbering function together Stamp on Designating Slip Sheet You can select to print the page number ...

Page 438: ...comesfullwhilescanningoriginals themachinecan makecopiesofscannedoriginalsfirst andthenautomaticallyproceed scanning remaining originals Letterhead Setting If you select Yes in this function the machine rotates images correctly Staple Position Specify which Top 2 staples or Bottom shown on the initial display with priority Punch Type Specify which punch type 2 holes or 3 holes has priority to be s...

Page 439: ...tray 37 171 Copying originals of various sizes 28 Copying originals such as books 7 Covers 137 Create Margin 100 Custom size originals 30 Custom size paper 40 D Date 111 Date format 111 Date Stamp 109 178 Default settings 84 Deleting a stored document 165 Deleting a stored program 82 Deleting jobs 78 Deleting the user stamp 108 Designate 139 181 Detectable original sizes 18 Directional Magnificati...

Page 440: ...ght 17 Originals 17 P Page Numbering 112 179 Pale 91 Photo 91 Placing originals 17 22 Placing originals in the ADF 25 Placing originals of different sizes 28 Placing originals on the exposure glass 24 Positive Negative 130 Preset Reduce Enlarge 43 171 Preset Stamp 14 102 178 Preview display 148 Printer functions 145 Printing a specified page 163 Printing a specified range 164 Printing stored docum...

Page 441: ...pecifying a password 153 Specifying a user name 152 Specifying original sizes 29 Specifying the reproduction ratio 45 46 96 97 Stack 60 64 174 Stamp 101 184 Stamp density 104 Stamp position 102 104 105 106 109 112 114 Stamp size 104 Staple 14 60 66 175 Staple Center 14 Stapling position 66 Storing data 150 Storing data in the Document Server 73 Supplementary information 171 Symbols 13 T Text 91 Te...

Page 442: ...MEMO 190 ...

Page 443: ...MEMO 191 ...

Page 444: ...MEMO 192 EN USA D012 7652 ...

Page 445: ...rporation in the United States and or other countries Adobe Acrobat Acrobat Reader PostScript and Reader are either registered trademarks or trademarks of Adobe Systems Incorporated in the United States and or other countries Other product names used herein are for identification purposes only and might be trademarks of their respective companies We disclaim any and all rights to those marks Copyr...

Page 446: ...040b MP 4000 MP 4000B LD040 LD040B Aficio MP 4000 Aficio MP 4000B Type for 9050 9050b MP 5000 MP 5000B LD050 LD050B Aficio MP 5000 Aficio MP 5000B Operating Instructions Copy Document Server Reference D012 7652 EN USA ...

Page 447: ...ing a Document Fax via Computer Appendix 1 2 3 4 Read this manual carefully before you use this machine and keep it handy for future reference For safe and correct use be sure to read the Safety Information in About This Machine before using the machine 5 6 7 Facsimile Reference Operating Instructions ...

Page 448: ...s a result of handling or operating the machine Notes Some illustrations in this manual might be slightly different from the machine Certain options might not be available in some countries For details please contact your local dealer Depending on which country you are in your machine may include certain options as standard For details please contact your local dealer Caution Use of controls or ad...

Page 449: ...s and other consumables Copy Document Server Reference Explains Copier and Document Server functions and operations Also refer to this manual for explanations on how to place originals Facsimile Reference Explains Facsimile functions and operations Printer Reference Explains Printer functions and operations Scanner Reference Explains Scanner functions and operations Network Guide Explains how to c...

Page 450: ... dealer This manual includes descriptions of functions and settings that might not be available on this machine Information Contains general notes on the machine and information about the trademarks of product names used in the manuals Other manuals Manuals for DeskTopBinder Lite DeskTopBinder Lite Setup Guide DeskTopBinder Introduction Guide Auto Document Link Guide Manuals provided are specific ...

Page 451: ...format US AAAEQ TXXXXX The digits represented by are the REN without a decimal point e g 03 is a REN of 0 3 5 If this equipment causes harm to the telephone network the telephone company will notify you in advance that temporary discontinuance of service may be required But if advance notice is not practical the telephone company will notify the customer as soon as possible Also you will be advise...

Page 452: ... residential installation This equipment generates uses and can radiate radio frequency energy and if not installed and used in accordance with the instructions may cause harmful interference to radio communications However there is no guarantee that interference will not occur in a particular installation If this equipment does cause harmful interference to radio or television reception which can...

Page 453: ...s Follow the FAX HEADER programming procedure in the Programming chapter of the operating instructions to enter the business identification and telephone number of the terminal or business This information is transmitted with your document by the FAX HEADER feature In addition to the information be sure to program the date and time into your machine Note to users in Canada Note This Class B digita...

Page 454: ...ve these instructions IMPORTANTES MESURES DE SÉCURITÉ Certaines mesures de sécurité doivent être prises pendant l utilisation de material téléphonique afin de réduire les risques d incendle de choc électrique et de blessures En voici quelquesunes Ne pas utiliser l appareil près de l eau p ex près d une balgnoire d un lavabo d un évier de cuisine d un bac à laver dans un sous sol humide ou près d u...

Page 455: ...ion of Transmission 29 IP Fax Functions 31 Terminology 33 Notes on Using IP Fax 34 Functions Not Available for IP Fax Transmission 34 Internet Fax Functions 35 Notes on Using Internet Fax 36 Functions Not Available by Internet Fax Transmission 37 Functions Not Available by Internet Fax Reception 38 T 37 Full Mode 38 E mail Encryption 39 Sending to E mail Folder Destinations 41 Functions Not Availa...

Page 456: ...77 Sending over a Fax Line 77 Sending by IP Fax 81 Sending by Internet Fax 85 Sending an E mail 91 Sending to Folder Destinations 96 Using the Address Book to Specify Destinations 99 Specifying Group Destinations 100 Selecting Destinations from Recent Destinations 101 Programming Destinations in the Address Book 103 Registering a Fax Destination 103 Changing a Fax Destination 105 Deleting a Fax De...

Page 457: ...al Is Being Transmitted 143 Before the Transmission Is Started 145 Confirming a Transmission 149 Checking the Storage Result Memory Storage Report 151 Setting Transmission Function Defaults 152 2 Other Transmission Features Sending at a Specific Time Send Later 155 Requesting a Reception Notice 157 Setting an Internet Fax E mail Destination as a BCC 159 Confirming Transmission Results by E mail 16...

Page 458: ...Functions 192 Routing Received Documents 192 Transferring Received Documents 193 Forwarding Received Documents 194 SMTP Reception of E mail 195 JBIG Reception 198 Auto Fax Reception Power Up 198 Printing Options 199 Print Completion Beep 199 Checkered Mark 199 Center Mark 199 Reception Time 200 Two Sided Printing 200 Multi Copy Reception 202 Image Rotation 202 Page Separation and Length Reduction ...

Page 459: ... Confirming by E mail 228 Confirming by Report and E mail 229 Communication Result Report Memory Transmission 229 Immediate TX Result Report Immediate Transmission 230 Communication Failure Report 230 Checking the Reception Result Reception File Status 232 Confirming on Display 232 Confirming by Report 233 Print Journal 234 Printing the Journal 234 Journal 238 Transmitting Journal by E mail 240 Co...

Page 460: ...8 Installing Individual Applications 280 Setting LAN Fax Driver Properties 281 Basic Transmission 282 Specifying Options 286 Checking Transmission Using LAN Fax Driver 289 Confirming Transmission Results by E mail 290 LAN Fax Result Report 290 Printing and Saving 291 Editing Address Book 292 Using the Machine s Address Book Data in the Destination List of the LAN Fax 294 Editing Fax Cover Sheets 2...

Page 461: ... Changing Keystroke Programs 304 Deleting a Program 307 Using a Program 308 Optional Equipment 310 Expansion Memory 28MB DIMM 310 Handset 310 Extra G3 Interface Unit 310 Specifications 311 Specifications Required for the Internet Fax Destination Machines 314 Maximum Values 316 Function List 319 INDEX 323 13 ...

Page 462: ...points to pay attention to when using the machine and explanations of likely causes of paper misfeeds damage to originals or loss of data Be sure to read these explanations Indicates supplementary explanations of the machine s functions and instructions on resolving user errors This symbol is located at the end of sections It indicates where you can find further relevant information Indicates the ...

Page 463: ... in System Settings The Facsimile Features menu includes a user parameter setting switch 17 bit 3 that enables you to configure the machine to return to standby mode whenever it finishes scanning an original see Facsimile Features General Settings Guide To manually return to the standby display do one of the following IfyouhaveplacedtheoriginalintheoptionalAutoDocumentFeeder ADF andhavenotpressed ...

Page 464: ...et Fax E mail and Folder When Fax is selected you can specify fax numbers or IP Fax destinations When Internet Fax is selected you can specify Internet Fax destinations When E mail is selected you can specify e mail destinations When Folder is selected you can specify folder destinations 7 Displays the entered number of a destination 8 Allows you to store documents in the Document Server For detai...

Page 465: ... Key see Facsimile Features General Settings Guide 19 Title word keys appear Allows you to switch from one page display to another on the destination list 20 Switches the type of title word keys For details see Switching the type of title in the Address Book 21 Appears on Destination keys programmed as a group destination The display will differ depending on installed optional units To use the Int...

Page 466: ...tial display to the simplified display Letters and keys are displayed at a larger size making operations easier BDE009S Example of a simplified display BDC005S 1 Key Color Press to increase screen contrast by changing the color of the keys This is available only for the simplified display To return to the initial display press the Simplified Display key again Certain keys do not appear on the simp...

Page 467: ...ocument away with you You can also send the same original to severaldestinations broadcasting FordetailsaboutabroadcastandParallelMemoryTransmission see Parallel Memory Transmission and Broadcasting sequence BBB013S Immediate Transmission Immediately dials the destination number and while scanning the original sends to it It is very convenient when you want to send an original quickly or when you ...

Page 468: ... 152 Setting Transmission Function Defaults Selecting Type of Transmission You can select the transmission type standard fax IP Fax Internet Fax e mail transmission or folder transmission Press the tab in the standby display to select the transmission type When sending to a standard fax or IP Fax destination Make sure that Fax is selected When sending to an Internet Fax destination Press Internet ...

Page 469: ... When sending to a folder destination Press Folder to switch the type of transmission to folder For details about each transmission type see IP Fax Functions Internet Fax Functions and Sending to E mail Folder Destinations p 31 IP Fax Functions p 35 Internet Fax Functions Transmission Modes 21 1 ...

Page 470: ...rt is printed to help you check the list of deleted files Simply turning off the power by pressing the operation switch does not delete stored documents See Turning Off the Main Power In the Event of Power Failure Troubleshooting If memory is full 0 appears in Memory at the upper right of the screen Memory Transmission is disabled Use Immediate Transmission instead 1 Make sure Immed TX is not high...

Page 471: ...nding the same original to several destinations broadcasting press Add to specify the destinations You do not have to press Add when adding a destination using the destination list 6 Specify the next destination Press the transmission type tab to switch the transmission type between fax IP Fax Internet Fax e mail and folder Multiple transmission types can be specified simultaneously 7 Press the St...

Page 472: ...iles in memory p 59 Scan Settings p 77 Specifying a Destination p 316 Maximum Values Sending originals using the exposure glass Memory Transmission This section explains how to send originals by Memory Transmission using the exposure glass 1 Make sure Immed TX is not highlighted 2 Place the first page of the original face down on the exposure glass 3 Specify a destination 4 Make the scan settings ...

Page 473: ... You can turn this function on or off with the User Parameter switch 07 bit 2 in the Facsimile Features menu See Facsimile Features General Settings Guide Standard Memory Transmission may be used instead of Parallel Memory Transmission depending on the optional equipment installed if there is not enough free memory left If you use this function the Memory Storage Report will not be printed If the ...

Page 474: ...ed If the fax document could not be transmitted the machine redials that destination after the last destination specified for broadcasting For example if you specify four destinations A through D for broadcasting and if the lines to destinations A and C are busy the machine dials the destinations in the following order A B C D A and C To check the transmission progress print the TX file list See P...

Page 475: ...st Using Multiple Line Ports p 222 Printing a List of Files in Memory Print TX File List Immediate Transmission Immediate Transmission is possible with standard fax transmission and IP Fax transmission Internet Fax e mail transmission and folder transmission are performed using Memory Transmission which automatically starts transmission after storing documents in memory If you switch the type of t...

Page 476: ...s about specifying a destination see Specifying a Destination 5 Press the Start key The machine dials a destination Documents are not stored in memory p 59 Scan Settings p 77 Specifying a Destination Sending originals using the exposure glass Immediate Transmission This section explains how to send originals by Immediate Transmission using the exposure glass 1 Press Immed TX 2 Place the first page...

Page 477: ...ds when you send multiple originals and then repeat steps 4 and 5 Repeat this step for each page 7 Press the key Displaying Confirmation of Transmission On this screen you can check the destination transmission mode and other transmission settings before transmission 1 Press Check Modes and then check the transmission settings The following display appears Transmission Modes 29 1 ...

Page 478: ...2 After checking the settings on the display press Exit 1 Transmission 30 1 ...

Page 479: ...ax number for sending When using a gatekeeper specify an alias telephone number Specify addresses of the gatekeeper or SIP server proxy server registrar server redirect server as appropriate under H 323 Settings SIP Settings or Program Change Delete Gateway in the Facsimile Features menu When using a SIP server you can send by specifying SIP user name You can also transmit to a G3 facsimile connec...

Page 480: ...d its IP Fax settings correctly specified under Initial Settings in the Facsimile Features menu For details about these settings see Facsimile Features General Settings Guide Before using this function configure the network in the System Settings menu For details about the required settings see Connecting the Machine General Settings Guide 1 Transmission 32 1 ...

Page 481: ...odifying and terminating sessions with one or more participants Gatekeeper VoIP gatekeeper A gatekeeper manages devices connected to an IP network and converts alias telephone numbers to IP addresses and performs authentication functions In addition a gatekeeper governs band transmission rate assignment and access control SIP server A SIP server mediates connection requests between devices connect...

Page 482: ...wer switch is turned on the Power Failure Report is printed to help you check the list of deleted files Simply turning off the power by pressing the operation switch does not delete stored documents See Turning Off the Main Power In the Event of Power Failure Troubleshooting Functions Not Available for IP Fax Transmission This section tells you which functions are not available for IP Fax transmis...

Page 483: ...and set up correctly in System Settings For details about the required settings see Connecting the Machine General Settings Guide To send Internet Fax documents in the Facsimile Features menu under Initial Settings set Internet Fax Setting to On However documents can still be forwarded or delivered to Internet Fax destinations even if Off is selected See Facsimile Features General Settings Guide T...

Page 484: ...e transmission result see Checking the Transmission Result Transmission File Status In this manual IP address covers both IPv4 and IPv6 environments Read the instructions that are relevant to the environment you are using p 88 Bypassing the SMTP server p 188 Received images p 226 Checking the Transmission Result Transmission File Status Notes on Using Internet Fax This section describes notes on u...

Page 485: ...epending on e mail environment conditions When available memory is low you may not be able to send Internet Fax documents Because the machine sends documents as e mail messages with an attached TIFF F image viewer applications are required in order to view documents when they are received on a computer With a large volume of document it may take some time before transmission starts This is due to ...

Page 486: ...ed if the sender requests reception notice the receiver sends a return receipt that includes the receiving machine s capability compression type paper size and resolution Registering the Received Reception Confirmation Contents Whenthesenderreceivesthereturnreceiptthatincludesthereceiver sreceptioncapability thesender checks that the final recipient address sent is programmed in the Address Book I...

Page 487: ... documents to addresses registered in Transfer Boxes E mail forwarding Routing e mail received via SMTP First register the forwarding routing destinations e mail addresses in the Address Book and then specify the encryption settings in both Address Book and Web Image Monitor for each destination that you want to send encrypted e mail to For details about these settings ask your administrator E mai...

Page 488: ...n receive S MIME encrypted e mail For details about how to specify encryption and digital signature settings see Facsimile Features General Settings Guide For details about forwarding routing transferring functions see the following Routing Received Documents Transferring Received Documents Forwarding Received Documents Routing e mail received via SMTP p 192 Routing Received Documents p 193 Transf...

Page 489: ...menu under Initial Settings See Facsimile Features General Settings Guide To send to folder destinations set Folder Setting to On in the Facsimile Features menu under Initial Settings See Facsimile Features General Settings Guide Black and white images are sent in the same way as standard fax transmissions To send to a folder destination you must first register the path for the folder in the Addre...

Page 490: ...ng and routing Use of encryption and or digital signatures helps prevent e mail spoofing and information leakage Encryption and digital signatures can be used with the following functions Routing documents to addresses registered in Personal Boxes Transferring documents to addresses registered in Transfer Boxes E mail forwarding Routing e mail received via SMTP First register the forwarding routin...

Page 491: ...inations broadcasted documents are sent one by one in the order in which the destinations were specified This machine cannot receive e mails encrypted with S MIME When configuring the S MIME encryption settings you should confirm that the receiver can receive S MIME encrypted e mail For details about how to specify encryption and digital signature settings see Facsimile Features General Settings G...

Page 492: ...ls Copy Document Server Reference Note that Special Original of the copy function cannot be used with the facsimile function Place the originals according to their paper size Original size Placing on the exposure glass Placing into the ADF A4 B4 JIS A3 81 2 11 81 2 14 11 17 A4 B4 JIS A3 81 2 11 81 2 14 11 17 B6 JIS A5 B5 JIS 51 2 81 2 B6 JIS A5 B5 JIS 51 2 81 2 If you place A5 or B6 JIS size origi...

Page 493: ... sure that all ink correcting fluid etc has completely dried before placing your original If it is still wet the exposure glass will become marked and those marks will appear on the received image Generally place A4 81 2 11 originals in the landscape orientation If you place an A4 81 2 11 original in the portrait orientation the image is sent rotated by 90 See Transmission with Image Rotation You ...

Page 494: ...e the Original Orientation setting to display the top bottom orientation of the original correctly in the preview 1 Place the original and then select the scan settings you require 2 Press Original Feed Type 3 Specify the original orientation Check the orientation of the placed document and then press or 4 Press OK The selected original orientation appears in Original Feed Type 5 Specify a destina...

Page 495: ... original with the same orientation at the other end specify the Original position and Page opening orientation BBB025S To use this function the optional ADF is required When you use 2 Sided Original under Original Feed Type the originals cannot be sent by using just the exposure glass Two sided originals are only sent with Memory Transmission Immediate Transmission is not possible 1 Place the ori...

Page 496: ... the original orientation Check the orientation of the placed document and then press or Make sure that the specified original orientation matches the orientation of originals loaded in the ADF 4 Press 2 Sided Original 1 Transmission 48 1 ...

Page 497: ...tart key You can confirm whether both sides were properly scanned using the Stamp function For details about Stamp see Stamp For details about acceptable original size and paper thickness for two sided scanning with the ADF see Acceptable Original Sizes You can set the original feed types that are selected right after the power is turned on or whenever the Clear Modes key is pressed See Setting Tr...

Page 498: ...Mixed Original Sizes mode is 52 81 4 g m2 13 8 21 5 lb Paper Size and Scanned Area This section explains the size of the area the machine can scan and detect There may be a difference in the size of the image when it is printed at the destination Even if an original is correctly placed on the exposure glass or in the ADF a margin of 3 mm 0 1 inch around each edge of the original may not be sent If...

Page 499: ... Inch Version BDC003S Unable to auto detect 1 Normally a length of about 420 mm 16 5 inches can be scanned however it is only possible to specify a scanning size up to 432 mm 17 inches If the machine cannot detect the size of the original you placed specify the scan area original size manually For details about specifying the scan area see Scan Size Placing Originals 51 1 ...

Page 500: ...es W L Immediate Transmission 297 1200 mm 11 47 inches W L BBB001S The machine detects paper sizes in the following ways Metric Version Length 240 mm 240 291 mm 291 320 mm 320 mm Width 138 mm B6 JIS B6 JIS B6 JIS B6 JIS 138 191 5 mm A5 B6 JIS B5 JIS B5 JIS B5 JIS 191 5 230 mm A5 81 2 11 A4 81 2 13 230 263 5 mm B5 JIS B4 JIS B4 JIS B4 JIS 263 5 288 mm 81 2 11 11 17 11 17 11 17 288 mm A4 A3 A3 A3 1 ...

Page 501: ...ct This section describes the kinds of original whose sizes might be difficult to detect If the original type is one of the following the machine might not detect its size correctly and the receiver s machine might print it on paper of the wrong size originals placed on the exposure glass that are of a size not listed in the following table originals with index tabs tags or protruding parts transp...

Page 502: ...tect Transmission with Image Rotation As a general rule place A4 81 2 11 originals in the landscape orientation If you place an A4 81 2 11 original in the portrait orientation the image is sent rotated by 90 Providing the receiver has A4 81 2 11 landscape paper the document is printed at the same size as the original This function is unavailable with Immediate Transmission This function is unavail...

Page 503: ...en scanning from the ADF 1 Place the original and then select the scan settings you require 2 Press Original Feed Type 3 Press Stamp To cancel the stamp press Stamp again before pressing OK 4 Press OK 5 Specify the destination and then press the Start key Placing Originals 55 1 ...

Page 504: ...tures General Settings Guide A paper jam during Parallel Memory Transmission may cause the transmission to fail even if stamping is performed You cannot turn the Stamp function on or off while an original is being scanned p 152 Setting Transmission Function Defaults Checking the Content of a Scanned Original Preview Before Transmission The Preview Before Transmission function allows you to check t...

Page 505: ...can the original When scanning ends a preview is displayed If you want to cancel a preview press Cancel 4 Check the preview Press Zoom Out or Zoom In to reduce or enlarge the preview image Press to scroll the preview image Press Switch under Display File to display another selected file Press Switch under Display Page to change the displayed page Placing Originals 57 1 ...

Page 506: ... display appears You can have the machine select Preview Before Transmission right after the power is turned on or whenever the Clear Modes key is pressed For details see Setting Transmission Function Defaults p 46 Setting the Original Orientation p 152 Setting Transmission Function Defaults 1 Transmission 58 1 ...

Page 507: ...ains photographs illustrations or diagrams with complex shading patterns or grays select the appropriate scan type to optimize image clarity Text Select Text to send high contrast black and white image originals Use this setting when you only want to send clearer text even if the original contains text and photographs Text Line Art Select Text Line Art to send high contrast black and white graphic...

Page 508: ...ected If you send a fax document with Text Line Art Text Photo or Photo and the background of the received image is dirty reduce the density setting and resend the fax For details about setting the image density see Density Contrast You can set the scan type that is selected right after the machine is turned on or whenever the Clear Modes key is pressed See Setting Transmission Function Defaults 1...

Page 509: ...etermines the quality of the image and how long it takes to transmit Therefore images scanned at high resolution Super Fine have high quality but transmission takes longer Conversely low resolution Standard scanning results in lower quality but the original is sent more quickly Select the setting that matches your needs based upon this trade off between speed and image clarity Standard 8 3 85 line...

Page 510: ... that is supported You can check the resolution at which you actually sent by printing the Journal For details about printing the Journal see Print Journal Sending with Super Fine resolution requires that the machine has the optional expansion memory and the other party s machine has the capability to receive fax documents at Super Fine resolution The machine supports Standard Detail Fine with the...

Page 511: ...ll Mode p 38 T 37 Full Mode p 152 Setting Transmission Function Defaults p 234 Print Journal Scan Size Specify a scan area within an original Normally originals are scanned according to their size which the machine detects automatically However you can specify the scan area manually also Specifying the scan area manually can be useful for cropping excess border space around an image Auto Detect De...

Page 512: ...ss Auto Detect 4 Press OK Auto Detect appears above Scan Settings For details about an original the machine cannot detect its size correctly see Types of Original whose Sizes are Difficult to Detect p 53 Types of Original whose Sizes are Difficult to Detect 1 Transmission 64 1 ...

Page 513: ... size regardless of actual size The sizes that can be specified are A4 B4 JIS A3 81 2 11 81 2 14 and 11 17 1 Press Scan Settings 2 Press Scan Size 3 Press the size of the originals to be sent 81 2 11 indicates LT 81 2 14 indicates LG 11 17 indicates DLT Scan Settings 65 1 ...

Page 514: ...Area Only the area in the specified size is scanned regardless of the actual size of a placed original You must first register the sizes of the originals that you want to scan in Program Change Delete Scan Size on the Facsimile Features menu See Facsimile Features General Settings Guide 1 Press Scan Settings 1 Transmission 66 1 ...

Page 515: ... Original Sizes You can send the different size of originals simultaneously Select this to individually scan the size of originals loaded into the optional ADF For example when A3 andA4 sizeoriginalsaresenttogether usuallyallaresentusingthesizeofthefirstoriginal Byselecting Mixed Original Sizes the machine scans and sends each original according to its size Scan Settings 67 1 ...

Page 516: ...e originals of two different sizes at a time When placing originals in the ADF align their rear and left edges against the ADF and adjust the document guide according to the largest original Since small originals may not be correctly aligned with the original guide the scanned image may be slanted 1 Press Scan Settings 2 Press Scan Size 1 Transmission 68 1 ...

Page 517: ...u can have the machine select Mixed Original Sizes right after the power is turned on or whenever the Clear Modes key is pressed See Setting Transmission Function Defaults p 152 Setting Transmission Function Defaults Density Contrast You can adjust the density at which the originals are scanned The text and diagrams on originals should stand out clearly from the paper they are on If the original h...

Page 518: ...y levels 1 If Auto Density is selected press Auto Density to turn it off 2 Press or to adjust the density The indicator moves Combined Auto and Manual Density You can only adjust density for photographs illustrations or diagrams if the original has a dark background You can select one of seven density levels 1 Make sure that Auto Density is selected 2 Press or to adjust the density The indicator m...

Page 519: ...erent scan setting for each page It is recommended that originals be placed on the exposure glass when mixing scan settings for a multiple page original If you are using the ADF do not change the Resolution setting while originals are being scanned When placing originals on the exposure glass 1 Check which pages you want to scan with different settings 2 Remove the previous page and place the next...

Page 520: ...nt Feeder ADF 1 Check which pages you want to scan with different settings 2 Make the scan settings before the page you want to change the settings for starts being scanned Depending on what time the scan settings are adjusted the settings may not be reflected in the resulting operation 1 Transmission 72 1 ...

Page 521: ... the extra G3 interface unit is installed communications can take place simultaneously through three lines at once The following list shows protocol combinations available for each line type Option Available line types Available protocol combinations Without option PSTN G3 Extra G3 interface unit PSTN PSTN G3 G3 Extra G3 interface unit Extra G3 interface unit PSTN PSTN PSTN G3 G3 G3 IP Fax When se...

Page 522: ...or whether you should select SIP or H 323 as the protocol 1 Press Select Line 2 Select the line you want to use If you select G3 Auto the machine will use any available line This increases efficiency When one optional extra G3 unit is installed When two optional extra G3 units are installed When H 323 SIP are set to On 1 Transmission 74 1 ...

Page 523: ...usly If three communications are in progress the display shows the first communication that was initiated p 152 Setting Transmission Function Defaults Simultaneous Broadcast Using Multiple Line Ports The standard broadcast function sends faxes one at a time to multiple destinations in the order of specified destinations However the Simultaneous Broadcast function can simultaneously send faxes to m...

Page 524: ...N are possible When using the optional extra G3 interface unit if you set the line selection as G3 Auto beforehand the machine will use whichever G3 line is not busy This increases efficiency This function is available when using the LAN Fax Driver 1 Transmission 76 1 ...

Page 525: ...ide of the control panel to enter numbers 1 Make sure that Fax is selected 2 Enter the fax number using the number keys If you make a mistake press the Clear Stop key and then enter again When adding a destination pressing the transmission type tab switches the transmission type between fax IP Fax Internet Fax e mail and folder 3 Press the Start key The machine starts to scan the original and stor...

Page 526: ...Entered Destinations to the Address Book For the maximum number of digits that can be included in a destination see Maximum Values p 73 Changing the Line Port p 78 Entering a pause p 79 Entering a tone p 99 Using the Address Book to Specify Destinations p 109 Registering Entered Destinations to the Address Book p 316 Maximum Values Entering a pause This section explains how to enter a pause Press ...

Page 527: ...e tone function with On Hook Dial as an example 1 Press On Hook 2 Enter the fax number using the number keys 3 Press Tone 4 Enter the number you want to tone dial using the number keys 5 Press the Start key Transmission starts If you want to cancel a transmission press the Clear Stop key and then remove the originals After transmission the standby display appears Certain services may be unavailabl...

Page 528: ...s function helps prevent users accidentally sending faxes to the wrong destination If you want to enable this function contact your service representative Whenusingthisfunction youmustpress ManualEntry onthestandbydisplaytoenterthefaxnumber 1 Press Manual Entry 2 Enter the fax number using the number keys and then press OK If you make a mistake press Clear and then enter the number again 1 Transmi...

Page 529: ... You can specify the number of times 1 to 15 that the fax number must be re entered Step 3 must be repeated as many times as is set here You cannot edit the first fax number that is entered You cannot use this function from the simplified display Sending by IP Fax This section explains how to specify a destination using IP Fax transmission When using IP Fax transmission specify the IP Fax destinat...

Page 530: ...elected 2 Press Manual Entry 3 Enter the IP Fax destination and then press OK If you enter an incorrect character press Backspace or Delete All Then re enter the characters correctly To change the IP Fax destination after pressing OK press Edit Dest re enter an IP Fax destination and then press OK 4 To add a destination press Add 1 Transmission 82 1 ...

Page 531: ... network settings made by the administrator Ask the machine administrator for details For details about entering the IP Fax destination see Regarding IP Fax destinations For details about text entry see Entering Text About This Machine The Facsimile Features menu includes a user parameter setting switch 17 bit 2 that enables you to configure the machine to force the user to press Add whenever s he...

Page 532: ...ple 0312345678 When using a gatekeeper server From IP Fax to IP Fax Specify the alias telephone number of the receiving machine Example 0311119999 alias telephone number From IP Fax to G3 fax Specify the G3 fax telephone number of the receiving machine Example 0312345678 When using a SIP server From IP Fax to IP Fax Specify the SIP user name of the receiving machine Example ABC SIP user name From ...

Page 533: ...hough the machine can have multiple IP addresses in an IPv6 environment only one address can receive IP Faxes To send via IPv6 you must specify for the receiver s IPv6 address and host name the manually configured address for the receiver s fax For reception when not using SIP server in an IPv6 environment you must specify this machine s IPv6 address manually This is not necessary if you are using...

Page 534: ...te Transmission mode the transmission mode is automatically switched to Memory Transmission 1 Press Internet Fax to switch the transmission type to Internet Fax 2 Specify the sender For details see Sender Settings 3 Press Manual Entry 4 Enter the Internet Fax destination and then press OK If you enter an incorrect character press Backspace or Delete All Then re enter the characters correctly 1 Tra...

Page 535: ... on the security settings Manual Entry might not appear and you might not be able to enter the e mail address To select a destination from the Address Book see Using the Address Book to Specify Destinations For details about text entry see Entering Text About This Machine For details about canceling a transmission see Canceling a Transmission The Facsimile Features menu includes a user parameter s...

Page 536: ...a Transmission p 316 Maximum Values Bypassing the SMTP server You can send Internet Fax documents directly to their destinations without going through the SMTP server Normally Internet Fax is sent through the SMTP server With this feature however the domain part of the destination se mailaddressisreadastheSMTPserver saddressandtransmissionsbypasstheSMTPserver Since this reduces the load on the ser...

Page 537: ... machine There are two ways of specifying a destination as follows By specifying the other party s host name Specify a destination s e mail address by adding the other party s host name to the domain part of the e mail address Specify the address after the as follows host name dot and domain name xxxx host name of the other party domain name For example if the other party s e mail address is abc d...

Page 538: ...ified in the Address Book is enabled For details about making the SMTP server settings in the Address Book see Registering Addresses and Users for Facsimile Scanner Functions General Settings Guide To send Internet Fax documents from a computer use the LAN Fax Driver to specify whether or not to bypass the SMTP server When sending with the Use device address check box selected the SMTP server sett...

Page 539: ...nd Users for Facsimile Scanner Functions General Settings Guide To use an e mail address registered in the Address Book as an e mail destination set Use E mail Address for as E mail Internet Fax Destination E mail transmission is performed using Memory Transmission which automatically starts transmission after storing documents in memory If you switch the type of transmission to e mail while the m...

Page 540: ...nter the e mail destination and then press OK If you enter an incorrect character press Backspace or Delete All Then re enter the character correctly To change the e mail address after pressing OK press Edit Dest re enter the e mail address and then press OK 1 Transmission 92 1 ...

Page 541: ...ess Book see Using the Address Book to Specify Destinations For details about text entry see Entering Text About This Machine For details about canceling a transmission see Canceling a Transmission The Facsimile Features menu includes a user parameter setting switch 17 bit 2 that enables you to configure the machine to force the user to press Add whenever s he specifies a destination using a desti...

Page 542: ...hrough the SMTP server Normally e mail is sent through the SMTP server With this feature however the domain part of the destination se mailaddressisreadastheSMTPserver saddressandtransmissionsbypasstheSMTPserver Since this reduces the load on the server you can send e mails without having to take into account the transfer time from server to destination To use this function the following settings ...

Page 543: ...By specifying the other party s host name Specify a destination s e mail address by adding the other party s host name to the domain part of the e mail address Specify the address after the as follows host name dot and domain name xxxx host name of the other party domain name For example if the other party s e mail address is abc defcompany com and the host name is HOST abc HOST defcompany com By ...

Page 544: ...ddress Book is enabled Sending to Folder Destinations You can specify a folder destination by selecting a Destination key from the destination list To send to a folder destination you must first register the path for the folder in the Address Book You cannot enter the path on the standby display For details about how to register a folder destination see Registering Addresses and Users for Facsimil...

Page 545: ...1 Press Folder to switch the transmission type to folder 2 To set the file type press File Type Select TIFF or PDF and then press OK Specifying a Destination 97 1 ...

Page 546: ...u switch the type of transmission to folder while the machine is in Immediate Transmission mode the transmission mode is automatically switched to Memory Transmission For details about canceling a transmission see Canceling a Transmission The Facsimile Features menu includes a user parameter setting switch 17 bit 2 that enables you to configure the machine to force the user to press Add whenever s...

Page 547: ... Functions General Settings Guide 1 Press the transmission type tab to switch the transmission type to fax IP Fax Internet Fax e mail or folder 2 Press the title word key where the desired destination is programmed For example if you want to specify NewYork Office programmed in LMN press LMN 3 Press the Destination key programmed with the desired destination If the desired Destination key is not s...

Page 548: ...okes Destinations programmed in a group are indicated by a group icon In the destination list program groups in advance For details about programming destinations see Registering Addresses and Users for Facsimile Scanner Functions General Settings Guide Group destination can be used only for Memory Transmission it cannot be used for Immediate Transmission The machine automatically changes to Memor...

Page 549: ...ress and to display the desired destination and then press the Clear Stop key You can also cancel a transmission by pressing the highlighted Destination key to deselect it p 316 Maximum Values Selecting Destinations from Recent Destinations The machine stores the latest destinations specified for each transmission method This function saves time when you are sending to the same destination repeate...

Page 550: ...ll When you press Program Dest you can register a selected destination in the destination list For details about storing a destination you selected see Registering Entered Destinations to the Address Book For the maximum number of recent destinations the machine can store see Maximum Values p 109 Registering Entered Destinations to the Address Book p 316 Maximum Values 1 Transmission 102 1 ...

Page 551: ... and folder destinations to groups You can register destinations using Prg Dest on the initial display In the facsimile initial display if you change the contents of the Address Book the Destination list machinesettingsareupdated messageappears Press Exit tobringbackthefacsimileinitialdisplay You can register destinations in the Address Book using Web Image Monitor or SmartDeviceMonitor for Admin ...

Page 552: ...ess Book Management 5 Check that Program Change is selected 6 Press New Program 7 Press Change under Name The name entry display appears 8 Enter the name and then press OK 9 Press the key for the classification you want to use under Select Title 1 Transmission 104 1 ...

Page 553: ... your faxes when the receiver prints them Label Insertion specify label information such as the destination name that appears on your faxes when the receiver prints them 14 Press OK 15 Press Exit 16 Press the User Tools Counter key For details about the procedure in step 13 see Registering Addresses and Users for Facsimile Scanner Functions General Settings Guide Changing a Fax Destination This se...

Page 554: ... Select the name whose fax destination you want to change Press the name key or enter the registration number using the number keys 7 To change the name or key display press Change under Name or Key Display 8 Enter the name or key display and then press OK 9 To change the title press the key for the classification you want to use from Select Title 1 Transmission 106 1 ...

Page 555: ...and Label Insertion as necessary 14 Press OK 15 Press Exit 16 Press the User Tools Counter key For details about the procedure in step 13 see Registering Addresses and Users for Facsimile Scanner Functions General Settings Guide Deleting a Fax Destination This section explains how to delete destination information from the Address Book Programming Destinations in the Address Book 107 1 ...

Page 556: ... 3 Press Administrator Tools 4 Press Address Book Management 5 Press Delete 6 Select the name you want to delete Press the name key or enter the registration number using the number keys 7 Press Yes 8 Press Exit 9 Press the User Tools Counter key 1 Transmission 108 1 ...

Page 557: ...ormation 3 Press OK For details about registering destinations see Registering Addresses and Users for Facsimile Scanner Functions General Settings Guide Depending on the security settings Prg Dest might not appear and you might not be able to register the destination To use an e mail address registered in the Address Book as an e mail destination specify Use E mail Address for for E mail Internet...

Page 558: ...the maximum number of destinations you can search for at a time Press Exit and change the destination name to view fewer destinations For the maximum number of destinations you can search at a time using Search Dest see Maximum Values Although one user can program multiple e mail addresses only one address can be retrieved by the search The address retrieved by the search depends on the searching ...

Page 559: ...sion type tab to switch the transmission type to fax IP Fax Internet Fax e mail or folder If you selected an LDAP server in step 2 you cannot select Folder 4 Press Name Searching for a Destination in the Address Book 111 1 ...

Page 560: ...n 6 Check the characters you have entered are correct and then press Start Search When the search is finished a result appears 7 Select a destination If the destination you require does not appear use or to scroll through the list Press Details to display the details of a selected destination For details about text entry see Entering Text About This Machine 1 Transmission 112 1 ...

Page 561: ...est 2 Select a search destination To search through the Address Book select Address Book To search through an LDAP server select the relevant LDAP server 3 Press Fax Destination 4 Enter the number you want to search for and then press OK To search for an IP Fax destination enter the IP Fax destination that you want to find Searching for a Destination in the Address Book 113 1 ...

Page 562: ... fax numbers you have entered are correct and then press Start Search When the search is finished a result appears 6 Select a destination If the destination you require does not appear use or to scroll through the list Press Details to display the details of a selected destination 1 Transmission 114 1 ...

Page 563: ... by Internet Fax destination 1 Press Search Dest 2 Select a search destination To search through the Address Book select Address Book To search through an LDAP server select the relevant LDAP server 3 Press Internet Fax to switch the transmission type to Internet Fax Searching for a Destination in the Address Book 115 1 ...

Page 564: ... want to search for and then press OK If you enter a wrong character press Backspace or Delete All and then enter the character again 6 Check the characters you have entered are correct and then press Start Search When the search is finished a result appears 1 Transmission 116 1 ...

Page 565: ...on Search by E mail Destination This section explains how to search for a destination registered in the Address Book by e mail destination 1 Press the Search Dest 2 Select a search destination To search through the Address Book select Address Book To search through an LDAP server select the relevant LDAP server Searching for a Destination in the Address Book 117 1 ...

Page 566: ... type to e mail 4 Press E mail Address 5 Enter the e mail address e mail destination you want to search for and then press OK If you enter a wrong character press Backspace or Delete All and then enter the character again 1 Transmission 118 1 ...

Page 567: ...he destination you require does not appear use or to scroll through the list Press Details to display the details of a selected destination Search by Folder Destination This section explains how to search for a destination registered in the Address Book by folder destination 1 Press the Search Dest Searching for a Destination in the Address Book 119 1 ...

Page 568: ...2 Make sure that Address Book is selected 3 Press Folder to switch the transmission type to folder 4 Press Folder Name 1 Transmission 120 1 ...

Page 569: ...er again 6 Check the characters you have entered are correct and then press Start Search When the search is finished a result appears 7 Select a destination If the destination you require does not appear use or to scroll through the list Press Details to display the details of a selected destination Searching for a Destination in the Address Book 121 1 ...

Page 570: ...arch Dest 2 Select a search destination To search through the Address Book select Address Book To search through an LDAP server select the relevant LDAP server 3 Press the transmission type tab to switch the transmission type to fax IP Fax Internet Fax e mail or folder If you selected an LDAP server in step 2 you cannot select Folder 1 Transmission 122 1 ...

Page 571: ...nation E mail Address Company Name and Department Name 6 Select search criteria for each condition The meanings of the search criteria are as follows Beginning Word Search for strings that start with the specified character Example When searching for ABC enter A End Word Search for strings that end with the specified character Example When searching for ABC enter C Exact Match Search for strings t...

Page 572: ... you require does not appear press or to display it Press Details to display the details of a selected destination You can add one additional search condition for LDAP servers by specifying the Search Options under Program Change Delete LDAP Server under System Settings See System Settings General Settings Guide The string you enter in the Name condition field is read as the first or last name dep...

Page 573: ...nter a registration number using the number keys and then press While usually a registration number is displayed in the five digit format you do not need to enter the first zeros of a registration number If you make a mistake press Clear before pressing and then try again 4 Press OK The corresponding destination appears Searching for a Destination in the Address Book 125 1 ...

Page 574: ...gistration No message appears the specified registration number or selected type of transmission is wrong or does not exist Press Exit check the registration number again and then follow the procedure from step 1 or 3 1 Transmission 126 1 ...

Page 575: ...gs you require 2 Press On Hook You will hear a low tone from the internal speaker If you want to cancel this operation press On Hook again 3 Dial The machine immediately dials the destination If you make a mistake press On Hook or the Clear Modes key and then try again 4 When the line is connected and you hear a high pitched tone press the Start key Transmission starts If you want to cancel a tran...

Page 576: ... external telephone on the fax machine you can speak with the other party when you hear a voice If you hear a voice before pressing the Start key pick up the optional handset or the handset of the external telephone and tell the receiver you want to send a fax document ask them to switch to facsimile mode The Facsimile Features menu contains the On Hook Mode Release Time setting which allows you t...

Page 577: ...one 3 Dial The machine immediately dials the destination If you make a mistake replace the handset and then try again from step 2 4 When the line is connected and you hear a high pitched tone press the Start key to send your fax document If you hear a voice tell the receiver that you want to send them a fax document ask them to switch to facsimile mode Transmission starts 5 Replace the handset If ...

Page 578: ...r switch is on you cannot operate this machine using only the optional handset or the handset of the external telephone You must first press the operation switch to turn on the machine p 99 Using the Address Book to Specify Destinations 1 Transmission 130 1 ...

Page 579: ...and then specify Use Name as for Sender If you want senders to receive e mail notification of transmission results specify Use Name as for both Sender and Destination For details about these settings see Registering Addresses and Users for Facsimile Scanner Functions General Settings Guide If user authentication is set the user logged in is set as sender The transmission result is sent to the logg...

Page 580: ... press OK 5 To print the sender s name on the receiver s sheet press Stamp Sender Name to highlight it If you enable this function the sender s name user name appears on the receiver s sheet lists and report 6 To confirm the transmission results by e mail notification press E mail TX Results to highlight it If the sender s e mail address is registered you can send the transmission result to the re...

Page 581: ...n set whether to use both of these together in User Parameter switch 10 bit 6 in the Facsimile Features menu See Facsimile Features General Settings Guide You can use Communication Result Report etc to check usage status by specified users If user authentication is set you can check usage by logged in users If User Code is set to sender you can count the number of uses by each user To cancel the S...

Page 582: ...can print the document Documents can also be sent via facsimiles that have the Transfer Station function This function helps you save costs when you send the same document to more than one place in a distant area and saves time since many documents can be sent in a single operation Documents can be sent to facsimiles that have the Personal Box function A SUB Code cannot be used with Internet Fax e...

Page 583: ...de Transmission 5 Press OK twice The standby display appears 6 Enter the fax number of a destination or an IP Fax destination 7 Press Adv Features 8 Make sure that SUB Code is selected 9 Press Transmission SUB Code Advanced Features 135 1 ...

Page 584: ...e machine to which you are sending For the maximum number of digits for the SUB Code of this machine see Maximum Values You can store SUB Codes as well as names and fax numbers in the destination list and Keystroke Programs For registering into the destination list see Registering Addresses and Users for Facsimile Scanner Functions General Settings Guide For registering into the Keystroke Programs...

Page 585: ...he Keystroke Programs see Registering and Changing Keystroke Programs The SID Code is printed on lists and reports p 304 Registering and Changing Keystroke Programs p 316 Maximum Values Setting SEP Codes for Reception This section explains how to enter a SEP Code to request the destination to transmit a document You can receive a document stored in the destination s memory if the document has the ...

Page 586: ...1 Press TX Mode 2 Press Option Setting 3 Press SEP Code Reception 4 Press OK twice The standby display appears 5 Enter the fax number of a destination or an IP Fax destination 1 Transmission 138 1 ...

Page 587: ...h you are receiving For the maximum number of digits for the SEP Code of this machine see Maximum Values You can enter numbers and spaces You can store SEP Codes as well as names and fax numbers in the destination list and Keystroke Programs For registering into the destination list see Registering Addresses and Users for Facsimile Scanner Functions General Settings Guide For registering into the ...

Page 588: ...ms see Registering and Changing Keystroke Programs The PWD Code is printed on lists and reports p 304 Registering and Changing Keystroke Programs p 316 Maximum Values SEP Code RX Reserve Report This report is printed after SEP Code Reception is set up You can use this report to check the reservations for SEP Code Reception You can turn this function on or off with the User Parameter switch 03 bit ...

Page 589: ...ile Features menu If user authentication is set you can select whether to display a destination with the User Parameter switch 04 bit 4 in the Facsimile Features menu If user authentication is set you can select whether to display a sender name with the User Parameter switch 04 bit 5 in the Facsimile Features menu For details about Parameter Setting see Facsimile Features General Settings Guide Yo...

Page 590: ...eing executed Before the Original Is Scanned Use this procedure to cancel a transmission before pressing the Start key 1 Press the Clear Modes key BBB054S When originals are placed into the ADF you can cancel transmission simply by removing them While the Original Is Being Scanned Use this procedure to cancel a transmission while the originals are being scanned after the Start key has been pressed...

Page 591: ...cel operation While the Original Is Being Transmitted This section explains how to cancel a transmission while the Communicating indicator is lit 1 Press the Clear Stop key BDE010S The screen shown in step 2 can also be displayed by pressing Check Stop Transmission File under Change TX Info Canceling a Transmission 143 1 ...

Page 592: ...to find it There are cases when a destination may not be selected as the destination appears as depending on the security settings 3 Press Stop Transmission 4 Press OK To cancel another file repeat steps 2 through 4 To cancel stopping transmission press Cancel 1 Transmission 144 1 ...

Page 593: ...le destinations were specified only one destination number appears Before the Transmission Is Started Use this procedure to cancel a transmission after the original is scanned This function is useful to cancel a transmission when you notice a mistake in destination or with the originals after storing To cancel Memory Transmission search for the file to be canceled among the files stored in memory ...

Page 594: ... for transmission appears To display only the files being sent press Files under TX 3 Select the file you want to cancel If the desired file is not shown press or to find it There are cases when a destination may not be selected as the destination appears as depending on the security settings 1 Transmission 146 1 ...

Page 595: ...ress Cancel 6 Press Exit twice The standby display appears To delete some destinations from a broadcast see Deleting a Destination from a Broadcast If you cancel a transmission while the file is being sent some pages of your file may have already been sent and is received at the other end Canceling a Transmission 147 1 ...

Page 596: ... destinations were specified only the number of the destinations that have not received the document you sent is shown If multiple destinations were specified only one destination number appears To display all destinations press Check Change Settings p 209 Deleting a Destination from a Broadcast 1 Transmission 148 1 ...

Page 597: ...1 Press Change TX Info 2 Press Check Stop Transmission File 3 Select a file to check If multiple destinations were specified only the name of the destination you specify first and only the number of destinations that have not received the document you sent are shown Confirming a Transmission 149 1 ...

Page 598: ...nfirm a transmission and then press Exit 6 Press Exit twice The standby display appears You cannot view or edit a file that is in the process of being sent or a file that was sent by LAN Fax and is stored in memory 1 Transmission 150 1 ...

Page 599: ...is still printed if an original could not be stored You can select whether to include part of the original image on the report with the User Parameter switch 04 bit 7 in the Facsimile Features menu If user authentication is set you can select whether to display a destination with the User Parameter switch 04 bit 4 in the Facsimile Features menu If user authentication is set you can select whether ...

Page 600: ...type Scan Type Resolution Scan Size MixedOriginalSizes AutoDensity ManualDensity OriginalOrientation OriginalSettings Stamp Select Line Send Later Reception Notice BCC Transmission E mail TX Results Text Standard Message Auto Reduce Label Insertion Closed Network SUB Code Transmission SEP Code Reception Fax Header Print TX Status Report Store File File Type Preview before transmission 1 On the ini...

Page 601: ...ctory default settings for the settings on the initial display press Restore Factory Defaults You can set the default settings of the normal and simplified screens separately Setting Transmission Function Defaults 153 1 ...

Page 602: ...1 Transmission 154 1 ...

Page 603: ...ntage of off peak telephone charges without having to be by the machine at the time If the machine is switched off for about one hour all fax documents stored in memory are lost If documents are lost for this reason a Power Failure Report is automatically printed when the operation switch is turned on Use this report to check the list of lost documents See Turning Off the Main Power In the Event o...

Page 604: ...stination and then press the Start key You can specify a time within 24 hours of the current time If the current time shown is not correct change it using Set Time under System Settings For details about the setting see System Settings General Settings Guide You can program one of the Quick Operation keys with operations for this function Using the Quick Operation key allows you to omit step 2 and...

Page 605: ...erify the transmission was received The Reception Notice feature is only available if the receiver supports MDN Message Disposition Notification 1 Place the original and then select the scan settings you require 2 Specify the sender For details see Sender Settings 3 Press TX Mode 4 Press Reception Notice to highlight it 5 Press OK The standby display appears To check the settings press TX Mode 6 S...

Page 606: ...not be overwritten even if you subsequently receive a reception notice message as OK following the error message Reception notice results are only shown in the Journal The Result column in all other files lists and transmission reports show Reception notice messages themselves are not recorded in the Journal You can select whether or not to print the Reception Notice This can be set with User Para...

Page 607: ...ess TX Mode 4 Press BCC Transmission to highlight it 5 Press OK The standby display appears To check the settings press TX Mode 6 Specify a destination and then press the Start key You can program one of the Quick Operation keys with operations for this function Using the Quick Operationkeyallowsyoutoomitsteps3and5 FordetailsaboutQuickOperationKey see Facsimile Features General Settings Guide Sett...

Page 608: ... p 131 Sender Settings 2 Other Transmission Features 160 2 ...

Page 609: ... specified destination Register the e mail address of the destination for e mail notification in the destination list in advance 1 Place the original and then select the scan settings you require 2 Specify the sender For details see Sender Settings 3 Press TX Mode 4 Press E mail TX Results Confirming Transmission Results by E mail 161 2 ...

Page 610: ...on of notification selected appears 6 Press OK The standby display appears To check the settings press TX Mode 7 Specify a destination and then press the Start key You can program one of the Quick Operation keys with operations for this function Using the Quick Operationkeyallowsyoutoomitsteps3and6 FordetailsaboutQuickOperationKey see Facsimile Features General Settings Guide p 131 Sender Settings...

Page 611: ...or the Internet Fax or e mail document you want to send 1 Place the original and then select the scan settings you require 2 Specify the sender For details see Sender Settings 3 Press TX Mode 4 Press Subject 5 Enter the subject Entering the Subject 163 2 ...

Page 612: ... Internet Fax or e mail without setting a subject a subject is automatically inserted For details about how the subject is automatically inserted see Specifying Auto Generated Subjects for E mail and Received images You cannot send a subject only as Internet Fax or e mail without an original For details about text entry see Entering Text About This Machine You can program one of the Quick Operatio...

Page 613: ...aboutusingtheStampSenderName function see Sender Settings When Stamp Sender Name is set to on From Sender Name Fax Message NO xxxx When Stamp Sender Name is set to off If Own Fax Number and Own Name are programmed From Own Fax Number Own Name Fax Message NO xxxx If only Own Fax Number is programmed From Own Fax Number Fax Message NO xxxx If only Own Name is programmed From Own Name Fax Message NO ...

Page 614: ...ancein Program Change DeleteE mailMessage in SystemSettings For details about the programming method see System Settings General Settings Guide 1 Place the original and then select the scan settings you require 2 Specify the sender For details see Sender Settings 3 Press TX Mode 4 Press Text 2 Other Transmission Features 166 2 ...

Page 615: ... Start key You cannot send text only without an original You can program one of the Quick Operation keys with operations for this function Using the Quick Operationkeyallowsyoutoomitsteps3and6 FordetailsaboutQuickOperationKey see Facsimile Features General Settings Guide p 131 Sender Settings Entering the Text 167 2 ...

Page 616: ...efourtypesofstandardmessages Confidential Urgent Pleasephone and Copytocorres Section You can also program other messages While this function is in use the third line of the Label Insertion is not printed When there is an image around the area where the standard message is to be stamped that image is deleted 1 Place the originals and then select the scan settings you require 2 Press TX Mode 3 Pres...

Page 617: ...u You can program one of the Quick Operation keys with operations for this function Using the Quick Operation key allows you to omit steps 2 3 and 6 For details about Quick Operation Key see Facsimile Features General Settings Guide Auto Reduce When this function is turned on if the receiver s paper is smaller than the size of the original you are sending the document is automatically reduced to f...

Page 618: ...t Auto Reduce is highlighted To cancel an Auto Reduce press Auto Reduce to turn the highlight off 5 Press OK twice 6 Specify the destination and then press the Start key Label Insertion With this function you can have the receiver s name printed on the document that is received at the other end 2 Other Transmission Features 170 2 ...

Page 619: ...ge the programmed message is printed within the next two lines Set this function as follows Set Label Insertion to On when programming fax destinations Set Label Insertion to on when sending fax documents On the Standard Message screen select the standard message you want to print 1 Place the original and then select the scan settings you require 2 Press TX Mode 3 Select Option Setting 4 Press Lab...

Page 620: ...tures General Settings Guide Closed Network Transmission will only take place if the destination s Closed Network Code is the same as yours This function can stop you accidentally sending information to the wrong place You must program a Closed Network Code beforehand using Program Closed Network Code under Facsimile Features For details about the programming method see Facsimile Features General ...

Page 621: ...UB Code Transmission This function is not available with Internet Fax e mail transmission and folder transmission To perform SUB Code Transmission a SUB Code must be set in Adv Features the Address Book or Keystroke Programs in advance Even though SUB Code Transmission is set to on if the SUB Code is not appended to the specified destination transmission is in standard fax mode When you select a d...

Page 622: ... SUB Codes in the Address Book see Registering Addresses and Users for Facsimile Scanner Functions General Settings Guide To register SUB Codes in Keystroke Programs see Registering and Changing Keystroke Programs You can program one of the Quick Operation keys with operations for this function Using the Quick Operation key allows you to omit steps 2 3 and 5 For details about Quick Operation Key s...

Page 623: ...on is not performed When you select a destination that has a registered SEP Code from the Address Book if SEP Code Reception is set to off the SEP Code is not appended and transmission is in standard fax mode 1 Press TX Mode 2 Select Option Setting 3 Press SEP Code Reception to highlight it To cancel SEP Code Reception press SEP Code Reception again 4 Press OK twice 5 Specify the destination and t...

Page 624: ...Setting SEP Codes for Reception p 304 Registering and Changing Keystroke Programs Fax Header Print When the Fax Header is set to on the stored name is printed on the receiver s paper You can store two Fax Headers First Name and Second Name For example if you store your department name in one and your organization name in the other you could use the first when sending internal faxes and the second ...

Page 625: ...le Features General Settings Guide If you used the number keys to specify the receiver the first header name is printed on the receiver s paper To print the second header name contact your service representative You can program one of the Quick Operation keys with operations for this function Using the Quick Operation key allows you to omit steps 2 3 and 5 For details about Quick Operation Key see...

Page 626: ...2 Other Transmission Features 178 2 ...

Page 627: ...ory space is low If free memory reaches 0 during Immediate Reception any further reception becomes impossible and the current communication is terminated Reception is always by Immediate Reception unless 2 Sided Print is set to On or Reception File Print Quantity is set to 2 or higher in which cases the machine switches to Memory Reception If the Substitute Reception is used a fax document is not ...

Page 628: ...al expansion memory The machine may not be able to receive fax documents when free memory space is low If free memory reaches 0 during Memory Reception any further reception becomes impossible and the current communication is terminated Reception is always by Immediate Reception unless 2 Sided Print is set to On or Reception File Print Quantity is set to 2 or higher in which cases the machine swit...

Page 629: ...e Receive File indicator lights For details about Reception File Setting see Facsimile Features General Settings Guide The Receive File indicator may light even when receiving documents using Immediate Reception Receiving documents unconditionally When faxes cannot be printed as normal Substitute Reception allows fax reception This section describes the conditions under which this will occur If on...

Page 630: ...ty Replace the toner cartridge For details about replacing the toner cartridge see Adding Paper Toner and Staples Troubleshooting The message This tray is out of order appears All trays are out of action Call your service representative In User Parameters switch 05 bit 2 1 on the Facsimile Features menu specify the following conditions for Substitute Reception When Own Name or Own Fax Number is re...

Page 631: ...twork Code match The machine switches to Substitute Reception only when the programmed Closed Network Code of the other end matches the Closed Network Code of this machine Disable The machine does not receive any documents For details about Parameter Setting see Facsimile Features General Settings Guide Types of Reception 183 3 ...

Page 632: ...s If the call is a fax document you must switch manually to facsimile mode 1 When the machine rings pick up the optional handset or the handset of the external telephone 2 If you hear beeps press the Start key or hold the Facsimile key down for a few seconds The Start key is only available in facsimile mode when an original is not placed 3 Replace the optional handset or the handset of the externa...

Page 633: ...u If you program a Quick Operation key with Switch Reception Mode you can switch the reception mode quickly 1 Press Switch RX Mode 2 Select the reception mode and then press OK The standby display appears To cancel the selection press Cancel For details about Switch Reception Mode and Quick Operation Key see Facsimile Features General Settings Guide Reception Modes 185 3 ...

Page 634: ...JPEG JPEG Mail to Print Text TIFF JPEG JPEG Mail to Print Text JPEG TIFF JPEG Mail to Print TIFF TIFF TIFF TIFF Internet Fax JPEG 1 JPEG 2 JPEG 1 Mail to Print TIFF JPEG JPEG Mail to Print JPEG TIFF JPEG Mail to Print Text PDF PDF Mail to Print TIFF PDF PDF Mail to Print JPEG PDF JPEG Mail to Print PDF JPEG PDF Mail to Print PDF 1 PDF 2 PDF 1 Mail to Print If JPEG or PDF files are attached along w...

Page 635: ...he e mail server for incoming e mail and downloads it as necessary If memory runs out e mail will not be received at the specified intervals Reception will resume when sufficient memory becomes available E mail auto reception should be set in System Settings When you select auto reception set the reception interval in minutes under E mail Reception Interval in System Settings See System Settings G...

Page 636: ...tion The received image varies according to the e mail application When Internet Fax e mail is sent to computer the following information is always inserted in the e mail text This E mail was sent from Host Name product name Queries to Administrator s e mail address To check the machine s host name and administrator s e mail address use Host Name or Administrator s E mail Address under System Sett...

Page 637: ... 6 Subject Shows the subject specified in TX Mode at the time of transmission If no subject is specified one is automatically assigned in the format shown in 1 above 7 The message is inserted in all e mail xxxx is the machine name 8 Attachment File Any document included by the sender is displayed as an attached document The display format of the sender name differs according to that of the Stamp S...

Page 638: ... bit 2 that you can use to enable or disable this function Text and TIFF files will still be printed even if this function is disabled If a JPEG or PDF file is received when the Mail to Print function is disabled the file will be detected as an error and Error Mail Notification is sent back to the sender You can turn this function on or off with the User Parameter switch 21 bit 7 in the Facsimile ...

Page 639: ... S which indicates the Standard resolution is always printed in the communication mode column regardless of the actual page resolution When receiving by Mail to Print this machine does not respond to reception notification requests attached to the received e mail p 187 Auto e mail reception p 187 Manual e mail reception Receiving E mail 191 3 ...

Page 640: ...e received documents using SUB Codes When a document is received its SUB Code is compared to SUB Codes programmed in Personal Boxes and if a match is found the document is routed to the destination whose SUB Code is specified BBB035S You must set the Personal Box and register a delivery destination beforehand Personal Boxes can be programmed in Box Setting in the Facsimile Features menu For detail...

Page 641: ... digital signature Use both Box Setting on the Facsimile Features menu and Web Image Monitor to specify whether or not to apply encryption and a digital signature For details about Box Setting see Facsimile Features General Settings Guide Transfer results are not sent back to the requesting party You can transfer data received from any fax machine regardless of manufacturer The Facsimile Features ...

Page 642: ...programmed in this machine For the maximum number of destinations you can register in a group see Maximum Values p 316 Maximum Values Forwarding Received Documents This machine can forward received documents to other destinations programmed in this machine BBB036S To use this function specify the Forwarding destination in advance Forwarding can be specified under Forwarding on the Facsimile Featur...

Page 643: ...Result Report is transmitted to the specified e mail address if folders are programmed as the forwarding destinations to which documents are sent from all senders or Special Senders For the maximum number of destinations you can register in a group see Maximum Values You can select whether the machine prints out the documents it forwards with User Parameter switch 11 bit 6 in the Facsimile Feature...

Page 644: ...ng e mail reception is aborted the e mail is deleted and Error Report is printed Also the SMTP server will send error notification e mail to the originator When the SMTP server attempts to route received documents to this machine while the machine is transmitting e mail the machine will respond to the SMTP server with a busy signal Then the SMTP server usually tries resending the documents until t...

Page 645: ... on the Facsimile Features menu and Web Image Monitor to specify whether or not to apply encryption and a digital signature For details about SMTP RX File Delivery Settings see Facsimile Features General Settings Guide If an e mail transfer request is received when the SMTP RX File Delivery Settings is Off in the Facsimile Features menu this machine responds with an error message to the SMTP serve...

Page 646: ... has used it for a while In these situations even though the operation switch is off the machine can still receive incoming documents as long as the main power switch is on Reception is not possible if both the operation switch and main power switch are turned off You can set whether documents are printed as soon as they are received Immediate Reception with the User Parameter switch 14 bit 0 in t...

Page 647: ...See Adjusting the Volume Troubleshooting Checkered Mark When this function is turned on a Checkered Mark is printed on the first page of fax documents to help you separate them BBB039S You can turn this function on or off using Checkered Mark in the Facsimile Features menu See Facsimile Features General Settings Guide Center Mark When this function is enabled marks are printed halfway down the lef...

Page 648: ... is received You can turn this function on or off using Print Reception Time in the Facsimile Features menu See Facsimile Features General Settings Guide When a received document is split and printed on two or more sheets the reception time is printed on the last sheet The time when the document was printed can also be recorded on the document If you need this function contact your service represe...

Page 649: ...receiving with this machine BBB002S This function works only when all pages are of the same width and received into memory You can turn this function on or off using 2 Sided Print in the Facsimile Features menu For details see Facsimile Features General Settings Guide Printouts may vary depending on how the sender sets the originals You can select to have documents only from selected senders print...

Page 650: ... When using the Multi copy function with specified senders the maximum number of copies is 10 You can turn this function on or off using Reception File Print Quantity in the Facsimile Features menu For details see Facsimile Features General Settings Guide The machine will use Memory Reception for Multi copy Reception Image Rotation If you have set paper in the orientation in the paper tray incomin...

Page 651: ...inted on a single sheet BBB045S For example this function splits the document if the document length is 20 mm 0 79 inch or longer than the paper used The document is reduced if it is less than 20 mm 0 79 inch When a document is split an asterisk is inserted at the split position and about 10 mm 0 39 inch of the split area is duplicated on the top of the second sheet Your service representative can...

Page 652: ... the document to a single A4 sheet You can turn this function on or off with the User Parameter switch 10 bit 3 in the Facsimile Features menu See Facsimile Features General Settings Guide When this function is used the printing quality may not be as good as usual To split a document into two sheets without using this function see Page Separation and Length Reduction p 203 Page Separation and Leng...

Page 653: ...Reduction Paper placed in the bypass tray is not usually selected for printing a received document However you can use this tray if you select the bypass tray as the main paper tray using Reception with Specified Senders Widths that this machine can receive are A4 B4 JIS LT 81 2 11 and A3 Any documents narrower than A4 or LT 81 2 11 are received at A4 or LT 81 2 11 width The length of documents de...

Page 654: ...ed size When you have loaded new paper press Exit to print the document After pressing Exit procedure varies depending on machine status when the message occurred If any received documents or reports were being printed automatically the printer automatically continues printing from where it left off If any documents or reports were being printed manually the printer does not resume printing Perfor...

Page 655: ...each line port You can specify the document feeding tray for each port telephone Internet Fax IP Fax For example you can specify documents received through the G3 1 port to be fed to the Finisher Upper Tray and documents received through the G3 2 port to be fed to the Finisher Shift Tray facilitating separation of files You can also set the machine to output Internet Fax documents and ordinary fax...

Page 656: ...he optional finisher is required You can turn this function on or off with the User Parameter switch 19 bit 0 in the Facsimile Features menu See Facsimile Features General Settings Guide 3 Reception 208 3 ...

Page 657: ...resend a file which the machine failed to transmit If the No transmission files found message appears on the screen after you press Check Stop Transmission File no files are being stored or sent by Memory Transmission You cannot view or edit files that are in the process of being sent files sent by LAN Fax or files saved for printing as reports There are cases when a destination may not be selecte...

Page 658: ...2 Press Check Stop Transmission File 3 Select the file from which you want to delete a destination 4 Press Check Change Settings 4 Changing Confirming Communication Information 210 4 ...

Page 659: ...press OK BDE010S Pressing the Clear Stop key deletes by single digits the fax number or IP Fax address The Internet Fax destination or e mail destination can be entirely deleted at once by pressing the Clear Stop key 7 Press Exit To delete another destination repeat from step 3 8 Press Exit twice The standby display appears Adding a Destination You can add a destination for broadcasting Changing t...

Page 660: ...1 Press Change TX Info 2 Press Check Stop Transmission File 3 Select the file to which you want to add a destination 4 Changing Confirming Communication Information 212 4 ...

Page 661: ...ax IP Fax Internet Fax e mail or folder If you specify a sender whose e mail address is already registered you can add Internet Fax destinations and e mail destinations You can add a folder destination only with Destination keys You can also program a SUB Code or SEP Code by pressing Adv Features 7 Press Exit Repeat from step 3 if you want to add another destination Changing the Settings of Files ...

Page 662: ...ing the Transmission Time You can change the transmission time specified with Send Later You can also delete the transmission time If the transmission time is deleted the file is transmitted immediately 1 Press Change TX Info 2 Press Check Stop Transmission File 4 Changing Confirming Communication Information 214 4 ...

Page 663: ...cancel the transmission time 4 Press Check Change Settings 5 Press Change TX Time If you press Transmit Now the file is transmitted immediately However if there is a file on standby that file is sent first Changing the Settings of Files in Memory 215 4 ...

Page 664: ...3 if you want to change another transmission time 8 Press Exit twice The standby display appears Changing the SMTP Server Setting You can change the settings for whether or not to bypass the SMTP server 1 Press Change TX Info 2 Press Check Stop Transmission File 4 Changing Confirming Communication Information 216 4 ...

Page 665: ...3 Select a file whose SMTP server setting you want to change 4 Press Check Change Settings 5 Press Change Changing the Settings of Files in Memory 217 4 ...

Page 666: ...6 Press SMTP 7 Select Yes or No and then press OK 8 Press OK 4 Changing Confirming Communication Information 218 4 ...

Page 667: ...9 Press Exit Repeat from step 3 to change the SMTP server settings of other recipients 10 Press Exit twice The standby display appears Changing the Settings of Files in Memory 219 4 ...

Page 668: ... use this procedure to print it out 1 Press Change TX Info 2 Press Check Stop Transmission File 3 Select the file you want to print If multiple destinations were specified only the number of the destinations that have not received the document you sent is shown 4 Changing Confirming Communication Information 220 4 ...

Page 669: ...ep 4 5 Press the Start key To cancel printing after pressing the Start key press Stop Printing The display returns to that of step 4 Repeat from step 3 if you want to print another file 6 Press Exit twice The standby display appears You can also print files that have not been successfully transmitted Printing a File from Memory 221 4 ...

Page 670: ...file numbers are Knowing the file number can be useful for example when erasing files 1 Press Change TX Info 2 Press Check Stop Transmission File 3 Press Print List To cancel printing before pressing the Start key press Cancel The screen returns to that displayed before pressing Print List 4 Changing Confirming Communication Information 222 4 ...

Page 671: ...ce The standby display appears The contents of a file stored in memory can also be printed If user authentication is set you can select whether to display a sender name with the User Parameter switch 04 bit 5 in the Facsimile Features menu See Facsimile Features General Settings Guide Printing a List of Files in Memory Print TX File List 223 4 ...

Page 672: ...ese documents Set Store documents in memory that could not be transmitted to On in User Parameter switch 24 bit 0 in the Facsimile Features menu 1 Press Change TX Info 2 Press Check Stop Transmission File 3 Select the file you want to resend TX failed is displayed for files that could not be sent 4 Changing Confirming Communication Information 224 4 ...

Page 673: ...pecify the destination 5 Press OK Transmission starts Repeat from step 3 to resend another file To cancel transmissions press Stop Transmission 6 Press Exit twice The standby display appears Files that could not be transmitted are kept for either 24 or 72 hours depending on the setting you make in User Parameter switch 24 bit 1 in the Facsimile Features menu For details about Parameter Setting see...

Page 674: ...ssion results are displayed from the latest result down in groups of nine When a fax is sent Destination shows the Own Fax Number or Fax Header information of the receiver When an Internet Fax or e mail is sent the e mail address or name programmed in the destination list appears For a transmission from a computer LAN Fax is shown Depending on security settings the destination may appear as 4 Pres...

Page 675: ...ports for confirmation Memory Transmission You can confirm the result with a Communication Result Report This report is printed each time a Memory Transmission is completed if turned on with User Parameter switch 03 bit 0 in the Facsimile Features menu You can also print the report by programming the TX Status Report to a Quick Operation key and pressing this when specifying a destination If you t...

Page 676: ...ng Transmission Results by E mail For details about the contents of the reports see Communication Result Report Memory Transmission ImmediateTXResultReport ImmediateTransmission SEPCodeRXResultReport ByprogrammingtheE mailTXResultstoaQuickOperationkeyinadvance youcansendtransmission results by e mail after each transmission is completed Select the destination for notification from the InternetFaxd...

Page 677: ... select whether to include part of the original image on the report with the User Parameter switch 04 bit 7 in the Facsimile Features menu If user authentication is set you can select whether to display a destination with the User Parameter switch 04 bit 4 in the Facsimile Features menu For details about Parameter Setting see Facsimile Features General Settings Guide The Pg s column gives the tota...

Page 678: ...General Settings Guide To view the report without text disruption select a font of even character width in your e mail application s settings If the page was sent successfully the Page column gives the total number of pages sent successfully If E mail TX Results is programmed in a Quick Operation key you can select whether a report e mail is sent after transmission For details about Quick Operatio...

Page 679: ... switch 04 bit 5 in the Facsimile Features menu For details about Parameter Setting see Facsimile Features General Settings Guide The Pg s column gives the total number of pages The Page Not Sent column gives the number of pages that could not be sent successfully Unprogrammed indicates that the document could not be sent because the forwarding destination is not programmed indicates that the e ma...

Page 680: ... are displayed from the latest result in groups of nine When a fax or IP Fax is received Sender shows the Own Fax Number or Fax Header information When an Internet Fax is received the sender s e mail address appears 4 Press Exit twice The standby display appears Only the reception results of the latest communications are displayed For the maximum number of communication results you can check on th...

Page 681: ... Status and then try again You can program one of the Quick Operation keys with operations for this function Using the key allows you to omit step 1 For details about Quick Operation Key see Facsimile Features General Settings Guide p 316 Maximum Values Confirming by Report Print a report to confirm reception results Journal Print the Journal to confirm the latest reception results For details see...

Page 682: ...nal is printed by line type with the User Parameter switch 19 bit 1 in the Facsimile Features menu If user authentication is set you can select whether to display a sender name with the User Parameter switch 04 bit 5 in the Facsimile Features menu For details about Parameter Setting see Facsimile Features General Settings Guide You can program one of the Quick Operation keys with operations for th...

Page 683: ... 4 Press the Start key To cancel a file printing press Stop Printing The display returns to that of step 3 5 Press Exit twice The standby display appears Print per File No Prints only the results of communications specified by file number Print Journal 235 4 ...

Page 684: ...a 4 digit file number If you make a mistake press Clear and then try again 5 Press the Start key To cancel a file printing press Stop Printing The display returns to that of step 3 6 Press Exit twice The standby display appears 4 Changing Confirming Communication Information 236 4 ...

Page 685: ...ess Print Journal 3 Select Print per User 4 Select a user Press Cancel if the user is not registered The display returns to that of step 3 5 Press OK after checking the user name shown on the display Press Cancel if a wrong user name is selected The display returns to that of step 3 Print Journal 237 4 ...

Page 686: ...urnal This section explains the items printed in the Journal BDE019S 1 Printing date Shows the date and time the report was printed 2 Programmed Fax Header Shows the sender name programmed for printing 3 Date Shows the transmission or reception date 4 Time Shows the transmission or reception start time 4 Changing Confirming Communication Information 238 4 ...

Page 687: ...de For fax transmissions and receptions After the line type T for outgoing faxes or R for incoming faxes and the communication mode appear in alphabetical letters or symbols If the optional extra G3 interface unit is installed G3 1 G3 2 or G3 3 appears For Internet Fax e mail transmissions and receptions After e mail mark T for outgoing e mail or R for incoming e mail and the communication mode ap...

Page 688: ...e representative Transmitting Journal by E mail Use this function to send the Journal to the administrator s e mail address The Journal is sent automatically after every 50 communications A CSV format Journal is attached to the e mail To transmit the Journal by e mail it is necessary to make settings with User Parameter switch 21 bit 4 in the Facsimile Features menu See Facsimile Features General ...

Page 689: ...nu If user authentication is set you can select whether to display a sender name with the User Parameter switch 04 bit 5 in the Facsimile Features menu For details about Parameter Setting see Facsimile Features General Settings Guide To confirm the administrator s e mail address use Administrator s E mail Address under System Settings See System Settings General Settings Guide Depending on securit...

Page 690: ...ected to store received documents and specified an e mail address for notification of receipt fax reception notification can be sent to that e mail address For the maximum number of received documents you can store on the machine s hard disk see Maximum Values You can view and print received and stored documents using a Web Image Monitor or DeskTopBinder For details see Viewing Fax Information Usi...

Page 691: ...ay 4 Press Preview 5 Check the preview Press Zoom Out or Zoom In to reduce or enlarge the preview image Press to scroll the preview image Press Switch under Display File to display another selected file Press Switch under Display Page to change the displayed page 6 Press Exit The display returns to that of step 4 Confirming Printing Deleting Received and Stored Documents 243 4 ...

Page 692: ... saved on the hard disk 1 Press Change TX Info 2 Select Print Delete Stored Reception File 3 Select a file to be printed and then press Print To cancel printing press Cancel To delete the document after printing press Delete File after Printing To perform two sided printing press Print on 2 Sides before pressing the Start key 4 Press the Start key To stop printing after pressing the Start key pres...

Page 693: ... step 1 For details about Quick Operation Key see Facsimile Features General Settings Guide You can specify and print multiple documents For the maximum number of documents you can print at a time see Maximum Values p 316 Maximum Values Deleting Received and Stored Documents This section explains how to delete documents stored on the hard disk 1 Press Change TX Info 2 Select Print Delete Stored Re...

Page 694: ...stored documents using the Document Server function You cannot delete a document while another person is printing it using a Web Image Monitor or DeskTopBinder You can specify and delete multiple documents For the maximum number of documents you can delete at a time see Maximum Values p 316 Maximum Values 4 Changing Confirming Communication Information 246 4 ...

Page 695: ...owing preparations are required in the Facsimile Features menu Program your Memory Lock ID under Program Memory Lock ID Set Memory Lock Reception to On under Memory Lock Reception For details about these settings see Facsimile Features General Settings Guide If the main power switch is turned off for about an hour all documents protected by Memory Lock Reception are deleted When this happens the P...

Page 696: ... Lock Reception and received document storage are both set to on Memory Lock Reception is unavailable and received documents become stored documents EvenwhenMemoryLockReceptionisavailable iffreememoryisinsufficient receptionisnotpossible You can also apply a Memory Lock Reception to documents that come only from certain senders Documents received by SEP Code Reception are automatically printed eve...

Page 697: ...n with that SUB Code When your machine has received a confidential document the Confidential File indicator lights If the main power switch is turned off for about an hour all documents received into Personal Boxes are deleted When this happens the Power Failure Report is printed so you can confirm which documents have been deleted See Turning Off the Main Power In the Event of Power Failure Troub...

Page 698: ...port see Confidential File Report p 250 Printing Personal Box Documents p 251 Confidential File Report Printing Personal Box Documents This section explains how to print a document received into a Personal Box 1 Make sure that the Confidential File indicator is lit BDE012S 2 Press Change TX Info 3 Press Print Personal Box File 4 Changing Confirming Communication Information 250 4 ...

Page 699: ...ting press Stop Printing The display returns to that of step 4 To print a document in another Personal Box repeat from step 4 7 Press Exit twice The standby display appears If you print a Personal Box document it is deleted The passwords for Personal Boxes can be programmed under Box Setting in the Facsimile Features menu For details about the programming method see Facsimile Features General Sett...

Page 700: ...u can turn this function on or off with the User Parameter switch 04 bit 0 in the Facsimile Features menu See Facsimile Features General Settings Guide 4 Changing Confirming Communication Information 252 4 ...

Page 701: ...uest them If the main power switch is turned off for about an hour all documents stored in Information Boxes are deleted When this happens the Power Failure Report is printed so you can confirm which documents have been deleted See Turning Off the Main Power In the Event of Power Failure Troubleshooting For other parties to be able to retrieve a document programmed in an Information Box you need t...

Page 702: ... Press Store Delete Print Information Box File 3 Select the box in which you want to store the file When there are pre programmed files a file mark appears to the left of the box name A message is displayed if you select a box with a file stored in it Press Yes when changing the file The stored original file is overwritten 4 Changing Confirming Communication Information 254 4 ...

Page 703: ... settings Original Orientation Original Settings The optional ADF is required Stamp The optional ADF is required 6 Press the Start key The machine starts to scan the original To stop scanning press Stop The display returns to that of step 3 To store a document in another Information Box repeat from step 3 7 Press Exit twice The standby display appears One Information Box stores one file The stored...

Page 704: ...w to print a document stored in an Information Box 1 Press Change TX Info 2 Press Store Delete Print Information Box File 3 Press Print 4 Select the box that contains the stored file you want to print You cannot select a box that has no stored file 4 Changing Confirming Communication Information 256 4 ...

Page 705: ...rt key To stop printing before pressing the Start key press Cancel The display returns to that of step 4 To stop printing after pressing the Start key press Stop Printing The display returns to that of step 4 Repeat from step 4 to print another stored file in the box 7 Press Exit twice The standby display appears Deleting Information Box Documents This section explains how to delete a file stored ...

Page 706: ...ess Clear before pressing OK and then try again To cancel entering a password press Cancel The display returns to that of step 4 6 Press Yes To stop deleting press No The display returns to that of step 4 Repeat from step 4 to delete another stored file in another box 7 Press Exit twice The standby display appears 4 Changing Confirming Communication Information 258 4 ...

Page 707: ...structions under Select Stored File when sending or printing stored documents BBB051S To use this function the optional HDD unit is required Data stored in the machine can be lost if there is an error on the machine s hard disk The manufacturer is not responsible for any damage that might result from the loss of data Stored documents are not deleted even if there is a power failure or the main pow...

Page 708: ... p 316 Maximum Values Storing a Document You can store and send a document at the same time You can also just store a document File names Scanned documents are automatically assigned names like FAX0001 or FAX0002 User Names You can set this function if necessary to know who and what departments stored documents in the machine Password You can set this function so as not to send to unspecified peop...

Page 709: ...t setting a user name file name or password proceed to step 5 You cannot change multiple documents at once 5 Press OK The file name appears to the left of Store File 6 If you have selected Send Store specify the receiver If you have selected Store Only proceed to step 7 7 Press the Start key You can change file names and user names p 46 Setting the Original Orientation Sending a Stored File 261 5 ...

Page 710: ...ed user name press Manual Entry and then enter the name User names entered by pressing Manual Entry are not programmed into the user code 3 Press OK Depending on the security settings Access Privileges might be displayed instead of User Name For details about setting Access Privileges ask the administrator Setting a file name Specify a name for the file 5 Storing a Document 262 5 ...

Page 711: ...ress File Name 2 Enter the file name 3 Press OK For details about text entry see Entering Text About This Machine Setting a password Set a password for the file 1 Press Password Sending a Stored File 263 5 ...

Page 712: ...ments stored in the Document Server can be sent again and again until they are deleted Once sent documents are stored in the Document Server Therefore you can send them in just one operation without having to set your originals again Store the documents to be sent in advance You can program a password for this function You can change the user names file names and passwords of stored documents You ...

Page 713: ...Name to place the documents in alphabetical order Press User Name to place the documents in order by programmed user name Press Date to place the documents in order of programmed date To view details about stored documents press Details Press the Thumbnails key to switch the screen to thumbnail display 3 If you select a document with a password enter the password and then press OK Sending a Stored...

Page 714: ...any scan settings you require The added originals are not stored You can send only documents saved with the facsimile function in the Document Server You cannot send documents stored in the Document Server using the copy printer or scanner functions The specified documents are sent with the scan settings made when they were stored To see details of the selected document press Details To return to ...

Page 715: ...r name of the programmed document and then press OK To search by directly entering a user name press Manual Entry and then enter the user name Forward matching is used when searching for a user name 3 Select the file to be sent Specifying documents by File Name Search for a file by file name Sending a Stored File 267 5 ...

Page 716: ...rd matching is used when searching for a file name 3 Select the file to be sent Displaying a preview Display a preview of stored documents 1 Select the document you want to send Press the Thumbnails key to switch the screen to thumbnail display 2 Press Preview 5 Storing a Document 268 5 ...

Page 717: ...window If the image file is corrupt store it again If you stored originals that had multiple mixed size pages without using the Mixed Original Sizes function the displayed size might differ from the actual size for pages after the first page Printing Stored Documents Use this function to print documents stored in the Document Server You can also print the first page only to check the content of th...

Page 718: ... press OK If the document does not have a password proceed to step 4 4 Press Print File or Print 1st Page When Print File is pressed the machine prints all the pages When Print 1st Page is pressed the machine prints only the first page To print both sides press Print 2 Sides When multiple files are specified they are printed per file To cancel printing press Stop Printing 5 Storing a Document 270 ...

Page 719: ...printing is through the facsimile function or the Document Server You can specify and print multiple documents at one time For the maximum values of the following items see Maximum Values Number of stored documents you can print at a time using Print 1st Page Number of stored documents you can print at a time using Print File p 316 Maximum Values Changing Stored Document Information You can change...

Page 720: ...or which a password is set enter the password and then press OK When a selected file does not have a password proceed to step 4 4 Change the desired information of the stored document Press the keys for the items you want to change 5 Press Exit The standby display appears 5 Storing a Document 272 5 ...

Page 721: ...tles To set a non programmed user name press Manual Entry and then enter the name User names entered by pressing Manual Entry are not programmed into the user code Depending on the security settings Change Access Priv might be displayed instead of Change User Name For details about setting Change Access Priv ask the administrator Changing the file name Change the name of a stored document Sending ...

Page 722: ...ace or Delete All and then re enter the file name 3 Press OK For details about text entry see Entering Text About This Machine Changing the password Change the password of a stored document 1 Press Change Password 5 Storing a Document 274 5 ...

Page 723: ...ssword using the number keys and then press OK 3 Enter the password again and then press OK Deleting a Stored Document Use this function to delete stored documents 1 Press Select Stored File Sending a Stored File 275 5 ...

Page 724: ...delete You can also delete multiple documents at once 4 Enter a password using the number keys and then press OK 5 Press Delete File 6 Press Yes If you do not want to delete the document press No 7 Press Exit The standby display appears 5 Storing a Document 276 5 ...

Page 725: ...In addition to sending faxes the LAN Fax Driver allows this machine to be used for printing out documents prepared on a computer for proof checking To use the LAN Fax Driver connect this machine to computers and make the necessary network settings and then install the LAN Fax Driver and the related utilities on your computer BBB052S To use this function the optional HDD unit and printer scanner fu...

Page 726: ...This section provides information about LAN Fax Driver Address Book and LAN Fax Cover Sheet Editor LAN Fax Driver This driver allows you to use LAN Fax functions All operations cannot be guaranteed depending on the system environment You can install the LAN Fax Driver from the CD ROM provided with this machine or download it from the supplier s Web site If your operating system is Windows 98 Me or...

Page 727: ...s Book and LAN Fax Cover Sheet Editor can be installed by Auto Run If the plug and play function starts click Cancel in the Found New Hardware dialog box and then insert the CD ROM Auto Run might not work automatically with certain OS settings If this is the case double click Setup exe located on the CD ROM root directory If you want to cancel Auto Run hold down the SHIFT key when your system is W...

Page 728: ...artDeviceMonitor for Client 1 Quit all applications currently running 2 Insert the CD ROM included with this machine into the CD ROM drive of your computer The installer launches automatically and the language selection window appears Depending on your operating system settings the installer may not launch automatically If it does not double click Setup exe in the CD ROM root directory to launch t...

Page 729: ...trol Panel on the Start menu Then select Hardware and Sound and then Printers 2 Select to highlight LAN Fax M8 then click Properties on the File menu 3 Click Printing Preferences to set the following properties Paper Size Orientation Tray Resolution 4 Click OK Making settings for option configuration Make settings for optional units installed in this machine 1 On the Start menu select Control Pane...

Page 730: ... After checking this option select a protocol by clicking an appropriate radio button If the options on this machine are not configured as instructed LAN Fax functions may fail When this machine is connected to a network and the port is set via the SmartDeviceMonitor for Client port option configuration is automatically performed For details about automatic option configuration see LAN Fax Deriver...

Page 731: ...ick User Settings 5 Specify necessary options For details about specifying options see Specifying Options and Confirming Transmission Results by E mail 6 Click Send When you click Send Print the fax is sent to the destination and your machine prints a copy of the document you sent The machine can retain documents sent from a LAN Fax Driver as files to be sent For the maximum values of the followin...

Page 732: ...ation number of the Destination key in the Device Address box 4 Click Set as Destination The entered destination is added and appears in the List of Destination box If you add a destination by mistake click the wrong destination and then click Delete from List 5 To specify more destinations repeat steps 3 and 4 For details about specifying destinations see the LAN Fax Driver s Help p 294 Using the...

Page 733: ...destination by mistake click the wrong destination and then click Delete from List In the Address Book list box directly enter the name you want to search for You can then jump to the name you entered 6 To specify more destinations repeat steps 2 through 5 For details about specifying destinations see the LAN Fax Driver s Help Destination list contents can be narrowed down by selecting the first l...

Page 734: ...tion box If you add a destination by mistake click the wrong destination and then click Delete from List 6 To specify more destinations repeat steps 2 through 5 For details about specifying destinations see the LAN Fax Driver s Help When specifying multiple destinations if you select different lines the document is sent using the Simultaneous Broadcast function For details about the Simultaneous B...

Page 735: ...e Send Options tab appears 2 Select the Print Fax Header check box To attach a cover sheet Attach a cover sheet to a document 1 Click Send Options The Send Options tab appears 2 Select the Attach a Cover Sheet check box A cover sheet is added to the first page of a transmission file Click Edit Cover Sheet to edit the cover sheet For details see Editing Fax Cover Sheets p 294 Editing Fax Cover Shee...

Page 736: ... TIFF format TIFF F 1 Click Send Options The Send Options tab appears 2 Select the Save as file check box 3 Click Save to 4 Select a folder on the folder tree 5 Select a method of file naming To enter a file name manually select the Specify file name when saving check box To have the file assigned a name and saved automatically select the Automatically create a new file check box 6 Click OK 7 Clic...

Page 737: ...files sent using LAN Fax Driver For the maximum number of transmission results you can check see Maximum Values Also you can save the contents of the Journal in a personal computer as a CSV file using Load Fax Journal in SmartDeviceMonitor for Admin When data is transmitted from the LAN Fax Driver via the SmartDeviceMonitor for Client port the Data transmission complete message appears on the comp...

Page 738: ...tton and then enter the registration number of the Destination key in the Device Address box The Device Address box is unavailable when Specify destinations is selected and you cannot enter anything in the text box 4 Click Send or Send Print You can confirm transmission results using the E mail TX Results function and the Communication Result Report You can set whether to use both of these togethe...

Page 739: ...rt Memory Transmission Printing and Saving You can print documents created using Windows applications Opentheapplicationdocumentyouwanttoprintorcreateanewdocument andthenperformthefollowing procedure 1 On the File menu click Print 2 Select LAN Fax M8 in the list and then click Print The LAN Fax dialog box appears The setting method may differ depending on the application you are using In all cases...

Page 740: ... fax number e mail address InternetFaxdestination andIP Faxaddress Thenameanddestination FaxNumber E mailaddress or IP Fax address cannot be omitted 4 Click Add The destination is added to the destination list 5 Click Close 6 If you made changes to a destination a confirmation message appears To save the changes click Yes If you do not want to save the changes and want to quit editing click No To ...

Page 741: ...tion a confirmation message appears To save the changes click Yes If you do not want to save the changes and want to quit editing click No To return to the editing display click Cancel The confirmation dialog box does not appear when you have not made any changes after starting Address Book Deleting programmed destinations Delete destinations registered in the LAN Fax Address Book 1 On the Start m...

Page 742: ...ned according to the following order of priority check before inserting and changing the order of priority if necessary IP Fax destination Fax number E mail address Depending on the machine type you may not be able to use the machine when it is updating the AddressBookusingCSVfiles retrievedusingSmartDeviceMonitorforAdmin thatcontainusercodes For details see SmartDeviceMonitor for Admin Help Editi...

Page 743: ...click Print 2 Select LAN Fax M8 in the list and then click Print The LAN Fax dialog box appears 3 Click Edit Cover Sheet The Cover Sheet dialog box appears 4 Select a cover sheet file from the dropdown list or after clicking Browse in Select Cover Sheet The selection made in Select Cover Sheet is not canceled unless you select another file If you want to change only destination information omit th...

Page 744: ...ceMonitor for Admin Network Guide and SmartDeviceMonitor for Admin Help LAN Fax Operation Messages This section explains typical operation error messages displayed on the computer when using the LAN Fax Driver and solutions to those messages Message Causes and Solutions The number of entries in Destinations exceed the limits Up to 500 entries can be entered The number of destinations specified exc...

Page 745: ...ral Settings Guide You can also check and manage the documents using DeskTopBinder For details about the operation on DeskTopBinder see the DeskTopBinder s manual and Help For details about using Web Image Monitor see Monitoring and Configuring the Printer Network Guide Viewing Printing and Deleting Received Fax Documents Using a Web Image Monitor This section explains how to view and or print rec...

Page 746: ...Printer Network Guide To enlarge the preview image click Enlarge Image Enlargement cannot be performed without Acrobat Reader installed For more information see Help on the Web Image Monitor To download the document data on the list of received fax documents click TIFF or PDF For details about downloading see the Web Image Monitor Help The method for downloading differs depending on the selected f...

Page 747: ... in the left pane The list of received fax documents appears 4 Select the check box of the fax document to be deleted When viewing a list of the fax documents you can select the thumbnail display icon display or detail display Click or 5 Click Delete 6 Click Delete File s To cancel deletion press Cancel before clicking Delete File s 7 Click OK The display returns to that of step 5 8 Close the Web ...

Page 748: ...ess or host name of this machine in the address bar The top page of Web Image Monitor is displayed 3 Click Login and then enter the Administrator s name and password 4 Click Address Book in the left pane The Address Book is displayed 5 Click the radio button to the left of the machine you want to modify and then click Change The Change User page appears 6 Set the properties for Internet Fax data f...

Page 749: ...on number name and e mail address then set the necessary properties You can set the Internet Fax data format after entering the e mail address 7 Click Full Mode under Internet Fax Data Format and set the properties according to the receiver s properties If you change the mode to Simple Mode you cannot set machine properties 8 Click OK at the upper or lower left of the screen To cancel the setting ...

Page 750: ...nts with no SUB Code Own Name or Own Fax Number are saved in the delivery server inbox You can also set it so that the received documents are stored in the specified delivery server inbox according to the line used for reception You can check or download received documents stored in the delivery server inbox using DeskTopBinder Documents received in Personal Boxes are also forwarded to the deliver...

Page 751: ... addition in System Status you can check the number of Transmission Standby File s Memory Lock File s and RX Print Standby File s Others shows the total number of documents registered in Information Boxes and received in Personal Boxes See Checking Machine Status and Settings Troubleshooting If you set the Reception File Setting in the Facsimile Features menu to Store you can check the number of r...

Page 752: ...ry Send Later Reception Notice BCC Transmission E mail TX Results Text Standard Message Auto Reduce Label Insertion Closed Network SUB Code Transmission SEP Code Reception Fax Header Print TX Status Report Store File File Type Preview before transmission Program name The following procedure explains using Send Later with the fax number 0123456789 as an example of how to register a program 1 Make t...

Page 753: ...stered the name is displayed To change the program name press Backspace or Delete All and then try again You should register the program name To cancel a program press Cancel The display returns to that of step 5 Use the same procedure to register and change programs In step 5 select the program number you want to change For details about text entry see Entering Text About This Machine The method ...

Page 754: ...316 Maximum Values Changing a program name This section explains how to change a program name 1 Make sure that the machine is in facsimile mode and the standby display is shown If the standby display is not shown press the Facsimile key 2 Press the Program key BAT182S 3 Press Change Name 7 Appendix 306 7 ...

Page 755: ...display appears Press Cancel to cancel the change Deleting a Program This section explains how to delete an unnecessary program 1 Make sure that the machine is in facsimile mode and the standby display is shown If the standby display is not shown press the Facsimile key 2 Press the Program key BAT182S Programs 307 7 ...

Page 756: ... delete the program The display returns to that of step 4 Using a Program This section explains how to recall and use a registered program 1 Make sure that the machine is in facsimile mode and the standby display is shown If the standby display is not shown press the Facsimile key 2 Place the original 7 Appendix 308 7 ...

Page 757: ...re recalled 5 Press the Start key The machine starts to scan the original Then transmission starts with the recalled transmission settings Using the program causes the previous settings to be cleared If you have no programmed destinations or scan settings as programs select the program number and then enter the fax number of the destination and select the scan settings you require Programs 309 7 ...

Page 758: ...onsult your service representative For details about the memory capacity of machines equipped with the optional expansion memory see Maximum Values p 316 Maximum Values Handset You can make or receive calls by installing the optional handset and dialing manually For details about the functions see On Hook Dial and Manual Dial p 127 On Hook Dial p 129 Manual Dial Extra G3 Interface Unit This option...

Page 759: ...ansmission 2 seconds Data compression method MH MR MMR JBIG Maximum original size Standard A3 11 17 Custom 297 1200 mm 11 47 inches Maximum scanning size 297 1200 mm 11 47 inches Print process Printing on standard paper using a laser Transmission speed G3 33 600 31 200 28 800 26 400 24 000 21 600 19 200 16 800 14 400 12 000 9 600 7 200 4 800 2 400bps auto shift down system Power Consumption Compon...

Page 760: ...patible machines IP Fax transmission function Specify an IP address and send faxes to an IP Fax compatible fax through a network Also capable of sending faxes to a G3 fax connected to a telephone line via a VoIP gateway IP Fax reception function Receive faxes sent from an IP Fax compatible fax through a network Also capable of receiving faxes from a G3 fax connected to a telephone line via a VoIP ...

Page 761: ...ory transmission only Internet Fax receive functions Automatic detection and printing of appended TIFF F MH files and ASCII text Memory reception only 1 Full mode E mail Transmission and Reception and Folder Transmission Component Specifications Network Ethernet 1000BASE T 100BASE TX 10BASE T Wireless LAN Based on IEEE 802 11a b g Scan line density 200 100 dpi Standard character 1 200 200 dpi Deta...

Page 762: ...ived e mail Sending to folder functions Sends scanned files over the network to shared folders FTP server folders or NetWare folders 1 When you send document in TIFF format Specifications Required for the Internet Fax Destination Machines This section explains the specifications required for the Internet Fax destination machine When communicating with full mode compatible machines you can take adv...

Page 763: ...e64 Content Type Image tiff Multipart mixed text plain Image tiff attached file forms Data format Profile TIFF Profile S Coding MH Original size A4 Resolution dpi 200 100 200 200 204 98 204 196 p 311 Specifications Specifications 315 7 ...

Page 764: ... 500 500 Number of destinations you can specify per file 500 500 Number of destinations you can specify for all files including files in memory 500 500 Number of destinations you can search at a time using Search Dest 100 100 Number of recent destinations the machine can store 10 10 Number of digits that can be included in a destination 128 128 Number of digits for a SEP SUB PWD SID Code 20 20 Num...

Page 765: ...tsyoucanstoreonthemachine s hard disk 400 400 Number of documents you can print at a time in Print Delete Stored Reception File 30 30 Number of documents you can delete at a time in Print Delete Stored Reception File 30 30 Number of stored documents you can specify at a time in Select Stored File 30 30 Number of stored pages you can send in one operation in Select Stored File 1 000 1 000 Numberofs...

Page 766: ...Approx 9 000 Approx 9 000 Number of destinations you can register in the Address Book of the LAN Fax 2 000 2 000 Number of destinations you can specify at once using LAN Fax 500 500 1 You can program up to 2 000 destinations when the optional HDD unit is installed The maximum number of pages that can be stored or transmitted may decrease depending on the contents of documents 7 Appendix 318 7 ...

Page 767: ...mission and reception and totals on the display Adjust Sound Volume Adjust the sound volume during On Hook Mode and Immediate Transmission Box Setting The following functions are for delivery and transfer of documents Personal Box Information Box and Transfer Box Box Setting Print List You can print a list of the currently registered Personal Boxes Information Boxes and Transfer Boxes On Hook Mode...

Page 768: ...to be forwarded to a programmed receiver Reception File Setting Select whether received documents are saved on the hard disk to be printed later or printed immediately without being saved Stored Reception File User Setting The administrator can be specified for managing documents stored on the machine after fax documents are received SMTP RX File Delivery Settings This function is available on sys...

Page 769: ... this document enter the Memory Lock ID Initial Settings Function name Description Parameter Setting User Parameters allow you to customize various settings to suit your needs Parameter Setting Print List Print this list to see the current User Parameter settings Program Closed Network Code Register an ID required for Closed Network communication Program Memory Lock ID Program a Memory Lock ID to ...

Page 770: ... name and SIP user name Program Change Delete Gateway Register change ordeletethegatewayusedfortransmission to IP Fax Menu Protect Using Menu Protect you can prevent unauthenticated users from changing the user tools E mail Setting Set whether or not to use E mail in the fax functions Folder Setting Set whether or not to use Folder in the fax functions 7 Appendix 322 7 ...

Page 771: ... the transmission is started 145 Canceling a transmission of an Internet Fax 142 Canceling a transmission while the original is being scanned 142 Canceling a transmission while the original is being transmitted 143 Canceling an Immediate Transmission 142 Caution 6 Center Mark 199 320 Change Stop Transmission File 149 Change File Name 273 Change Name 306 Change Password 274 Change Title 100 Change ...

Page 772: ...7 Deleting a program 307 Deleting a stored document 275 Deleting fax information using a Web browser 299 Deleting Information Box documents 257 Deleting programmed destinations 293 Deleting received and stored documents 242 245 Delivering files received by fax 302 Density contrast 69 Destination key 99 100 Detail 61 Displaying confirmation of transmission 29 Document Server 289 Dual Access 26 E E ...

Page 773: ...x 253 Initial display 15 Initial Settings 321 Installing individual applications 280 Internet Fax 20 Internet Fax functions 35 Internet Fax Setting 321 IP Fax functions 31 J JBIG reception 198 JBIG transmission 61 Journal 233 238 Journal by e mail 241 JPEG 190 Just size printing 206 K Key Color 18 Keystroke Programs 304 L Label Insertion 170 LAN Fax Cover Sheet Editor 279 294 LAN Fax Driver 277 27...

Page 774: ...Print Delete Stored Reception File 244 245 Print 1st Page 269 Print completion beep 199 Print Fax Header 287 Print File 269 Print Journal 234 Print List 222 319 320 321 Print Memory Lock 247 Print per File No 235 Print per User 237 Print Personal Box File 250 Print Reception Time 320 Printing a file from memory 220 Printing a file received with Memory Lock 247 Printing a list of files in memory 22...

Page 775: ...151 193 222 229 230 238 251 290 Resending a file 224 Resolution 61 Returning the machine to the standby mode 15 Routing e mail received via SMTP 196 Routing received documents 192 Routing received documents with SUB Code 192 RTI Own Name 182 S Saving as files 288 Scan Settings 59 319 Scan Size 63 Scan Type 59 Scanning Two Sided Originals 47 Search by destination name 110 Search by e mail destinati...

Page 776: ... destination using Address Book 284 Specifying a host name 84 Specifying a SIP user name 84 Specifying an alias telephone number 84 Specifying an IP address 81 Specifying auto generated subjects for e mail 165 Specifying documents by File Name 267 Specifying documents by User Name 267 Specifying documents from File List 266 Specifying group destinations 100 Specifying options 286 Specifying tray f...

Page 777: ...rIdentificationPrint 204 Two sided printing 200 TX File List 222 TX Mode 155 157 159 161 163 166 Types of original whose sizes are difficult to detect 53 Types of reception 179 U User Name 262 User Text 163 User Tools Counter key 319 Using a program 308 Using the Address Book to specify destinations 99 Using the Document Server 259 Using the machine s Address Book data in the destination list of t...

Page 778: ...MEMO 330 ...

Page 779: ...MEMO 331 ...

Page 780: ...MEMO 332 EN USA D346 8515 ...

Page 781: ...t Windows 2000 Professional Microsoft Windows 2000 Server Microsoft Windows 2000 Advanced Server The product names of Windows XP are as follows Microsoft Windows XP Professional Microsoft Windows XP Home Edition Microsoft Windows XP Media Center Edition Microsoft Windows XP Tablet PC Edition The product names of Windows Vista are as follows Microsoft Windows VistaTM Ultimate Microsoft Windows Vist...

Page 782: ...040 9040b MP 4000 MP 4000B LD040 LD040B Aficio MP 4000 Aficio MP 4000B Type for 9050 9050b MP 5000 MP 5000B LD050 LD050B Aficio MP 5000 Aficio MP 5000B Operating Instructions Facsimile Reference D346 8515 EN USA ...

Page 783: ...re reference For safe and correct use be sure to read the Safety Information before using the machine Preparing the Machine Setting Up the Printer Driver Other Print Operations Saving and Printing Using the Document Server Appendix 1 2 3 4 5 Printer Reference Operating Instructions ...

Page 784: ... c N m š ˆ Œ ˆŠŒ šˆ ˆ š ˆ m š ˆ i ŠŒ ŠL i N ips Œ š ˆ ˆŠŒ šˆ ˆ š ˆ z c šŒ O Œš Œ Œ Œˆ Œ š ˆ u Œšˆ sš šˆ š ˆ š Œˆ N t ˆ b ˆš š ž Š ˆ ˆŠŒ šˆ ˆ š ˆ ž ˆ b ˆš š sigL i N ˆ rŒ c L lš Œ ˆ Œ ˆ ˆN nˆšž ˆLipxLipxOspx ˆ ˆŒš ˆ ˆŠŒ šˆ ˆ š ˆ š ˆ n œˆ L i N oš ˆ š ˆ ˆ ˆ ˆŒ ˆ Œ ˆ šŒ Œ šŒ ˆ ŒŠ š ˆ š ˆ š ˆŒ ˆ ˆ šŒœˆ Œˆ N wˆ Œ Œ ŒŠ š š š ˆ N t ˆ ˆ ˆ š ˆ wŒ ž ˆ šŒ Š šˆ ˆ ž Z J t ˆ š ˆ wŒ ž YX Œ mŒ š wŒ ž YXN J t ˆ š ...

Page 785: ...s and other consumables Copy Document Server Reference Explains Copier and Document Server functions and operations Also refer to this manual for explanations on how to place originals Facsimile Reference Explains Facsimile functions and operations Printer Reference Explains Printer functions and operations Scanner Reference Explains Scanner functions and operations Network Guide Explains how to c...

Page 786: ...se visit our Web site or consult an authorized dealer This manual includes descriptions of functions and settings that might not be available on this machine Information Contains general notes on the machine and information about the trademarks of product names used in the manuals Other manuals Manuals for DeskTopBinder Lite DeskTopBinder Lite Setup Guide DeskTopBinder Introduction Guide Auto Docu...

Page 787: ...ntrol Panel 18 Setting Custom Size Paper Using the Control Panel 19 Setting Thick Paper Thin Paper or OHP Transparencies Using the Control Panel 21 1 Preparing the Machine Confirming the Connection Method 25 Network Connection 25 Local Connection 28 Installing the Printer Driver 29 Quick Install 29 Installing the Printer Driver for the Selected Port 30 Using as a Windows Network Printer 40 Using a...

Page 788: ...60 Windows Vista Accessing the Printer Properties 61 Windows NT 4 0 Accessing the Printer Properties 63 RPCS Accessing the Printer Properties 65 Windows 95 98 Me Accessing the Printer Properties 65 Windows 2000 Accessing the Printer Properties 66 Windows XP Windows Server 2003 2003 R2 Accessing the Printer Properties 68 Windows Vista Accessing the Printer Properties 70 Windows NT 4 0 Accessing the...

Page 789: ... Canceling a Print Job Using the Control Panel 109 Windows Canceling a Print Job from the computer 109 Checking the Error Log 111 Spool Printing 112 User Defined Pages 113 Printing with the Finisher 114 Staple 114 Punch 116 Collate 118 Covers 121 Chaptering 124 No Slip Sheets 124 Inserting Chapter Slip Sheets 124 Slip Sheet 126 Using the Virtual Printer 128 Adding a Virtual Printer 128 Changing a ...

Page 790: ...4 Saving and Printing Using the Document Server Accessing the Document Server 133 5 Appendix Specifications 135 Printer Features Menu 137 INDEX 145 6 ...

Page 791: ...ad these notes They can be found in the Safety Information section of About This Machine Indicates points to pay attention to when using the machine and explanations of likely causes of paper misfeeds damage to originals or loss of data Be sure to read these explanations Indicates supplementary explanations of the machine s functions and instructions on resolving user errors This symbol is located...

Page 792: ...20 to 240 V model Indicates information that is specific to the 120 V model Check the label on the rear of the machine to identify the model BDH005S Dimensions in this manual are given in two units of measure metric and inch If your machine is the 220 to 240 V model refer to the metric units If your printer is the 120 V model refer to the inch units 8 ...

Page 793: ... specify an item on the control panel it becomes highlighted Keys dimmed for example cannot be used BDH001S 1 Operational status or messages Displays current machine status such as Ready Offline and Printing Information about the print job user ID and document name appears in this section 2 Online Offline Press to switch the machine between online and offline When the machine is online it can rece...

Page 794: ...lay spooled jobs 8 Paper Tray Status indicators The paper tray settings appear When the power is turned on the copier display is shown This is a factory default This initial setting can be changed See System Settings General Settings Guide Simplified Display This section explains how to switch to the simplified display When you press the Simplified Display key the screen changes from the initial d...

Page 795: ...Example of a simplified display To return to the initial display press the Simplified Display key again Certain keys do not appear on the simplified display 11 ...

Page 796: ...the facsimile function and scanner function are not displayed in the job list Job List Screen This section explains displays and icons that appear in the Job List screen The Job List screen varies depending on whether Job Order is selected with Print Priority for the System Settings For details about setting procedure see System Settings General Settings Guide When Job Order is not selected The jo...

Page 797: ...obs Job printed using copy function Job printed using printer function Job printed using Document Server function Job printed using DeskTopBinder Job printed using Web Image Monitor Checking Jobs in the Job List You can check the contents of jobs in the job list 1 Press Job List 2 Select a job whose contents you want to check 3 Press Details and then check the contents 4 Press Exit 13 ...

Page 798: ...ob list 1 Press Job List 2 Select a job whose order you want to change 3 Press Change Order 4 Change the order using Top Previous or Next 5 Press OK Holding Jobs You can hold jobs that are queued or currently printing 1 Press Job List 2 Select a job you want to hold 14 ...

Page 799: ... You can delete a job that is queued or currently printing 1 Press Job List 2 Select a job you want to delete To delete multiple print jobs select all print jobs you want to delete 3 Press Delete Reservation 4 Press OK Checking the Job History You can view the history and contents of completed print jobs 1 Press Job List 2 Press Job History A list of completed print jobs appears 3 Select a job who...

Page 800: ...bypass tray Duplex Booklet printing when the optional Finisher SR3020 Auto Tray Select Auto Tray Switching Rotating Collate Staple when the optional Finisher SR790 SR3020 or SR3030 is installed Punch when the optional Finisher SR3020 or SR3030 and Punch Unit are installed Printing onto paper with specific orientation When printing onto paper that has specific orientation requirements such as envel...

Page 801: ...tween the sheets to avoid a multi sheet feed BCY005S 1 Extender 2 Paper Guide 3 Set the paper size using the printer driver or the control panel When loading thick paper thin paper or OHP transparencies set paper size and paper type The number of sheets that can be loaded in the bypass tray depends on the paper type When loading letterhead paper see Loading Paper General Settings Guide When the Pa...

Page 802: ...uide In that case set the paper size using the printer driver Under Printer Features System if you set Bypass Tray Setting Priority to Driver Command paper size settings made on the printer driver must match those made on the control panel If they do not match anerrormessageappearsandprinting stopsif PrinterFeatures System AutoContinue is not set For details about Printer Features settings see Gen...

Page 803: ...ze For details about setting printer drivers see the printer driver Help Setting Custom Size Paper Using the Control Panel Follow the procedure below to set the machine using the control panel when loading custom size paper onto the bypass tray The following procedures are not required if you select Driver Command from Bypass Tray Setting Priority in System of Printer Features see Printer Features...

Page 804: ...rinter driver is not used select Machine Settings from Bypass Tray Setting Priority in System of Printer Features see Printer Features General Settings Guide Set paper size using the control panel 1 Press the User Tools Counter key on the control panel BAC001S 2 Press System Settings 3 Press the Tray Paper Settings tab 4 Press Printer Bypass Paper Size 5 Press Custom Size If a custom size is alrea...

Page 805: ...n that case set the paper size using the printer driver If you select Machine Settings from Bypass Tray Setting Priority in System of Printer Features see PrinterFeatures GeneralSettingsGuide thesettingsmadeusingthecontrolpanelhavepriority over the printer driver settings If the printer driver is not used select Machine Settings from Bypass Tray Setting Priority in System of Printer Features see P...

Page 806: ... the list 5 Press Paper Type Bypass Tray 6 Select the proper items according to the paper type you want to set Press OHP Transparency on the Paper Type area when loading OHP transparencies Press No Display on the Paper Type area and then press Thick Paper 1 Thick Paper 2 or Thin paper on the Paper Thickness area when loading thick paper or thin paper 22 ...

Page 807: ...uch as thick paper thin paper or OHP transparencies may be slower than printing on plain paper The settings made will remain valid until they are reset again After printing on OHP transparencies or thick paper thin paper make sure to clear settings for the next user For details about setting printer drivers see the printer driver Help 23 ...

Page 808: ...24 ...

Page 809: ...stallation procedure that is appropriate to the connection method Network Connection This machine can be used as a Windows printing port or network printer Using this machine as the Windows printing port Network connections can be established through Ethernet and Wireless LAN Available ports are determined based on the combination of Windows operating system version and connection method used BAC0...

Page 810: ...ndows Server 2003 2003 R2 Connection Method Available Ports Ethernet Wireless LAN SmartDeviceMonitor for Client port Standard TCP IP port LPR port Windows NT 4 0 Connection Method Available Ports Ethernet Wireless LAN SmartDeviceMonitor for Client port LPR port See the explanation about how to install the printer driver for each type of port For details about SmartDeviceMonitor for Client port see...

Page 811: ...ote printer BAC011S In an IPv6 environment NetWare servers cannot be used See the explanation about how to install the printer driver for each type of network printer For details about Windows network printer see Using as a Windows Network Printer For details about NetWare print server and remote printer see Using as a NetWare Print Server Remote Printer p 40 Using as a Windows Network Printer p 4...

Page 812: ...ws Server 2003 2003 R2 USB connections Parallel connections Bluetooth connections Windows NT 4 0 Parallel connections See the explanation about how to install the printer driver for each method of connections For details about Bluetooth connections see Printing with Bluetooth Connection Network Guide For details about USB connections see Installing the Printer Driver Using USB For details about pa...

Page 813: ...nter driver DeskTopBinder SmartDeviceMonitor for Client are installed under network environment and the TCP IP port will be set To install the printer driver under Windows 2000 XP Vista and Windows Server 2003 2003 R2 you must have an account that has Manage Printers permission Log on as an Administrator If you connect using USB see Installing the Printer Driver Using USB and install the printer d...

Page 814: ...llel connection For details about bidirectional communication between the machine and computer see Making Option Settings for the Printer p 45 Installing the Printer Driver Using USB p 52 Making Option Settings for the Printer Installing the Printer Driver for the Selected Port Using the SmartDeviceMonitor for Client port To install SmartDeviceMonitor for Client under Windows 2000 XP Vista and Win...

Page 815: ...Cancel before installation is complete Auto Run may not work with certain operating system settings If this happens launch Setup exe on the CD ROM root directory Changing the port settings for SmartDeviceMonitor for Client Follow the procedure below to change the SmartDeviceMonitor for Client settings such as TCP IP timeout recovery parallel printing and printer groups Windows 95 98 1 On the Start...

Page 816: ...P If no settings on the Recovery Parallel Printing tab are available follow the procedure below 1 Click Cancel to close the Port Configuration dialog box 2 Start SmartDeviceMonitor for Client and then right click the SmartDeviceMonitor for Client icon on the tasktray 3 Point to Properties and then click Extended Features Settings 4 Select the Set Recovery Parallel Printing for each port check box ...

Page 817: ... SmartDeviceMonitor and then click OK 12 Click TCP IP and then click Search A list of printers using TCP IP appears 13 Select the printer you want to use and then click OK Only printers that respond to a broadcast from the computer appear To use a machine not listed here click Specify Address and then enter the IP address or host name of the machine 14 Check that the port of the selected printer i...

Page 818: ... has Manage Printers permission Log on as an Administrators or Power Users group member 1 Quit all applications currently running 2 Insert the CD ROM into the CD ROM drive The installer starts 3 Select an interface language and then click OK The default interface language is English 4 Click RPCS Printer Driver or PCL Printer Driver 5 The software license agreement appears in the License Agreement ...

Page 819: ...racters or symbols can be entered 18 Select the Default Printer check box to configure the printer as default 19 Click Continue Installation starts 20 After the installation is completed select one of the options to restart the computer either now or later and then click Finish Restart the computer to complete installation To stop installation of the selected software click Cancel before installat...

Page 820: ...m dialog box You can select several printer drivers 7 Click Next 8 Select the machine model you want to use The printer name can be changed in the Change settings for Printer Name box 9 Double click the printer name to display the printer settings The details shown in Comment Driver and Port vary depending on the operating system printer model and port 10 Click Port and then click Add 11 Click Sta...

Page 821: ... When a Message Appears during Installation of the Printer Driver TroubleShooting Using the LPR port This describes how to install the PCL or RPCS printer driver using the LPR port To install this printer driver under Windows 2000 XP Vista and Windows Server 2003 2003 R2 you must have an account that has Manage Printers permission Log on as an Administrators or Power Users group member Installing ...

Page 822: ...allation starts 17 After the installation is completed select one of the options to restart the computer either now or later and then click Finish Restart the computer to complete installation To stop installation of the selected software click Cancel before installation is complete Auto Run may not work with certain operating system settings In that case launch Setup exe on the CD ROM root direct...

Page 823: ...ine 6 Click Browse my computer for driver software advanced 7 Insert the provided CD ROM into the computer s CD ROM drive If the AutoPlay dialog box appears click the close button and then proceed to step 8 8 Click Browse and then specify a location for the printer driver If the CD ROM drive letter is D the printer driver s source files are stored in D DRIVERS RPCS XP_VISTA Language DISK1 9 Click ...

Page 824: ...ry Printing and Parallel Printing cannot be used from the client If you print under Windows XP Vista or Windows Server 2003 2003 R2 print server notification functions of SmartDeviceMonitor may not be used with the client If you print under Windows NT 4 0 print server install the printer driver before you connect the print server to the printer Installing the PCL or RPCS Printer Driver 1 Quit all ...

Page 825: ...6 Select the Default Printer check box to configure the printer as default 17 Click Continue The printer driver installation starts 18 After the installation is completed select one of the options to restart the computer either now or later and then click Finish Restart the computer to complete installation To stop installation of the selected software click Cancel before installation is complete ...

Page 826: ... are used in the example Operating system Windows 98 NetWare version 4 1 File server name CAREE Queue name R QUEUE 1 Insert the CD ROM into the CD ROM drive The installer starts Auto Run may not work with certain operating system settings In that case launch Setup exe on the CD ROM root directory 2 Select an interface language and then click OK The default interface language is English 3 Click RPC...

Page 827: ...n open the printer properties Under Windows XP or Windows Server 2003 open the printer properties from the Printers and Faxes window 18 On the Printer Settings tab clear the Form Feed and Enable Banner check boxes Under Windows 2000 XP Windows Server 2003 or Windows NT 4 0 click the NetWare setting tab Do not select these check boxes since they are automatically selected by the printer driver If y...

Page 828: ...anner check box on the Printer Settings tab in the printer properties dialog box Under Windows 2000 XP Vista Windows Server 2003 2003 R2 or Windows NT 4 0 clear the Enable banner check box on the NetWare Settings tab in the printer properties dialog box Printing after Resetting the Printer Printer to print server connection requires 30 40 seconds to resume after the printer is reset During this pe...

Page 829: ...n download USB Printing Support from the supplier s Web site Save it where you can locate it easily 2 Download the printer driver from the supplier s Web site and then extract it Extract the printer driver where you can locate it easily 3 Connect the machine to the computer using a USB cable Connect the USB cable firmly If USB Printing Support is already installed on the computer proceed to Step 9...

Page 830: ...pport if the printer driver is not installed follow the plug and play instructions of the printer Windows 2000 USB To install a printer driver you must have Administrator privilege Log on using an account that has Administrator privilege When USB is first used Found New Hardware Wizard starts and USB Printing Support is installed automatically If the printer driver is already installed and plug an...

Page 831: ... installed and plug and play is enabled the icon of the printer connected to the USB001 port appears in the Printers window The number after USB varies depending on the number of printers that the computer is connected to Windows XP Windows Server 2003 2003 R2 USB To install a printer driver you must have Administrators privilege Log on using an account that has Administrators privilege When USB i...

Page 832: ...nter driver are stored in the following location RPCS D DRIVERS RPCS XP_VISTA Language DISK1 PCL 5e D DRIVERS PCL5E XP_VISTA Language DISK1 PCL 6 D DRIVERS PCL6 XP_VISTA Language DISK1 PostScript 3 D DRIVERS PS XP_VISTA Language DISK1 5 Check the printer driver location and then click Next 6 Click Continue 7 Click Finish If the installation is successful the icon of the printer connected to the US...

Page 833: ... search online A message prompting you to insert the provided CD ROM appears 4 Insert the provided CD ROM into the computer s CD ROM drive The printer driver search begins and a list of printer drivers appears 5 Select the printer driver you want to use and then click Next If the Windows can t verify the publisher of this driver software message appears click Install this driver software anyway 6 ...

Page 834: ...ears in the License Agreement dialog box After reading the agreement click I accept the agreement and then click Next 6 Select the printer driver you want to use in the Select Program dialog box You can select several printer drivers 7 Click Next 8 Select the Printer Name check box to select the printer model you want to use The printer name can be changed in the Change settings for Printer Name b...

Page 835: ...tup exe on the CD ROM root directory A message appears if there is a newer version of the printer driver already installed If there is you cannot install the printer driver using Auto Run If you still want to install the printer driver use Add Printer See When a Message Appears during Installation of the Printer Driver Trouble Shooting Printing with Parallel Connection 51 1 ...

Page 836: ... be met When connected with parallel cables The computer must support bidirectional communication The machine must support bidirectional communication The interface cable must support bidirectional communication The machine must be connected to the computer using the standard parallel cables and parallel connectors Under Windows 2000 Enable bidirectional support must be selected and Enable printer...

Page 837: ...folder Log on as an Administrators or Power Users group member 1 On the Start menu click Printers and Faxes The Printers and Faxes window appears When using Windows 2000 point to Settings on the Start menu and then click Printers The Printers window appears When using Windows Vista click Control Panel on the start menu and then click Printer The Printers window appears 2 Click the icon of the prin...

Page 838: ...nd then select the appropriate size position and type for the tray Select the Do not use Auto Tray Select check box to exclude the tray from the targets of automatic tray selection 8 Click OK to close the printer properties dialog box 1 Preparing the Machine 54 1 ...

Page 839: ...equires Administrator privilege To install a printer driver by Auto Run log on using an account that has Administrator privilege 1 Quit all applications currently running 2 Insert the Font Manager CD ROM into the CD ROM drive The installer starts 3 Click Font Manager 4 Follow the instructions on the display Installing Font Manager 55 1 ...

Page 840: ...r PageMaker 6 0 default installation The directory is C PM6 RSRC PPD4 For PageMaker 6 5 default installation The directory is C PM65 RSRC USENGLISH PPD4 The USENGLISH may vary depending on your language selection For PageMaker 7 0 default installation The directory is C PM7 RSRC USENGLISH PPD4 The USENGLISH may vary depending on your language selection If the driver is not set correctly after copy...

Page 841: ... The Printers window appears 2 Click the icon of the printer you want to use 3 On the File menu click Properties 4 Make the settings you require and then click OK With some applications the printer driver settings are not applied and the application s own default settings are applied For details see the printer driver Help Making printer settings from an application You can make printer settings f...

Page 842: ...Accessing the Printer Properties Making printer default settings the printer properties To change the printer s default settings including settings for options log on using an account that has Manage Printers permission Members of the Administrator and Power Users groups have Manage Printers permission by default You cannot change the printer default settings for individual users Settings made in ...

Page 843: ...er settings for a specific application open the Printing Preferences dialog box from that application The following procedure explains making printer settings for Windows 2000 WordPad as an example of how to make printer settings for a specific application 1 On the File menu click Print The Print dialog box appears 2 In the Select Printer list select the printer you want to use 3 Make the settings...

Page 844: ... click Properties The Printer Properties dialog box appears 4 Make the settings you require and then click OK The settings you make here are used as the default settings for all applications For details see the printer driver Help Making printer default settings printing preferences You cannot change the printer default settings for each user Settings made in the Printer Properties dialog box are ...

Page 845: ...s procedure apply to the current application only General users can change the properties displayed in the Print dialog box of an application Settings made here are used the defaults when printing from the application For details see the printer driver Help Windows Vista Accessing the Printer Properties Making printer default settings the printer properties To change the printer s default settings...

Page 846: ...e used as the default settings for all applications For details see the printer driver Help Making printer settings from an application You can make printer settings for a specific application To make printer settings for a specific application open the Printing Preferences dialog box from that application The following procedure explains making printer settings for Windows Vista WordPad as an exa...

Page 847: ...plied to all users 1 On the Start menu point to Settings and then click Printers The Printers window appears 2 Click the icon of the printer you want to use 3 On the File menu click Properties The Printer Properties dialog box appears 4 Make the settings you require and then click OK The settings you make here are used as the default settings for all applications For details see the printer driver...

Page 848: ... a specific application 1 On the File menu click Print The Print dialog box appears 2 In the Name list select the printer you want to use 3 Click Properties The Printer Properties dialog box appears 4 Make the settings you require and then click OK Procedures for opening the Printer Properties dialog box vary depending on the application For details see the manuals provided with the application Wi...

Page 849: ...en the Printer Properties dialog box from the Printers window You cannot change the printer default settings for individual users Settings made in the Printer Properties dialog box are applied to all users 1 On the Start menu point to Settings and then click Printers The Printers window appears 2 Click the icon of the printer you want to use 3 On the File menu click Properties When you open the Pr...

Page 850: ...e not used and the application s own default settings are applied Any settings you make using this procedure apply to the current application only General users can change the properties displayed in the Print dialog box of an application Settings made here are used the defaults when printing from the application For details see the printer driver Help Windows 2000 Accessing the Printer Properties...

Page 851: ...nters window appears 2 Click the icon of the printer you want to use 3 On the File menu click Printing Preferences The Printing Preferences dialog box appears 4 Make the settings you require and then click OK The settings you make here are used as the default settings for all applications For details see the printer driver Help Making printer settings from an application You can make printer setti...

Page 852: ...ge Printers permission Members of the Administrators and Power Users groups have Manage Printers permission by default You cannot change the printer default settings for individual users Settings made in the Printer Properties dialog box are applied to all users 1 On the Start menu click Printers and Faxes The Printers and Faxes window appears 2 Click the icon of the printer you want to use 3 On t...

Page 853: ...ion open the Printing Preferences dialog box from that application The following procedure explains making printer settings for Windows XP WordPad as an example of how to make printer settings for a specific application 1 On the File menu click Print The Print dialog box appears 2 In the Select Printer list select the printer you want to use 3 Click Preferences The Printing Preferences dialog box ...

Page 854: ... you open the Printer Properties dialog box for the first time after installing the RPCS printer driver a confirmation message appears After you click OK the Printer Properties dialog box appears 4 Make the settings you require and then click OK The settings you make here are used as the default settings for all applications For details see the printer driver Help Making printer default settings p...

Page 855: ...e Printing Preferences dialog box vary depending on the application For details see the manuals provided with the application Any settings you make using this procedure apply to the current application only General users can change the properties displayed in the Print dialog box of an application Settings made here are used the defaults when printing from the application For details see the print...

Page 856: ...uding settings for options log on using an account that has Full Control permission Members of the Administrators Server Operators Print Operators and Power Users groups have Full Control permission by default You cannot change the printer default settings for individual users Settings made in the Printer Properties dialog box are applied to all users 1 On the Start menu point to Settings and then...

Page 857: ... Make the settings you require and then click OK Procedures for opening the Printer Properties dialog box vary depending on the application For details see the manuals provided with the application With some applications the printer driver settings are not used and the application s own default settings are applied Any settings you make using this procedure apply to the current application only Ge...

Page 858: ...2 Setting Up the Printer Driver 74 2 ...

Page 859: ... components cannot be printed PDF files created using PDF version 1 6 watermark note functions extended optional contents or page size exceeds 5 08 m cannot be printed PDF version 1 7 Acrobat 8 0 files created without any functions that are exclusive to PDF version 1 7 can be printed Some types of High Compression PDF files may not be printed Paper size errors may occur when printing on custom siz...

Page 860: ...on2 dialog box click Add The PDF Direct Print Properties dialog box appears 4 Select the driver for this machine and then click OK The PDF Direct Print Properties dialog box closes 5 Click Next repeatedly until Finish appears 6 Click Finish Function Palette The Function palette contains buttons for functions that are already configured through DeskTopBinder Lite enhancement Using these buttons you...

Page 861: ...x appears 2 Click Start and then click Next repeatedly until the Printing Function2 dialog box appears 3 In the Printing Function2 dialog box click Properties The PDF Direct Print Properties dialog box appears 4 Select the Use PDF Password check box at the bottom right of the dialog box and then click OK 5 Click Next repeatedly until Finish appears 6 Click Finish The Extended Features Wizard dialo...

Page 862: ... DeskTopBinder Lite or the machine s control panel the same group password must be set on the other also PDF Direct Print Properties BAC010S 16 1 2 3 4 5 6 7 8 9 10 15 11 12 13 14 17 1 Setting name Displays the plug in configuration name up to 63 single byte characters 2 Change Icon Changes the icon displayed on the tool bar 3 Printer Displays a list of RPCS drivers that support PDF direct printin...

Page 863: ...White not available for this machine Specify color or black and white printing 15 Resolution Specify a print resolution 16 PDF password Enter the password for password protected PDF files A password protected PDF file cannot be printed unless its password is entered here 17 Group password If a group password is assigned to DeskTopBinder Lite and this machine enter the group password in this field ...

Page 864: ...ence window 2 Click Add Change Custom Settings 3 Select the Unauthorized copy check box 4 Click Control Settings The Unauthorized Copy Control window appears For details see the printer driver Help Using Data security for copying You can embed a print pattern by setting it in the printer driver Setting Data security for copying in the printer driver Select the Data security for copying check box Y...

Page 865: ... copying or storing a document protected by vertical stripes overprint Only the RPCS printer driver is supported Printing at 200 200 dpi is not possible You cannot partially embed a pattern and text in a document To make the embedded pattern clear set the character size at least 50 pt preferably 70 to 80 pt and character angle to between 30 and 40 degrees Use 182 257 mm 71 4 101 2 in or larger pap...

Page 866: ...ng Mask type BAC034S 1 The pattern and text you have set is printed palely 2 The document is copied scanned or stored in copiers multifunction machines 3 The pattern and text you have set appear clearly Only the RPCS printer driver is supported Printing at 200 200 dpi is not possible You cannot partially embed patterns and texts strings in a document To make the embedded pattern clear set the char...

Page 867: ...r driver Help Important Notice The supplier does not provide warranty regarding the appearance of print patterns and other copy protection features The appearance of the print patterns and the performance of Unauthorized Copy Control may vary depending on the quality of paper used and the machine model and settings The supplier takes no responsibility for any damages sustained in connection with u...

Page 868: ... deleted after printing is completed If you select Stored Print the files remain in the machine even after printing is finished If you press Print Jobs on the Printer screen the Complete List or the List Per User ID screen appears depending on which list type you select from Initial Print Job List Complete List If you select Complete List from Initial Print Job List the following screen appears 1 ...

Page 869: ... password press Change Password enter the current password and then enter the new password on the confirmation screen To delete the password press Change Password leave the entering confirming a new password box blank and then press OK You can also set passwords to the Stored Print files that do not currently have passwords 12 Clear All Clears all selections 13 Select All Jobs Selects all files st...

Page 870: ...press the selected print jobs again The display is not updated if a new file is stored while the list of stored files is displayed To update the display press Exit to return to the Printer screen and then press Print Jobs again If a large number of print jobs is stored in the machine processing may slow temporarily depending on which functions are used If you press List Per User ID in the Complete...

Page 871: ... it Selecting the Initial Print Job List 1 Press the User Tools Counter key BAC001S 2 Press Printer Features The Printer Features menu appears 3 On the System tab press Initial Print Job List 4 Select either Complete List or List Per User ID After configuring the settings the selected type of print job list is displayed Using the Print Job Function 87 3 ...

Page 872: ...Displaying a Print Job List 1 Press the Printer key BAC003S 2 Press Print Jobs Either the Complete List or List Per User ID screen appears 3 Other Print Operations 88 3 ...

Page 873: ...Stored Print Jobs settings are applied first If the application has a collate option make sure it is not selected before sending a print job By default Sample Print jobs are automatically collated by the printer driver If a collate option is selected from the application s Print dialog box more prints than intended may be produced If the first set of the Sample Print files is not as you expected a...

Page 874: ...Start printing from the application s Print dialog box Make sure to set more than two copies The Sample Print job is sent to the machine and the first set is printed 3 On the machine s control panel press the Printer key to display the Printer screen 4 Press Print Jobs A list of print files stored in the machine appears 5 Press Sample Print Job List A list of Sample Print files stored in the machi...

Page 875: ...n the number specified on the computer is printed for every selected document If the number of sets specified on the computer is 1 one set each is printed for every document When printing accumulated sample print documents you cannot change the numbers of sets When printing is completed the stored file will be deleted To stop printing after printing has started press Exit until the Printer screen ...

Page 876: ...chine s control panel Your confidential documents will be safe from being viewed by other people A Locked Print file cannot be stored if the total number of Sample Print Locked Print Hold Print and Stored Print files in the machine is over 100 The maximum number varies depending on the volume of data in files the file contains over 1 000 pages the machine s sent or stored files total over 9 000 bl...

Page 877: ... see PostScript 3 Supplement included as a PDF file on the CD ROM Applications with their own drivers such as PageMaker do not support this function If you are using Mac OS X you need Mac OS X v10 2 or higher to use this function 1 Configure the Locked Print in the printer driver s properties For details about configuring the printer drivers see the corresponding Help files 2 Start printing from t...

Page 878: ...r keys and then press OK The print confirmation screen appears A confirmation screen will appear if the password is not entered correctly Press Exit to enter the password again If multiple print files are selected the machine prints files that correspond to the entered password The number of files to be printed is displayed on the confirmation screen If you forgot your password ask your file admin...

Page 879: ...n screen appears A confirmation screen will appear if the password is not entered correctly Press Exit to enter the password again If you forget your password ask your file administrator for help 6 Press Yes The selected file is deleted If you do not want to delete the file press No If multiple print files are selected the machine deletes files that correspond to the entered password The number of...

Page 880: ...Auto Delete Temporary Print Jobs and Auto Delete Stored Print Jobs see Printer Features General Settings Guide p 111 Checking the Error Log Printing a Hold Print File The following procedure describes how to print a Hold Print file with the PCL 6 5e and the RPCS printer driver For details about how to print a Hold Print file with the PostScript 3 printer driver see Postscript 3 Supplement included...

Page 881: ...elect the file you want to print and press Print The confirmation screen appears 8 Press Yes The Hold Print file is printed Press No to cancel printing When printing is completed the stored file is deleted To stop printing after printing has started press Exit until the Printer screen appears and then press Job Reset The file will be deleted Printing from the Print Job Screen 97 3 ...

Page 882: ...screen appears 5 Press Yes to delete the file The selected file is deleted If you do not want to delete the file press No If you select multiple files the confirmation screen displays the total number of files to be deleted Stored Print Use this function to store a file in the machine and then print it from the computer or the machine s control panel later Jobs are not deleted after they are print...

Page 883: ...ed Print File The following procedure describes how to print a Stored Print file with the PCL 6 5e and the RPCS printer driver For details about how to print a Stored Print file with the PostScript 3 printer driver see Postscript 3 Supplement included as a PDF file on the supplied CD ROM Applications with their own drivers such as PageMaker do not support this function If you are using Mac OS X yo...

Page 884: ...printer driver a password confirmation screen appears Enter the password If multiple print files are selected and some of these require a password the machine prints files that correspond to the entered password and files that do not require a password The number of files to be printed is displayed on the confirmation screen If you forgot your password ask your file administrator for help 3 Other ...

Page 885: ...ears and then press Job Reset A Stored Print file is not deleted even if Job Reset is pressed The Stored Print file that sent to the machine is not deleted unless you delete a file or select Auto Delete Stored Print Jobs see Printer Features General Settings Guide For details about setting printer drivers see the printer driver Help You can also print or delete a Stored Print file from Web Image M...

Page 886: ...s files correspond to the entered password and files that do not require a password The number of files to be deleted is displayed on the confirmation screen If you forgot your password ask your file administrator for help 5 Press Yes to delete the file The selected file is deleted If you do not want to delete the file press No If you select multiple files the confirmation screen displays the tota...

Page 887: ...ter key The Printer screen appears 2 On the Printer screen press Print Jobs A list of user IDs whose files are stored in the machine appears 3 Press the user ID whose file you want to print You cannot select multiple user IDs at the same time Press Previous or Next to scroll through the list Press Clear to cancel a selection Printing from the Jobs Per User ID Screen 103 3 ...

Page 888: ...clear all selections press Clear All 6 Press Print The confirmation screen appears 7 Press Yes The selected files are printed If you select multiple files the confirmation screen displays the total number of files to be printed Printing All Print Jobs 1 Press the Printer key The Printer screen appears On the Printer screen press Print Jobs 3 Other Print Operations 104 3 ...

Page 889: ...You cannot select multiple user IDs at the same time Press Previous or Next to scroll through the list Press Clear to cancel a selection 3 Press Print All Jobs If the selected user ID has multiple types of print jobs the selection screen of the print job type appears Printing from the Jobs Per User ID Screen 105 3 ...

Page 890: ...d document If the number of sets specified on the computer is 1 one set each is printed for every document If you select Stored Print the number you set on the confirmation screen is applied to all files of the selected print job type If you do not set a quantity the minimum number is applied to all files If you select Locked Print enter the correct password If there are multiple passwords the mac...

Page 891: ... canceling the settings Staple Punch Duplex If Auto Continue is selected form fed paper is printed after a set interval See Printer Features General Settings Guide Printing from a Selected Tray If the machine does not have a tray for the selected paper size or paper type or if the selected paper loaded in the machine has run out a caution message appears If this message appears do the following pr...

Page 892: ...he machine is shared by multiple computers be careful not to accidentally cancel someone else s print jobs Under Windows if the machine is connected to the computer using a parallel cable sent print jobs may be canceled if Reset All Jobs is pressed while Waiting for print data is on the control panel After the interval set in I O Timeout in Printer Features has passed the next print job can be sen...

Page 893: ... Reset All Jobs Reset the Job cancels the print job currently being processed Reset All Jobs cancels all jobs in the print queue Resume Printing resumes printing print jobs A confirmation message appears 4 Press Yes to cancel the print job 5 Press No to return to the previous display Windows Canceling a Print Job from the computer You can cancel a print job from the computer if transferring print ...

Page 894: ...ata is on the control panel After the interval set in I O Timeout in Printer Features has passed the next print job can be sent A print job sent from a different client computer will not be canceled in this case Under Windows XP Vista Windows Server 2003 2003 R2 or Windows NT 4 0 click Cancel on the Document menu Under Windows 95 98 Me 2000 or Windows NT 4 0 you can also open the print job queue w...

Page 895: ...ter key The Printer screen appears 2 Press Error Log An error log list appears Depending on the security settings certain errors may not be displayed 3 Press the desired job list You can select job list from Complete List Locked Print Job List Sample Print Job List Hold Print Job List or Stored Print Job List 4 Select the print file you want to check and then press Details A detailed error log app...

Page 896: ...e Network Guide or Help for more information Using telnet Type in spoolsw spool on to set Spool Printing For details see Network Guide for more information about telnet Viewing a list of spool jobs on the control panel If Spool Printing is set a list of spooled jobs can be viewed on the control panel screen Press the Printer key and then press Spooling Job List A list of spooled jobs appears Delet...

Page 897: ...on is available with the PCL 6 5e printer driver only If Document Server is selected under Job Type User Defined Page cannot be used If User Defined Pages is selected under Paper Selection on the Paper tab Layout cannot be selected BAC028S For details see the printer driver Help User Defined Pages 113 3 ...

Page 898: ...int dialog box If Collate is enabled in the application printing will not be as intended When printing restarts after removing jammed paper the printing position may be different depending on the location of the jam If the paper jam occurred in the optional finisher printing will restart from the top page of the data currently being printed or from the page where the paper jam occurred If the pape...

Page 899: ...tions General Settings Guide For printing methods see the printer driver Help Stapling Precautions Stapling can be done only with the optional finisher installed Staple printing will be canceled under the following conditions If the number of pages to staple exceeds maximum If a paper size that cannot be stapled is selected If a paper type that cannot be stapled is selected If positions other than...

Page 900: ... Correct option settings in the printer driver For details see the printer driver Help When the finisher is being used for another function s job for example a copy job printing will start after that job ends Be sure to set paper size and orientation in the printer driver when stapling When duplex printing is selected adjust staple positions to the binding orientation Depending on the application ...

Page 901: ...sitions will vary slightly from page to page as holes are punched into each sheet individually The number of holes that can be punched varies according to country For details about paper sizes that can be punched see Supplementary Informations Copy Document Server Reference For details about printing methods see the printer driver Help Printing with the Finisher 117 3 ...

Page 902: ...he specified position when printing on letterhead paper If you cannot make punch settings even with the optional finisher installed options may not be set correctly in the printer driver Correct option settings in the printer driver For details see the printer driver Help When duplex print is selected adjust the punch position to the binding direction Be sure to set the punch position as same as t...

Page 903: ... Printed output is assembled as sets in sequential order BAC016S Rotating Collate Every other print set is rotated by 90 degrees BAC017S Shift Collate The optional finisher is required for this function BAC018S The finisher shift tray moves backward or forward when a job or set is output causing the next to shift so you can separate them When Rotate Collate is cancelled If the following functions ...

Page 904: ...h other collate functions Set Collate and Rotating collate when using the RPCS printer driver Separation sheets cannot be inserted if Slip Sheet is specified Follow the procedure below when using a printer driver other than the RPCS Set Collate and Rotating Collate in the printer driver If you cannot make Shift Collate even with the optional finisher installed options may not be set up correctly i...

Page 905: ...size and orientation as the body paper Cover sheet Prints the first page of the document on the sheet for the cover page Print on one side Prints on one side of the cover sheet only even when duplex printing is selected BAC021S Print on both sides Prints on both sides of the cover sheet when duplex printing is selected Cover sheet printed on both sides BAC022S Cover sheet printed on one side BAC02...

Page 906: ... side Prints on one side of the cover sheet only even when duplex printing is selected BDJ004S Print on both sides Prints on both sides of the cover sheets when duplex printing is selected Back cover page face inside and the number of pages is odd BDJ005S Back cover page face inside and the number of pages is even 3 Other Print Operations 122 3 ...

Page 907: ... is set as the paper feed tray for the body paper the paper will be delivered from a tray containing paper in the orientation Therefore if the cover paper is set to the orientation the orientation of the output cover and body will be different For printing methods see the printer driver Help Covers 123 3 ...

Page 908: ...the first page BAC037S This function is only valid with duplex printing You can designate up to 100 locations using the printer driver This function can be used together with combine layout printing For printing methods see the printer driver Help Inserting Chapter Slip Sheets Insert chapter slip sheets before the specified page Print Prints on the chapter slip sheets When duplex printing is selec...

Page 909: ...perfeedtrayforthebodypaper thepaperwillbedelivered from a tray containing paper in the orientation Therefore when the slip sheet has been set to the orientation the orientation of the output slip sheet and body will be different The same paper feed tray cannot be set for the body of the document and the slip sheet For details about printing methods see the printer driver Help Chaptering 125 3 ...

Page 910: ...slip sheet between OHP transparencies Print BAC025S Blank BAC020S Collate cannot be set when using slip sheets When the duplex printing or cover printing is set you cannot insert slip sheets The slip sheet should be the same size and orientation as the body paper 3 Other Print Operations 126 3 ...

Page 911: ...vered from a tray containing paper in orientation Therefore when the slip sheet has been set to orientation the orientation of the output slip sheet and body paper will be different The same paper feed tray cannot be set for the body of the document and slip sheets Slip Sheet 127 3 ...

Page 912: ...ocols are available TCP IP Unspecified Normal TCP IP DIPRINT TCP IP RHPP AppleTalk and NetWare 1 Log on to Web Image Monitor as an administrator For details about login user names and passwords see Using Web Image Monitor Network Guide 2 Inthemenuarea click Configuration andthenclick VirtualPrinterSettings inthe Printer category A list of the available virtual printers appears 3 Click Add The scre...

Page 913: ...iguration see Web Image Monitor Help Confirming a Virtual Printer Configuration Use this procedure to confirm a virtual printer configuration 1 Start Web Image Monitor For details about login user names and passwords see Using Web Image Monitor Network Guide 2 Inthemenuarea click Configuration andthenclick VirtualPrinterSettings inthe Printer category A list of available virtual printers appears 3...

Page 914: ...er s default virtual printer Delete appears only if you have already added a virtual printer Printing Using a Virtual Printer To print directly from a specified virtual printer assign the virtual printer in the print command Before printing for the first time specify the virtual printer you want to use 1 Log on to Web Image Monitor in administrator mode For details about login user name and passwo...

Page 915: ...ftp ftp put path name file name Virtual Printer Name Using the Virtual Printer 131 3 ...

Page 916: ...3 Other Print Operations 132 3 ...

Page 917: ... to eight alphanumeric characters You should enter a Password and File Name to distinguish the job from others Up to 3 000 files can be stored in the Document Server New files cannot be stored when 3 000 files have already stored Even if less than 3 000 files are stored new files cannot be stored when a file to be stored contains more than 1 000 pages the machine s sent or stored files total over ...

Page 918: ...out Document Server functions see Document Server General Settings Guide For details about how to access Document Server from a client see the printer driver Help 4 Saving and Printing Using the Document Server 134 4 ...

Page 919: ...peeds depend on the machine Check which type of machine you have See General Settings Guide Interface Standard Ethernet interface 100BASE TX 10BASE T USB 2 0 interface Option Gigabit Ethernet Interface 1000BASE T IEEE 1284 parallel interface Use a standard 36 pin printer cable not longer than 3 meters 10 feet IEEE 802 11a b g or IEEE 802 11 b g wireless LAN interface Bluetooth interface Network pr...

Page 920: ...r later Transmission spec USB 2 0 Standard Connectable Device Devices corresponding to USB 2 0 Standard When using Mac OS use only the standard USB Interface The optional USB interface board is not supported When using the USB Interface Standard with Mac OS 10 3 3 USB2 0 is supported When using the USB Interface Standard with Windows Me install USB Printing Support Windows Me only supports USB 1 1...

Page 921: ...Page You can print the current PCL configuration and installed PCL font list PS Configuration Font Page You can print the current PS configuration and installed PostScript font list This menu can be selected only when the optional PostScript 3 unit is installed PDF Configuration Font Page You can print the current PDF configuration and installed PDF font list This menu can be selected only when th...

Page 922: ...m error occurs Memory Overflow Select this to have a memory overflow error report printed Job Separation You can enable Job Separation This menu can be selected only when a finisher optional is installed Rotate by 180 Degrees Use this to select or deselect rotation of the print image by 180 degrees Auto Delete Temporary Print Jobs You can select to automatically delete print jobs temporarily store...

Page 923: ...age You can specify the printer language Sub Paper Size You can enable the Auto Substitute Paper Size A4 LT feature Page Size You can select the default paper size Letterhead Setting You can rotate original images when printing When printing original images are always rotated by 180 degrees Therefore output might not be as expected when printing onto letterhead or preprinted paper requiring orient...

Page 924: ...ce You can set the storage location of the default font Font Number You can set the ID of the default font you want to use Point Size You can set the point size you want to use for the selected font Font Pitch You can set the number of characters per inch for the selected font Symbol Set You can specify the set of print characters for the selected font Courier Font You can select a courier font ty...

Page 925: ...you want to allocate to it Emulation Mode Specifies the emulation mode Print Mode Specifies the print mode Default Code Page Specifies the default code page The default value is 037 Default FGID Specifies the default FGID Font Typeface Global Identifier which identifies the printer s default resident font The default FGID is 416 Courier 10 point Characters Per Inch Specifies the number of characte...

Page 926: ...t color specification controls are processed on a monochrome laser printer Suppress Staple Count Nacks Lets you select whether or not to notify the user when stapling errors occur Suppress Punch Nacks Lets you select whether or not to notify the user when punching errors occur Tray Mapping Maps the media source input tray to an ID the host uses for the media source Corner Staple Angle Lets you sel...

Page 927: ... For details about Copier Features and System Settings see Copy Document Server Reference and General Settings Guide Printer Features Menu 143 5 ...

Page 928: ...5 Appendix 144 5 ...

Page 929: ...ected tray 107 H Hold Print 95 deleting 98 printing 96 How to Read This Manual 7 I Initial Display 9 Initial Print Job List 87 Inserting Chapter Slip Sheets 124 Installing the Printer Driver 29 IPP 34 LPR port 37 NetWare print server remote printer 42 parallel connection 50 SmartDeviceMonitor for Client Port 30 Standard TCP IP port 35 TCP IP 32 USB connection 45 Windows network printer 40 WSD port...

Page 930: ...ws Vista 70 Windows XP 68 Printing a PDF File Directly 75 Punch 116 Q Quick Install 29 R Remote Printer 42 RPCS Printer Driver 29 65 S Sample Print 89 deleting 91 printing 89 Simplified Display 10 Slip Sheet 126 SmartDeviceMonitor for Client Port 30 31 Specifications 135 Spool Printing 112 Standard TCP IP Port 35 Staple 114 Stored Print 98 deleting 101 printing 99 T TCP IP 32 Thick Paper 21 Thin P...

Page 931: ...MEMO 147 ...

Page 932: ...MEMO 148 EN USA AE AE D381 ...

Page 933: ...Copyright 2007 ...

Page 934: ...Operating Instructions Printer Reference D381 7002 EN USA ...

Page 935: ... Originals with the Network TWAIN Scanner Various Scan Settings Appendix 1 2 3 4 5 6 7 Read this manual carefully before you use this machine and keep it handy for future reference For safe and correct use be sure to read the Safety Information in About This Machine before using the machine Scanner Reference Operating Instructions ...

Page 936: ...le for direct indirect special incidental or consequential damages as a result of handling or operating the machine Notes Some illustrations in this manual might be slightly different from the machine Certain options might not be available in some countries For details please contact your local dealer Caution Use of controls or adjustments or performance of procedures other than those specified in...

Page 937: ...s and other consumables Copy Document Server Reference Explains Copier and Document Server functions and operations Also refer to this manual for explanations on how to place originals Facsimile Reference Explains Facsimile functions and operations Printer Reference Explains Printer functions and operations Scanner Reference Explains Scanner functions and operations Network Guide Explains how to c...

Page 938: ...t please visit our Web site or consult an authorized dealer Information Contains general notes on the machine and information about the trademarks of product names used in the manuals Other manuals Manuals for DeskTopBinder Lite DeskTopBinder Lite Setup Guide DeskTopBinder Introduction Guide Auto Document Link Guide Manuals provided are specific to machine types The following software products are...

Page 939: ...8 Selecting the Destination from the Machine s Address Book 28 Entering an E mail Address Manually 31 Selecting Destinations by Searching an LDAP Server 32 Registering a Directly Entered Destination in the Address Book 35 Specifying the E mail Sender 37 Selecting a Sender from the List 37 Using a Registration Number to Specify a Sender Name 38 Selecting the Sender by Searching the Machine s Addres...

Page 940: ...rver 68 Registering the Path to the Selected Destination in the Address Book 72 Simultaneous Storage and Sending by Scan to Folder 73 3 Storing Files Using the Scanner Function Before Storing Files 75 Outline of File Storage under the Scanner Function 75 Basic Operation for Storing Scan Files 77 Specifying File Information for a Stored File 79 Specifying a User Name 79 Specifying a File Name 79 Sp...

Page 941: ...nder by Entering the Registration Number 108 Selecting a Sender by Searching the Delivery Server s Destination List 109 Specifying the Subject of the E mail to Be Transmitted via the Delivery Server 112 Simultaneous Storage and Delivery 113 5 Scanning Originals with the Network TWAIN Scanner Before Using the Network TWAIN Scanner 115 Outline of the Network TWAIN Scanner 115 Preparing to Use the Ne...

Page 942: ...e 152 Registering the Default Values of the Scanner s Initial Display 154 Scan Settings When Using TWAIN Scanner 156 Setting Original Orientation on the TWAIN Scanner 156 When Scanning Originals of Mixed Sizes Using TWAIN Scanner 158 7 Appendix Relationship between Resolution and Scan Size 159 When Using the E mail Folder Sending Storing or Network Delivery Functions 159 When Using as a TWAIN Scan...

Page 943: ...Specifications 174 INDEX 177 7 ...

Page 944: ...ad these notes They can be found in the Safety Information section of About This Machine Indicates points to pay attention to when using the machine and explanations of likely causes of paper misfeeds damage to originals or loss of data Be sure to read these explanations Indicates supplementary explanations of the machine s functions and instructions on resolving user errors This symbol is located...

Page 945: ...eliver scan files using a delivery server For details see chapter 4 Delivering Scan Files Scanning originals from a client computer TWAIN Scanner You can use the TWAIN driver to scan files from a networked or directly connected computer For details see chapter 5 Scanning Originals with the Network TWAIN Scanner Storing files Scan files can be stored on the machine s hard disk You can do various th...

Page 946: ... p 115 Scanning Originals with the Network TWAIN Scanner p 75 Storing Files Using the Scanner Function 10 ...

Page 947: ...r details see E mail Screen Scan to Folder Screen List of Stored Files and Network Delivery Scanner Screen p 22 E mail Screen p 55 Scan to Folder Screen p 82 List of Stored Files p 98 Network Delivery Scanner Screen Simplified Display This section explains how to switch to the simplified display When you press the Simplified Display key the screen changes from the initial display to the simplified...

Page 948: ...tain keys do not appear on the simplified display Confirmation Displays This section explains three confirmation displays Check Modes Preview and Transmission File Status Check Modes This section explains items that are displayed and how to display the Check Modes screen Use the Check Modes screen to check scanning and transmission settings Pressing Check Modes switches the screen from the initial...

Page 949: ...in use 3 Sender and Destination Displays the sender and transmission or delivery destinations The symbol indicates a group destination The symbol indicates a destination that can receive encrypted e mail 4 Send Displays transmission settings such as Sender and Subject 5 Expand Group Dest Press to display the members of the group when a group is specified as the destination 13 ...

Page 950: ...e files after checking the preview and the scan settings used for scanning Preview BAP003S 1 Zoom Out and Zoom In Press to reduce or enlarge the displayed preview 2 Press to shift the displayed area 3 Cancel Sending Press to close a preview and interrupt a transmission 4 Send Press to close a preview and continue a transmission 5 Display File Displays a file s name and size 6 Display Page Displays...

Page 951: ...le type Preview might not be displayed if scanning failed or the image file is corrupted If this is the case scan the original again p 85 Checking a Stored File Selected from the List Scanned Files Status This section explains items that are displayed and how to display the Scanned Files Status screen Use the Scanned Files Status screen to check e mail transmission Scan to Folder and delivery resu...

Page 952: ...ltiple destinations the first selected destination is displayed Other destinations appear as X X indicates the number of destinations when sending files by e mail or delivering them 4 Sender Displays the sender name 5 File Name Displays the stored file name of files that are simultaneously sent and stored or of stored files that are sent 6 Status Displays one of the following transmission statuses...

Page 953: ...on results by pressing Job List at the bottom of the screen To check transmission results press Scanned Files Status and then display the Scanner File Status screen Depending on security settings some transmission results might not be displayed 17 ...

Page 954: ...18 ...

Page 955: ...cess to an e mail server that supports SMTP Simple Mail Transfer Protocol to send scan files by e mail However it is not essential to have an e mail server inside the LAN where this machine belongs It transfers a received e mail to a specified destination through a LAN or the Internet 3 Client computer Use e mail client software to receive e mail messages and scan file attachments that are generat...

Page 956: ...must configure will vary depending on your operating environment For details about network settings and configuration procedures see Network Settings Required to Use E mail Function General Settings Guide 1 Press the User Tools Counter key and then press System Settings The System Settings screen appears 2 Press the Interface Settings tab 3 Press Machine IPv4 Address to specify the machine s IPv4 ...

Page 957: ...d e mail addresses in the address book Register e mail addresses in Address Book Management under Administrator Tools from System Settings Addresses can also be registered as groups For details about registering e mail addresses in the address book see Registering Addresses and Users for Facsimile Scanner Functions General Settings Guide You can also register e mail addresses in the address book u...

Page 958: ...reen and Scan to Folder screen Switch the screen also when sending the same files by both e mail and Scan to Folder 3 E mail icon Indicates that the E mail screen is displayed 4 Manual Entry To specify destinations not registered in the address book press this key and then enter the e mail addresses using the soft keyboard that appears 5 Reg No Press this key to specify the destination using a 5 d...

Page 959: ...ecurity Sender Name Recept Notice Enter the message and specify the subject security encryption and a signature sender and whether or not to use Message Disposition Notification Before Sending Scan Files by E mail 23 1 ...

Page 960: ...il Screen 3 Place originals 4 If necessary press Scan Settings to specify scanner settings such as resolution and scan size For details see Various Scan Settings 5 If necessary specify the scanning density For details see Adjusting Image Density 6 If necessary press Original Feed Type to specify settings such as original orientation For details see Setting of Original Feed Type 7 If necessary pres...

Page 961: ... Stop key You can cancel a destination selected from the destination list by pressing the selected destination again In System Settings you can specify the administrator s e mail address as the default sender name This lets you send e mail without entering anything for Sender Name For details see File Transfer General Settings Guide Depending on the security setting the logged on user may be speci...

Page 962: ... Security is set to Encryption if you specify multiple destinations a delivery failure message will appear each time a scan file is sent to a destination where decryption settings have not been configured After an e mail is sent the destination sender subject text and file name fields will be automatically cleared If you want to preserve the information in these fields contact your local dealer p ...

Page 963: ... E mail screen as follows 1 Press Delivery Dest The E mail screen or Scan to Folder screen appears 2 If the Scan to Folder screen appears press E mail The E mail screen appears Youcannotswitchfromthenetworkdeliveryscannerscreenwhiledeliverydestinationsarebeing specified To clear the specified destination display the destination in the destination field of the network delivery scanner screen and th...

Page 964: ...k To use this function you must register the destinations in System Settings in advance For details see Registering Addresses and Users for Facsimile Scanner Functions General Settings Guide You can use the following methods to select destinations registered in the machine s address book Select a destination from the list Select a destination by entering the registration number Select a destinatio...

Page 965: ...ddress book using its registration number 1 Press Reg No 2 Using the number keys enter the five digit registration number assigned to the required destination If the entered number is less than five digits press the key after the last number Example To enter 00003 Press the 3 key and then press the key By pressing Change you can change the selected destination 3 Press OK Searching the machine s ad...

Page 966: ...nced Search to specify the detailed search criteria and then press OK By pressing Advanced Search you can search using criteria such as Name E mail Address and Folder Name You can specify search criteria such as Beginning Word or End Word You can refine your search using multiple criteria The illustrated screen is an example The items that actually appear on the screen may differ 6 Press Start Sea...

Page 967: ...pear Beginning Word The names which start with the entered character or characters are targeted For example to search for ABC enter A End Word The names which end with the entered character or characters are targeted For example to search for ABC enter C Exact Match The names which correspond to an entered character or characters are targeted For example to search for ABC enter ABC Include one Wor...

Page 968: ...tered in the machine s address book For details see Registering a Directly Entered Destination in the Address Book p 35 Registering a Directly Entered Destination in the Address Book Selecting Destinations by Searching an LDAP Server This section explains how to search for an address registered in an LDAP server and specify it as an e mail destination To use this function an LDAP server must be co...

Page 969: ...s If you search by Name LDAP server s settings determine whether the search is based on surname or first name Consult your administrator 4 Enter the beginning of the destination name To search by e mail address enter the beginning of the destination address 5 Press OK 6 If necessary press Advanced Search to specify the detailed search criteria and then press OK By pressing Advanced Search you can ...

Page 970: ...s search results If an e mail address returned by the LDAP server is too long it will be impossible to specify it as the destination For details about the number of characters that can be specified see Sending E mail You can register multiple e mail addresses in individual LDAP server accounts However only onee mailaddresswillbedisplayedasthesearchresult Usually theaddressthatwasregistered first o...

Page 971: ...rch a vague search The function of this vague search depends on the system supported by the LDAP server p 166 Sending E mail Registering a Directly Entered Destination in the Address Book This section explains how to register a directly entered destination in the machine s address book You can also register a destination selected from the LDAP server 1 In the destination field display the destinat...

Page 972: ...ses and Users for Facsimile Scanner Functions General Settings Guide 4 Press OK Dependingonthesecuritysetting Prg Dest maynotappear Insuchcase youcannotcomplete the registration To register in the machine s address book a destination searched for and selected from the LDAP server display the destination and then press Prg Dest 1 Sending Scan Files by E mail 36 1 ...

Page 973: ...n System Settings you can specify the administrator s e mail address as the default sender name This lets you send e mail without entering anything for Sender Name For detail see File Transfer General Settings Guide Depending on the security setting the logged on user may be specified as Sender Name Whenaprotectioncodehasbeenset ascreenforenteringtheprotectioncodeappearsafterselecting the sender E...

Page 974: ...d to the required destination If the entered number is less than five digits press the key after the last number Example To enter 00006 Press the 6 key and then press the key By pressing Change you can change the selected destination 4 Press OK twice Selecting the Sender by Searching the Machine s Address Book This section explains how to select the sender by searching the machine s address book 1...

Page 975: ...iteria The illustrated screen is an example The items that actually appear on the screen may differ 7 Press Start Search Destinations that match the search criteria are displayed 8 Select the sender 9 Press OK Search criteria that appear in Advanced Search such as Name E mail Address and Folder Name are registered in the machine s address book For details see Registering Addresses and Users for Fa...

Page 976: ...xample to search for ABC enter ABC Include one Word The names which contain an entered character or characters are targeted For example to search for ABC enter A B or C Exclude Words The names which do not contain an entered character or characters are targeted For example to search for ABC enter D 1 Sending Scan Files by E mail 40 1 ...

Page 977: ...il 1 Press Subject 2 Enter the subject To enter characters press Text Entry To enter symbols press Symbol Entry To add predefined User Text registered on this machine press User Text For details about entering the text see Entering Text About This Machine 3 Press OK Specifying the E mail Subject 41 1 ...

Page 978: ... e mail message from the list Enter the message directly The messages that can be selected from the list must be registered in System Settings in advance For details see File Transfer General Settings Guide Selecting a Message from the List You can select a message from the list 1 Press Text 2 Select a message 3 Press OK 1 Sending Scan Files by E mail 42 1 ...

Page 979: ...Manual Entry of a Message You can enter the message manually 1 Press Text 2 Press Manual Entry The soft keyboard appears 3 Enter the message 4 Press OK twice Specifying the E mail Message 43 1 ...

Page 980: ...r Sending Scan Files by E mail Depending on the security setting Access Privileges may appear instead of User Name For details about specifying Access Privileges consult the administrator You can resend stored files by e mail To resend stored files select the files on the Select Stored File screen and then send them For details see Sending a Stored File If a file is sent and stored simultaneously ...

Page 981: ...s used to set security For details about security settings consult your network administrator Sending encrypted e mail Use the following procedure to specify a destination for which encryption is configured and encrypt and send an e mail Destinations for which encryption can be configured for each transmission are indicated by this symbol 1 Press Security 2 Select Encryption 3 Press OK Encrypting ...

Page 982: ...g e mail with a signature Use the following procedure to attach signatures to files and send those files by e mail To perform this procedure you must first select Set Individually in the signature settings of Web Image Monitor 1 Press Security 2 Select Signature 3 Press OK The certificate device certificate installed on this machine is used to attach signatures The S MIME settings of Web Image Mon...

Page 983: ...A signature is always applied to scan files that are sent by e mail You cannot cancel Signature in Security Security Settings to E mails 47 1 ...

Page 984: ...e to select Send Store To send the URL by e mail you must select Send Store 3 Press OK 4 Specify the e mail destination make any other necessary settings and then send the e mail For details about sending e mail see Basic Operation for Sending Scan Files by E mail An e mail similar to the following will be sent to the destination BAP044S 5 In the e mail destination click the URL Web Image Monitor ...

Page 985: ...ick Help on the upper right of each Web browser s window You can send the URL by e mail and simultaneously send it by Scan to Folder In this case the file is sent to the Scan to Folder destination not the URL p 24 Basic Operation for Sending Scan Files by E mail Sending the URL by E mail 49 1 ...

Page 986: ...1 Sending Scan Files by E mail 50 1 ...

Page 987: ...an files by Scan to Folder Sending files to shared folders ZZZ509S 1 This machine You can send scan files to shared network folders To send scan files to shared network folders use the SMB protocol 2 Computer with a shared folder To use this function it is necessary to create a shared folder in advance You can specify a shared folder to save scan files 3 Client computer You can also browse scanned...

Page 988: ... It is essential to have the FTP server inside the LAN WAN where this machine belongs It is not possible to access an FTP server via a proxy server 3 Client computer You can browse scanned files saved to an FTP server from a client computer You need to have an FTP client program on the computer to connect to an FTP server Sending files to a NetWare server ZZZ511S 1 This machine You can send scan f...

Page 989: ... Configure the network settings in System Settings according to your environment and how you will be using the machine The following procedure explains connecting this machine to an IPv4 network using Ethernet cable Note that the settings you must configure will vary depending on your operating environment For details about network settings and configuration procedures see Network Settings Require...

Page 990: ...onitor or Telnet etc The settings you must configure in System Settings vary depending on your network environment For details about network settings see Connecting the Machine General Settings Guide Registering Destination Folders in the Address Book You can register the addresses of frequently used destination folders in the address book Register the folder addresses in Address Book Management u...

Page 991: ...ch between the Scan to Folder screen and E mail screen Also switch the screen when sending a file simultaneously by both Scan to Folder and e mail 3 Scan to Folder icon Shows that the Scan to Folder screen is displayed 4 Manual Entry To specify destinations not registered in the address book press this button to display the soft keyboard and then enter the address of the destination folder 5 Reg N...

Page 992: ...ption and a signature sender and whether or not to use Message Disposition Notification The entries will be used for e mail transmission when sending files simultaneously by Scan to Folder and e mail For details see Sending Scan Files by E mail p 19 Sending Scan Files by E mail 2 Sending Scan Files to Folders 56 2 ...

Page 993: ...creen 3 Place originals 4 If necessary press Scan Settings to specify scanner settings such as resolution and scan size For details see Various Scan Settings 5 If necessary specify the scanning density For details see Adjusting Image Density 6 If necessary press Original Feed Type to specify settings such as original orientation For details see Setting of Original Feed Type 7 If necessary press Se...

Page 994: ... Preview and then start scanning while Preview is highlighted the Preview screen appears You can use this screen to check how the originals are scanned and the scan settings used for scanning After checking the preview you can specify whether to send the file or not For details see Preview To cancel scanning press the Clear Stop key You can also store a file and simultaneously send it by Scan to F...

Page 995: ... to Folder screen as follows 1 Press Delivery Dest The E mail screen or Scan to Folder screen appears 2 If the E mail screen appears press Folder The Scan to Folder screen appears Youcannotswitchfromthenetworkdeliveryscannerscreenwhiledeliverydestinationsarebeing specified To clear the specified destination display the destination in the destination field of the network delivery scanner screen and...

Page 996: ... the machine s address book by any of the following methods Select the destination from the destination list Select the destination by entering its registration number Select the destination by searching the machine s address book If you have specified the address protection code for accessing the address book the screen for entering the address protection code appears Depending on the security se...

Page 997: ...ntering the registration numbers Select the destination from the machine s address book using its registration number 1 Press Reg No 2 Enter the five digit registration number that has been assigned to a destination folder using the number keys If the entered number is less than five digits press the key after the last number Example To enter 00004 Press the 4 key and then press the key By pressin...

Page 998: ... also search by combining Name and Folder Name 3 Enter the beginning of the destination name To search by path enter the beginning of the path 4 Press OK 5 If necessary press Advanced Search to specify the detailed search criteria and then press OK By pressing Advanced Search you can search using criteria such as Name E mail Address and Folder Name You can specify search criteria such as Beginning...

Page 999: ...d as search results By pressing Advanced Search the following criteria appear Beginning Word The names which start with the entered character or characters are targeted For example to search for ABC enter A End Word The names which end with the entered character or characters are targeted For example to search for ABC enter C Exact Match The names which correspond to an entered character or charac...

Page 1000: ...support DFS Distributed File System You can send a file to a shared folder over the network by any of the following methods Enter the path to the destination directly Specify the path by browsing the network for the destination Entering the path to the destination manually You can enter the path to the destination folder manually 1 Press Manual Entry 2 Press SMB 3 Press Manual Entry on the right s...

Page 1001: ...mes containing more than 12 characters cannot be displayed To change the path for the folder that has been entered press Edit on the left side of the destination field Enter the correct path for the folder and then press OK The connection test may take time You may not be able to press Connection Test right after pressing Cancel during a connection test Even if the connection test was successful t...

Page 1002: ...access the selected computer the authentication screen appears To authenticate enter the user name and password 6 Select the destination folder When the selected folder has sub folders the sub folders list appears If you cannot find the destination folder press Up One Level and then search for the folder at that level 7 Press OK twice If authentication is required to access the folder the login sc...

Page 1003: ...on in the Address Book Sending Files to an FTP Server This section explains how to specify destinations when sending files to an FTP server Entering the path to an FTP server manually You can enter the path to an FTP server manually 1 Press Manual Entry 2 Press FTP 3 Press Manual Entry side of the server name field The soft keyboard appears 4 Enter a server name Instead of specifying the destinati...

Page 1004: ...nnection test To change the registered path to a destination folder press Edit to the left of the destination field to display the soft keyboard enter the new path and then click OK You can register the path to the destination in the machine s address book For details see Registering the Path to the Selected Destination in the Address Book The machine may fail to transfer the file if you do not ha...

Page 1005: ...t the connection type to NDS the NDS tree name is tree the name of the context including the volume is context the volume name is volume and the folder name is folder the path will be tree volume context folder If you set the connection type to Bindery the NetWare server name is server the volume name is volume and the folder name is folder the path will be server volume folder 6 Press OK 7 Enter ...

Page 1006: ...and then press OK You can connect only to folders that you have the read privileges for The connection test may take time You may not be able to press Connection Test right after pressing Cancel during a connection test Even if the connection test was successful the machine may fail to transfer the file if you do not have write privileges for the file or there is not enough free hard disk space Yo...

Page 1007: ...e names in the NDS tree or on the NetWare Bindery server might appear garbled Up to 100 items can be displayed If the selected NDS tree or NetWare Bindery server requires authentication a login screen appears Enter a user name and password for logging on to the NDS tree or NetWare Bindery server If you log on to the NDS tree enter a user name and then enter the name of the context containing the u...

Page 1008: ...he destination field display the destination you want to register 2 Press Prg Dest 3 Press Names and then specify the name and other information to be registered For details about specifying the information to be registered see Registering Addresses and Users for Facsimile Scanner Functions General Settings Guide 4 Press OK Depending on the security setting Prg Dest may not appear 2 Sending Scan F...

Page 1009: ...then send the file For details about sending a file by Scan to Folder see Basic Operations When Using Scan to Folder Depending on the security setting Access Privileges may appear instead of User Name For details about specifying Access Privileges consult the administrator You can resend stored files by Scan to Folder To resend stored files select the files on the Select Stored File screen and the...

Page 1010: ...2 Sending Scan Files to Folders 74 2 ...

Page 1011: ...e occurs We advise against using the hard disk to store important files The supplier shall not be responsible for any damage that may result from the loss of files For long term storage of files we recommend the use of DeskTopBinder For details contact your local dealer ZZZ512S 1 This Machine You can store scan files on the machine s hard disk The stored files can be sent by e mail Scan to Folder ...

Page 1012: ...ent computer after receiving them on the computer You can also store a file and simultaneously send it For details see Simultaneous Storage and Sending by E mail Simultaneous Storage and Sending by Scan to Folder and Simultaneous Storage and Delivery p 44 Simultaneous Storage and Sending by E mail p 73 Simultaneous Storage and Sending by Scan to Folder p 113 Simultaneous Storage and Delivery 3 Sto...

Page 1013: ...h as User Name File Name and Password For details see Specifying File Information for a Stored File 6 Press OK 7 If necessary press Scan Settings to specify scanner settings such as resolution and scan size For details see Various Scan Settings 8 If necessary specify the scanning density For details see Adjusting Image Density 9 If necessary press Original Feed Type to specify settings such as ori...

Page 1014: ...he file type and security is applied High Compression PDF is selected as the file type You cannot specify Store Only if a destination is specified Preview is selected To cancel scanning press the Clear Stop key After an e mail is sent the file information fields will be automatically cleared If you want to preserve the information in these fields contact your local dealer p 79 Specifying File Info...

Page 1015: ... of user names appears 3 Press the user name you want to specify The user names shown here are names that were registered on the Administrator Tools tab in System Settings To specify a name not shown here press Manual Entry and then enter the user name 4 Press OK twice Depending on the security setting Access Privileges may appear instead of User Name For details about specifying Access Privileges...

Page 1016: ...entering the text see Entering Text About This Machine Specifying a Password You can specify a password for the stored file Do not forget the password If you forget it consult the system administrator of the machine By specifying a password you can ensure that only the people who know the password can view the file 1 Press Store File 3 Storing Files Using the Scanner Function 80 3 ...

Page 1017: ...reen appears 2 Press Password 3 Using the number keys enter a four to eight digit number 4 Press OK 5 Enter the same number again using the number keys 6 Press OK twice Specifying File Information for a Stored File 81 3 ...

Page 1018: ...anel it is highlighted like Keys that cannot be selected appear like BAP007S 1 Keys for searching for files Press to switch to the screens for searching for a file by user name or file name or to the screen for displaying all files 2 List Thumbnails You can select whether to display stored files as a list or as thumbnails 3 Send Press this to deliver or send a stored file by e mail or Scan to Fold...

Page 1019: ...r name for the file Depending on the security setting some files may not appear in the list Files stored under functions other than the scanner function do not appear on this screen p 85 Checking a Stored File Selected from the List Searching the List of Stored Files You can search for files from the stored files using the user name or file name You can search the list of stored files by either of...

Page 1020: ...he search begins and then files belonging to the specified user appear Searching by file name You can search for a stored file by its file name 1 Press Select Stored File 2 Press File Name The soft keyboard appears 3 Enter the file name For information about how to enter characters see Entering Text About This Machine 4 Press OK The search starts and files whose name starts with the entered string...

Page 1021: ... File The list of stored files appears For details about the list of stored files see List of Stored Files 2 From the list of stored files select the file you want to check You can select more than one file 3 Press Preview A preview of the selected stored file appears If you select a password protected stored file a screen for entering the password appears To select the file enter the correct pass...

Page 1022: ...iewed page total number of pages page size and color mode appear 7 Display Position When the preview is enlarged the location of the part of the page displayed on the preview screen is indicated Checking Stored Files from a Client Computer Using DeskTopBinder Lite or Web Image Monitor you can also display the files stored in the machine on a client computer To view stored files from a client compu...

Page 1023: ... Ifyouenterhttp machineIPv4orIPv6address orhostname intheaddressbaroftheclientcomputer s Web browser the top page of Web Image Monitor appears Do not begin IPv4 segments with zeros For example if the address is 192 168 001 010 enter it as 192 168 1 10 You can also download the stored files It is recommended that you use Web Image Monitor only within your local area network For details about displa...

Page 1024: ...lication a phishing warning might appear after you receive an e mail message To prevent phishing warnings appearing after you receive e mail from a specified sender you must add the sender to your e mail application s exclusion list For details about how to do this see your e mail application s Help Sending Stored Files This section mainly explains how to select the files you want to send For deta...

Page 1025: ...he Start key The stored file will be sent If you select a password protected stored file a screen for entering the password appears To select the file enter the correct password and then press OK When the URL has been sent by e mail the recipient can check the stored file by clicking that URL For details see Sending the URL by E mail You can encrypt e mail or attach a signature to it For details s...

Page 1026: ...t of stored files appears 2 Press Manage Delete File 3 Select the file you want to delete If you select a password protected stored file a screen for entering the password appears To select the file enter the correct password and then press OK 4 Press Delete File A confirmation message about deleting the file appears 5 Press Yes Files waiting for delivery cannot be deleted 3 Storing Files Using th...

Page 1027: ...u can change information for a stored file such as User Name File Name and Password Information for files waiting for being sent cannot be changed Changing a user name You can change the user name for a stored file 1 Press Select Stored File The list of stored files appears 2 Press Manage Delete File 3 Select the file containing the information you want to change If you select a password protected...

Page 1028: ...nge the user name of a file stored in the machine from the client computer For details about Web Image Monitor see Web Image Monitor Help For details about DeskTopBinder see the manuals supplied with DeskTopBinder Depending on the security setting Change Access Priv may appear instead of Change User Name For details about specifying Change Access Priv consult the administrator Changing a file name...

Page 1029: ...he client computer For details about Web Image Monitor see Web Image Monitor Help For details about DeskTopBinder see the manuals supplied with DeskTopBinder Changing a password Enter the password for accessing the stored file Be sure not to forget the password If you forget it consult the system administrator of the machine 1 Press Select Stored File The list of stored files appears 2 Press Manag...

Page 1030: ...or or DeskTopBinder you can also change the password of a file stored in the machine from the client computer For details about Web Image Monitor see Web Image Monitor Help For details about DeskTopBinder see the manuals supplied with DeskTopBinder 3 Storing Files Using the Scanner Function 94 3 ...

Page 1031: ...e function for delivering files using the network delivery scanner ZZZ513S 1 This machine You can send scan files to the delivery server 2 Delivery server Install the ScanRouter delivery software on this computer to use it as the delivery server After receiving a scan file the delivery server delivers the file according to the setting specified for the destination The delivery settings are as foll...

Page 1032: ...ettings Configure the network settings in System Settings according to your environment and how you will be using the machine The following procedure explains connecting this machine to an IPv4 network using Ethernet cable Note that the settings you must configure will vary depending on your operating environment For details about network settings and configuration procedures see Network Settings ...

Page 1033: ...or details about settings see the manuals supplied with the ScanRouter delivery software To view files delivered to an in tray DeskTopBinder Lite must be installed on the client computer For details about installing DeskTopBinder Lite see Installing DeskTopBinder Lite from the Supplied CD ROM The settings you must configure in System Settings vary depending on your network environment For details ...

Page 1034: ...twork Delivery Scanner Screen This section describes the screen layout when using the network delivery scanner The function items displayed serve as selector keys You can select or specify an item by pressing it When you select or specify an item on the display panel it is highlighted like Keys that cannot be selected appear like BAP009S 1 Destination Field The specified destination appears If mor...

Page 1035: ...mail address For details about how to send a file by e mail via the delivery server see ScanRouter delivery software manual 5 Destination List The list of destinations registered in the delivery server appears If all of the destinations cannot be displayed press or to switch the screen The symbol indicates a group destination 6 Subject Sender Name Recept Notice Specify the subject sender and wheth...

Page 1036: ...emain If a previous setting remains press the Clear Modes key 2 If the E mail screen or Scan to Folder screen appears switch to the network delivery scanner screen For details see Switching to the Network Delivery Scanner Screen 3 Place originals 4 If necessary press Scan Settings to specify scanner settings such as resolution and scan size For details see Various Scan Settings 5 If necessary spec...

Page 1037: ...ing the selected destination again You can use the Message Disposition Notification function when sending e mail via delivery server An e mail is sent to the sender selected in step 9 notifying him her that the recipient has read his her e mail To specify this setting press Recept Notice To enable the Return Receipt function you must specify the ScanRouter delivery software settings for sending e ...

Page 1038: ... Delivery Scanner Screen p 121 Various Scan Settings p 131 Adjusting Image Density p 132 Setting of Original Feed Type p 104 Specifying Delivery Destinations p 112 Specifying the Subject of the E mail to Be Transmitted via the Delivery Server p 108 Specifying the Sender p 31 Entering an E mail Address Manually p 12 Check Modes p 14 Preview p 113 Simultaneous Storage and Delivery 4 Delivering Scan ...

Page 1039: ... delivery scanner screen 1 Press Delivery Dest The network delivery scanner screen appears You cannot switch from the E mail screen or Scan to Folder screen while destinations or senders are being specified To clear a specified destination display the destination in the destination field of the E mail screen or Scan to Folder screen and then press the Clear Stop key Switching to the Network Delive...

Page 1040: ...istration number Select the destination by searching in the delivery server Selecting a destination from the Destination List From the destination list select a destination 1 In the destination list press the key including the destination name The selected destination is highlighted and also is displayed in the destination field at the top of the screen Destinations are registered in the delivery ...

Page 1041: ...ter a registration number of fewer than three digits Example To enter 009 Press the 9 key and then press the key By pressing Change you can change the selected destination 3 Press OK To cancel a selected destination press or next to the destination field to scroll through the destinations until the one you want to cancel appears and then press the Clear Stop key Selecting destinations by searching...

Page 1042: ...eria 6 Press Start Search Destinations that match the search criteria are displayed 7 Select the destination 8 Press OK The Comment search function searches for destinations by comment information which is a registration item required by the ScanRouter delivery software By pressing Details you can view details about the selected destinations Up to 100 destinations can be displayed as search result...

Page 1043: ... ABC enter ABC Include one Word The names which contain an entered character or characters are targeted For example to search for ABC enter A B or C Exclude Words The names which do not contain an entered character or characters are targeted For example to search for ABC enter D Specifying Delivery Destinations 107 4 ...

Page 1044: ...stination List Selecting a Sender from the Sender List This section explains how to select a sender from the sender list The sender list displays destinations that are registered on the delivery server 1 Press Sender Name 2 Select the sender 3 Press OK Selecting the Sender by Entering the Registration Number Select a sender by entering its Short ID number registered using the ScanRouter delivery s...

Page 1045: ... than five digits press the key after the last number Example To enter 006 Press the 6 key and then press the key By pressing Change you can change the selected destination 4 Press OK twice Selecting a Sender by Searching the Delivery Server s Destination List This section explains how to select a sender by searching the delivery server s Destination List Specifying the Sender 109 4 ...

Page 1046: ...e beginning of the sender s name To search by comment enter beginning of the comment 5 Press OK 6 If necessary press Advanced Search to specify the detailed search criteria and then press OK By pressing Advanced Search you can search by Name and Comment You can specify search criteria such as Beginning Word or End Word You can refine your search using multiple criteria 4 Delivering Scan Files 110 ...

Page 1047: ...rd The names which start with the entered character or characters are targeted For example to search for ABC enter A End Word The names which end with the entered character or characters are targeted For example to search for ABC enter C Exact Match The names which correspond to an entered character or characters are targeted For example to search for ABC enter ABC Include one Word The names which...

Page 1048: ...sending a file by e mail via the delivery server 1 Press Subject 2 Enter the subject To enter characters press Text Entry To enter symbols press Symbol Entry To add predefined User Text registered on this machine press User Text For details about entering the text see Entering Text About This Machine 3 Press OK 4 Delivering Scan Files 112 4 ...

Page 1049: ...e and then send the file For details about delivering a file see Basic Operation for Delivering Files Depending on the security setting Access Privileges may appear instead of User Name For details about specifying Access Privileges consult the administrator You can resend stored files To resend stored files select the files on the Select Stored File screen and then send them For details see Sendi...

Page 1050: ...4 Delivering Scan Files 114 4 ...

Page 1051: ...TWAIN scanner a TWAIN compliant application such as DeskTopBinder must be installed on the client computer DeskTopBinder Lite is on the supplied CD ROM For details about installing DeskTopBinder Lite see Installing DeskTopBinder Lite from the Supplied CD ROM p 117 Installing the TWAIN Driver from the Supplied CD ROM p 97 Installing DeskTopBinder Lite from the Supplied CD ROM Outline of the Network...

Page 1052: ...rk TWAIN Scanner To use this machine as a network TWAIN scanner you must first perform the following Check the machine is properly connected to the network Configure the network settings in System Settings Install the TWAIN driver on a client computer Install a TWAIN compliant application on the same client computer This section explains each of these steps and where you can find more information ...

Page 1053: ...installing the TWAIN driver see Installing the TWAIN Driver from the Supplied CD ROM Install a TWAIN compliant application on the same client computer To use this machine as a network TWAIN scanner a TWAIN compliant application such as DeskTopBinder must be installed on the client computer DeskTopBinder Lite is included on the supplied CD ROM For details about installing DeskTopBinder Lite see Ins...

Page 1054: ...nstaller does not start automatically see Auto Run Program When the installation is complete a message about restarting the client computer may appear In this case restart the client computer After the installation is complete a folder with the name of the machine in use is added in Programs or All Programs on the Start menu Help can be displayed from here Notes on using the network TWAIN scanner ...

Page 1055: ...e machine you want to use in the list and then click Select 5 Click OK 6 Place originals 7 On the File menu point to Add Document and then click Scan to display the Scanner Control dialog box The Scanner Control dialog box and DeskTopBinder viewer will appear 8 Make settings according to such factors as the type of original type of scanning and orientation of the original For details see the TWAIN...

Page 1056: ... scanner of the same model on the network make sure you have selected the correct scanner If you have not click Select Scanner Driver and then select the scanneragain Ifthe correctscannerdoesnotappearinthelist check thatthescanneriscorrectly connected to the network and that its IPv4 address has been specified If the correct scanner still does not appear consult the network administrator 5 Scannin...

Page 1057: ...ins how to make scan settings 1 Press Scan Settings 2 Specify resolution scan size and other settings as required For details about individual scan setting items see Items for Specifying Scan Settings 3 Press OK p 122 Items for Specifying Scan Settings 121 6 ...

Page 1058: ... to broaden the coverage of the specified color and not scan those colors B W Text Line Art Standard black and white originals containing mainly characters Creates scanned images suitable for printing B W Text Photo Originals containing a mixture of photographs pictures and characters two value Creates scanned images suitable for printing Black White Photo Originals containing photographs and othe...

Page 1059: ...es suitable for printing Text Photo Originals containing a mixture of photographs pictures and characters two value Creates scanned images suitable for printing Photo Originals containing photographs and other pictures two value Creates scanned images suitable for printing Gray Scale Originals containing photographs and other pictures multi value Creates scanned images suitable for displaying on a...

Page 1060: ...as A3 A4 or B4 B5 using the original position setting and size If you select Mixed Original Sizes the machine detects the length of each original and scans them If a template size is selected the machine scans originals at the selected size regardless of the actual size of originals If an original is smaller than the selected size the machine applies margins to the scan area If Auto Detect is sele...

Page 1061: ...area of an original To display the custom size setting screen on the initial scanner screen press Scan Settings Scan Size Custom Size The following custom size original is used to explain the method for specifying the scan settings on the custom size setting screen Custom size original to be scanned BAO013S Items for Specifying Scan Settings 125 6 ...

Page 1062: ...nd Y3 as Original Size X1 and Y1 respectively and then press the key For X1 and Y1 you can specify 140 mm 5 5 inches or larger To scan an original that is smaller than 140 mm 5 5 inches configure the settings as though you were scanning part of an original that is larger than 140 mm 5 5 inches For example to scan a CD label on the exposure glass specify X1 X3 and Y1 Y3 based on the chart below For...

Page 1063: ...nner Settings Scan Size Custom Size Measuring methods differ depending on where the original is placed and the orientation it is placed in For details about how to measure Original Size X1 and Y1 Start Position X2 and Y2 and Scan Area X3 and Y3 correctly see How to measure sizes Enter the sizes while referring to Scan settings on the custom size setting screen How to measure sizes Orientation and ...

Page 1064: ...zes and then press the key When scanning originals using Custom Size you cannot enter specific values in Original Size and Start Position To configure the scan area specify Scan Size and Start Position first and then Original Size How to set originals to scan them by custom size This section explains how to place originals you want to scan at Custom size Original Orientation setting Under Original...

Page 1065: ...own on the exposure glass ALQ018S Original Orientation is Item Description Placing an original in the ADF ALQ019S Placing an original on the exposure glass Turn the original over place it face down on the exposure glass and then align it with the top left corner of the exposure glass ALQ020S p 132 Setting of Original Feed Type Edit Make editing settings Items for Specifying Scan Settings 129 6 ...

Page 1066: ...to the specified width If you select Same Width you can specify a uniform width for deletion all around the original top bottom left and right sides If you select Different Width you can specify a different width for deletion for each side 6 Various Scan Settings 130 6 ...

Page 1067: ...ty corrects scanning density to improve resolution of paper types such as non white paper like newspaper or transparent originals When scanning originals in full color you can specify the Auto Density level in Background Density of ADS Full Colour under Scanner Features For details see Scanner Features General Settings Guide Background Density of ADS Full Colour is available only for color scannin...

Page 1068: ...Press or to select the same orientation as that of original 3 Press OK Placing Originals To correctly display the top bottom orientation of the scanned original on a client computer the placement of the original and the settings made on the control panel must match Place originals correctly by referring to the following table Exposure Glass Original orientation Control Panel Key top edge touches t...

Page 1069: ...o Colour Select for Scan Type and single page TIFF JPEG or multi page TIFF is selected as the file type refer to the table below for how to place originals Originals placed in orientations that are not recommended in the table might appear incorrectly top bottom oriented on client computer displays How to set an original Place Original orientation Placing an Original on the Exposure Glass Placing ...

Page 1070: ... of originals 1 Press Original Feed Type 2 In Original Settings select 2 Sided Original 3 In Page Opening Orientation select Top to Top or Top to Bottom according to the binding orientation of the originals Binding orientation and required page opening orientation Binding orientation Page opening orientation Top to Top Top to Bottom 6 Various Scan Settings 134 6 ...

Page 1071: ...cedure for stamping originals that are scanned from the ADF The stamp indicates the originals have been scanned When scanning a document using ADF the machine can stamp a circle mark at the bottom of the original When scanning a two sided document the document is marked at the bottom of the front page and top of the rear page This function is very useful when you want to distinguish scanned origin...

Page 1072: ...lly in the ADF select SADF If you select Batch scanning starts as soon as you place the additional originals and press the Start key When all the originals have been scanned press If you select Batch regardless of the default settings the machine waits until additional originals are placed If SADF is selected scanning starts as soon as you place additional originals in the ADF Select which operati...

Page 1073: ...press the Start key to start scanning additional originals After scanning additional originals using the exposure glass After changing settings while waiting for additional originals After opening closing the ADF p 139 Scanning Multiple Pages of Originals as One File Divide Thissectionexplainssettingsfordividingmultipleoriginalsbyaspecifiednumberofpagesandthensending them 1 Press Original Feed Typ...

Page 1074: ...r jam or multi sheet feed a screen for stopping or continuing scanning appears at the end of the scan 6 Press OK twice The current settings are displayed If the last page of a batch of divided two sided originals is blank you can skip that page To skip scanning in Last Page under 2 Sided Original select 1 Side To scan the last page as a blank page select 2 Sides For details see Two sided original ...

Page 1075: ...er delivering or storing 6 Press the Start key to scan originals If Batch is selected place additional originals and then press the Start key If SADF is selected scanning starts automatically when you place additional originals Repeat this step until all originals are scanned 7 After all originals are scanned press the key Storing or transmission starts If Batch is selected originals can be scanne...

Page 1076: ...d if Scan Settings or other settings are changed in the meantime Place additional originals and then press the Start key The machine scans the originals and the countdown is resumed For details about Wait Time for Next Orig Exposure Glass and Wait Time for Next Original s SADF see Scanner Features General Settings Guide If SADF is selected scanning from the exposure glass is enabled after scanning...

Page 1077: ...ompression PDF If you select a single page file type when scanning multiple originals one file is created for each single page and the number of files sent is the same as the number of pages scanned Multi page TIFF PDF High Compression PDF If you select a multi page file type when scanning multiple originals scanned pages are combined and sent as a single file High Compression PDF is available onl...

Page 1078: ...ending on the Compression and Scan Type settings JPEG Under Scanner Features Compression Gray Scale Full Colour or Compression Gray Scale is set to On and originals are scanned in full color or gray scale TIFF All other scannings High Compression PDF reduces the file s data volume without loss of character legibility For details about the limitations of High Compression PDF see Notes About and Lim...

Page 1079: ... is selected under Scan Type 100 dpi or 600 dpi is selected as the resolution Preview is selected The machine is working with ScanRouter delivery software and the Capture function is in use For details about the capture function see the manuals provided with the ScanRouter delivery software Adobe Acrobat Reader 5 0 Adobe Reader 6 0 and later versions support High Compression PDF High Compression P...

Page 1080: ...TIFF at 10 ms 15 sec 15 30 hours on Dec 31 2020 the file name will be 20201231153015010 tif If necessary you can change the file name 1 Press Send File Type Name 2 Press File Name The soft keyboard appears 3 Enter a file name 4 Press OK twice Changing the starting digit of file name serial numbers A single page file is assigned a serial number after the file name The starting number of this serial...

Page 1081: ...rial number Change the number under Scanner Features No of Digits for Single Page Files You can select 4 or 8 For details see Scanner Features General Settings Guide Security Settings to PDF Files This section explains security settings for PDF files Use security settings to prevent unauthorized access to PDF files Security settings can be made for PDF and High Compression PDF files only High Comp...

Page 1082: ...s possible only for scan files sent by e mail or Scan to Folder You cannot open an encrypted file without a password Make sure you do not forget a file s password 1 Press Send File Type Name 2 Check that PDF or High Compression PDF is selected 3 Press Security Settings 4 Select Encryption 5 In Encrypt Document select On 6 Various Scan Settings 146 6 ...

Page 1083: ...using Adobe Acrobat Reader 3 0 and 4 0 If Low Resolution Only is selected as the print permission you cannot select 40 bit as the PDF encryption level Changing security permissions for PDF files Set a Master Password to restrict unauthorized printing changing copying or extracting of a PDF file s content Only users who have the Master Password can reset or change these restrictions Encryption is p...

Page 1084: ...r Password select Set 6 In Password press Enter 7 Enter a password and then press OK The password entered here will be required to change the security settings of the PDF file 8 Enter the password again and then press OK 9 Select the security permission setting You can specify the following security settings 6 Various Scan Settings 148 6 ...

Page 1085: ...permission Prohibit or Allow 10 Press OK twice The Password and Master Password cannot be the same You can enter up to 32 alphanumeric characters for a Master Password If 40 bit is selected as the PDF encryption level you cannot select Low Resolution Only as the print permission Specifying the File Type and File Name 149 6 ...

Page 1086: ...an Settings 1 Sided 2 Sided Original Top to Top Top to Bottom 1 Side 2 Sides for the Last Page Divide Original Orientation File Type Batch SADF Stamp Store File Preview Reception Notice and Security E mail Encryption and Signature Setting made on the simplified display cannot be registered to a program Registering Frequently Used Setting To register frequently used settings in a program 1 On the i...

Page 1087: ...egistered in a program and use them for scanning 1 Press the Program key 2 Press Recall 3 Press the number of the program you want to recall Settings registered in the program are recalled and the initial scanner screen reappears Settings are not registered in numbers that appear without 4 Place originals and then press the Start key Changing a Registered Program To change the settings registered ...

Page 1088: ... the next step 9 Enter a program name 10 Press OK If overwritten the registered program is deleted The new program name appears briefly and then the initial screen reappears after a moment Deleting a Program To delete a registered program 1 Press the Program key 2 Press Delete 3 Press the number of the program you want to delete A confirmation screen appears 4 Press Yes The program is deleted and ...

Page 1089: ...e 3 Press the number of the program whose name you want to change The soft keyboard appears 4 Enter a new program name 5 Press OK The new program name appears briefly and then the initial screen reappears Programs 153 6 ...

Page 1090: ...Sides for the Last Page Divide Original Orientation File Type Batch SADF Stamp Store File Preview Reception Notice and Security E mail Encryption and Signature 1 Make the necessary scan settings on the initial screen 2 Press the Program key BAP040S 3 Press Program as Defaults 4 Press Program A confirmation screen appears 5 Press Yes The current settings are registered as defaults and then the init...

Page 1091: ... Default settings for the initial screen can be registered for normal screens and simplified displays respectively Registering the Default Values of the Scanner s Initial Display 155 6 ...

Page 1092: ... In the Original Scan Method list select the place where the original is placed 3 In the Orig Orientn list select or 4 In the Orientation list select or 5 If an original is placed in the ADF from the drop down menu of Scan Settings select 1 Sided 2 Sided Top to Top or 2 Sided Top to Bottom p 119 Basic Network TWAIN Scanner Operation Placing Originals The following table shows the relationship betw...

Page 1093: ...Scanner Control Dialog Box Key top edge of original placed first top edge touches rear of ADF bottom edge touches left side of ADF bottom edge touches top of ADF Originals are normally rectangular or horizontally long However the table above uses squares to make original orientation easier to understand Even if the actual shape of the Scan Settings When Using TWAIN Scanner 157 6 ...

Page 1094: ...ection explains the differences between scanning mixed size originals using the TWAIN scanner and normal scanning If Auto detect Mixed size is selected in the Original Size list the machine detects the length of each original and then scans them If Auto detect Uni size is selected in the Original Size list the machine detects the size of the first original of the batch and scans all subsequent ori...

Page 1095: ...Delivery Functions This section explains the relationship between resolution and scan size when using the e mail Scan to Folder storing or network delivery scanner functions If Black White Text Text B W Text Line Art Text Line Art B W Text Photo Text Photo Black White Photo Photo or Gray Scale is selected for Scan Type All combinations up to A3 and 600 dpi can be scanned Color scanning noncomplian...

Page 1096: ...ant models If Binary Text Binary Photo Gray Scale is selected in Col Grad The scan size determines the maximum possible resolution Refer to the table below for the maximum resolution available for each scan size Scan size and maximum resolution Scan size Maximum resolution dpi A3 11 17 B4 600 Legal 81 2 14 81 2 13 700 A4 Letter 81 2 11 800 B5 900 A5 A6 B6 51 2 81 2 1200 If 8 Colors 8 Colors Photo ...

Page 1097: ...or each scan size Scan size and maximum resolution Scan size Maximum resolution dpi A3 11 17 B4 600 Legal 81 2 14 81 2 13 700 A4 Letter 81 2 11 800 B5 900 A5 A6 B6 51 2 81 2 1200 If Gray Scale is selected in Col Grad The scan size determines the maximum resolution possible Refer to the table below for the maximum resolution available for each scan size Scan size and maximum resolution Scan size Ma...

Page 1098: ...Scan size Maximum resolution dpi A6 1200 7 Appendix 162 7 ...

Page 1099: ... Shift key pressed until the computer finishes reading from the CD ROM If Cancel is pressed during installation the installation of all the software thereafter will be stopped If cancelled reinstall the remaining software after restarting the client computer TWAIN Driver This section tells you the file path to the TWAIN driver and the TWAIN driver s system requirements You must install this driver...

Page 1100: ...inder Lite see DeskTopBinder Lite manuals or DeskTopBinder Lite Help File path DeskTopBinder Lite is stored in the following folder on the CD ROM provided with this machine UTILITY DESKV2 System requirements Computer hardware PC AT compatible machines that support the following operating system properly Operating system When installing all functions of DeskTopBinder Lite Microsoft Windows 98SE Me ...

Page 1101: ...nt Link on the client computer monitors in trays of the delivery server periodically retrieves files delivered to in trays and notifies the user of delivery Function Palette Function Palette allows you to use DeskTopBinder functions such as Scan using TWAIN scanner or Print without starting DeskTopBinder To use these functions from Function Palette you must first configure those using DeskTopBinde...

Page 1102: ... by E mail Item Maximum value Comments Number of subject line characters 128 alphanumeric characters Number of e mail message characters 80 alphanumeric characters This is the total number of characters selected from the list and the number of characters entered directly from text Number of e mail address characters 128 alphanumeric characters E mailaddressesfoundviaLDAP server search cannot be se...

Page 1103: ...r of user name characters on FTP 64 alphanumeric characters Number of password characters on FTP 64 alphanumeric characters Number of path name characters on NCP 128 alphanumeric characters Number of user name characters on NCP 64 alphanumeric characters Number of password characters on NCP 64 alphanumeric characters Number of addresses you can specify at the same time 50 addresses You can specify...

Page 1104: ...of the storage function settings Values of Set Items for File Storage Item Maximum value Comments Number of file name characters 64 alphanumeric characters On the control panel the first 16 characters are displayed When viewing the stored files from a client computer using DeskTopBinder all the entered characters can be viewed Number of user name characters 20 alphanumeric characters On the contro...

Page 1105: ... of Set Items for Network Delivery Item Maximum value Comments Number of subject line characters 128 alphanumeric characters This is the total number of characters selected from the list and the number of characters entered directly from text Number of e mail address characters 128 alphanumeric characters Number of addresses you can specify at the same time 500 addresses You can specify 65 destina...

Page 1106: ...Item Maximum value Comments manuals supplied with the ScanRouter delivery software Sendable file size 2 000 MB per file 7 Appendix 170 7 ...

Page 1107: ...the machine s address book or the LDAP server To search through an LDAP server under System Settings register the LDAP server and then set LDAP Search to On TWAIN Standby Time Select the machine s response if a client computer tries to use the TWAIN scanner while scanning is in progress Destination List Display Priority 1 Select the default destination list from the machine s destination list or f...

Page 1108: ...ning density to improve the resolution of transparent originals and on white paper such as newspaper Available Items in Send Settings Items Description Compression Black White Specify a compression method for files scanned in black and white For some originals even if On is selected compression setting is invalid and data cannot be compressed Compression Gray Scale Full Colour Specify a compressio...

Page 1109: ... the language in which the message is sent No of Digits for Single Page Files Set the number of digits in serial numbers used for single page file names Stored File E mail Method Sets the default for whether to attach a file or send URL Link when sending stored files by e mail Available Items in Initial Settings Items Description Menu Protect Set the default access level for functions whose settin...

Page 1110: ... size A4 Scan Type Text Line Art Resolution 200 dpi Compression Gray Scale Full Colour Compression Level 2 Original Chart 1 side scanning Scanning speed differs depending on the following operating environment of the machine and computer scan settings and the content of originals denser images require more time Image sensor type CCD Image Sensor Scan type Sheet book Ethernet interface 10BASE T 100...

Page 1111: ...olor scanning compliant models 600 dpi 24 bit full color Color scanning noncompliant models 600 dpi 8 bit gray scale Selectable scanning resolutions when using the E mail Scan to Folder Network delivery scanner function 100 dpi 200 dpi 300 dpi 400 dpi 600 dpi Selectable scanning resolution when using TWAIN scanner 100 dpi to 1200 dpi Sendable file formats TIFF JPEG PDF High Compression PDF Image c...

Page 1112: ...7 Appendix 176 7 ...

Page 1113: ...estination 104 Delivery server 95 DeskTopBinder Lite 86 87 97 164 Destination delivery searching the delivery server s destination list 105 selecting by entering the registration numbers 105 selecting from the delivery server s address book 104 selecting from the list 104 Destination e mail entering manually 31 registering a directly entered destination in the address book 35 searching an LDAP ser...

Page 1114: ...22 55 99 Mixed Original Sizes 124 Mixed size originals 124 158 Multi page 141 Multiple pages scanned as one file 139 N NCP 52 68 NetWare server 53 68 Network delivery function 169 Network delivery scanner screen 98 103 Network TWAIN scanner 115 Notes about file types 142 O One sided original 133 Original Feed Type 132 Original orientation 132 custom size 128 TWAIN scanner 156 Original Settings 133...

Page 1115: ...6 Security Settings 145 Select Stored File 82 Send Store 44 73 113 Send Settings 172 Sender delivery 108 searching the delivery server s destination list 109 selecting by entering a registration number 108 selecting from the list 108 Sender e mail 37 searching the machine s address book 38 selecting by entering a registration number 38 selecting from the list 37 Sender Name 37 38 108 109 Sending a...

Page 1116: ...27 network delivery scanner 103 Scan to Folder 59 Symbol 8 System Settings 20 53 96 116 T Template size 124 Text 42 43 123 Text Line Art 123 Text Photo 123 TIFF 141 TIFF JPEG 141 Transmission Function 166 TWAIN driver 117 119 163 TWAIN scanner 115 119 156 158 Two sided original 134 U URL 48 User Name 79 V Values of set items 166 e mail 166 network delivery 169 Scan to Folder 167 simultaneous trans...

Page 1117: ...ws Me is Microsoft Windows Millennium Edition Windows Me The product names of Windows 2000 are as follows Microsoft Windows 2000 Professional Microsoft Windows 2000 Server Microsoft Windows 2000 Advanced Server The product names of Windows XP are as follows Microsoft Windows XP Home Edition Microsoft Windows XP Professional The product names of Windows Vista are as follows Microsoft Windows Vista ...

Page 1118: ...Operating Instructions Scanner Reference D381 7102 EN USA ...

Reviews: