261
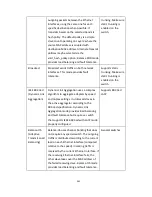
outgoing packets between the Ethernet
interfaces, using the same one for each
specific destination when possible. It
transmits based on the selected transmit
hash policy. The default policy is a simple
slave count operating on Layer 2 where the
source MAC address is coupled with
destination MAC address. Alternate transmit
policies may be selected via the
xmit_hash_policy option. Balance XOR mode
provides load balancing and fault tolerance.
trunking. Make sure
static trunking is
enabled on the
switch.
Broadcast
Broadcast sends traffic on both network
interfaces. This mode provides fault
tolerance.
Supports static
trunking. Make sure
static trunking is
enabled on the
switch.
IEEE 802.3ad
(Dynamic Link
Aggregation)
Dynamic Link Aggregation uses a complex
algorithm to aggregate adapters by speed
and duplex settings. It utilizes all slaves in
the active aggregator according to the
802.3ad specification. Dynamic Link
Aggregation mode provides load balancing
and fault tolerance but requires a switch
that supports IEEE 802.3ad with LACP mode
properly configured.
Supports 802.3ad
LACP
Balance-tlb
(Adaptive
Transmit Load
Balancing)
Balance-tlb uses channel bonding that does
not require any special switch. The outgoing
traffic is distributed according to the current
load on each Ethernet interface (computed
relative to the speed). Incoming traffic is
received by the current Ethernet interface. If
the receiving Ethernet interface fails, the
other slave takes over the MAC address of
the failed receiving slave. Balance-tlb mode
provides load balancing and fault tolerance.
General switches
Summary of Contents for VIOSTOR
Page 47: ...47 ...
Page 49: ...49 ...
Page 90: ...90 ...
Page 114: ...114 ...
Page 115: ...115 5 2 6Enable Disable Event Alert To enable event alerts on an E map click ...
Page 122: ...122 zoom is enabled you can use your mouse wheel to use digital zoom function ...
Page 140: ...140 Note You cannot play recording files via double click here ...
Page 142: ...142 ...
Page 184: ...184 ...
Page 185: ...185 ...
Page 194: ...194 ...
Page 196: ...196 Step2 Enter the Product Authorization Key PAK code to activate the license ...
Page 217: ...217 10 Confirm the settings and click Next 11 Click Finish to exit the wizard ...
Page 264: ...264 ...
Page 292: ...292 Process This tab shows information about the processes running on the NVR ...
Page 305: ...305 4 Enter a name to register your NVR and click Next ...
Page 306: ...306 5 The wizard will configure your router automatically ...
Page 307: ...307 6 Review the summary page and click Finish to complete the wizard ...
Page 311: ...311 ...
Page 324: ...324 Step5 Specify your replication schedule ...
Page 325: ...325 Step6 Click Finish to complete the setup ...
Page 336: ...336 Step 2 Go to All Apps Step 3 Click Add QSCM Lite to QVR ...
Page 340: ...340 Step 4 Click Install Manually Step 5 Find the unzipped QSCM Lite and click Install ...
Page 341: ...341 Step 6 Click OK Step 7 The NVR will then install QSCM Lite ...
Page 351: ...351 ...


