4
G(M4x14)
F
G(M4x14)
A
A
C
C (C*)
3
4
C (C*)
5
G(M4x14)
C*
G(M4x14)
2
2
1
1
C
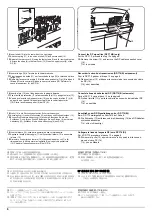
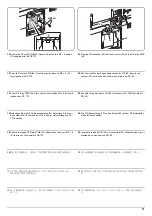
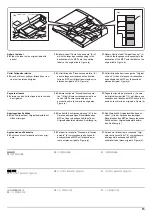
Attach the fixing fitting (DP-772)
1.
Align the projections (1) on the right fixing fit-
ting (C) and on the wider left fixing fitting (C*)
with the respective holes (2) in the MFP and
then insert the fixing fittings into the MFP.
2.
Secure each of the fixing fittings (C) (C*)
with 2 M4 × 14TP screws (G).
Install the DP
3.
Align hinge hole (3) of DP (A) with pin (4) of
fixing fitting (C), place DP (A) on the MFP.
4.
Slide the DP (A) toward the front side and
engage hinges into hooks (5) on fixing fit-
tings (C).
5.
Install DP (A) onto the MFP securely with pin
(F) and two M4 × 14TP screws (G).
Mettre en place la fixation (DP-772)
1.
Aligner les saillies (1) de la fixation droite (C)
et de la fixation gauche plus large (C*) avec
les trous correspondants (2) du MFP et
insérer les fixations dans le MFP.
2.
Fixer chaque des fixations (C) (C*) avec 2
vis TP M4 × 14 (G).
Installer le DP
3.
Aligner le trou de la charnière (3) du DP (A)
sur la goupille (4) de la fixation (C) et placer
le DP (A) sur le MFP.
4.
Faire glisser le DP (A) vers l'avant et
engager les charnières dans les crochets (5)
sur les pièces de fixation (C).
5.
Installer le DP (A) sur le MFP en le fixant à
l’aide de la goupille (F) et des deux vis TP
M4 × 14 (G).
Monte el herraje de fijación (DP-772)
1.
Alinee los salientes (1) del herraje de fijación dere-
cho (C) y del herraje de fijación izquierdo más
ancho (C*) con los orificios correspondientes (2)
del MFP y, después, inserte los herrajes de fijación
en el MFP.
2.
Asegure cada uno de los herrajes de fijación (C)
(C*) con 2 tornillos TP M4 × 14 (G).
Instale el DP
3.
Alinee el orificio de bisagra (3) del DP (A)
con el pasador (4) del herraje de fijación (C)
y coloque el DP (A) en el MFP.
4.
Deslice el DP (A) hacia el frente y enganche
las bisagras en los ganchos (5) de los her-
rajes de fijación (C).
5.
Instale el DP (A) firmemente en el MFP con
el pasador (F) y dos tornillos TP M4 × 14
(G).
Anbringen der Befestigungshalterung (DP-772)
1.
Die Zapfen (1) an der rechten Befestigungshalter-
ung (C) und an der breiteren Befestigungshalter-
ung (C*) mit den entsprechenden Öffnungen (2)
am MFP ausrichten und die Befestigungshalterun-
gen in den MFP einsetzen.
2.
Die Befestigungshalterungen (C) (C*) mit den 2 M4
× 14TP Schrauben (G) befestigen.
Installieren des DP
3.
Scharnierloch (3) des DP (A) mit Stift (4) der
Befestigungshalterung (C) ausrichten, und
DP (A) auf den MFP stellen.
4.
Den DP (A) nach vorne hin verschieben und
die Scharniere in die Haken (5) an den Bef-
estigungshalterungen (C) einsetzen.
5.
DP (A) sicher mit einem Stift (F) und zwei M4
× 14TP Schrauben (G) am MFP befestigen.
Applicazione dell’accessorio di fissaggio (DP-772)
1.
Allineare le sporgenze (1) sull'accessorio di fissag-
gio destro (C) e sull'accessorio di fissaggio sinistro
più largo (C*) con i rispettivi fori (2) nell'MFP, e
quindi inserire gli accessori di fissaggio nell'MFP.
2.
Fissare ciascuno degli accessori di fissaggio (C)
(C*) con 2 viti M4 × 14TP (G).
Montaggio del DP
3.
Allineare il foro della cerniera (3) del DP (A)
con il perno (4) dell’accessorio di fissaggio
(C), quindi posizionare il DP (A) sull’MFP.
4.
Far scorrere il DP (A) verso il lato anteriore
ed inserire le cerniere nei ganci (5) sugli
accessori di fissaggio (C).
5.
Montare il DP (A) sull’MFP assicurandolo
con il perno (F) e due viti M4 × 14TP (G).
固定金具の取り付け(DP-772)
1.
右側に固定金具 (C)、
左側に幅広の固定金具
(C*) のそれぞれの突起 (1) と MFP の穴 (2)
を合わせ、MFP に差し込む。
2.
ビス M4×14TP(G) 各 2 本で固定金具 (C) と
固定金具 (C*) を固定する。
DP の取り付け
3.
DP(A) のヒンジ部の穴 (3) と固定金具 (C)
のピン (4) を合わせ、MFP に DP(A) を乗せ
る。
4.
DP(A) を手前にスライドさせ、ヒンジ部を固
定金具 (C) の引っ掛け部 (5) にはめ込む。
5.
ピン (F)1 本とビス M4×14TP(G)2 本で
DP(A) を MFP に固定する。
安装固定工具
(DP-772)
1.
将固定工具
(C)
从右侧、宽幅固定夹具
(C*)
从左侧将各自的突出部分
(1)
与
MFP
的孔
(2)
对齐并插入到
MFP
中。
2.
使用各 2 颗 M4×14 螺丝 TP(G) 来固定固定工
具 (C) 与固定工具 (C*)
安装 DP
3.
将 DP(A)的铰链孔(3)对准固定工具(C)的
销(4),并将 DP(A)放在 MFP 上。
4.
朝前侧滑动 DP(A),然后将铰链与固定工具
(C)上的卡扣(5)相啮合。
5.
用销(F)和两颗 M4×14TP 螺丝(G)将 DP
(A)安装到 MFP 上。
고정쇠의 부착(DP-772)
1.
우측에 고정쇠 (C), 좌측에 광폭 고정쇠 (C*)
각각의 돌기 (1) 와 MFP 구멍 (2) 을 맞추고
MFP 에 꽂습니다 .
2.
나사 M4×14TP(G) 각 2 개로 고정쇠 (C) 와
고정쇠 (C*) 를 고정합니다 .
DP 부착
3.
DP(A) 의 힌지부 구멍 (3) 과 고정쇠 (C) 핀
(4) 을 맞추고 MFP 에 DP(A) 를 올립니다 .
4.
DP(A) 를 미끄러트려 힌지부를 고정쇠 (C)
의 걸쇠 (5) 에 끼웁니다 .
5.
핀 (F) 1 개와 나사 M4×14TP(G) 2 개로
DP(A) 를 MFP 에 고정합니다 .
Summary of Contents for TASKalfa 3010i
Page 10: ...This page is intentionally left blank ...
Page 100: ...2NL 2P8 1 2 76 This page is intentionally left blank ...
Page 286: ...2NL 2P8 1 3 186 This page is intentionally left blank ...
Page 443: ...2NL 2P8 1 5 59 This page is intentionally left blank ...
Page 471: ...2NL 2P8 2 2 8 This page is intentionally left blank ...
Page 532: ...Installation Guide DP 770 B Document processor DP 772 Document processor Installation Guide ...
Page 568: ...DP 773 Document processor Installation Guide ...
Page 594: ...PF 791 500 x 2 Paper feeder Installation Guide ...
Page 602: ...PF 810 3000 sheet deck Installation Guide ...
Page 615: ...DF 791 3000 sheet finisher Installation Guide ...
Page 630: ...DF 770 D 1000 sheet finisher Installation Guide ...
Page 648: ...AK 740 Bridge unit Installation Guide ...
Page 650: ...MT 730 B Mailbox Installation Guide ...
Page 665: ...PH 7A C D Punch unit Installation Guide ...
Page 686: ...DT 730 B Document tray Installation Guide ...
Page 731: ...5 2013 5 302LC56750 01 H F G D D 6 4 3 7 E C D D M4 8 M4 8 M4 8 M4 8 ...
Page 732: ...FAX System W B Installation Guide ...


