3
G(M4x14)
C
G(M4x14)
2
2
1
1
C
NOTICE
The illustrations of the DP in the Installation
Guide are for DP-772.
Procedure
Before starting installation, be sure to turn the
main power switch of the machine off, and
unplug the power plug from the wall outlet.
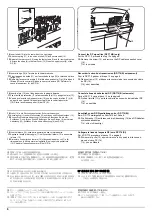
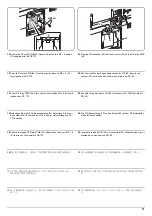
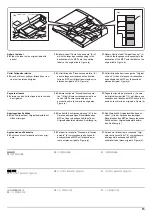
Attach the fixing fitting (DP-770(B))
1.
Align projections (1) of each fixing fitting (C)
with holes (2) on the MFP and insert the fix-
ing fittings (C) into the MFP.
2.
Secure each fixing fitting (C) with two M4 x
14TP screws (G).
REMARQUE
Les schémas du DP dans le Guide d''installation
concernent le DP-772.
Procédure
Avant de commencer l'installation, s'assurer de
mettre la machine hors tension et de
débrancher la fiche d'alimentation de la prise
murale.
Mettre en place la fixation (DP-770(B))
1.
Aligner les saillies (1) de chacune des
pièces de fixation (C) avec les trous (2) sur
le MFP et insérer ces pièces (C) dans le
MFP.
2.
Fixer chacune des pièces de fixation (C)
avec deux vis M4 x 14TP (G).
AVISO
Las ilustraciones del DP en la Guía de insta-
lación corresponden al DP-772.
Procedimiento
Antes de iniciar la instalación, asegúrese de
apagar el interruptor de encendido de la
máquina y desenchufar el cable de alimentación
de la toma de pared.
Monte el herraje de fijación (DP-770(B))
1.
Alinee las salientes (1) de cada herraje de
fijación (C) con los orificios (2) del MFP e
inserte los herrajes de fijación (C) en el MFP.
2.
Asegure cada uno de los herrajes de fijación
(C) con dos tornillos M4 x 14TP (G).
ANMERKUNG
Die Abbildungen des DP in der
Installationsanleitung gelten für Modell DP-772.
Vorgehensweise
Bevor Sie mit der Installation beginnen überzeu-
gen Sie sich, dass der Netzschalter des Geräts
ausgeschaltet und das Stromkabel aus der
Steckdose gezogen ist.
Anbringen der Befestigungshalterung (DP-
770(B))
1.
Die Zapfen (1) jeder Befestigungshalterung
(C) mit den Öffnungen (2) am MFP ausrich-
ten und die Befestigungshalterungen (C) in
den MFP einsetzen.
2.
Jede Befestigungshalterung (C) mit zwei M4
x 14TP Schrauben (G) befestigen.
AVVISO
Le illustrazioni del DP nella Guida
all’installazione sono per il modello DP-772.
Procedura
Prima di iniziare l'installazione, spegnere la
macchina e scollegare la spina dalla presa di
corrente.
Applicazione dell’accessorio di fissaggio (DP-
770(B))
1.
Allineare le sporgenze (1) di ogni accessorio
di fissaggio (C) con i fori (2) sull’MFP, ed
inserire gli accessori di fissaggio (C)
nell’MFP.
2.
Bloccare ogni accessorio di fissaggio (C)
con le due viti M4 x 14TP (G).
注意
設置手順書に記載している DP のイラストは、
DP-772 です。
取付手順
必ず機械本体の主電源スイッチを OFF にし、
機
械本体の電源プラグを抜いてから作業するこ
と。
固定金具の取り付け(DP-770(B))
1.
固定金具 (C) の突起 (1) と MFP の穴 (2) を
合わせ、MFP に固定金具 (C) を差し込む。
2.
ビス M4×14TP(G) 各 2 本で 2 つの固定金具
(C) を固定する。
注意
安装手册中关于 DP 的图示以 DP-772 为例。
安装步骤
安装前务必关闭机器的主电源开关,并从墙壁插
座拔下电源插头。
安装固定工具。(DP-770(B))
1.
将各固定工具(C)上的突出部分(1)与 MFP
上的孔(2)对齐,然后将固定工具(C)插入
MFP 中。
2.
用两颗 M4×14TP 螺丝(G)固定各固定工具
(C)。
주의
설치순서에 기재되어 있는 DP 일러스트는 DP-
772 입니다 .
설치순서
설치를 시작하기 전에 반드시 본체의 주 전원 스
위치를 끄고 벽 콘센트에서 전원 플러그를 분리
하십시오 .
고정쇠의 부착(DP-770(B))
1.
고정쇠 (C) 의 돌기 (1) 와 MFP 의 구멍 (2)
을 맞추고 MFP 에 고정쇠 (C) 를 꽂습니다 .
2.
나사 M4×14TP(G) 각 2 개로 2 개의 고정쇠
(C) 를 고정합니다 .
Summary of Contents for TASKalfa 3010i
Page 10: ...This page is intentionally left blank ...
Page 100: ...2NL 2P8 1 2 76 This page is intentionally left blank ...
Page 286: ...2NL 2P8 1 3 186 This page is intentionally left blank ...
Page 443: ...2NL 2P8 1 5 59 This page is intentionally left blank ...
Page 471: ...2NL 2P8 2 2 8 This page is intentionally left blank ...
Page 532: ...Installation Guide DP 770 B Document processor DP 772 Document processor Installation Guide ...
Page 568: ...DP 773 Document processor Installation Guide ...
Page 594: ...PF 791 500 x 2 Paper feeder Installation Guide ...
Page 602: ...PF 810 3000 sheet deck Installation Guide ...
Page 615: ...DF 791 3000 sheet finisher Installation Guide ...
Page 630: ...DF 770 D 1000 sheet finisher Installation Guide ...
Page 648: ...AK 740 Bridge unit Installation Guide ...
Page 650: ...MT 730 B Mailbox Installation Guide ...
Page 665: ...PH 7A C D Punch unit Installation Guide ...
Page 686: ...DT 730 B Document tray Installation Guide ...
Page 731: ...5 2013 5 302LC56750 01 H F G D D 6 4 3 7 E C D D M4 8 M4 8 M4 8 M4 8 ...
Page 732: ...FAX System W B Installation Guide ...

