16
5
6
OPT2
4
Procedure
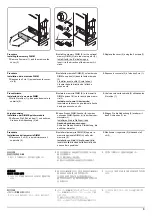
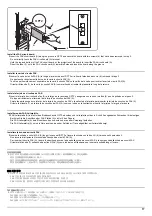
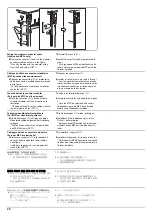
Removing the slot cover
1.
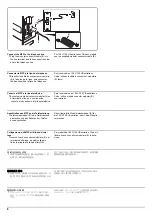
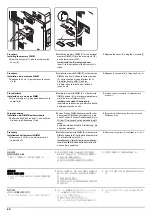
Remove the cover (4).
* For high-speed MFPs with/without the finisher and for medium-speed MFPs with the finisher
installed.
* This work is not required if a multiport is installed along with the fax system (OPT1).
2.
Remove 2 screws (6) and then remove the
OPT2 slot cover (5).
Procédure
Dépose du couvercle de la fente
1.
Déposer le couvercle (4).
* Pour les imprimantes multifonction à grande vitesse avec/sans module de finition et pour les
imprimantes multifonction à vitesse moyenne avec le module de finition installé.
* Cette opération n'est pas nécessaire si un port multiple est installé avec le fax (OPT1).
2.
Déposer les 2 vis (6) puis le couvercle de la
fente OPT2 (5).
Procedimiento
Desmontaje de la cubierta de la ranura
1.
Quite la cubierta (4).
* Para los MFP de velocidad alta con/sin finalizador y para los MFP de velocidad media con el
finalizador instalado.
* Esto no es necesario realizarlo si hay instalado un puerto múltiple con el sistema de fax (OPT1).
2.
Quite 2 tornillos (6) y, después, quite la cubi-
erta de la ranura OPT2 (5).
Vorgehensweise
Entfernen der Einschubabdeckung
1.
Die Abdeckung (4) entfernen.
* Bei schnellen MFPs mit/ohne Finisher oder mittelschnellen MFPs mit installiertem Finisher.
*Dies ist nicht nötig, wenn eine zweite Leitung zusammen mit dem FAX-System (OPT1) installiert
ist.
2.
2 Schrauben (6) entfernen und dann die
Abdeckung (5) des Einschubs OPT2 ent-
fernen.
Procedura
Rimozione del coperchio vano
1.
Rimuovere il coperchio (4).
* Per dispositivi MFP di fascia alta con/senza finisher e per dispositivi di fascia media con finisher
installato.
* Questa operazione non è richiesta quando con il modulo fax (OPT1) viene installata una porta
multipla.
2.
Rimuovere le 2 viti (6) e quinidi rimuovere il
coperchio (5) del vano OPT2.
取付手順
スロットカバーの取り外し
1.
カバー(4) を取り外す。
※ 高速 MFP の場合および中速 MFP にフィニッシャー装着時の場合
※ ファクスシステム (OPT1) と同時にマルチポートを設置する場合この作業は不要。
2.
ビス (6)2 本を外し、OPT2 のスロットカバー
(5) を取り外す。
安装步骤
拆下插槽盖板
1.
拆下盖板 (4)。
※ 对于高速机来说装订器可装可不装,对于中速机来说要安装。
※ 双路传真系统和传真系统(OPT1) 同时安装时,不需要此步骤。
2.
拆除 2 颗螺丝 (6),拆下 OPT2 的插槽盖板
(5)。
설치순서
슬롯커버 제거
1.
커버 (4) 를 제거합니다 .
※ 피닛셔 장착 및 비장착의 고속 MFP 및 피닛셔 장착 중속 MFP.
※ 이 작업은 다중 포트가 팩스 시스템 (OPT1) 과 함께 설치되어 있는 경우에는 필요하지 않습니
다 .
2.
나사 (6) 2 개를 제거하고 OPT2 의 슬롯커버
(5) 를 제거합니다 .
Summary of Contents for TASKalfa 3010i
Page 10: ...This page is intentionally left blank ...
Page 100: ...2NL 2P8 1 2 76 This page is intentionally left blank ...
Page 286: ...2NL 2P8 1 3 186 This page is intentionally left blank ...
Page 443: ...2NL 2P8 1 5 59 This page is intentionally left blank ...
Page 471: ...2NL 2P8 2 2 8 This page is intentionally left blank ...
Page 532: ...Installation Guide DP 770 B Document processor DP 772 Document processor Installation Guide ...
Page 568: ...DP 773 Document processor Installation Guide ...
Page 594: ...PF 791 500 x 2 Paper feeder Installation Guide ...
Page 602: ...PF 810 3000 sheet deck Installation Guide ...
Page 615: ...DF 791 3000 sheet finisher Installation Guide ...
Page 630: ...DF 770 D 1000 sheet finisher Installation Guide ...
Page 648: ...AK 740 Bridge unit Installation Guide ...
Page 650: ...MT 730 B Mailbox Installation Guide ...
Page 665: ...PH 7A C D Punch unit Installation Guide ...
Page 686: ...DT 730 B Document tray Installation Guide ...
Page 731: ...5 2013 5 302LC56750 01 H F G D D 6 4 3 7 E C D D M4 8 M4 8 M4 8 M4 8 ...
Page 732: ...FAX System W B Installation Guide ...

